
Tag: saratoga springs interior design firm

DIY: Rope Wrapped Vases + Glass Jars

Earlier this week, I excitedly announced that I recently partnered with Apartments.com to share simple solutions for small space living.  Specifically, I will be showcasing tips and strategic ideas for overcoming the obstacles and hurdles of apartment life to create an inviting, stylish, and most of all, functional space.  Additionally, each month I will be creating a DIY project that is perfectly fit for an apartment and/or small space.  Like this…

DIY: Rope Wrapped Vases perfect for creating & displaying in an apartment and/or small space #apartment #diy #apartmentliving

Do-It-Yourself + Apartment Life isn’t always an easy combo.  In my book a DIY project/craft best suited for an apartment has to be the following:

-> Easy to create using simple supplies (no major power tools here)

-> Easily moveable – something that can be repositioned and/or moved to another room.  In a small space, a few accessory moves will make the entire place feel fresh and new.

-> Unique, interesting, one-of-a-kind (of course)

For my first DIY project, Apartments.com put me to the challenge of creating something for the Summer.  Not to tricky.  To me, Summer brings to mind words like beach, sand, sun, sea, nautical, light, bright, airy…

For the project, I wanted to create something using the word nautical, which then in turn rope material came to mind, thus the creation of rope wrapped vases.  Knowing that I already had a plethora of glass vases and glass jars around the house, I started out by shopping my home.  How much better does it get not to have to spend a dime?!

TIP: In a small space, storing extra of anything, especially home decor accessories, isn’t easy.  My suggestion would be to have one shelf, one box, or one ‘spot’ where you can keep extra accessories or home type elements to rotate with what you currently have throughout your home.  When I shop, I usually purchase items because I love them and they have meaning, versus buying something just to buy.  But that means when I get it home, I might not use it right away.  Having a small place to store items like vases, baskets, extra candles, etc. will allow you to always have the ability to freshen up your space in no time without the need to go out and search/buy for something meaningless.  The box or shelf you choice is perfect because it will allow you to stay within the designated area.  Small spaces surely don’t allow for excess.

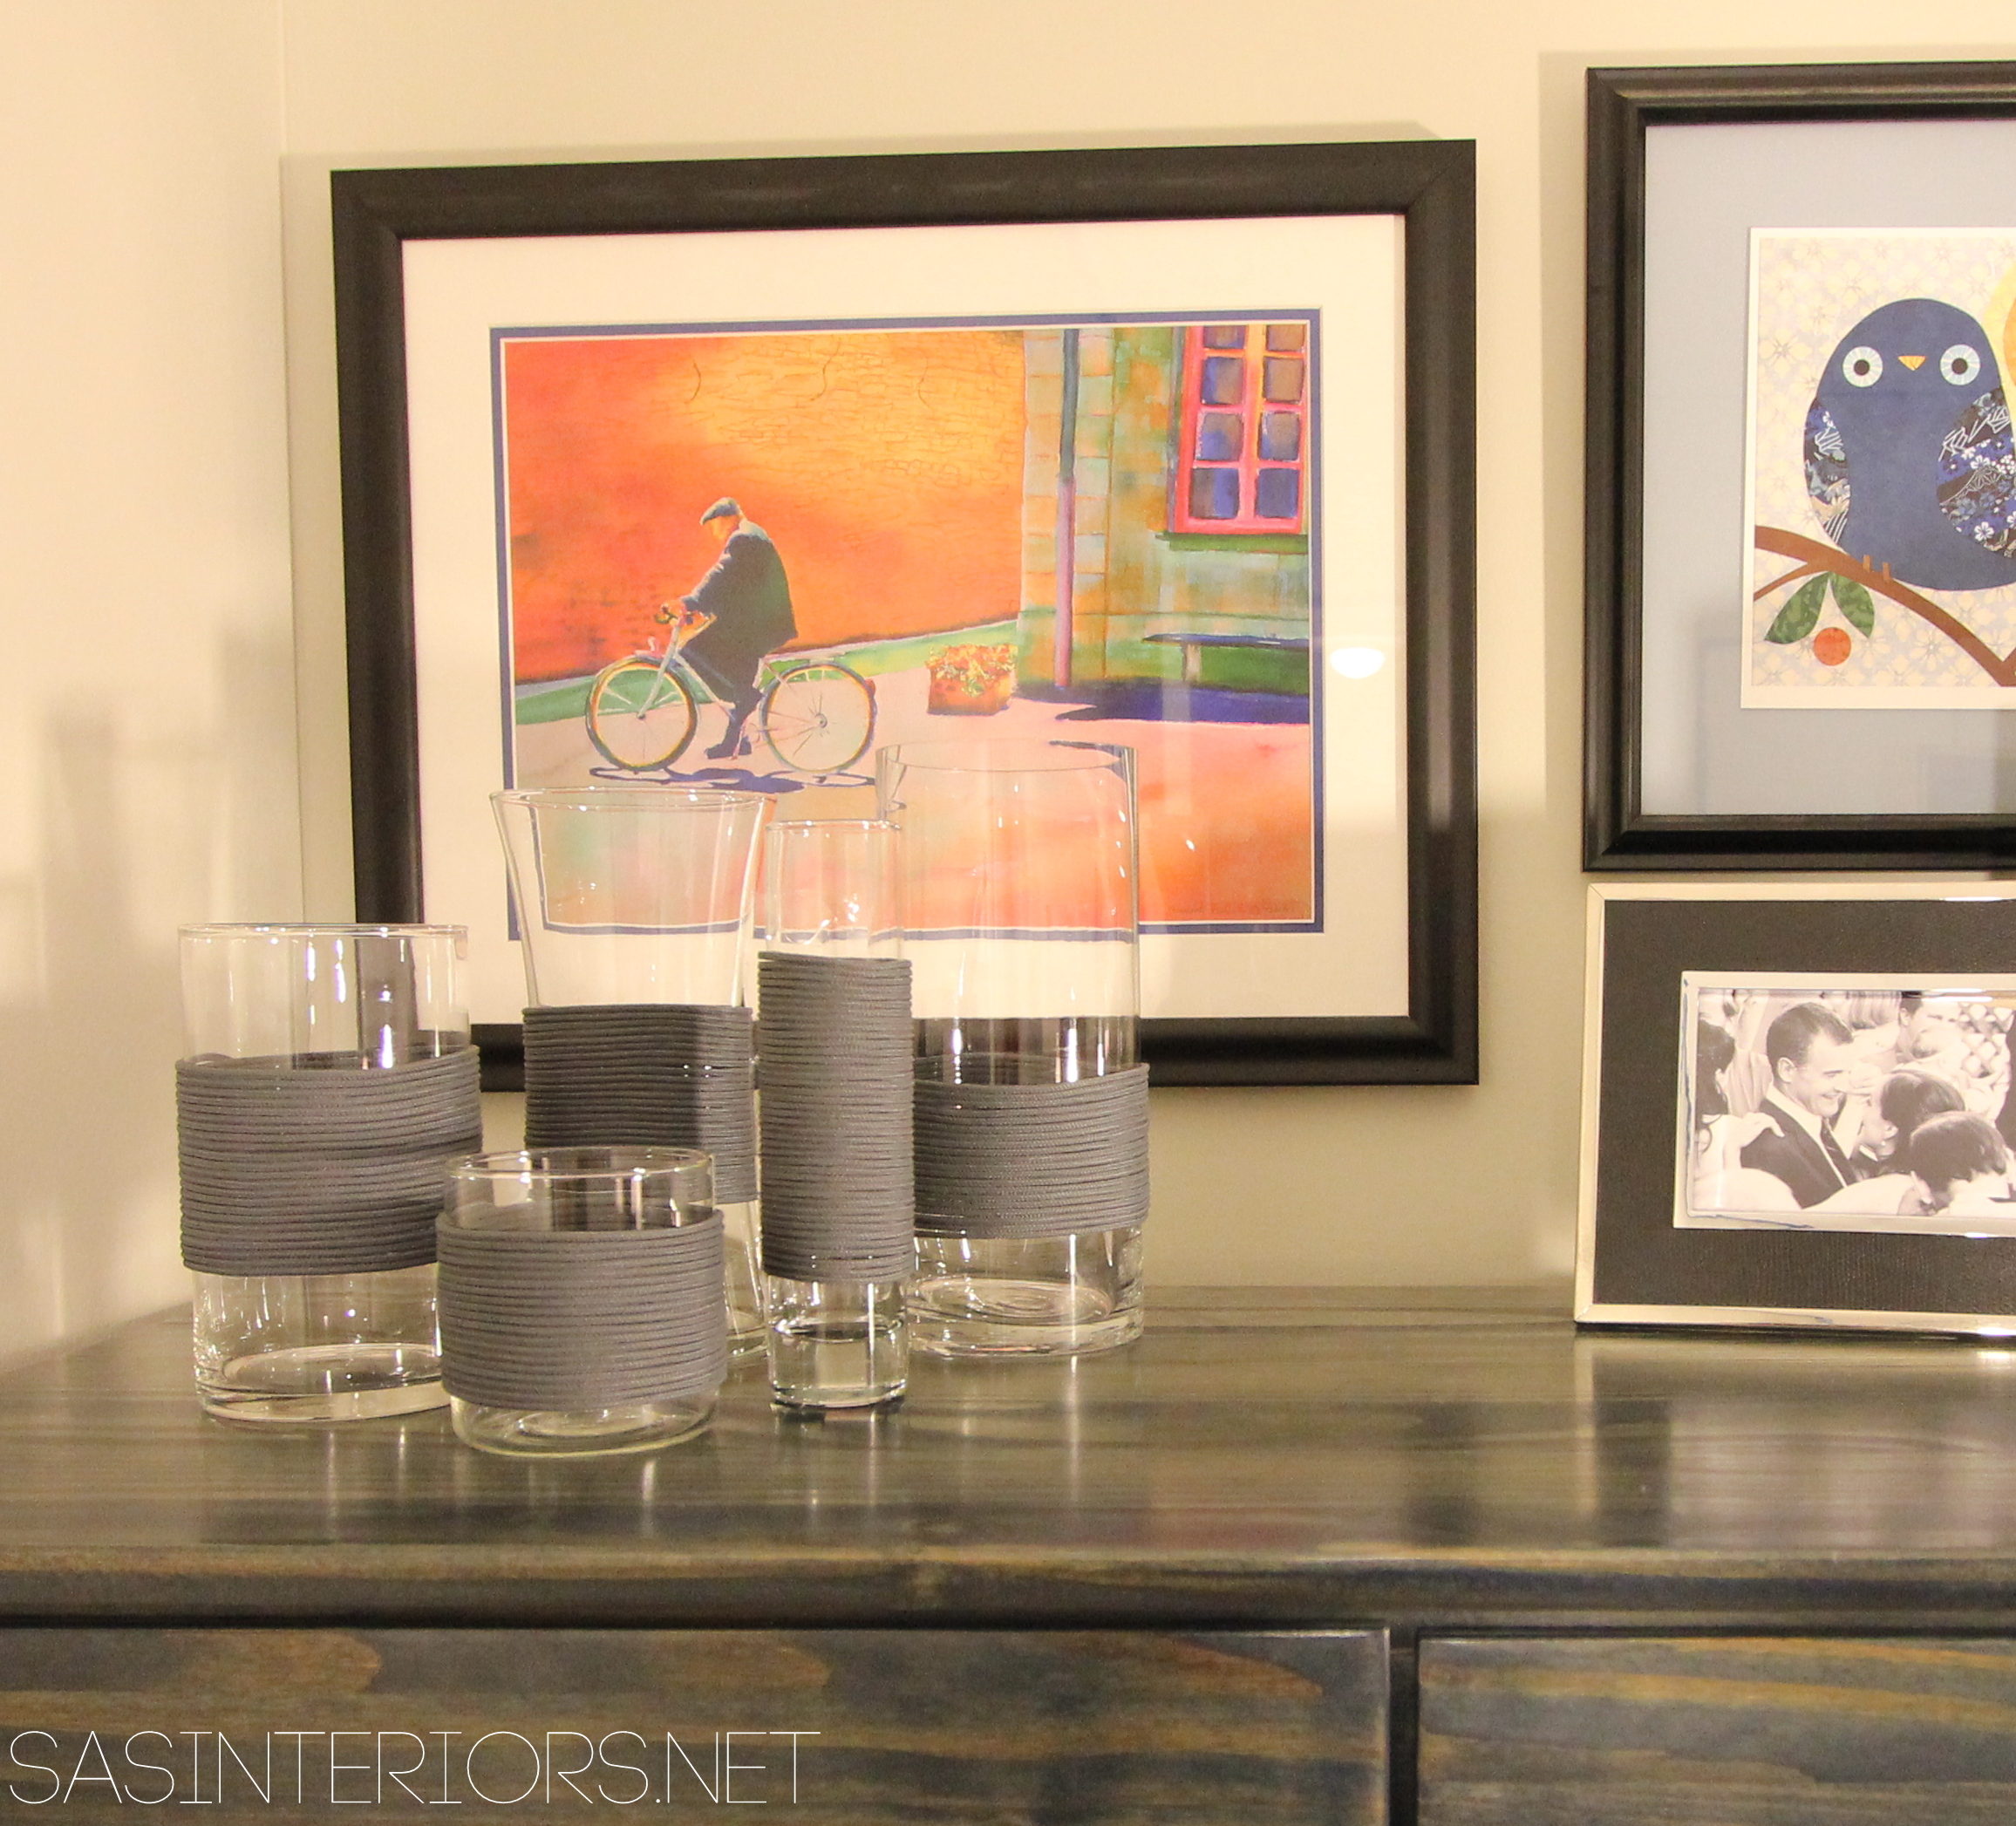
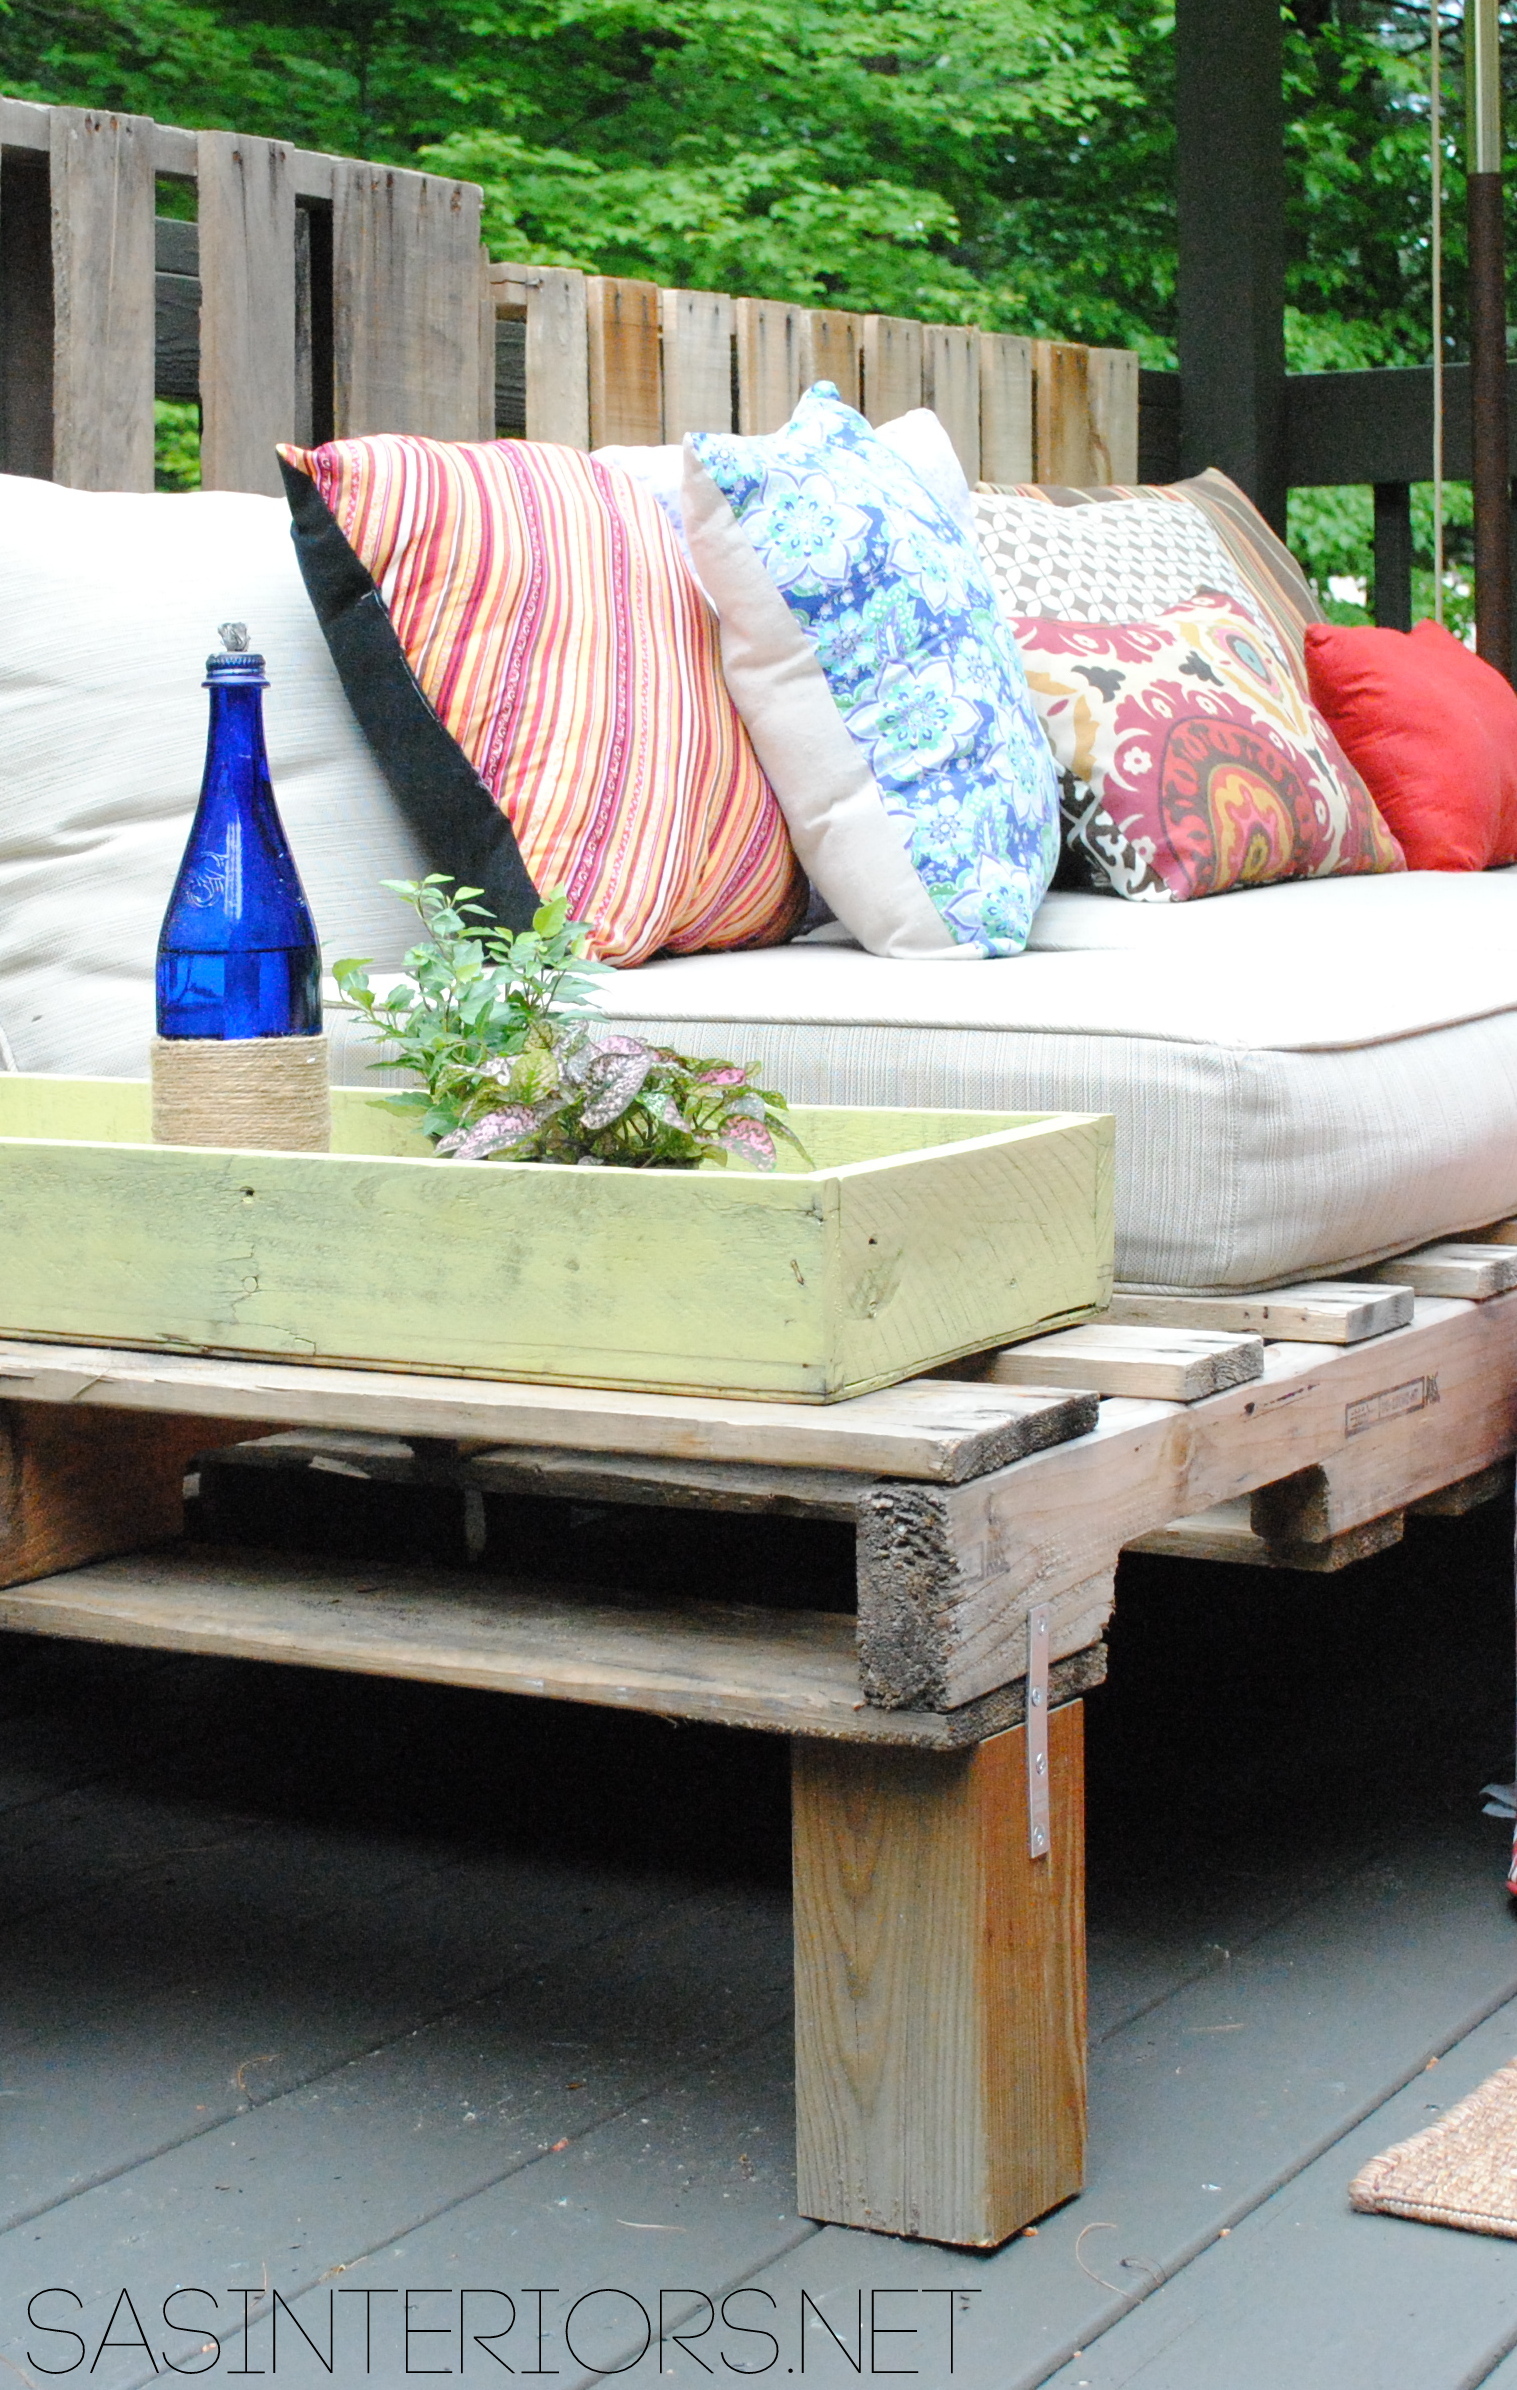
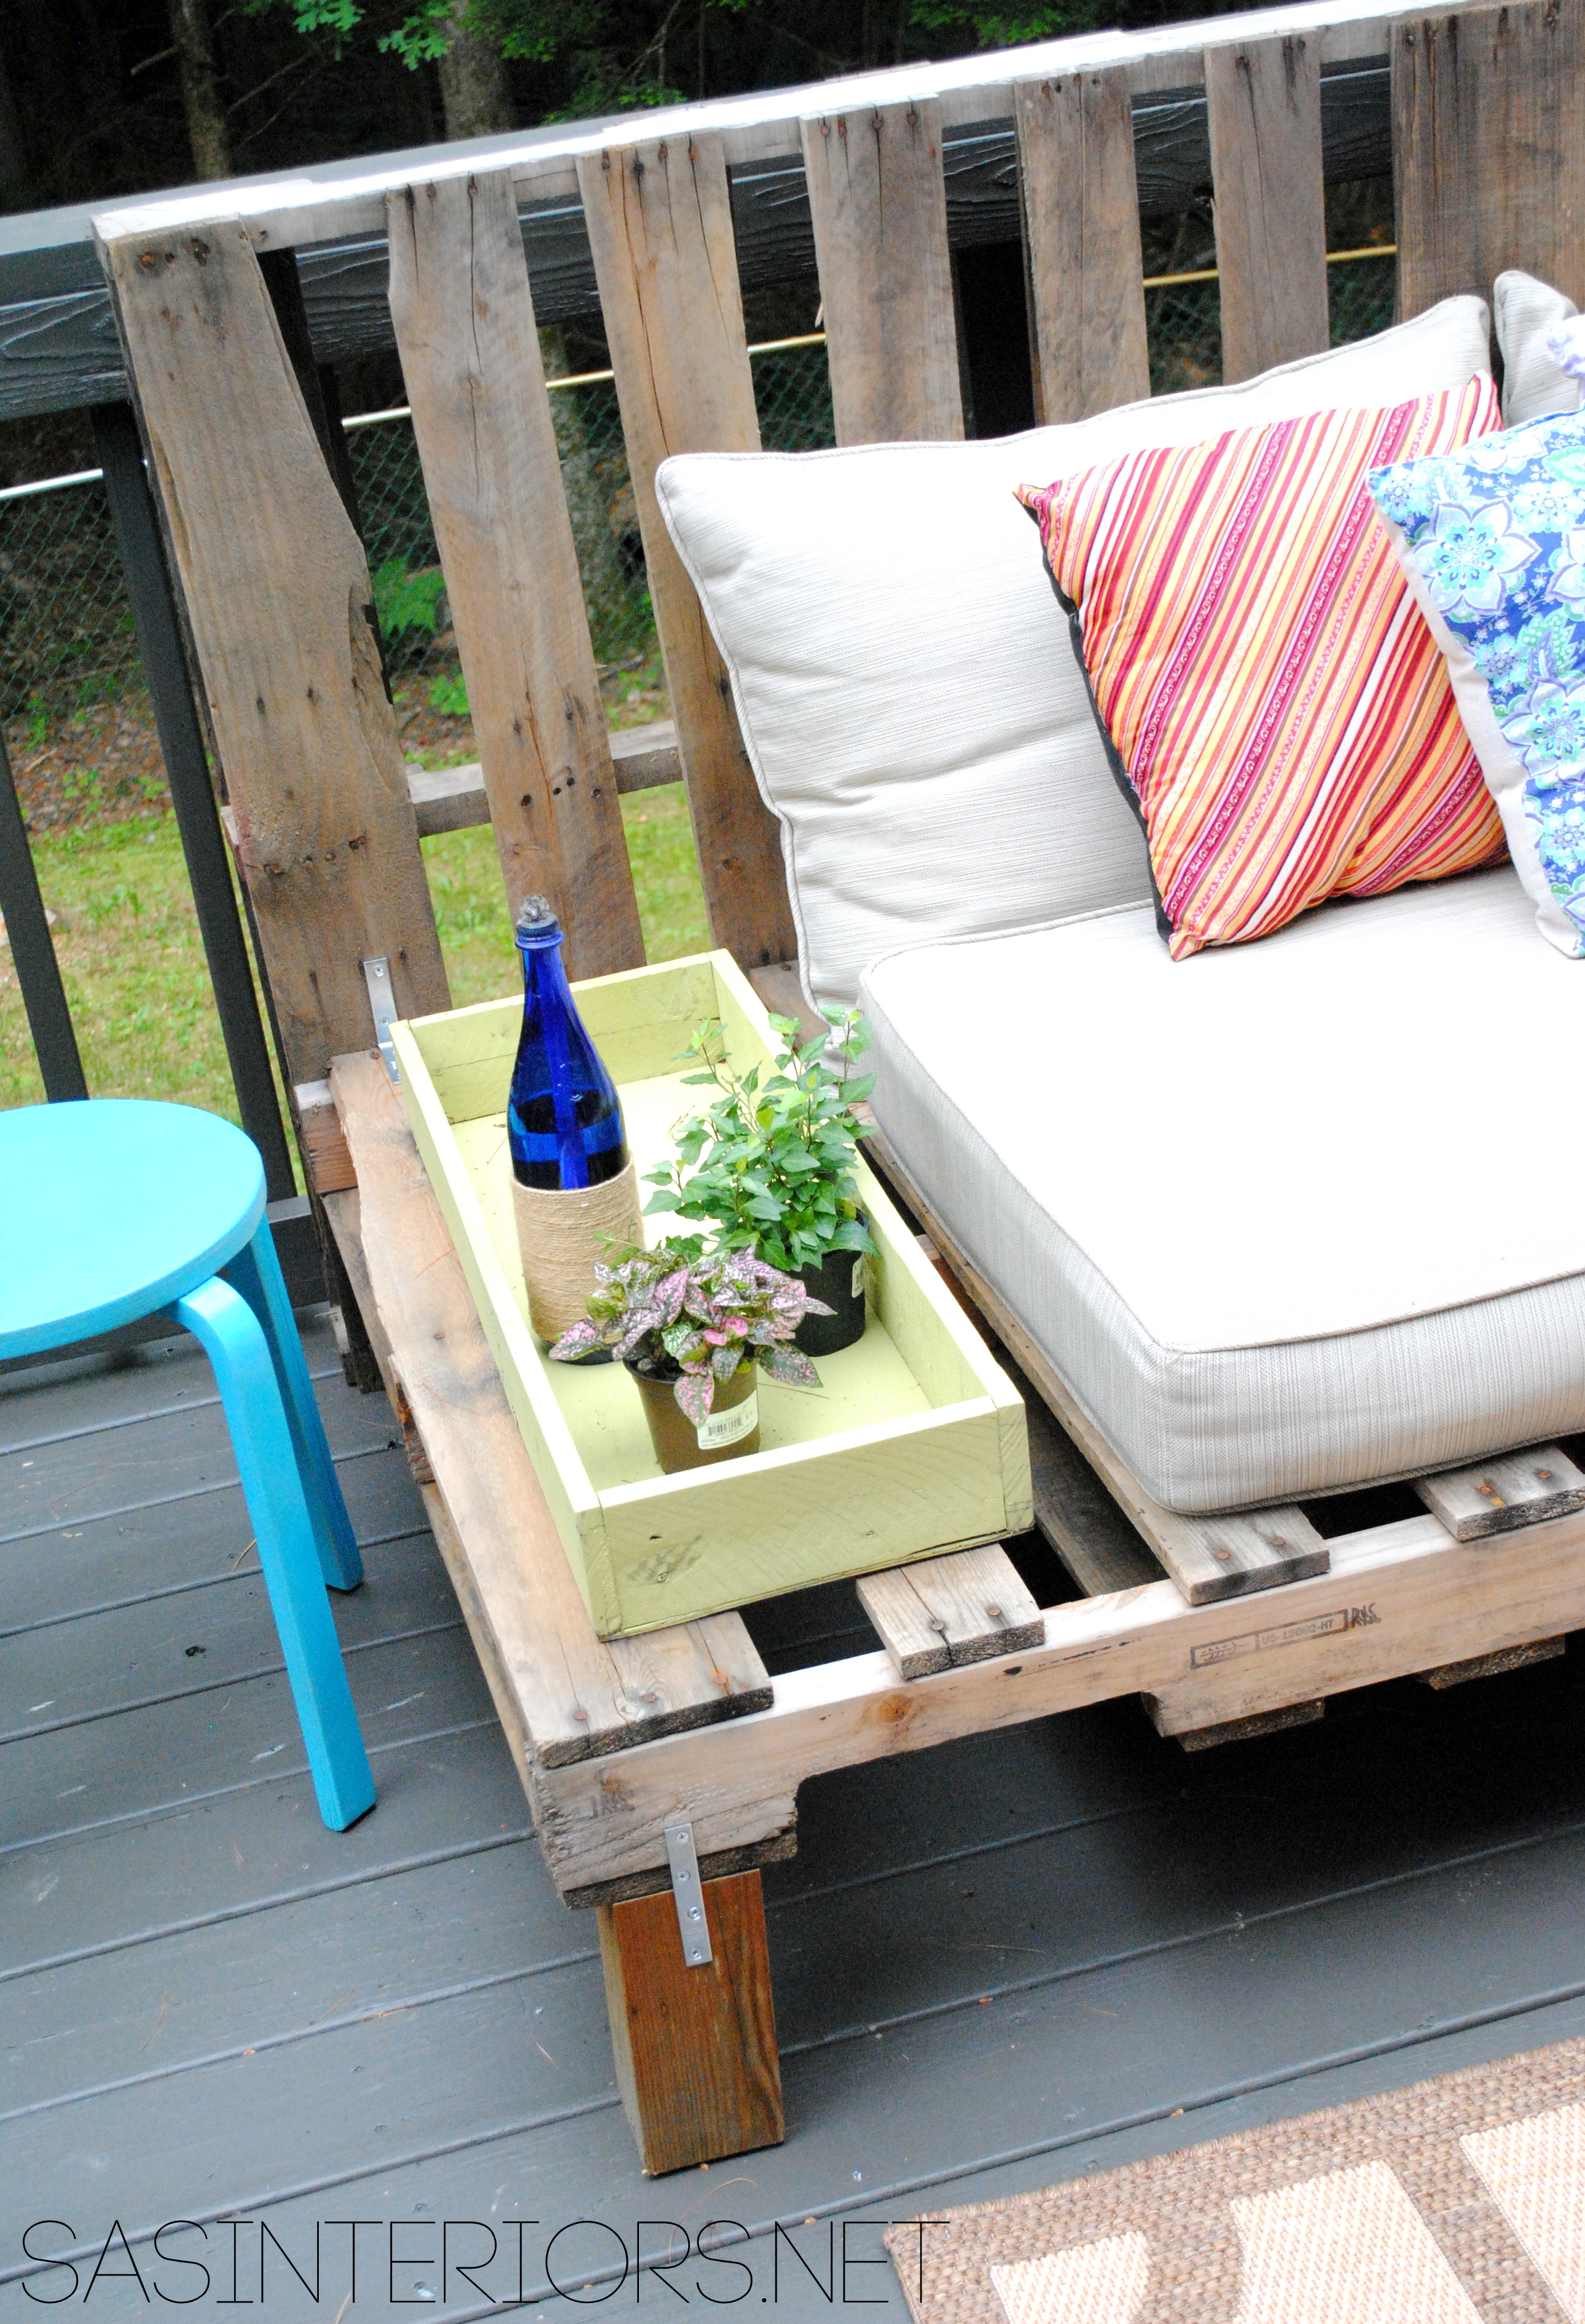
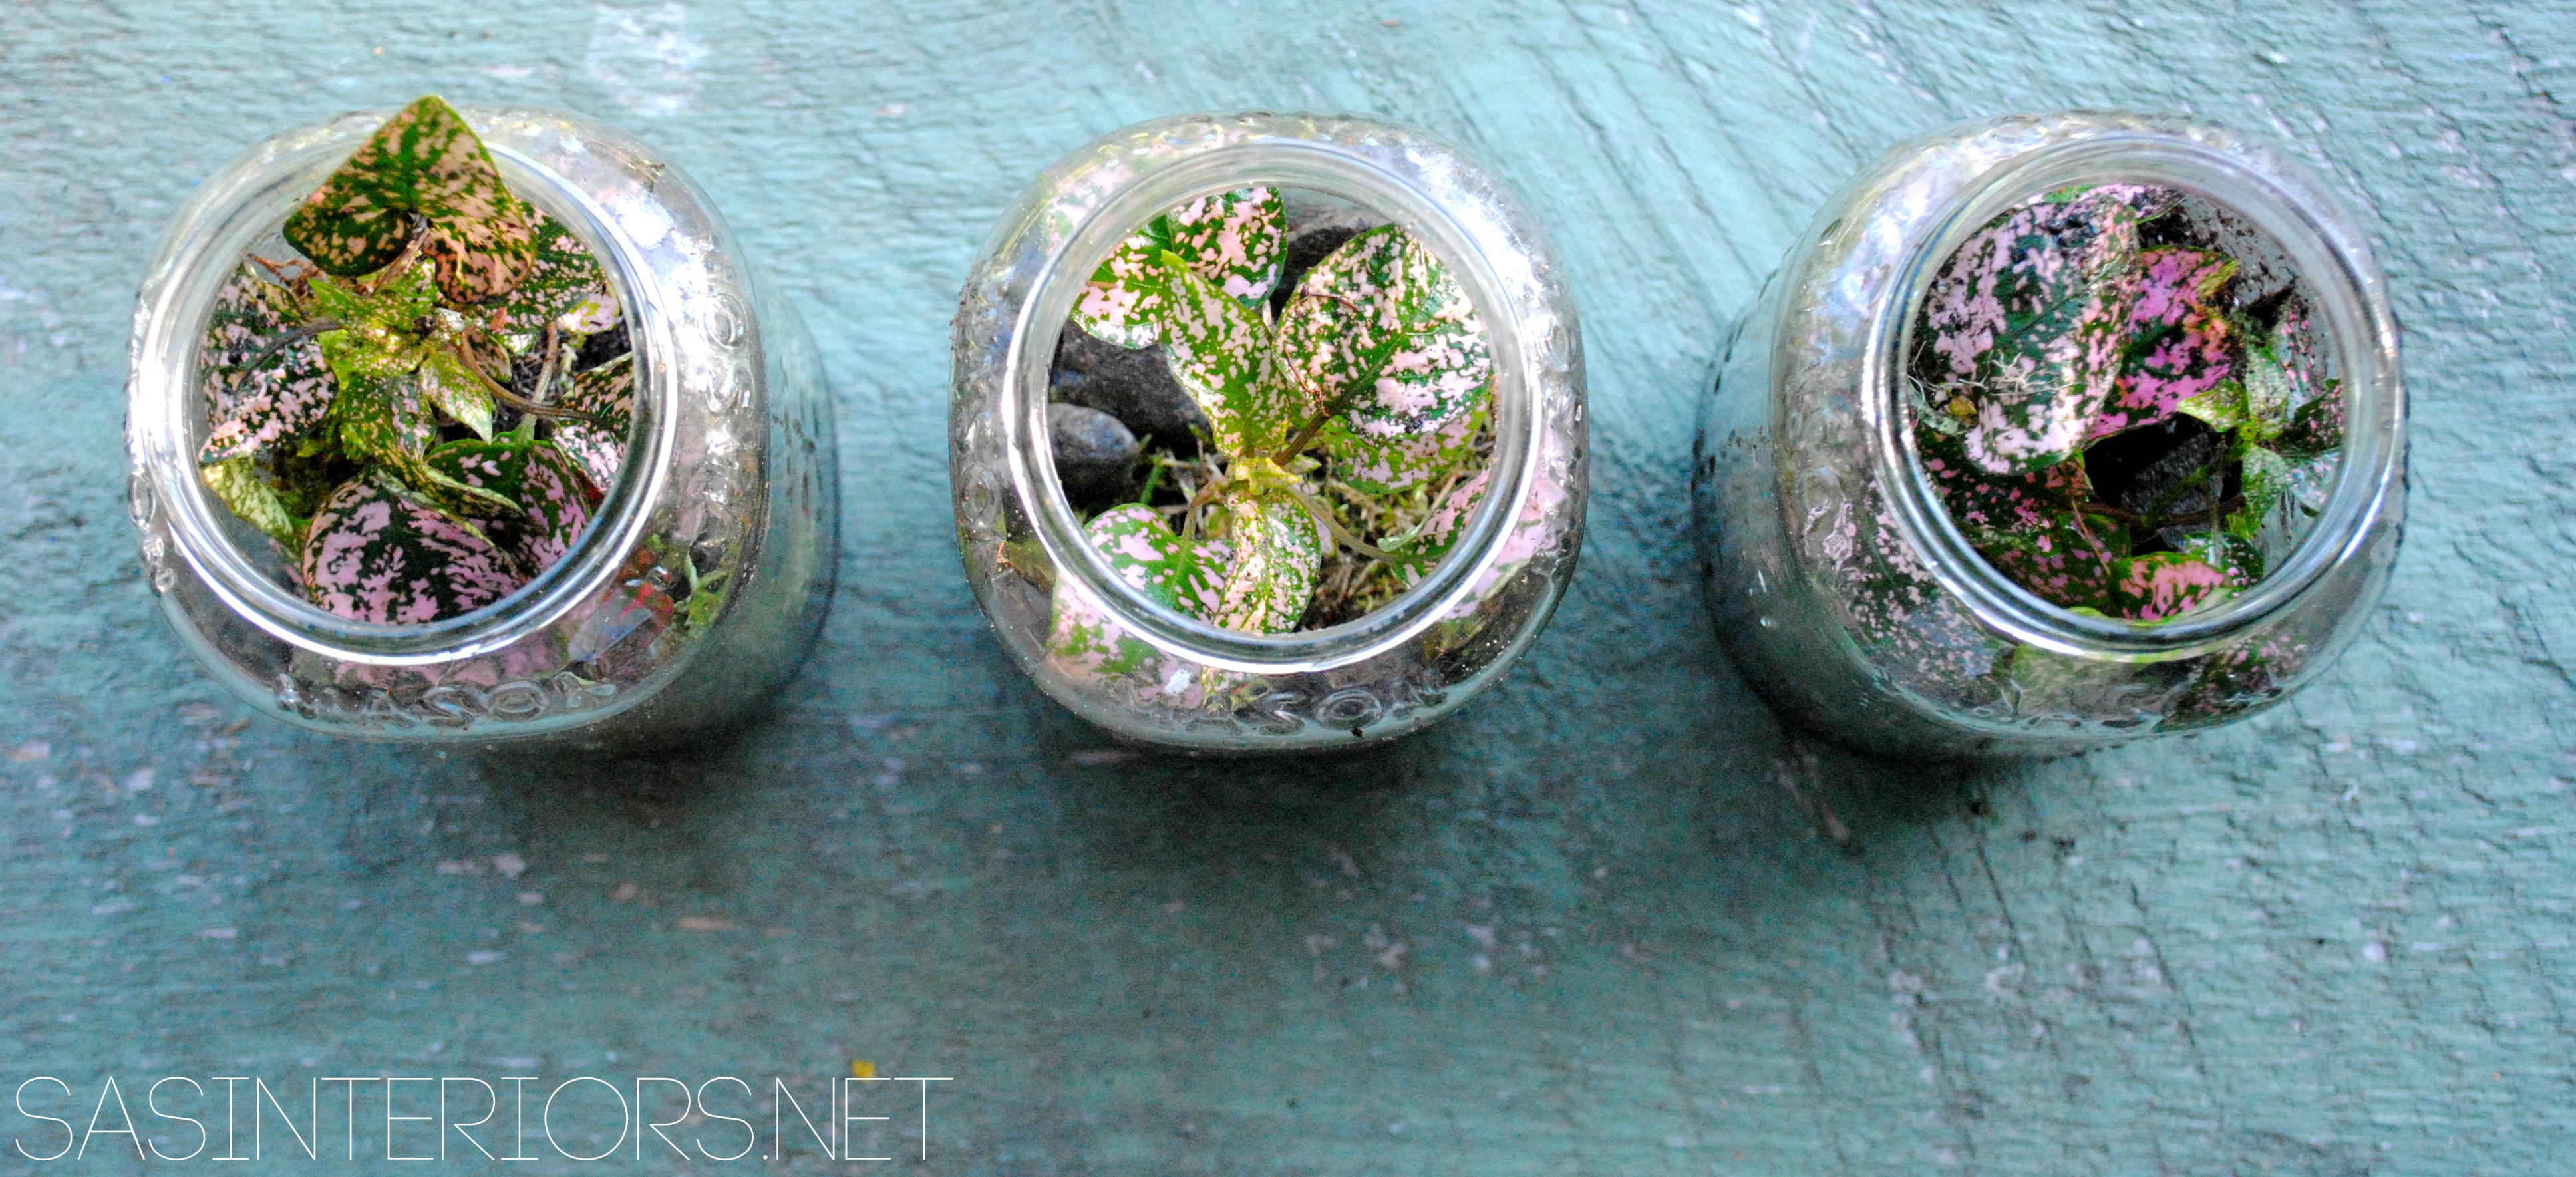
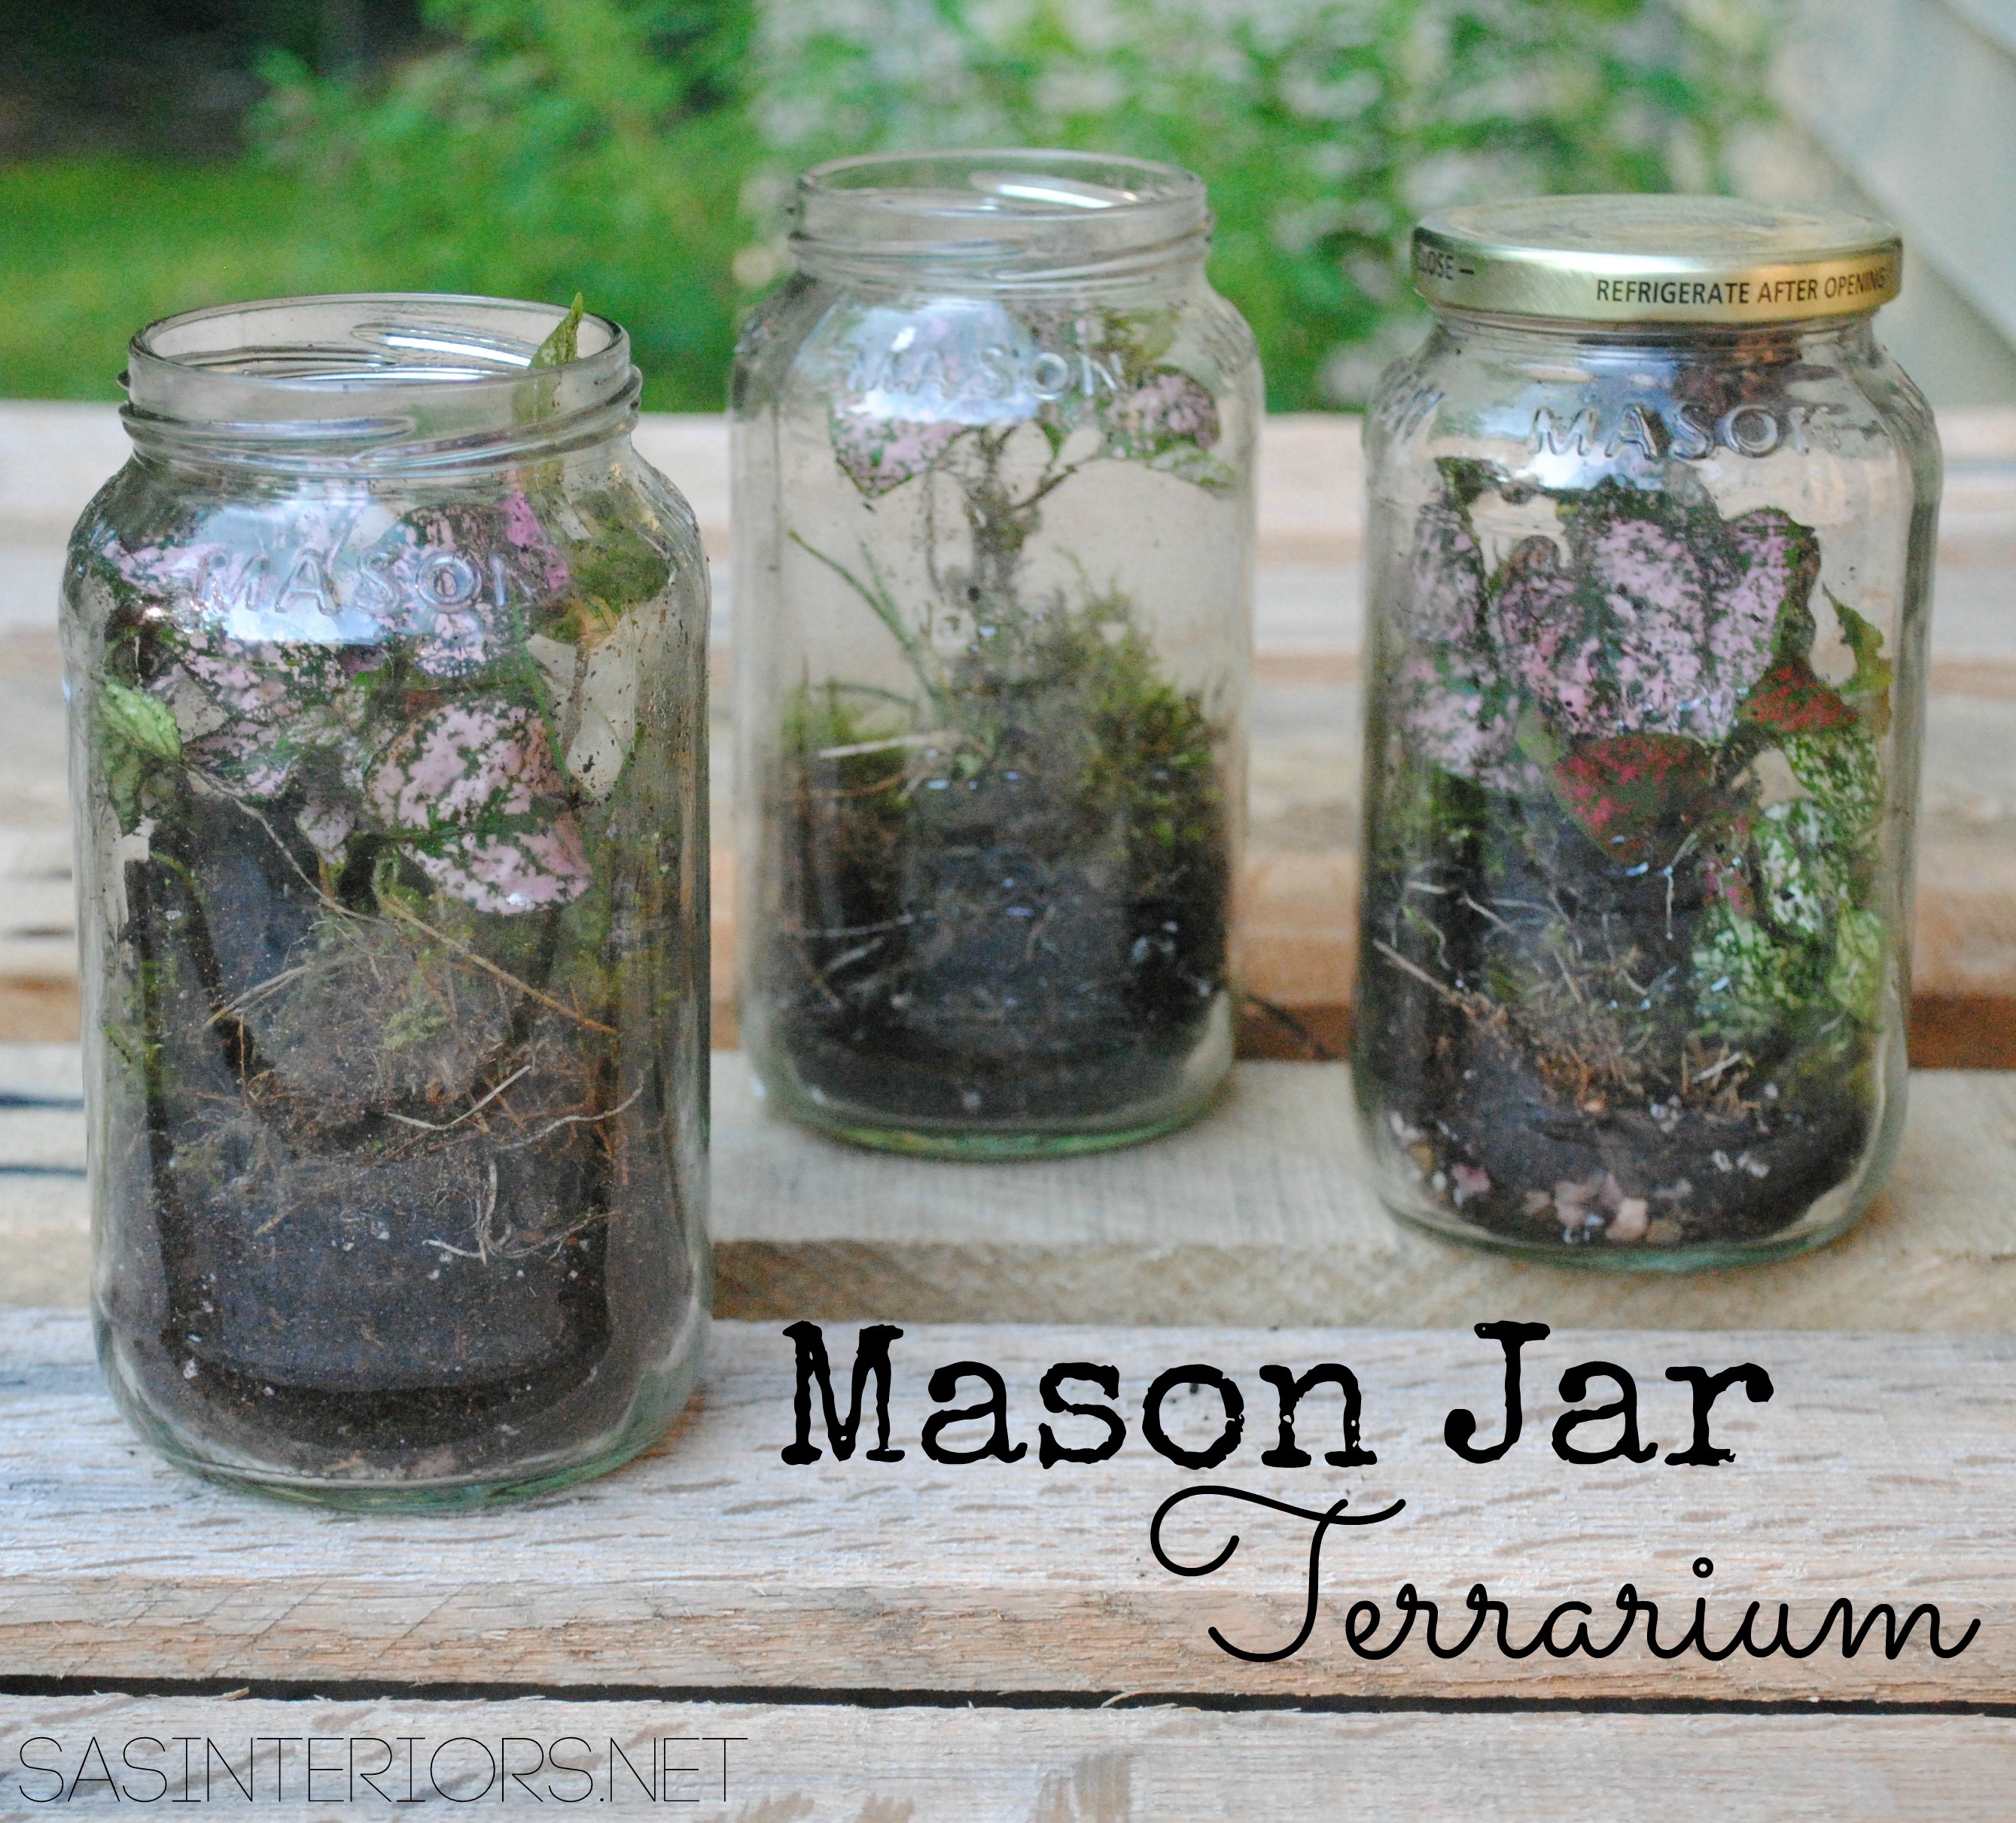
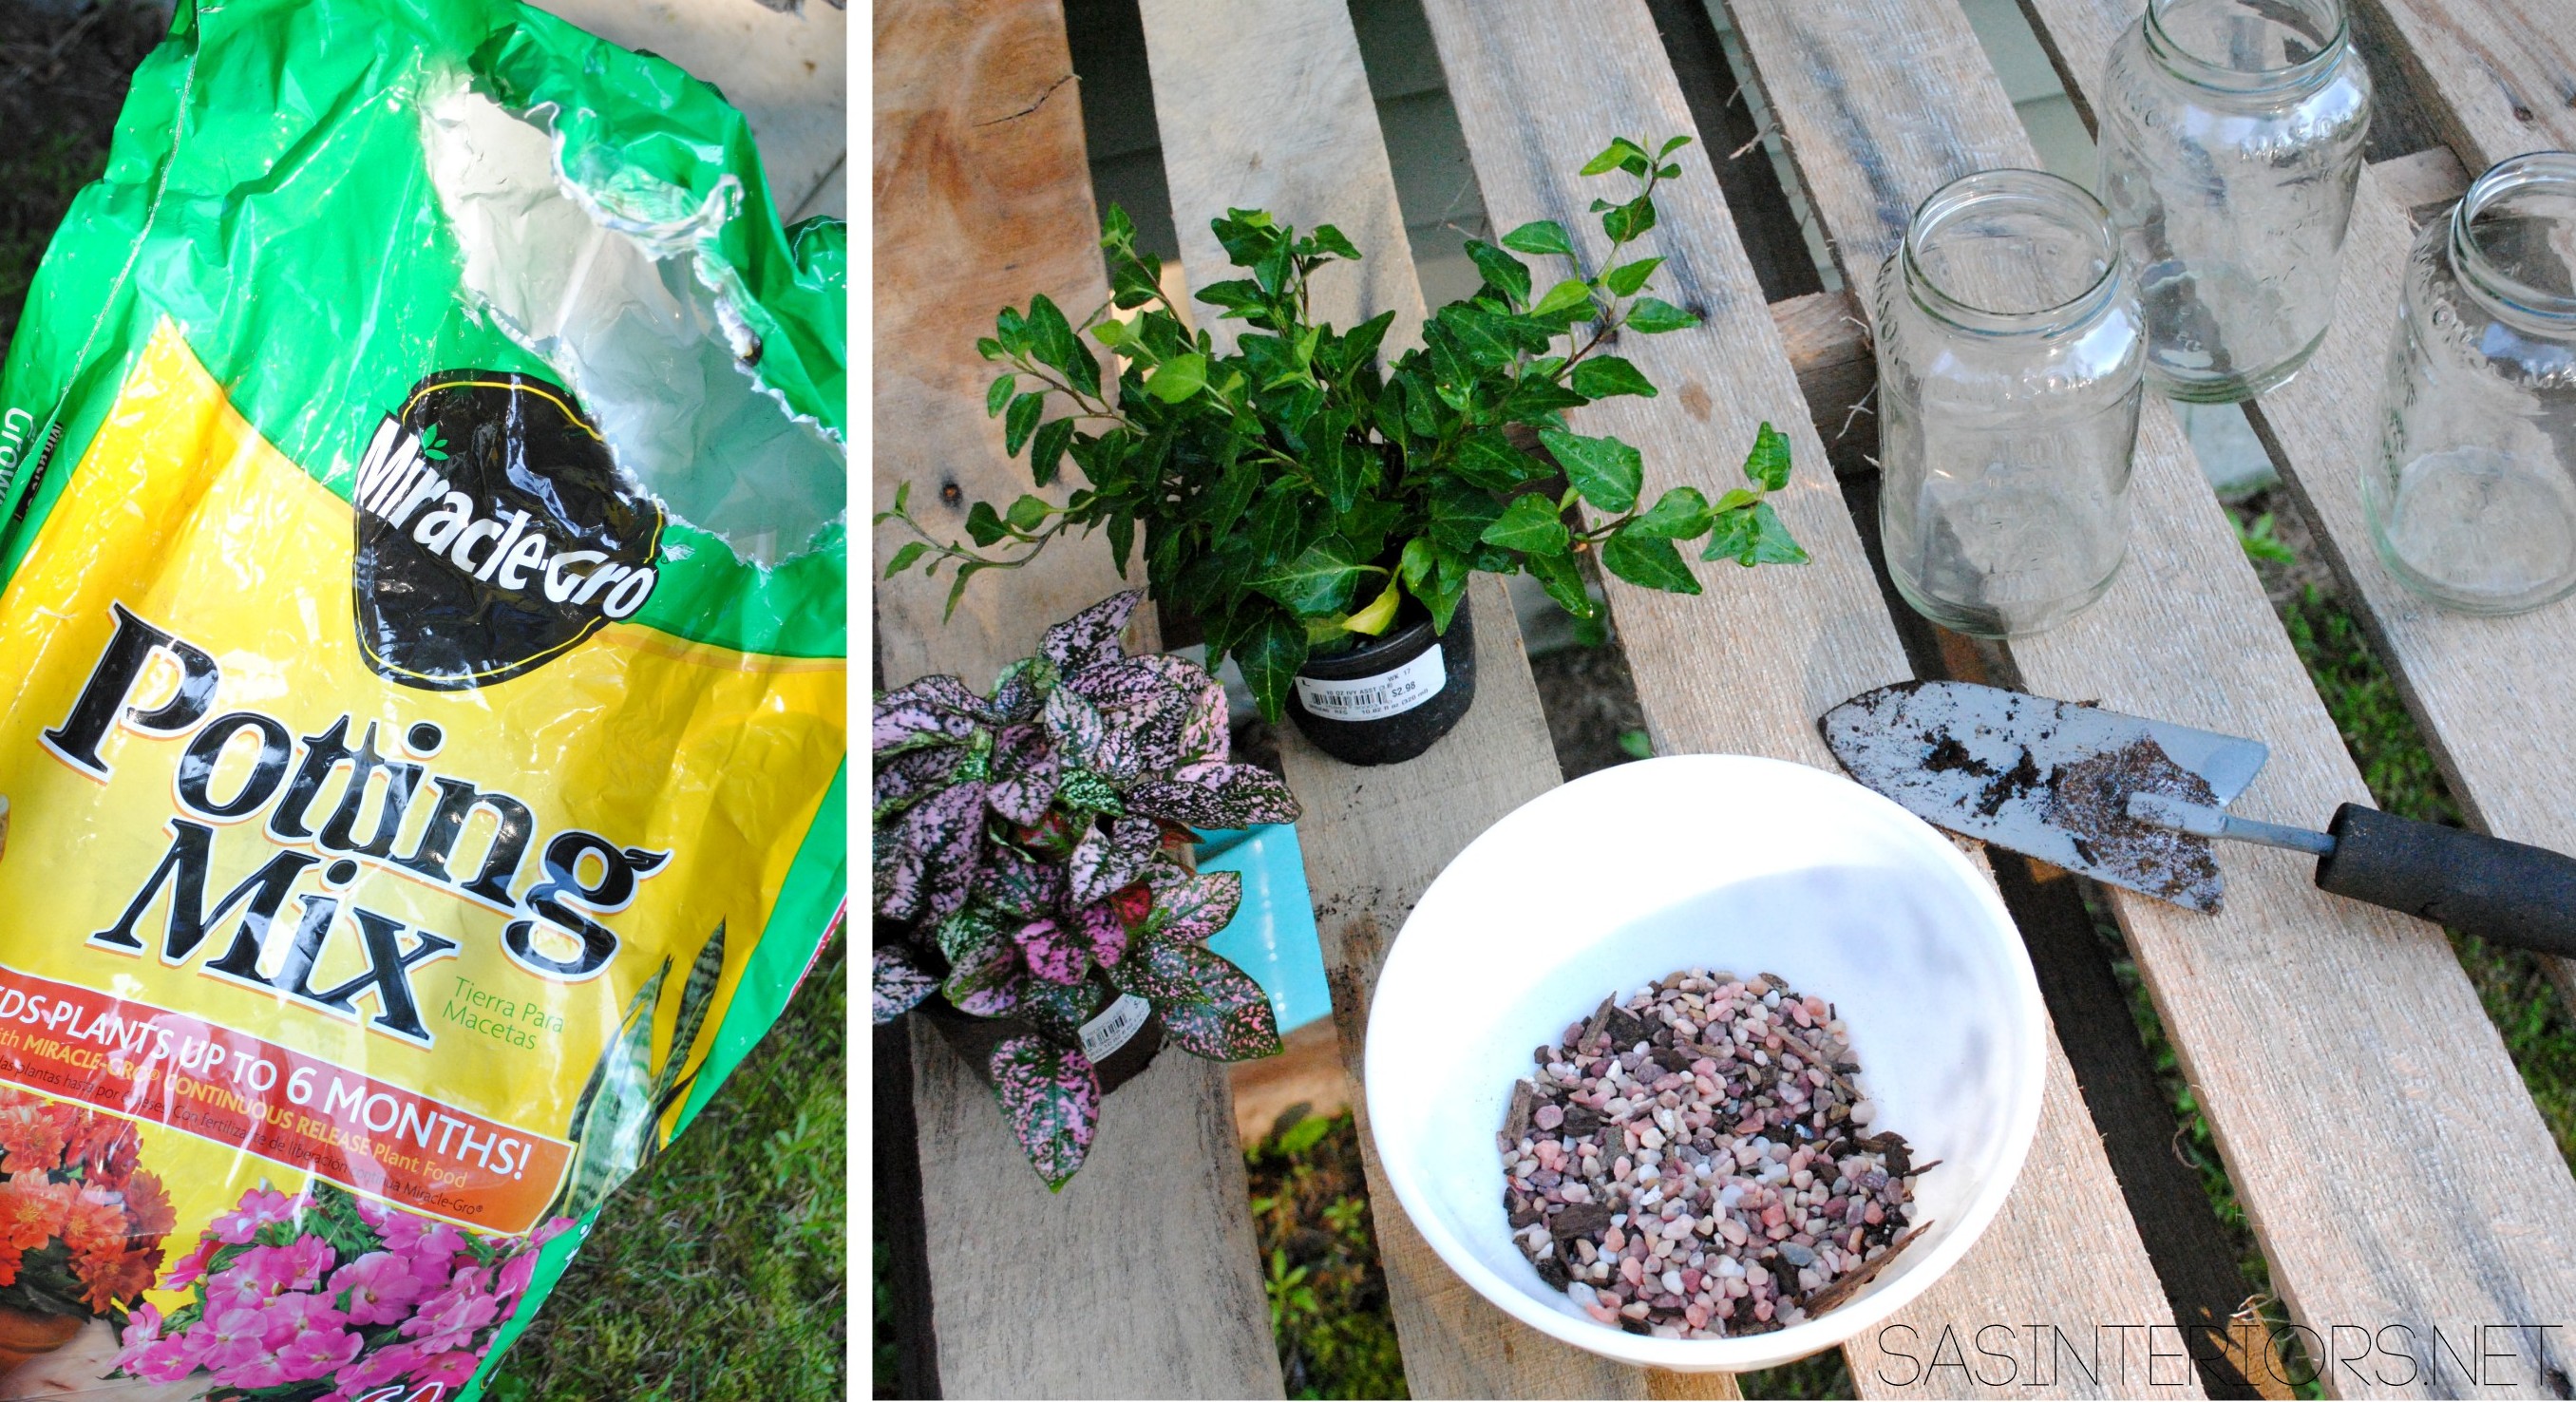
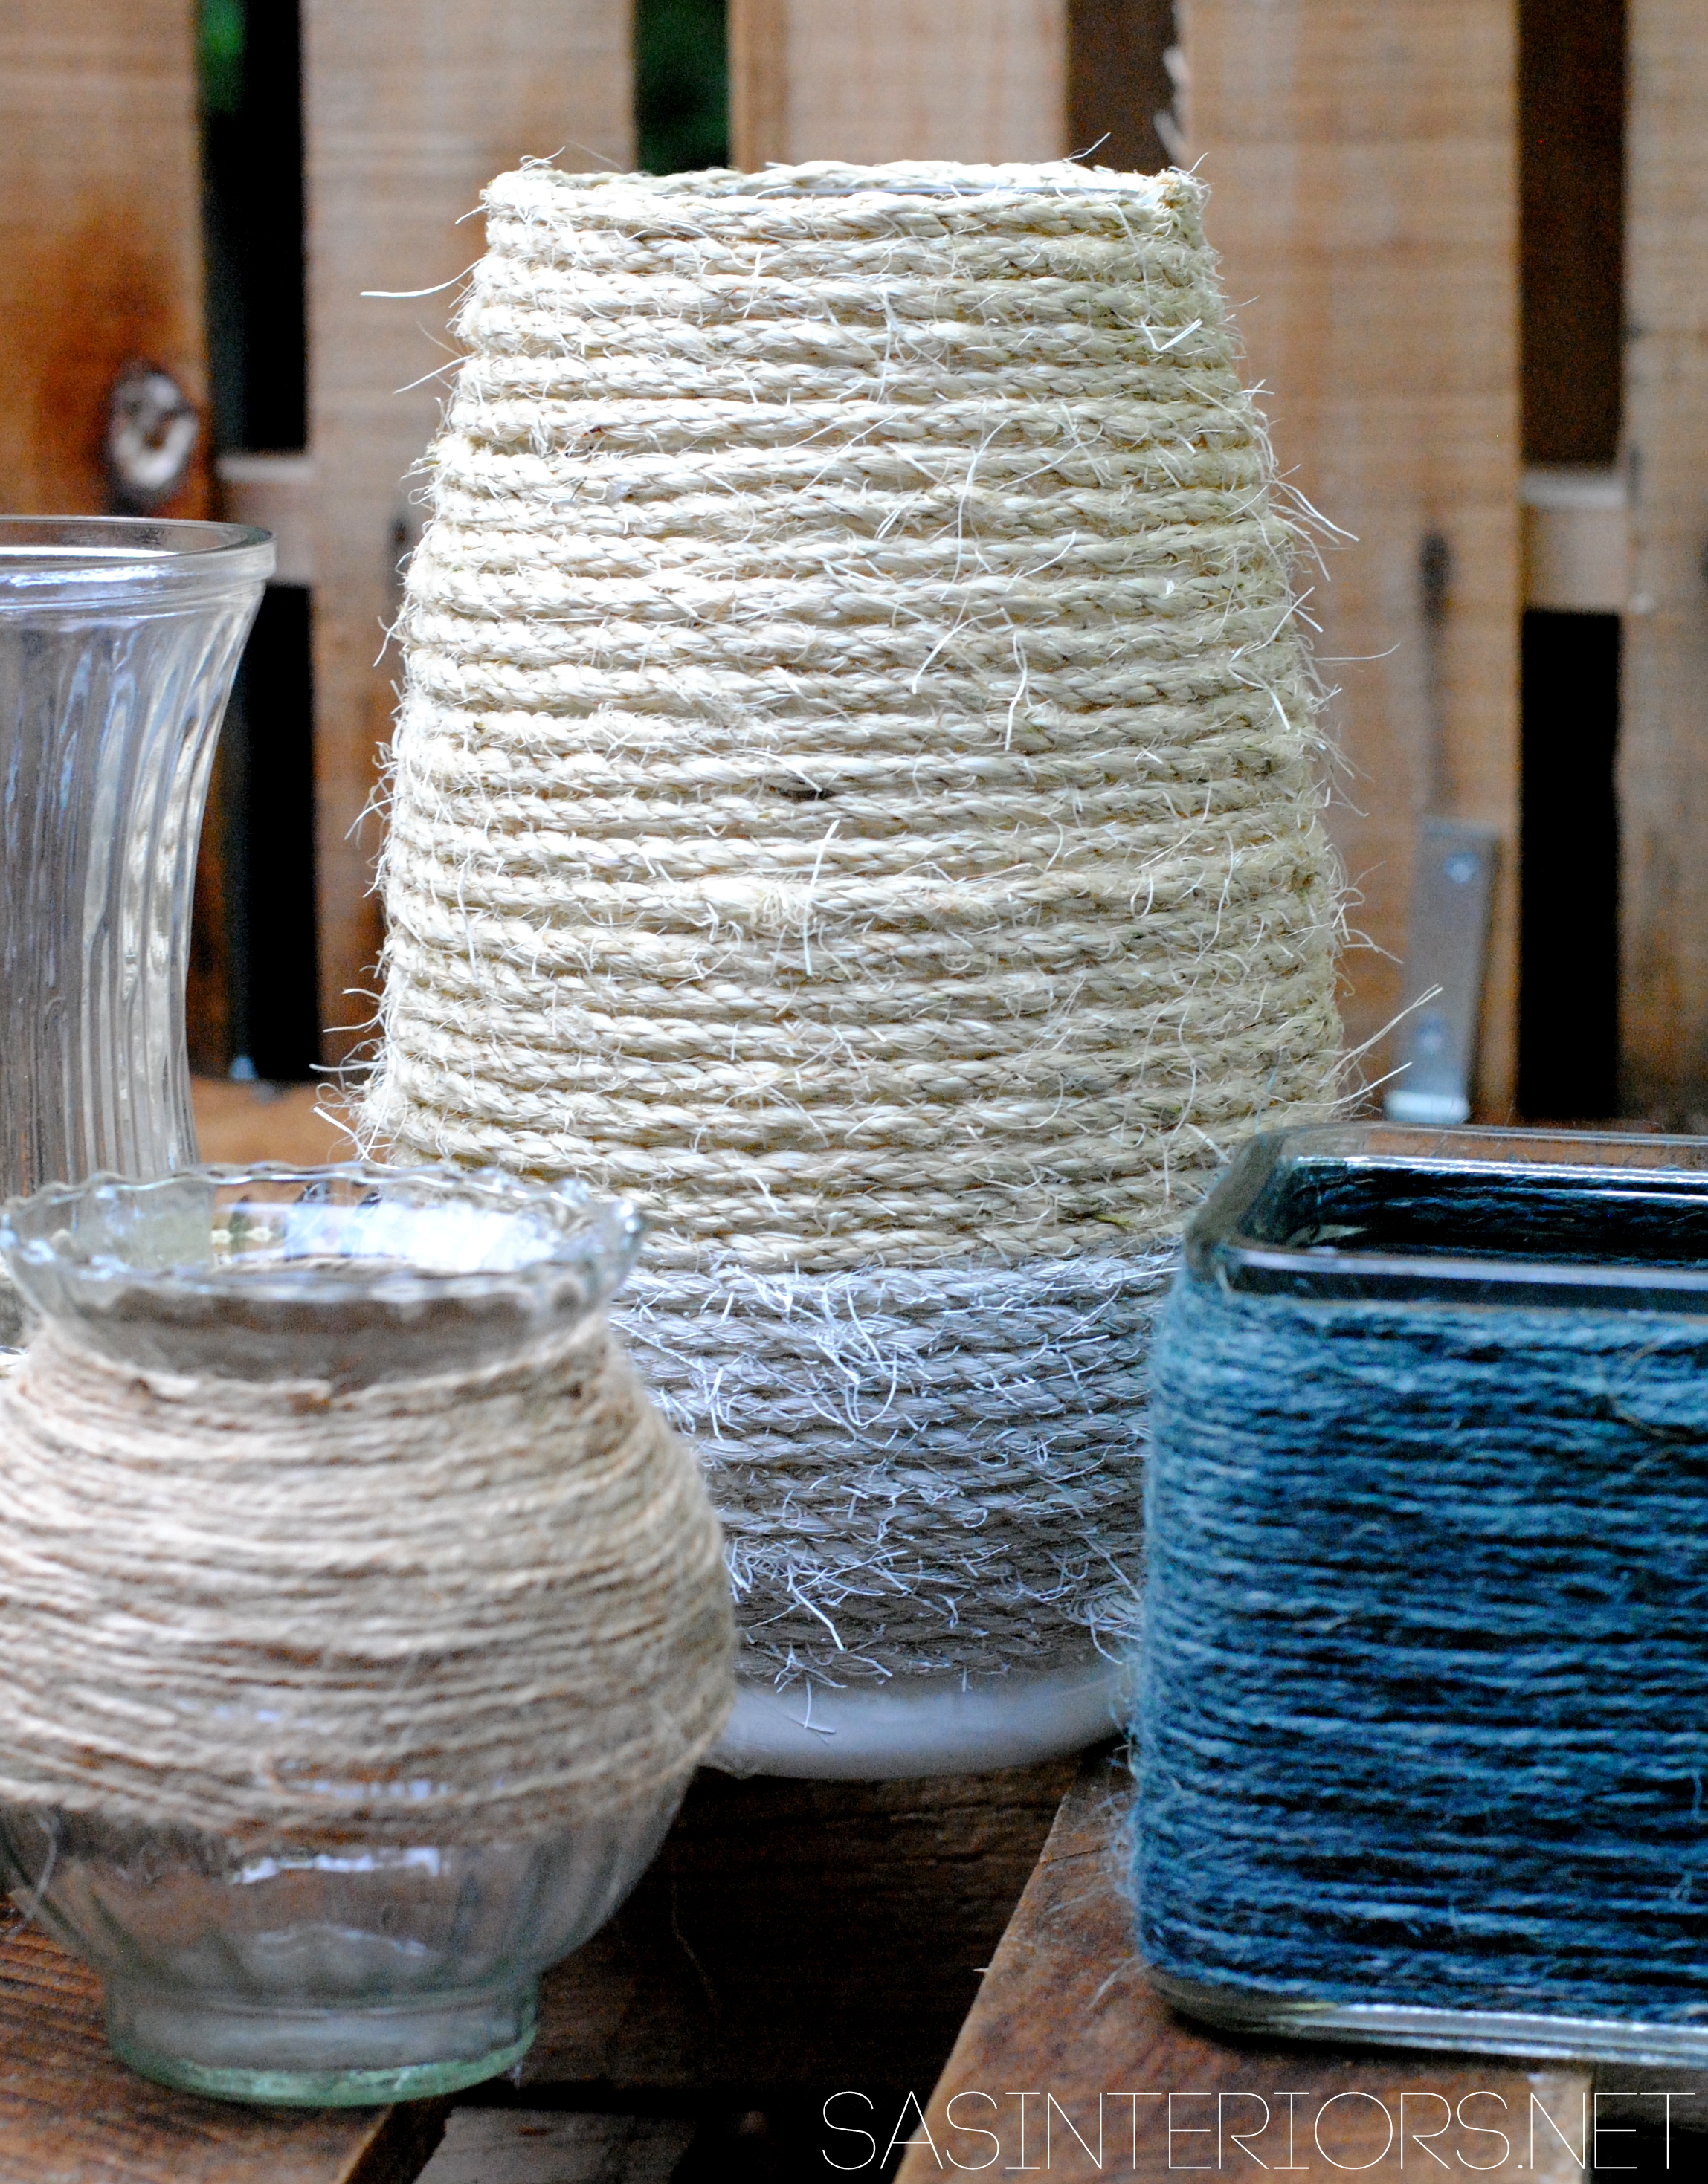
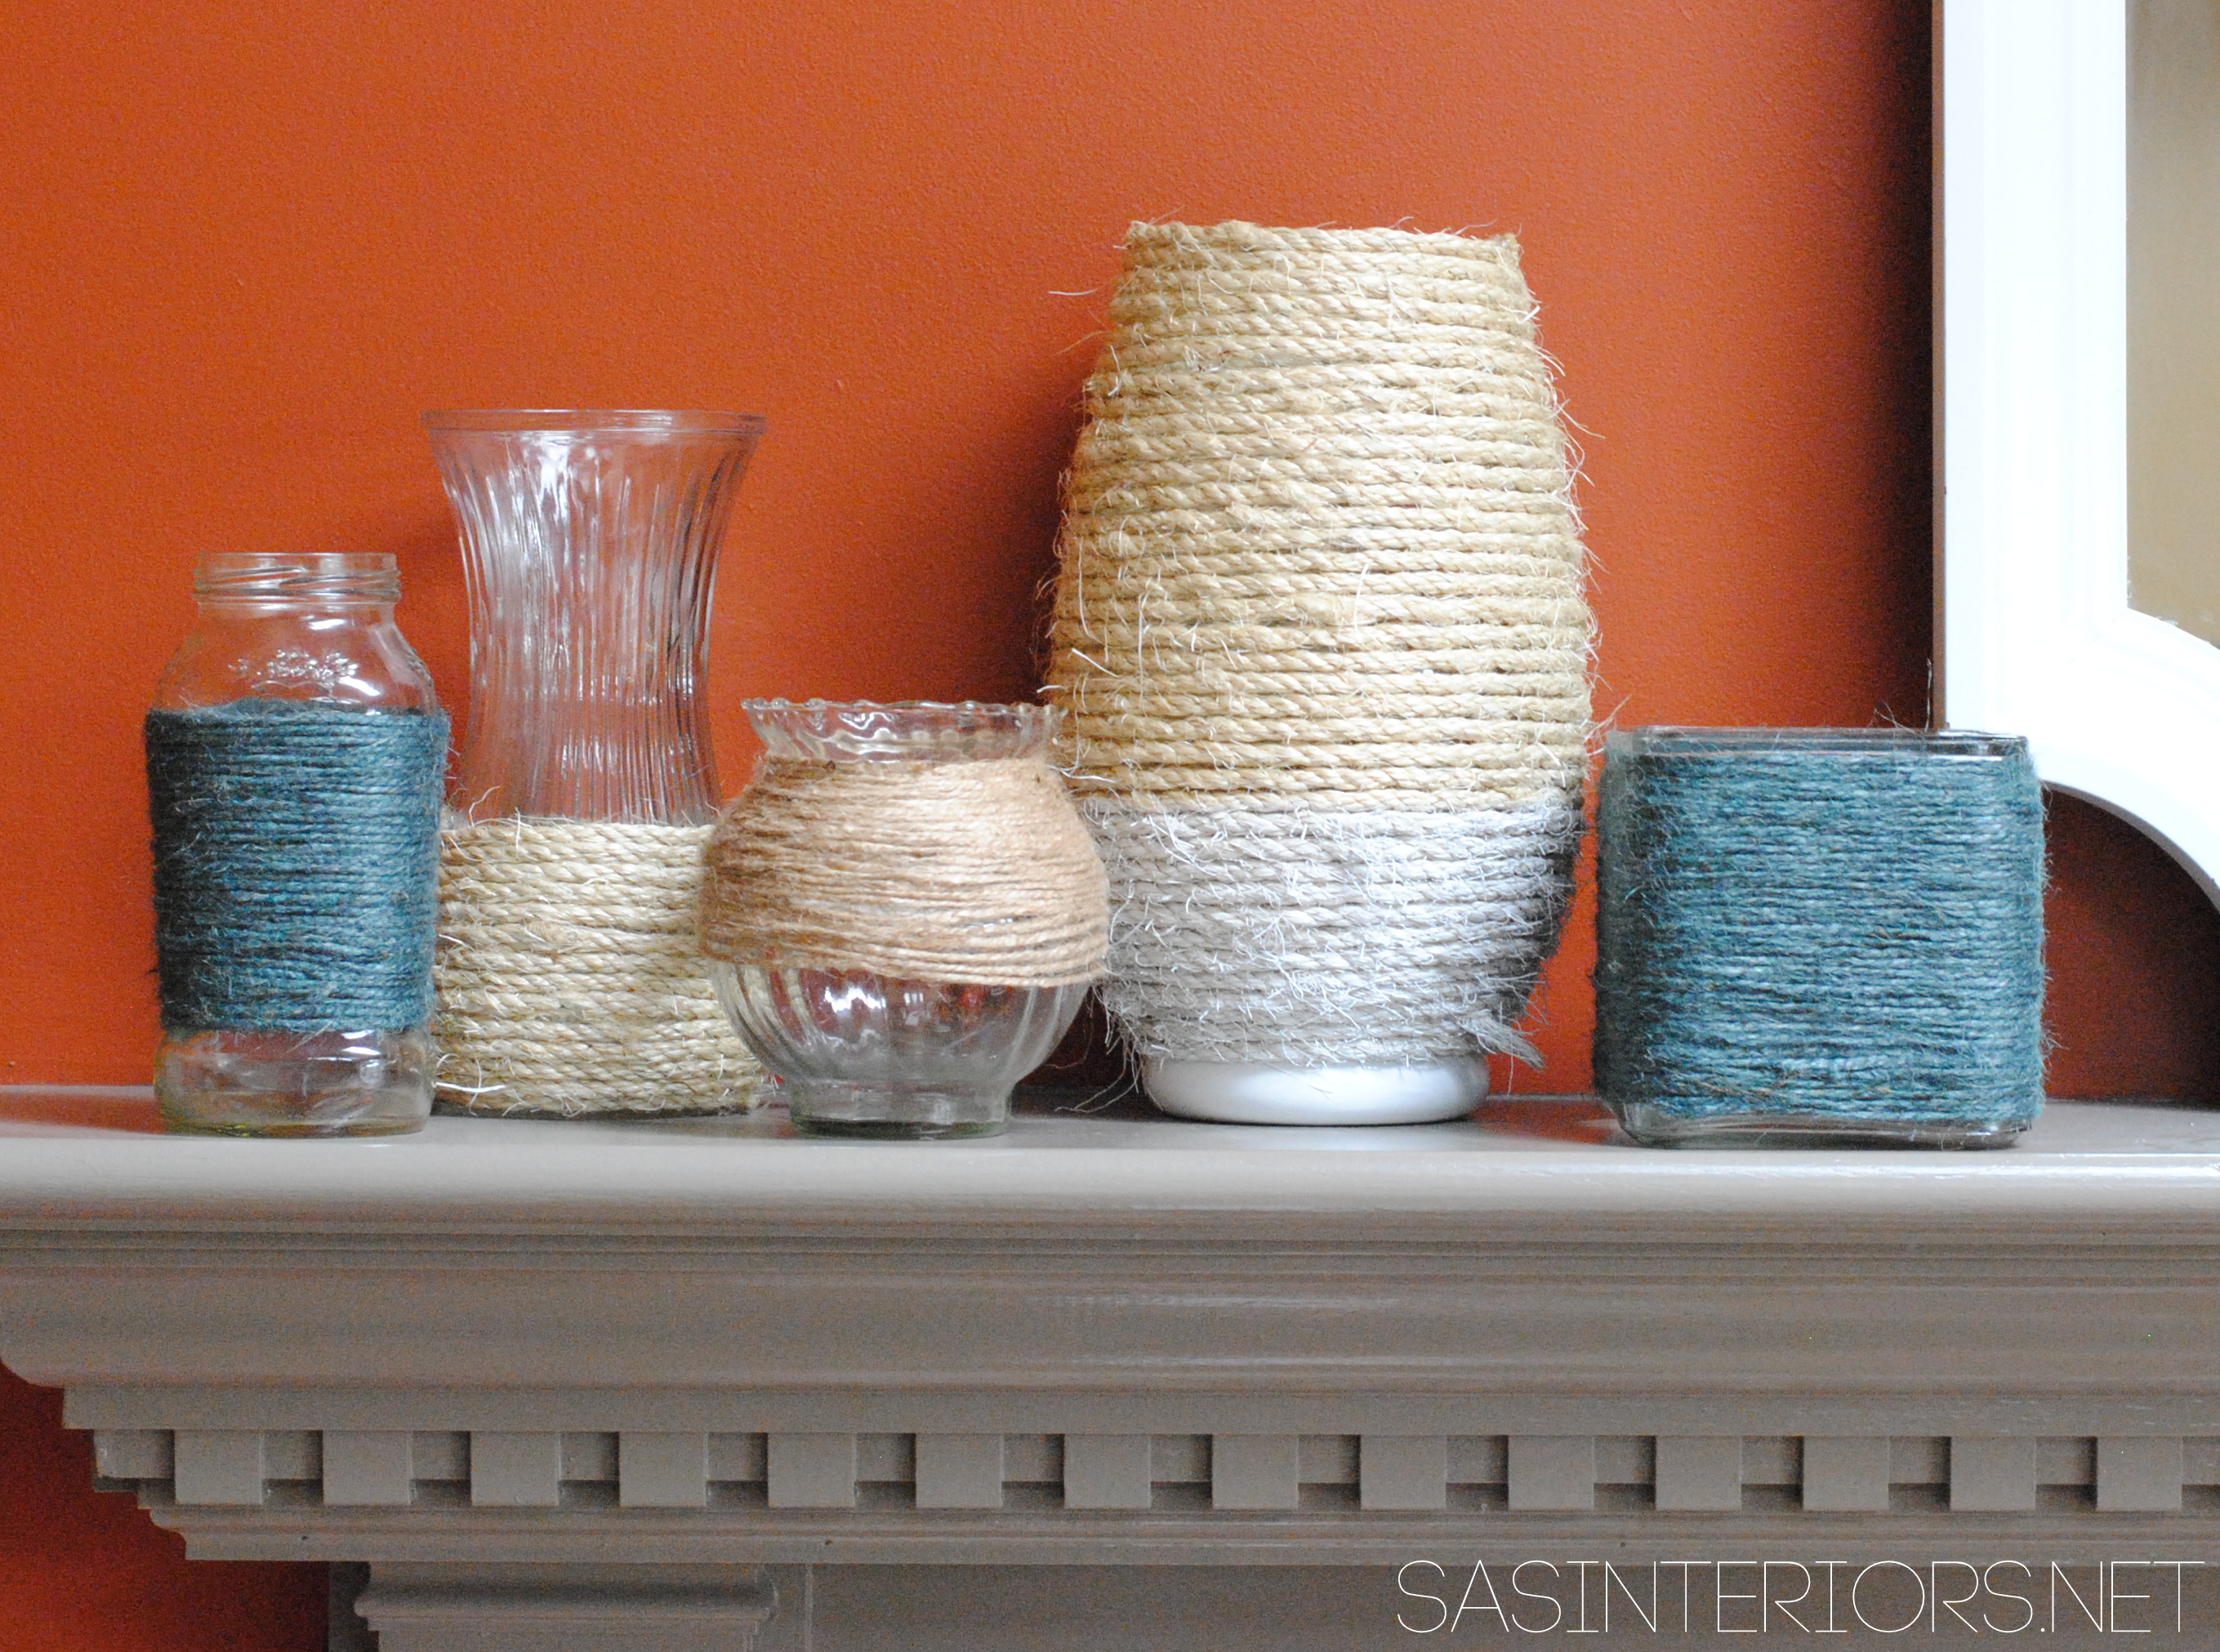
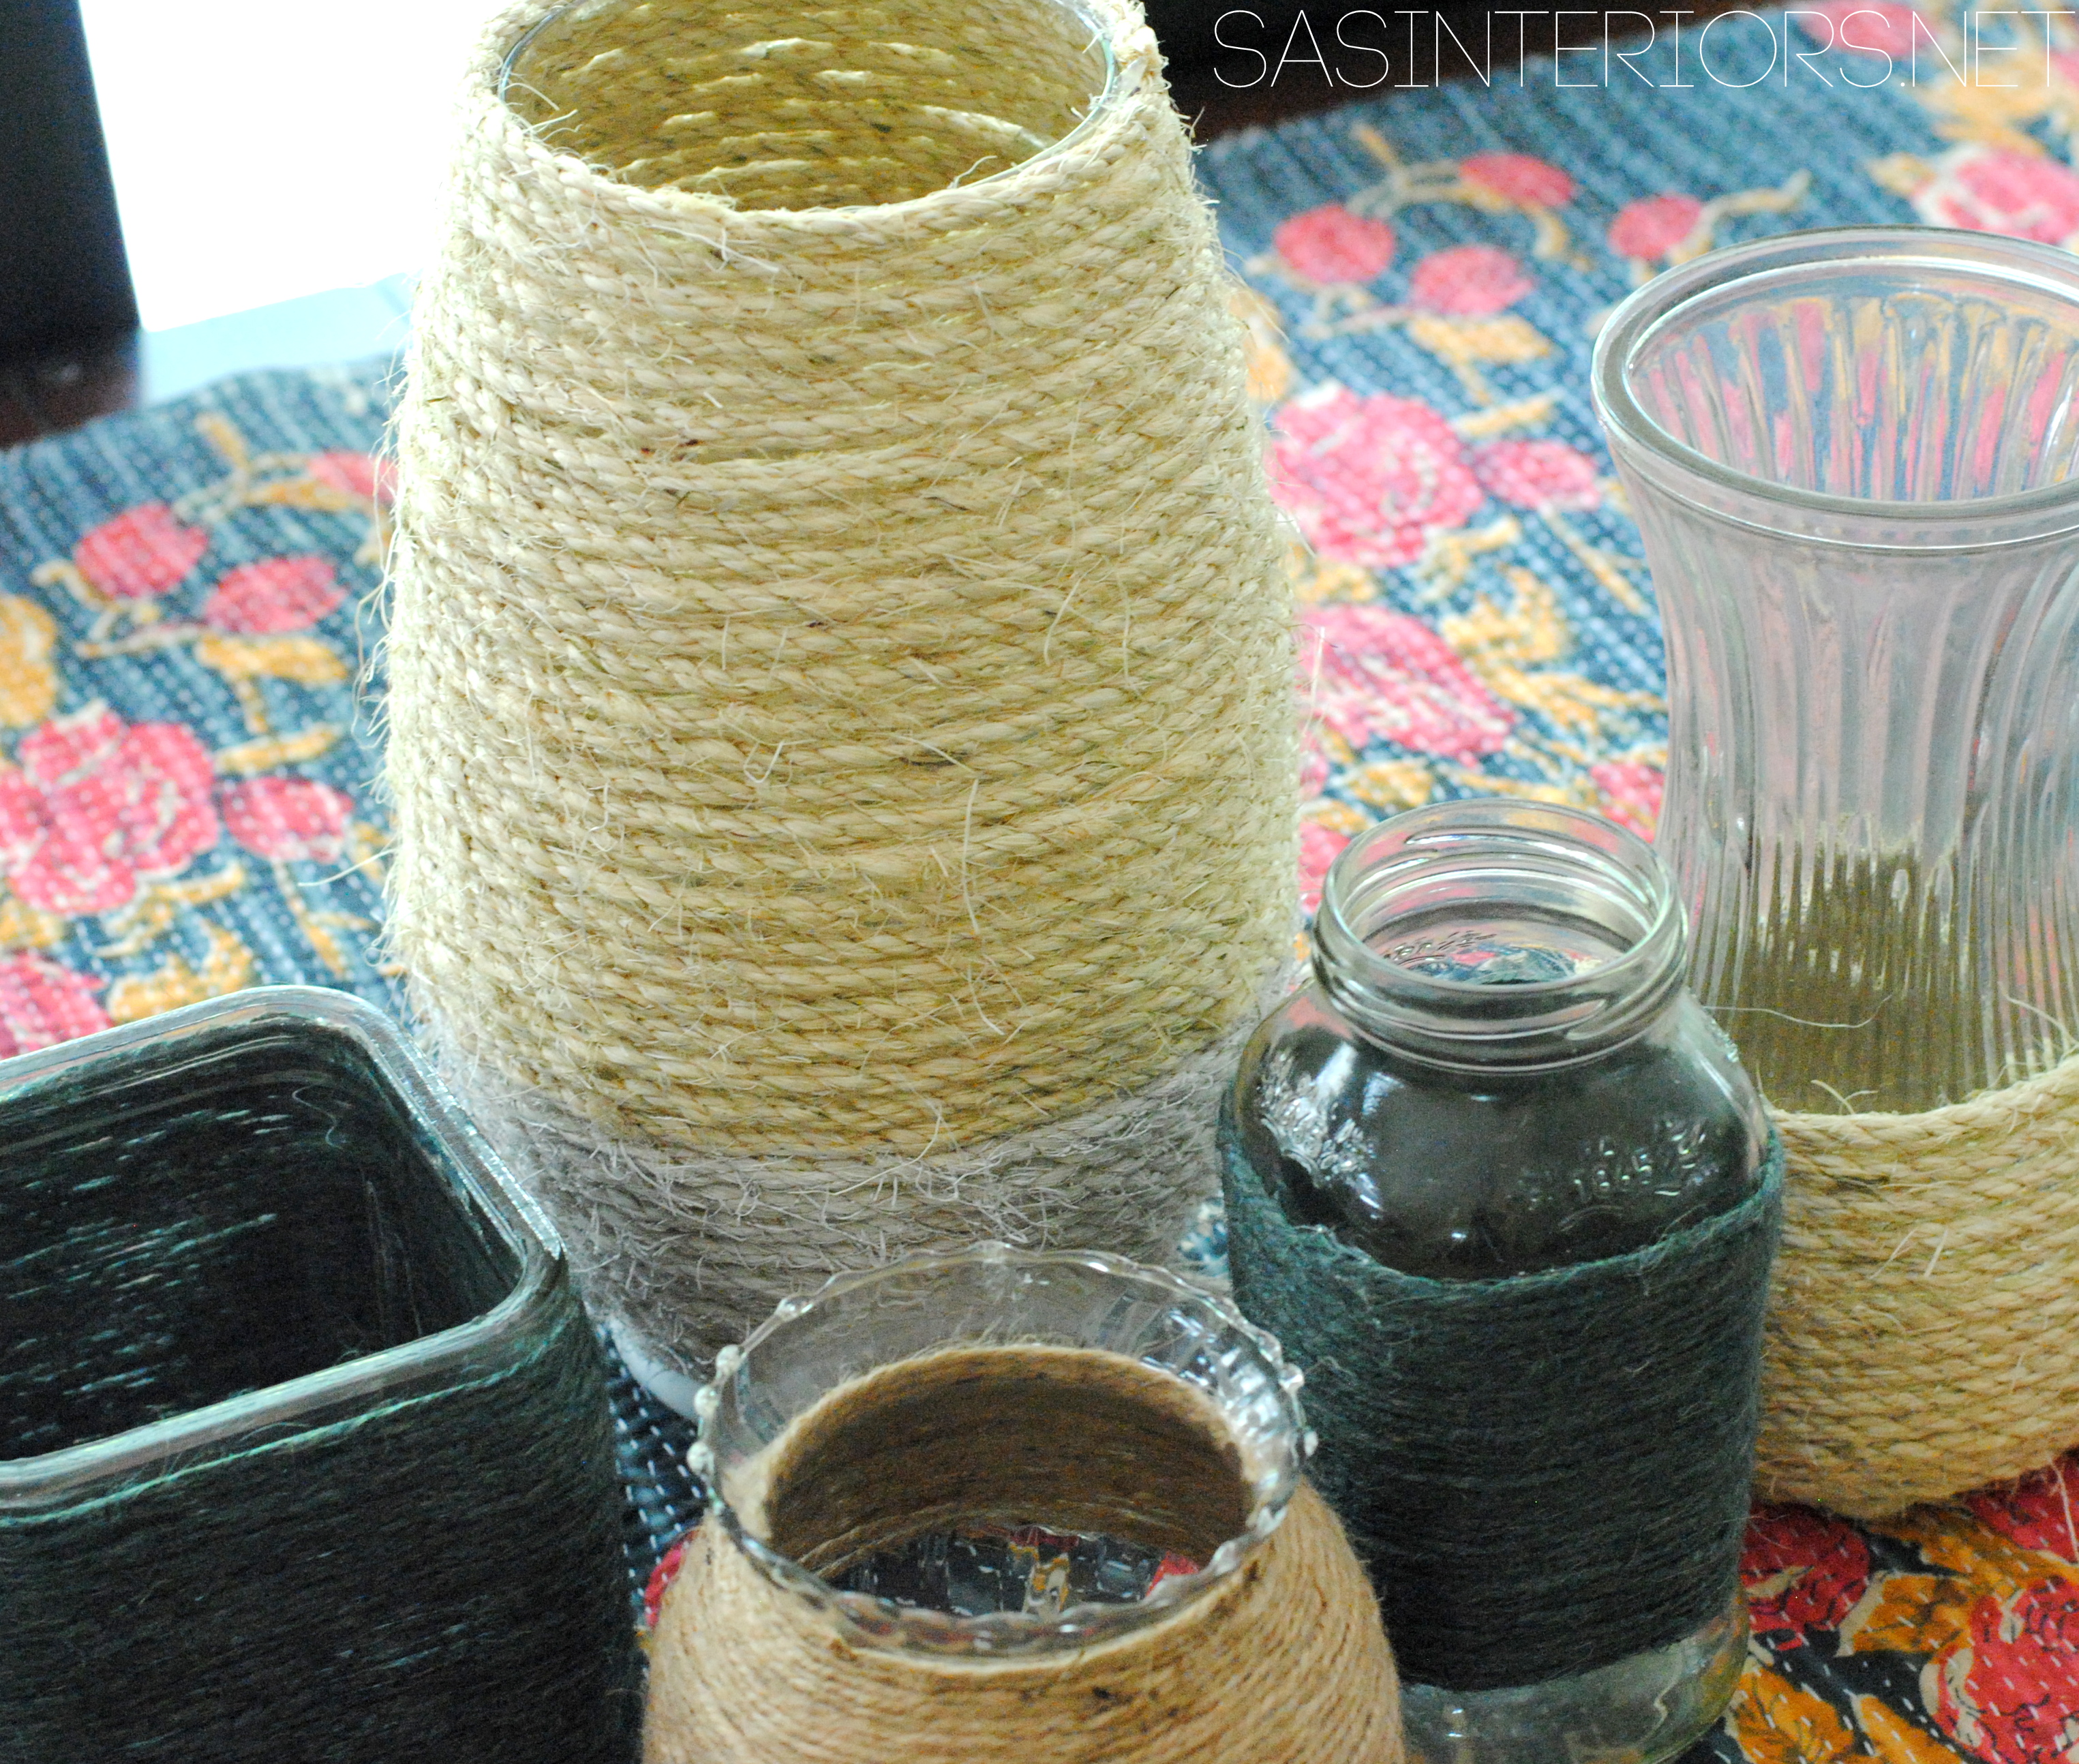
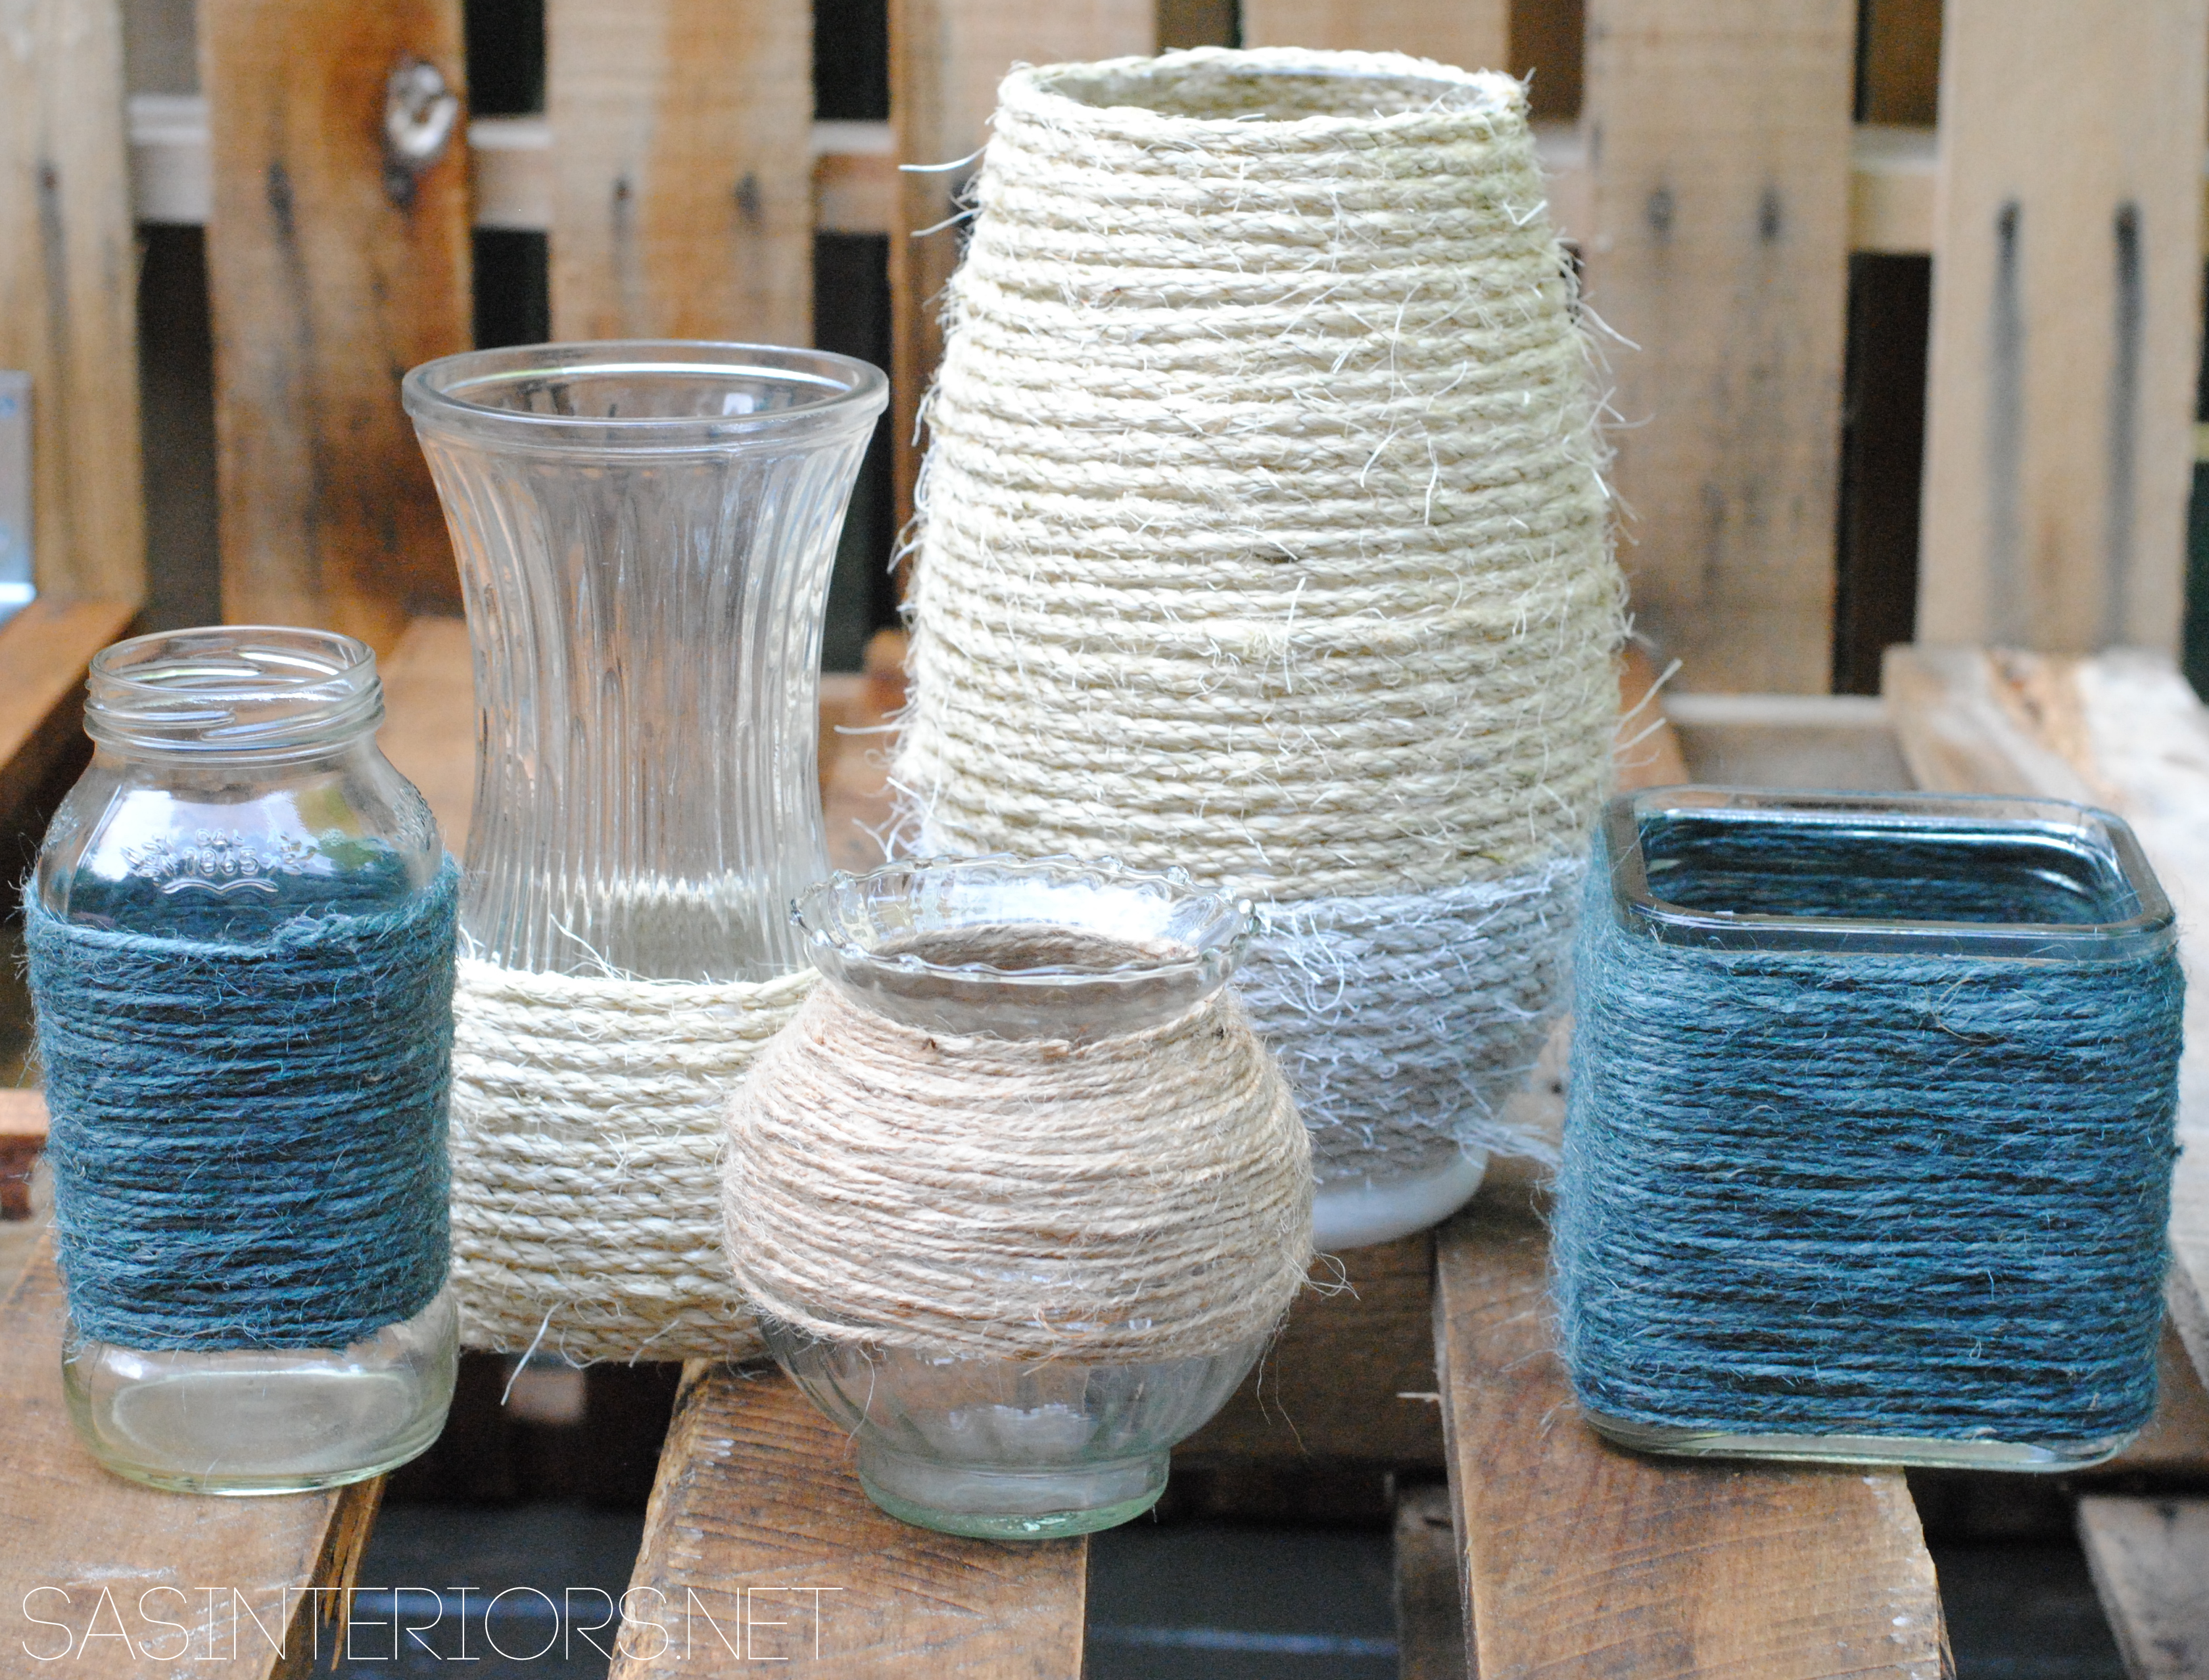
Vases and used glass jars (sauce or salsa jars are my favorites) or mason jars are always keepers for my accessory shelf.  At the moment they might not be of use, but I know they will always come in handy in the future.  For this project, I went right to the shelf and found a collection of 5 glass jars of varying heights and sizes.

DIY: Rope Wrapped Vases perfect for creating & displaying in an apartment and/or small space #apartment #diy #apartmentliving

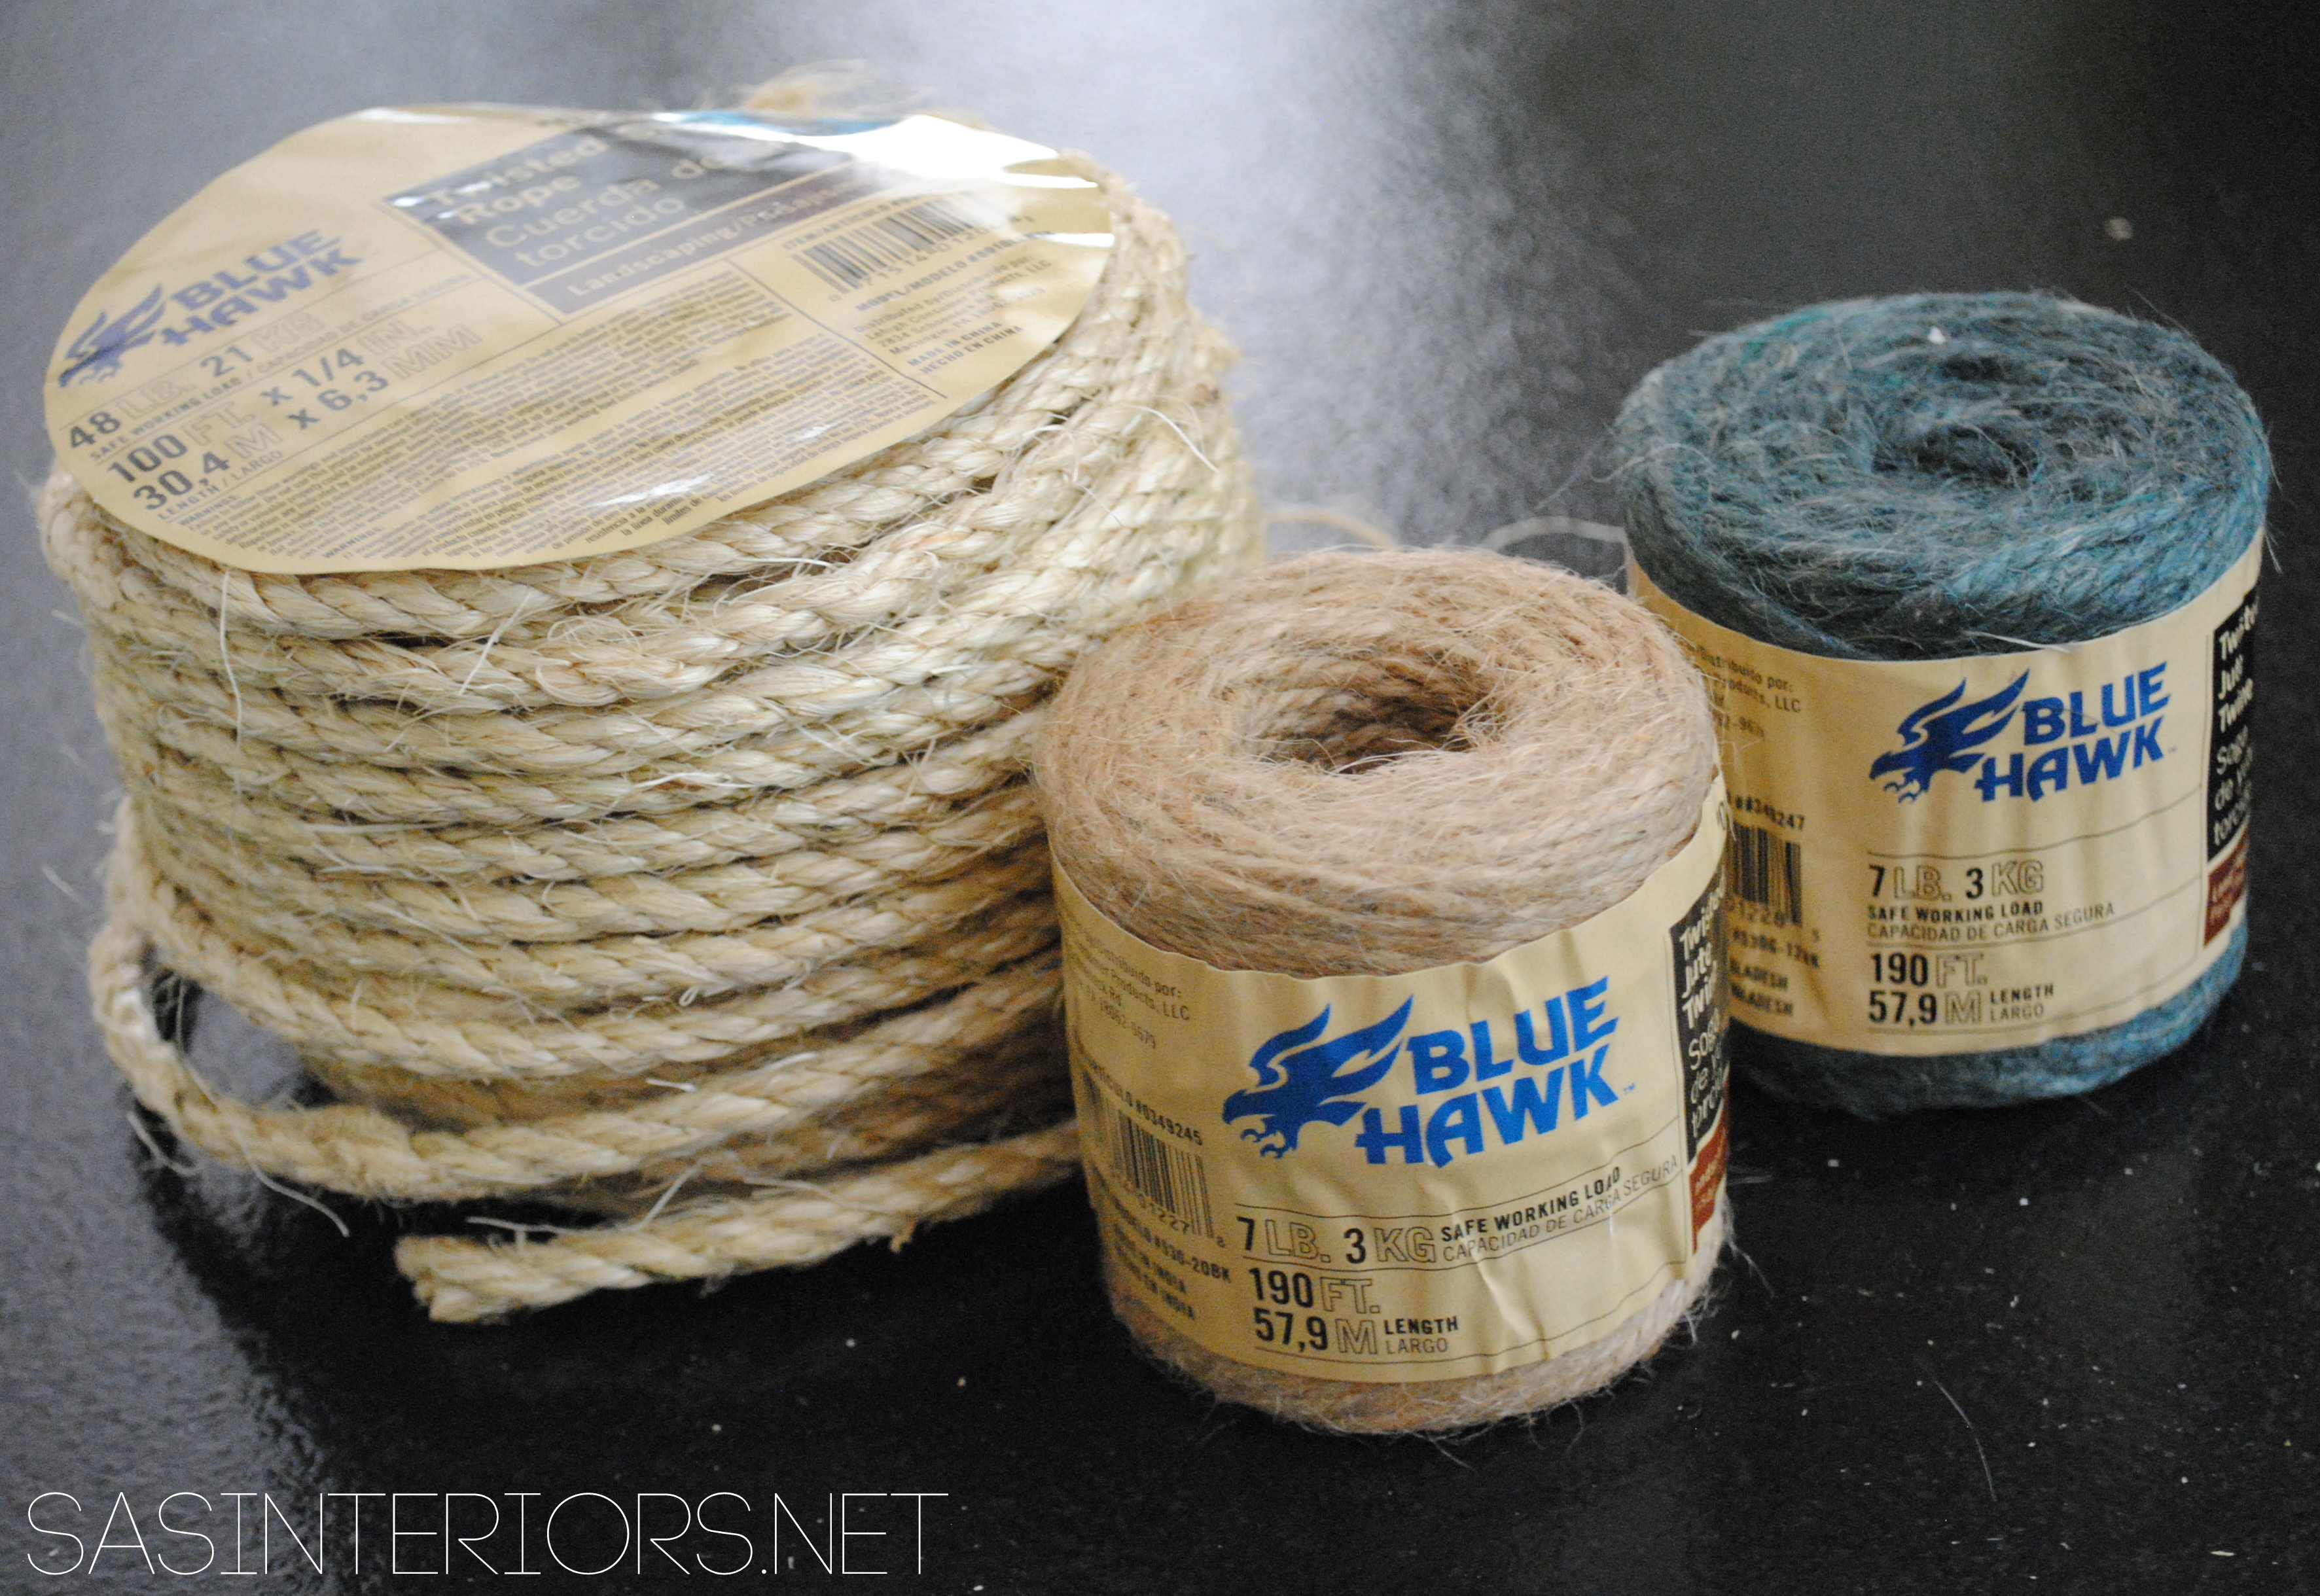
Instead of wrapping all the vases/glass jars in the same rope, I decided to use rope, twine, and jute of different sizes and colors.

These 3 styles I got at Lowes >

DIY: Rope Wrapped Vases perfect for creating & displaying in an apartment and/or small space #apartment #diy #apartmentliving

Using my hot glue gun, I dabbed a bit of the hot glue at the point where I wanted to start and then attached the end of the twine.

4

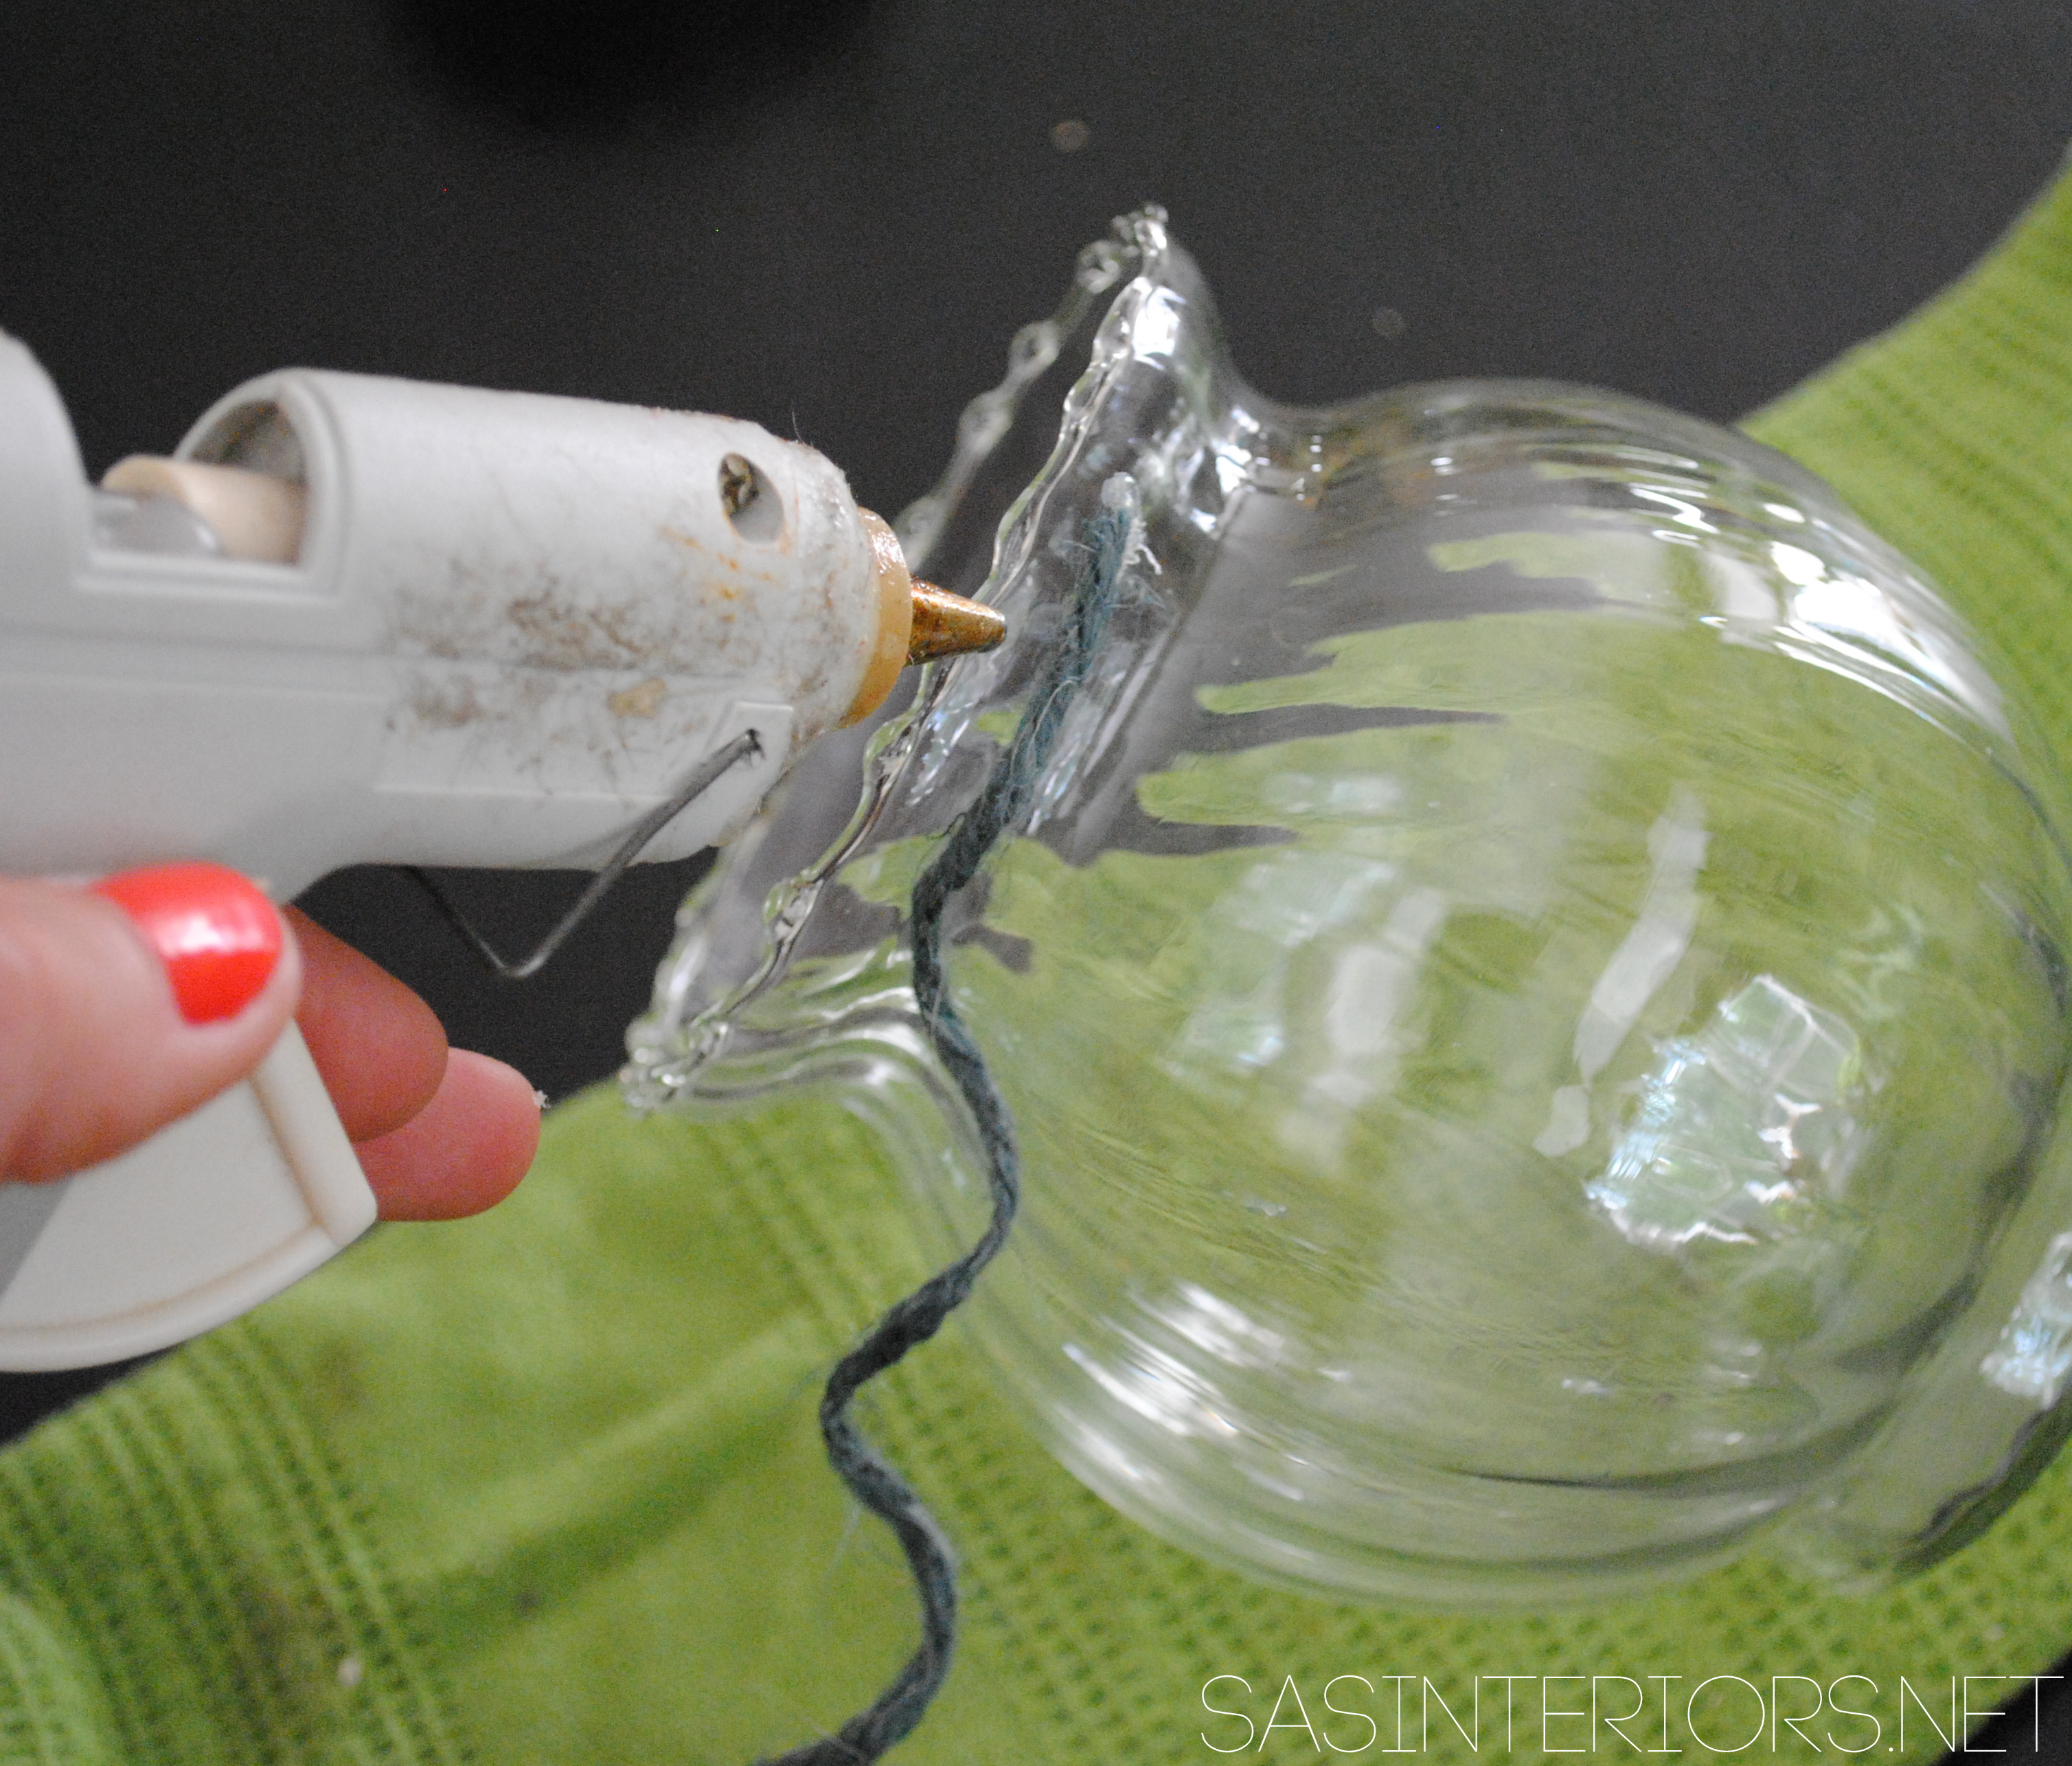
Then I wrapped and wrapped and wrapped around the glass jar.  Every so often I added another dab of hot glue to be sure that the twine / jute / rope was secure.

DIY: Rope Wrapped Vases perfect for creating & displaying in an apartment and/or small space #apartment #diy #apartmentliving

The large rope was my favorite because it gave the glass vase some great texture.

DIY: Rope Wrapped Vases perfect for creating & displaying in an apartment and/or small space #apartment #diy #apartmentliving

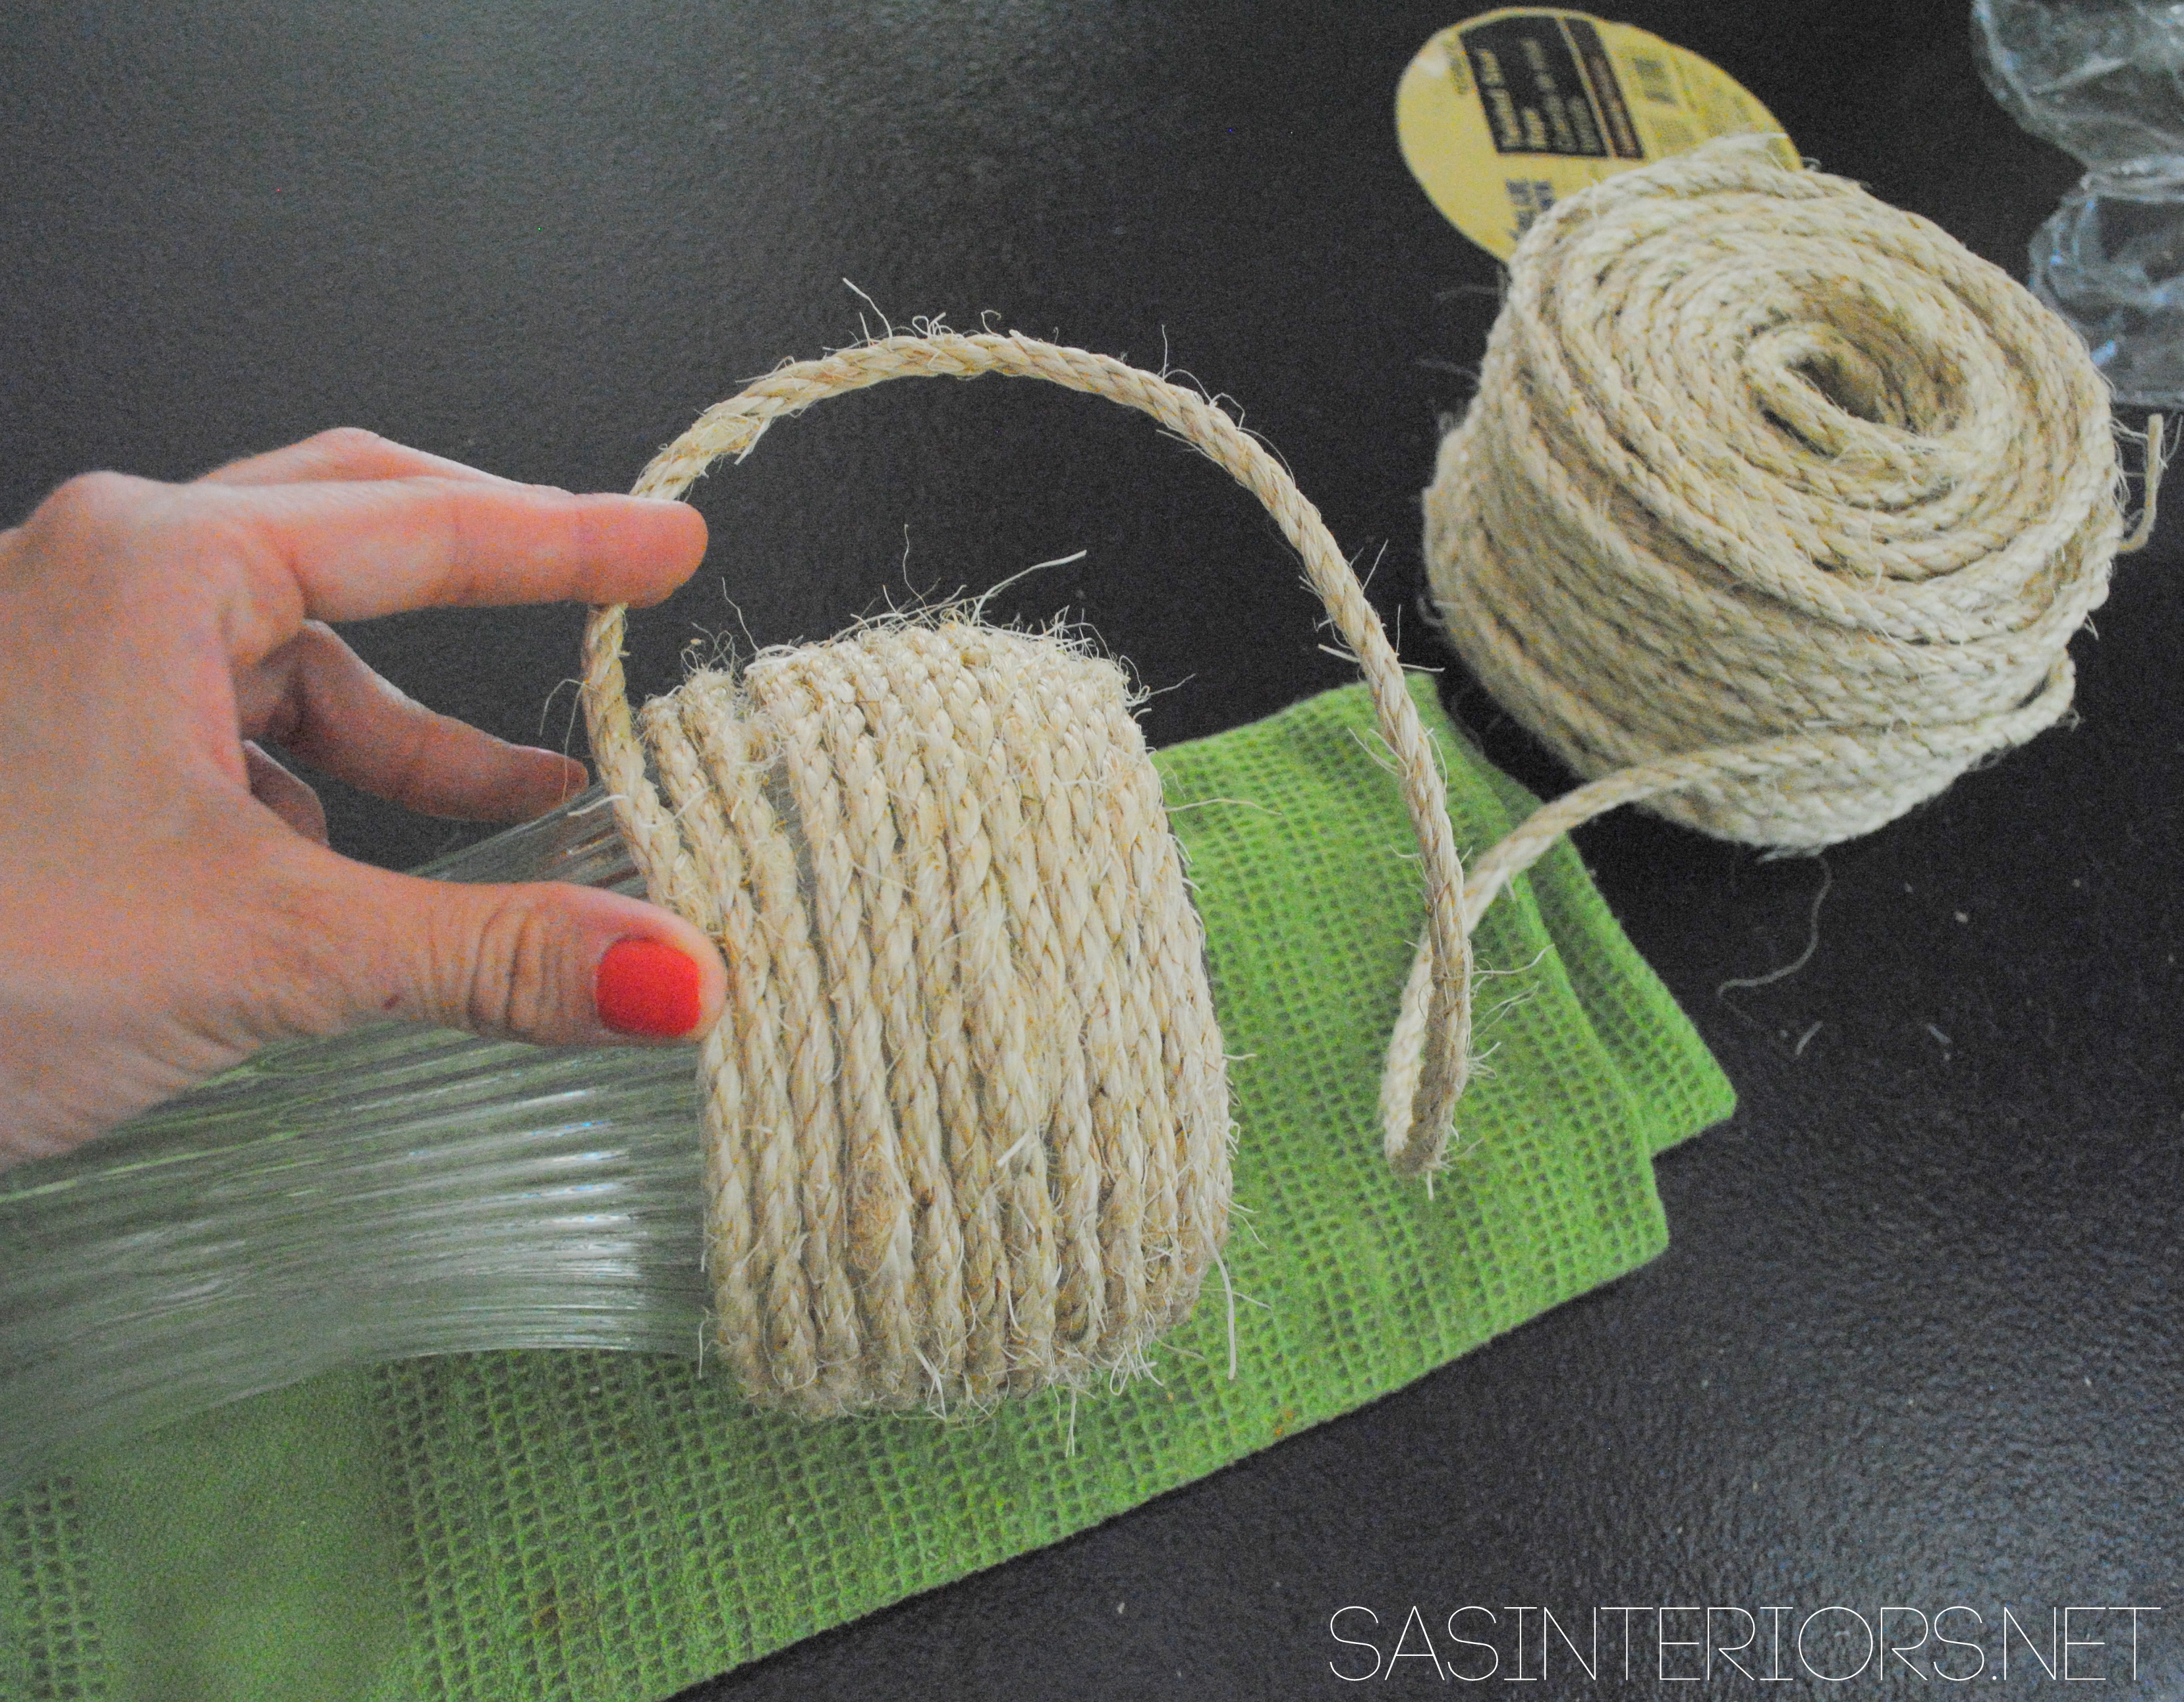
Each jar / vase is a different height and size, so I made each one even more unique with the color and/or application of the rope.  Some got fully covered in rope where others only a portion of the ‘body’ got covered.  It adds an interesting, one-of-a-kind quality.

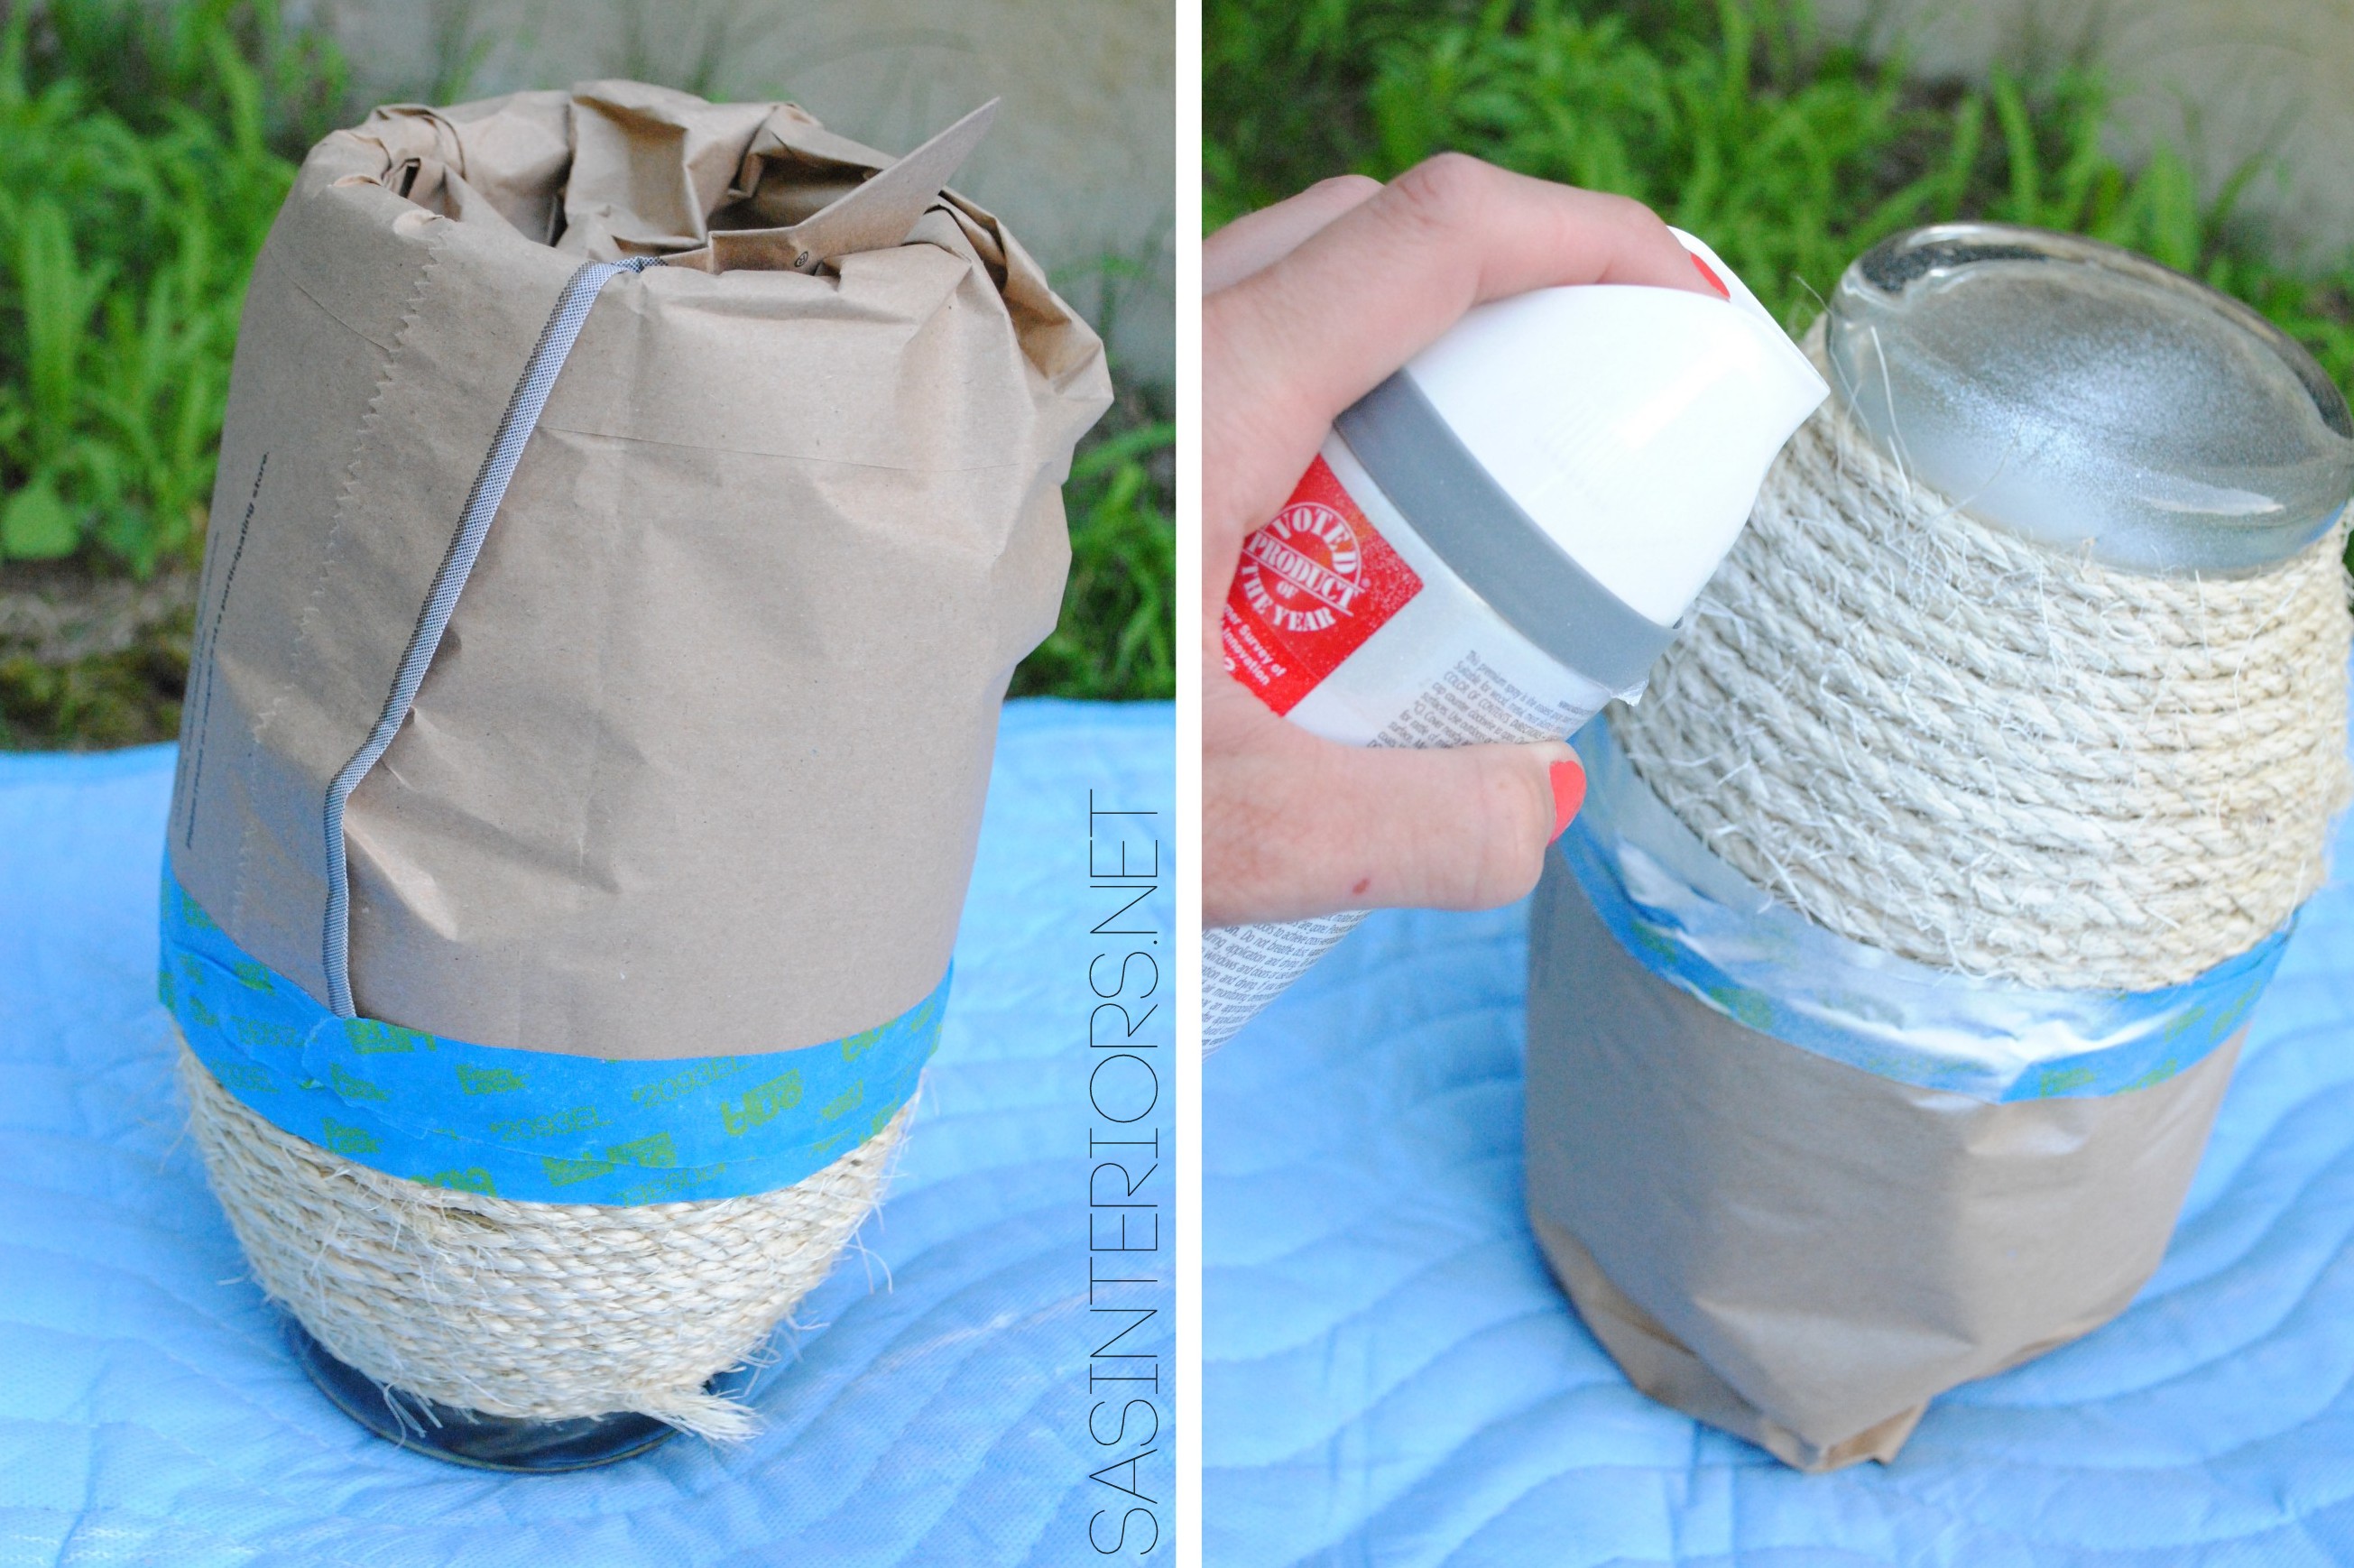
For the largest vase of all, I fully covered it in rope and then added a little color (white to be specific – some say it’s not technically a color) with a splash of spray paint. To do this, I decided the area that I wanted to spray paint and covered the rest.  I used painters tape along with a piece of paper (a staples bag to be exact, lol – it was the perfect size), flipped over the vase so the top was on the ground, and started to spray.  A few coats later, it was done.

DIY: Rope Wrapped Vases perfect for creating & displaying in an apartment and/or small space #apartment #diy #apartmentliving

The result >

DIY: Rope Wrapped Vases perfect for creating & displaying in an apartment and/or small space #apartment #diy #apartmentliving

And the entire collection >

On the mantel.

DIY: Rope Wrapped Vases perfect for creating & displaying in an apartment and/or small space #apartment #diy #apartmentliving

On the dining table.
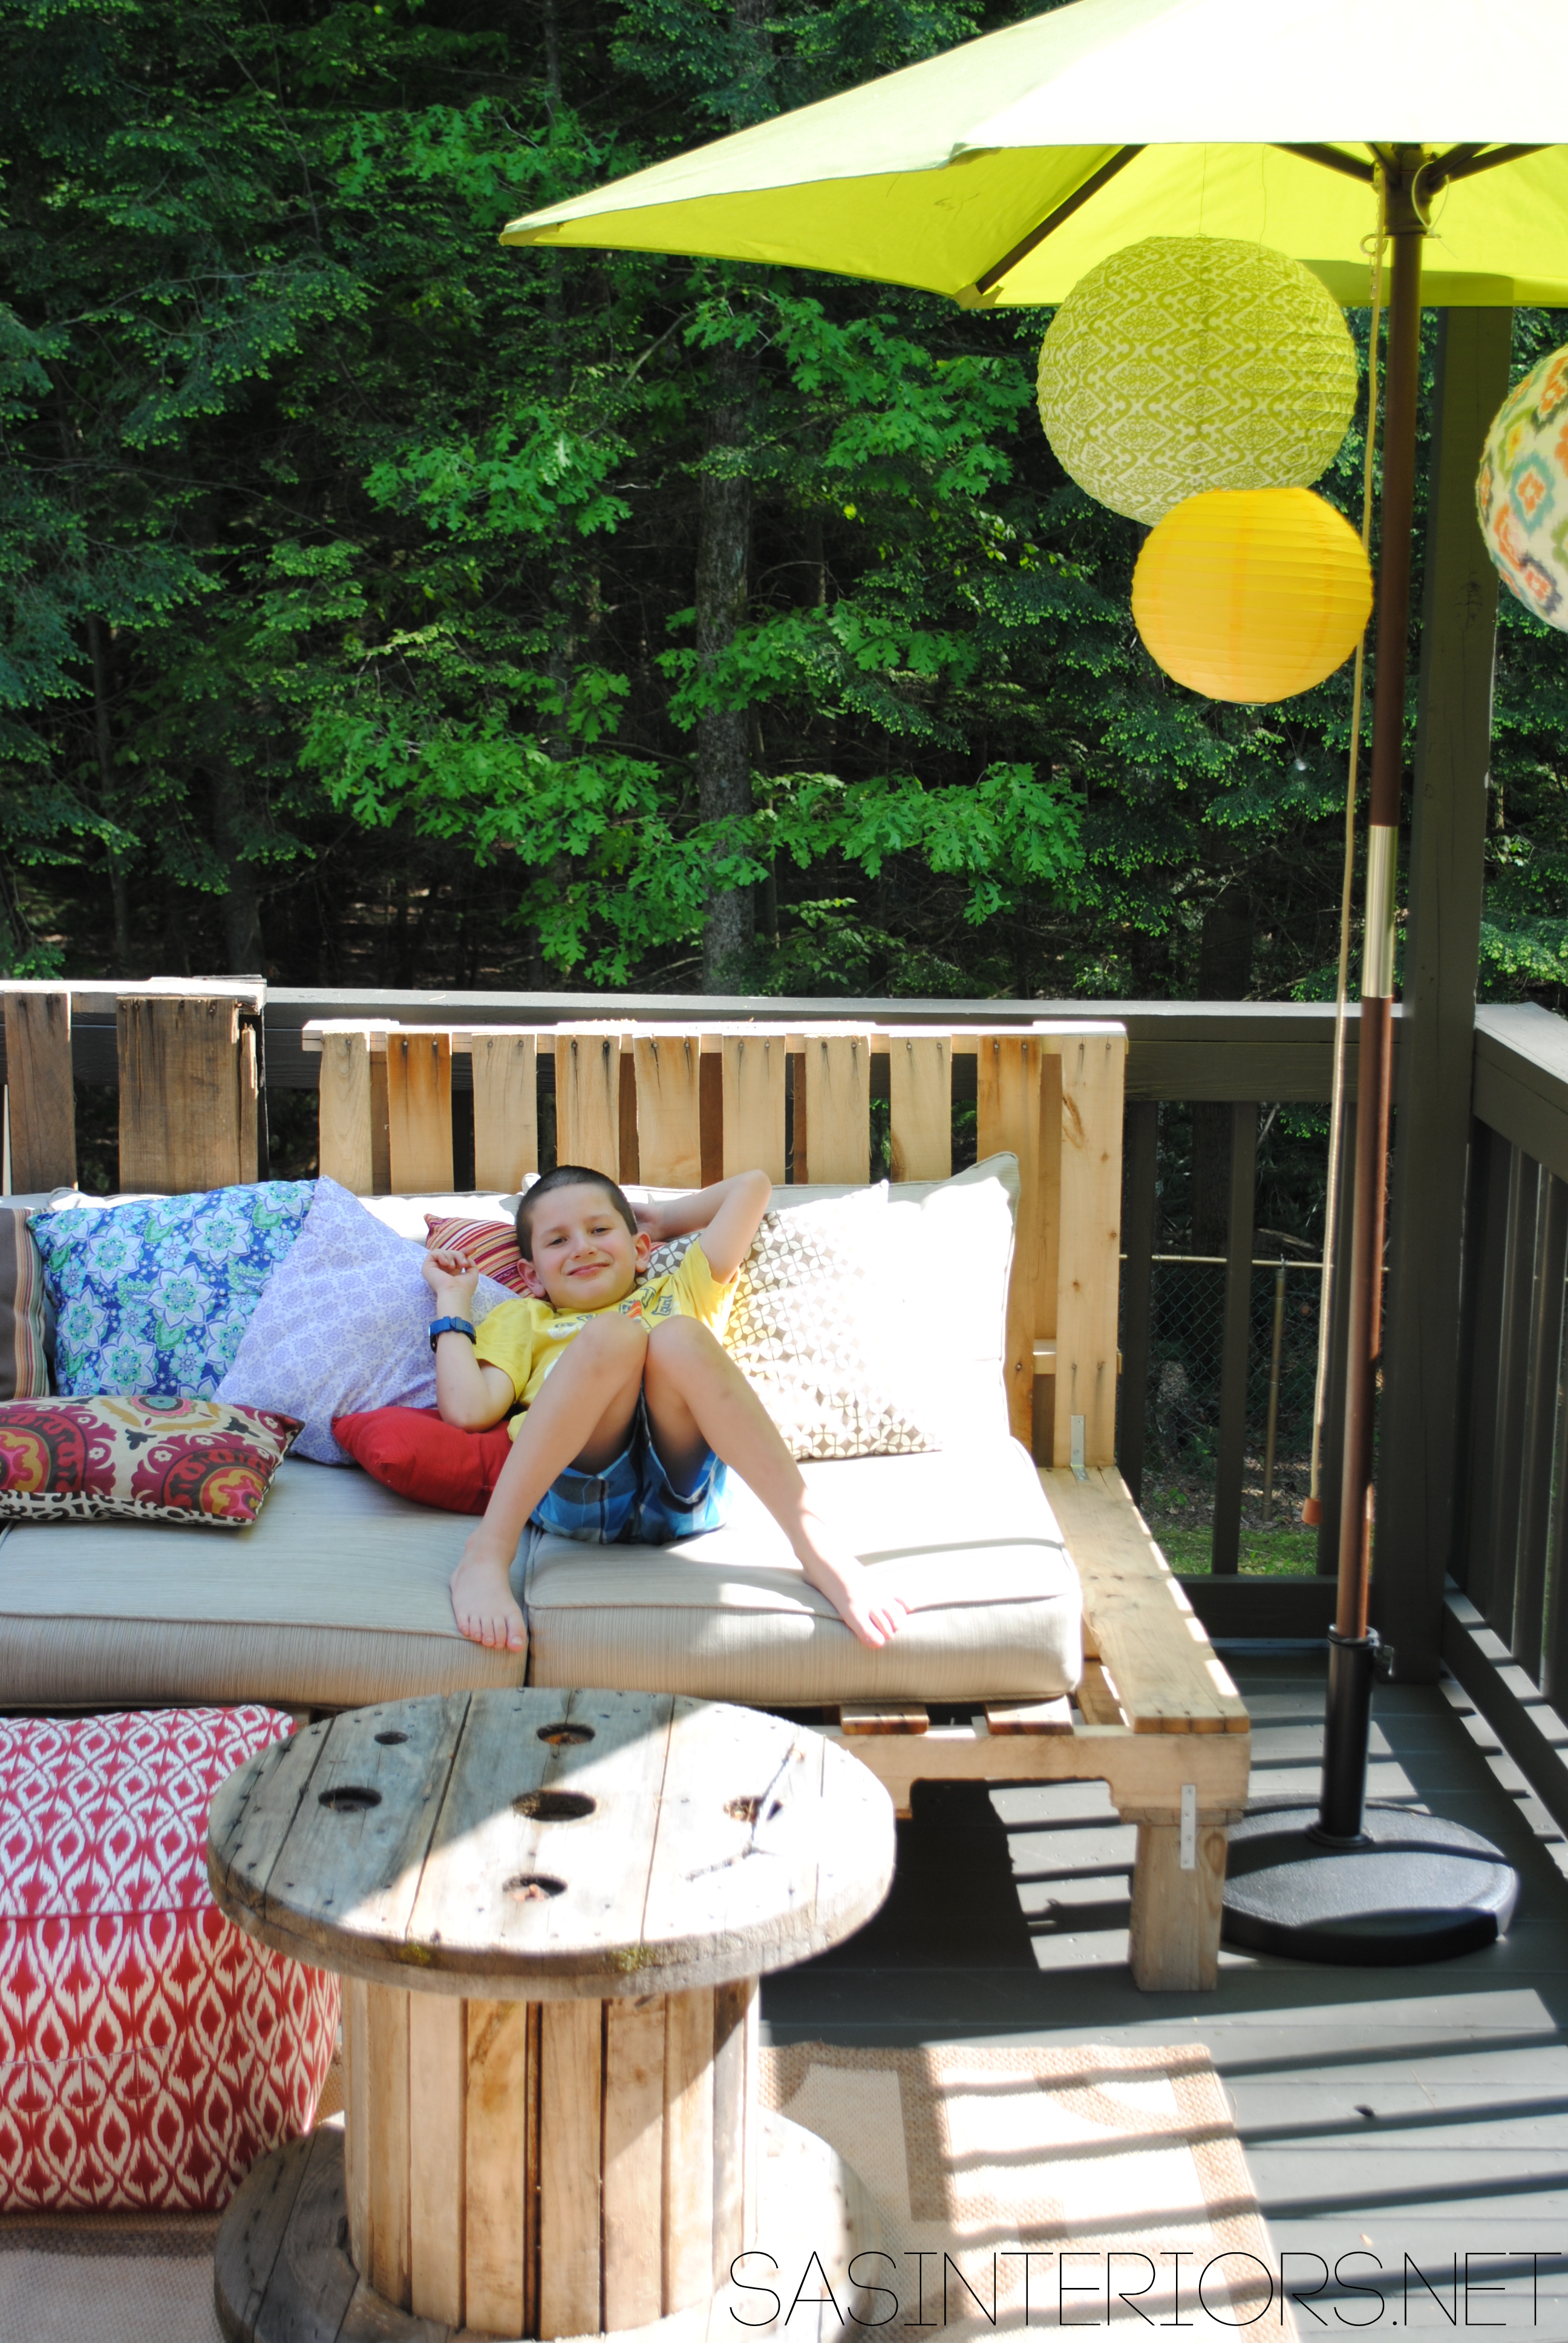
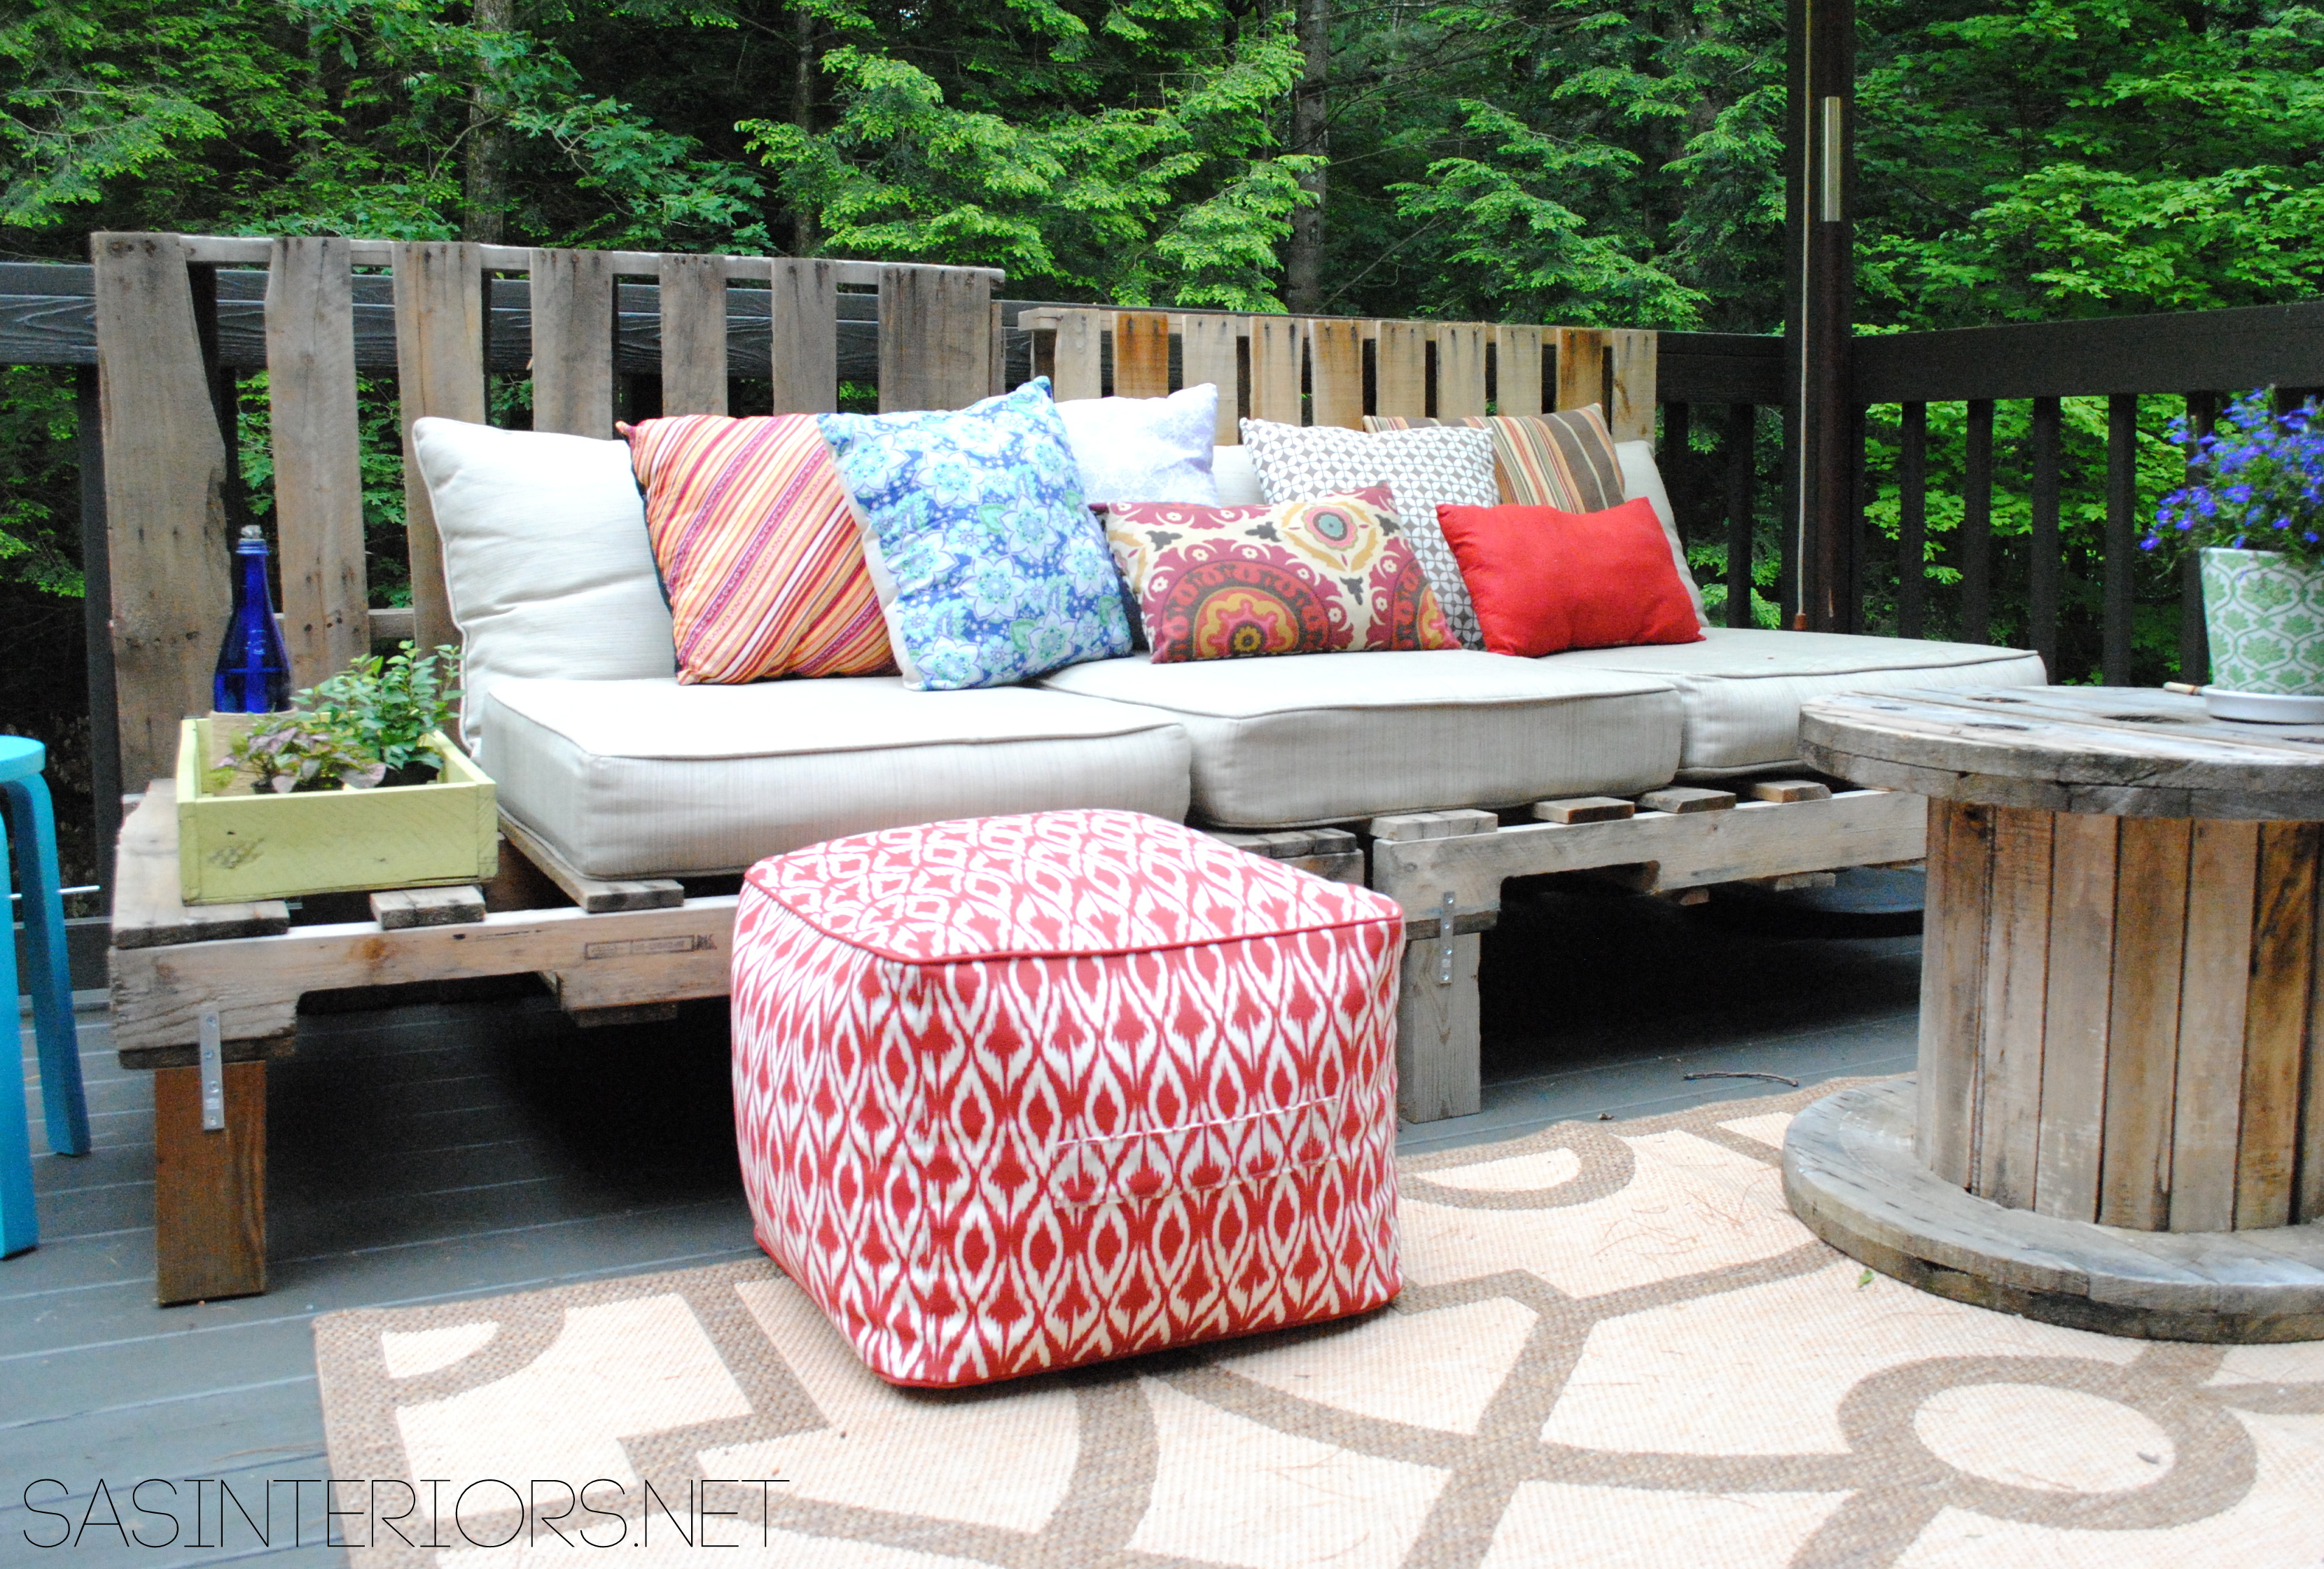
DIY: Rope Wrapped Vases perfect for creating & displaying in an apartment and/or small space #apartment #diy #apartmentliving

Outdoors.

DIY: Rope Wrapped Vases perfect for creating & displaying in an apartment and/or small space #apartment #diy #apartmentliving

Simple vases and glass jars changed into creative decor for little money and little time = a perfect DIY for an apartment dweller. No matter where you live, creative do it yourself projects can be tackled.  It might take a little more planning, but a fun and successful result can be accomplished!

As I mentioned the other day, I’ve recently been working with a NYC E-Design client on a bedroom makeover.  She shared some great insight with a brief Q & A into Life in an Apartment, and also tackled the same project I did.  I thought it would be fun and interesting to see how my rope wrapped vase collection looked in a home, and hers in an apartment.  She used differing glass vases with the same rope.  Take a look…

DIY: Rope Wrapped Vases perfect for creating & displaying in an apartment and/or small space #apartment #diy #apartmentliving

DIY: Kids Play + Camping Tent

Happy July!

For me, it officially feels like Summer has begun.  The kids are out of school now for just about a week, and the Summer sun is setting in (despite all the rain we’ve been having).  The kids and I have been enjoying fun outings each day, while also spending some down-time at home just relaxing.  Often on those home-bound days, the hours creep by with boredom, so when Lowe’s put me up to the challenge this month to create something related to DIY camping, I thought of the perfect solution…

a kids play + camping tent.  They can use it as a tent to play in during the day, as well as a spot to sleep in once the sun sets and the stars peak.

Kids Play + Camping Tent - 10 dollars to make +10 minutes to create! Super simple creation that your kids will love!

The the best part about this tent is that it only took about $10 to make + 10 minutes to create!  I made two, so the cost and time were double.

Supplies for (1) Tent:

  • (4) 1 x 2 piece of wood at 42″ long ($2.16)
    • At Lowe’s I had them cut down (1) 1 x 2 x 8 which cost $1.08 into my (2) 42″ long pieces
  • (1) 3/4″ diameter dowel at 48″ long ($2.85)
  • 2.5 total yards of fabric ($2.25/yard x 2.5 = $5.63)
  • 1.5 total yards of ribbon (leftovers)
  • Drill with a 3/4″ drill bit

This tent is really easy to create, and what’s even better is that you can put it up and take it down very easily with each use.   I made it so it can be easily assembled and just as easy to disassemble for storage.  More on that later…

1. (2 minutes)

To start off, I drilled a 3/4″ hole at each end of the 1 x 2 piece of wood.  The Mister and I set up a “drilling station” by creating two piles of stacked wood so the 1 x 2 could bridge across the top.  As an alternative, you can drill through your piece of lumber with a scrap piece underneath.  Either method will work.

One hole of each piece will be for the peak of the tent, while the other hole will be for the ribbon to tie through.  Keep reading and it’ll all come together…

Kids Play + Camping Tent - 10 dollars to make +10 minutes to create! Super simple creation that your kids will love!

2. (1 minute)

Once the holes were drilled, I fed one end of the dowel through two of the 1 x 2’s, then fed the other end of the dowel through the other two 1 x 2’s.

Kids Play + Camping Tent - 10 dollars to make +10 minutes to create! Super simple creation that your kids will love!

Note: The drill bit size needs to match the dowel size, so it fits snug.  I used a 3/4″ dowel and a 3/4″ drill bit.  The dowel needs to be snug in the 1 x 2’s so it stays in place, yet is still easily adjustable.

And the frame was done!

Onto the fabric.

3. (2 minutes)

Many fabric comes in a 44/45″ width, so the sides don’t need to be hemmed (if you want to hem them you can, but I didn’t).  To start off, I folded over one end of the fabric and sewed.

Kids Play + Camping Tent - 10 dollars to make +10 minutes to create! Super simple creation that your kids will love!

4. (2 minutes)

I draped the fabric (with one finished edge) over the tent frame.  I lined up the finished edge side with the bottom of the legs, so I could determine how much needed to be trimmed off the other side – be sure to leave enough fabric to fold over and sew (about  1″ extra inch).

Using my Jar O’ Ribbons, I picked out 4 fun colors.

Kids Play + Camping Tent - 10 dollars to make +10 minutes to create! Super simple creation that your kids will love!

5. (2 minutes)

To secure the fabric to the frame,  I added ribbon.  I cut (4) 12-15″ long pieces of ribbon, and sewed the center of it to the right side of each corner using a fun stitch.

Kids Play + Camping Tent - 10 dollars to make +10 minutes to create! Super simple creation that your kids will love!

After cutting the loose threads, it was complete!

I draped the fabric over the dowel, attached the 4 ribbons through the 4 bottom holes, and secured. (1 minute)

Kids Play + Camping Tent - 10 dollars to make +10 minutes to create! Super simple creation that your kids will love!

Kids Play + Camping Tent - 10 dollars to make +10 minutes to create! Super simple creation that your kids will love!

And the dual play + camping tent was complete.

Kids Play + Camping Tent - 10 dollars to make +10 minutes to create! Super simple creation that your kids will love!

It’s just as easy to disassemble as it is to assemble!  Plus it folds right up to store away.  I put all the legs together, wrapped the fabric around them, and secured it at both ends with the attached ribbon.

Kids Play + Camping Tent - 10 dollars to make +10 minutes to create! Super simple creation that your kids will love!

Kids Play + Camping Tent - 10 dollars to make +10 minutes to create! Super simple creation that your kids will love!

The details.

Kids Play + Camping Tent - 10 dollars to make +10 minutes to create! Super simple creation that your kids will love!

Kids Play + Camping Tent - 10 dollars to make +10 minutes to create! Super simple creation that your kids will love!

Kids Play + Camping Tent - 10 dollars to make +10 minutes to create! Super simple creation that your kids will love!

Kids Play + Camping Tent - 10 dollars to make +10 minutes to create! Super simple creation that your kids will love!

My kids are having such a fun time with their new creations.

Day for Play…

Kids Play + Camping Tent - 10 dollars to make +10 minutes to create! Super simple creation that your kids will love!

And night for camping… (well kinda.  it didn’t last the whole night).

Kids Play + Camping Tent - 10 dollars to make +10 minutes to create! Super simple creation that your kids will love!

Either way, they are fun, easy to make, and are perfect for some Summer Fun!

Kids Play + Camping Tent - 10 dollars to make +10 minutes to create! Super simple creation that your kids will love!

DIY: Outdoor Pallet Sofa

Despite the drear weather lately, the deck decor is coming together!

We power washed, we prepped, we stained, we built…

…an outdoor pallet sofa!

It is heaven.  Take a look (or just come on over to enjoy…)

A Summer Essential for the patio or deck: an Outdoor Pallet Sofa - Easy to make and costs less than 5 dollars!

And guess what’s the best part?  It cost less than $5.

Thankfully pallets are readily available in our neck of the woods (for free).  I usually snag mine from the back of my local Lowe’s – thanks Lowe’s, you’re the best!

After staining the deck, I knew I wanted something nice and comfy to fill the space right outside of our dining room slider.  It used to look like this before…

Deck before the super awesome makeover

But went to this with a little TLC…

A Summer Essential for the patio or deck: an Outdoor Pallet Sofa - Easy to make and costs less than 5 dollars!

Here’s how:

I got 4 pallets that were all about the same size (40″ x 30″) and made 2 “sofas”.  If you’re wanting to make something similar, then you can make yours as small or large as you desire.  If you’ve got a big patio or deck to fill, think about making a humungo sectional. How cool would that be?!

A Summer Essential for the patio or deck: an Outdoor Pallet Sofa - Easy to make and costs less than 5 dollars!

Using 4″x4″ posts from the fence we took out last year, we cut the legs using a compound miter saw (this is a favorite of mine <= affiliate link).

Determine the height of the legs:  A typical seat height is 18-20″, so we measured the height of the cushion we bought (4″ high) + the pallet thickness (5″ high), so the legs needed to be 10″.

Cutting the legs for the Pallet Sofa

To attach the legs, we used flat brackets (mending plate <= affiliate link) and braced them from the leg to the pallet edge.

Attaching the legs to the pallet sofa

Outdoor pallet sofa legs

To attach the back pallet, we used (3) 90 degree L-brackets (corner brace <= affiliate link)  for each “sofa”, so 6 in all.

Attaching the back of the pallet sofa

Then it was complete.  That’s how easy these bad-boys are to make,  But I will warn you…  THEY ARE HEAVY.  So you will definitely need some muscles & braun to lift and move the pallet sofas.

Once they were in place, we were in love!

Check out my little guy chilaxin’…

A Summer Essential for the patio or deck: an Outdoor Pallet Sofa - Easy to make and costs less than 5 dollars!

Heaven.

A Summer Essential for the patio or deck: an Outdoor Pallet Sofa - Easy to make and costs less than 5 dollars!

A Summer Essential for the patio or deck: an Outdoor Pallet Sofa - Easy to make and costs less than 5 dollars!

One more step we could have taken, but haven’t (yet or maybe never) is to paint or stain the pallets.  They certainly don’t need to be left the raw wood, it just depends on the look you desire.

A Summer Essential for the patio or deck: an Outdoor Pallet Sofa - Easy to make and costs less than 5 dollars!

A Summer Essential for the patio or deck: an Outdoor Pallet Sofa - Easy to make and costs less than 5 dollars!

I’m sure you’re wondering about the cushions. Right?  Boy, they were difficult to find.  I found lots of cushions, but they were all too $$$.  The tricky part was the seat depth of the pallet sofa which is 30″.  It’s the perfect spot for lounging and napping (you’ll never want to get up), but finding a cushion to fit was rough.  In the end, I ended up finding these oversized seat-with-back-cushions at Lowes.  They were a bit pricey at $55/each, but they are mega thick and durable.  They’ve been left in the rain a few times and survived, thankfully.  With the cushy back, they fit just right for the 30″ depth.

A Summer Essential for the patio or deck: an Outdoor Pallet Sofa - Easy to make and costs less than 5 dollars!

With 3 cushions across, they were just the right size to allow for some extra room on the ends of the pallets to rest a drink & drink tray.

A Summer Essential for the patio or deck: an Outdoor Pallet Sofa - Easy to make and costs less than 5 dollars!

Even though it’s been practically raining every day, I have been totally loving our new deck space.  Many a days ahead will be spent snoozing lounging!  A more thorough deck tour to come – I promise!  Until then, you’ve gotta make this pallet sofa!

DIY: Mason Jar Terrarium

#DIY: Mason Jar Terrarium tutorial by @Jenna_Burger, www.jennaburger.com

How fun are terrariums…

A collection of potted plants in a cute glass jar.  Yes, I’ll take it!

My guy + I got our hands dirty the other day making these small terrariums using mason jars.  Come have a look…

#DIY: Mason Jar Terrarium tutorial by @Jenna_Burger, www.jennaburger.com

Mason Jar Terrarium

Supplies Needed:

  • Glass Mason Jars
  • Small rocks
  • Terrarium style plants
  • Miracle-Gro Potting Mix
  • Moss
  • Rocks
  • Gardening tools

#DIY: Mason Jar Terrarium tutorial by @Jenna_Burger, www.jennaburger.com

I’m love hoarding collecting used glass jars.  Whether from apple sauce, tomato sauce, jelly, etc., glass jars never get thrown out in our house.

1. To start off, I took a bunch of glass mason jars and put about a 1/2″ layer of small rocks on the bottom.

#DIY: Mason Jar Terrarium tutorial by @Jenna_Burger, www.jennaburger.com

2. We then added a 1″ layer of Miracle Gro potting soil on top of the layer of rocks.

#DIY: Mason Jar Terrarium tutorial by @Jenna_Burger, www.jennaburger.com

3. We then took our plant, gently broke up the roots, and used a small section of the plant for our glass mason jar.

#DIY: Mason Jar Terrarium tutorial by @Jenna_Burger, www.jennaburger.com

This is where little hands come in handy.

4. My little guy snuggled the roots into the soil.

#DIY: Mason Jar Terrarium tutorial by @Jenna_Burger, www.jennaburger.com

5. Add a layer of moss (which we got from our backyard)

#DIY: Mason Jar Terrarium tutorial by @Jenna_Burger, www.jennaburger.com

#DIY: Mason Jar Terrarium tutorial by @Jenna_Burger, www.jennaburger.com

6. And finished it off with some water.

#DIY: Mason Jar Terrarium tutorial by @Jenna_Burger, www.jennaburger.com

The result?  A beautiful and easy-to-make, easy-to-maintain plant project to enjoy in the Summer or all year round.

#DIY: Mason Jar Terrarium tutorial by @Jenna_Burger, www.jennaburger.com

#DIY: Mason Jar Terrarium tutorial by @Jenna_Burger, www.jennaburger.com

#DIY: Mason Jar Terrarium tutorial by @Jenna_Burger, www.jennaburger.com

If you want to keep the Mason Jar Terrarium contained (less water will be needed), then use the cap from the glass jar.  This is from a used tomato sauce jar…

#DIY: Mason Jar Terrarium tutorial by @Jenna_Burger, www.jennaburger.com

So fun, right?! With the kids out of school and the chaos of Summer, the time I have to devote to the garden is very little.  Thankfully with Miracle-Gro’s new venture, The Gro Project, there is no more worry or need for gardening to be difficult.  The Gro-Project showcases fun garden projects, similar to what I created, that are easy, manageable, and that even a gal like me can tackle!

Happy Summer with a plethora of fun AND easy outdoor gardening projects!


An Easy Upgrade for a Small Space

Large mudrooms with a plethora of storage and plenty of seating are desired by most, but not a reality for many (myself included).  When I was in need of more storage in my small entryway, I decided to take advantage of the 30″ wide wall behind the front door to create more space for coats and our everyday wares.

When we first moved into our home, I had made the front closet a dual pantry / coat closet, which provided more shelf storage but cut the coat space (especially during the winter months) in half.  And even with the addition of my updated “vintage” cabinet, which holds most of the kids shoes, it just wasn’t enough.

As a growing family, we needed more space for coats, backpacks, and the every day “stuff”, so using the wall behind the entry door was the ideal spot for adding built-in coat hooks and wooden crates.

Easy Entry Upgrade with DIY built-in coat hooks and wooden crates via @Jenna_Burger, www.jennaburger.com

Before adding the built-in coat hooks, I had hung a decorative coat hanger for the kids coats. With only two hooks, it just wasn’t enough.  There was so much potential for this 30″ wide wall…

This is the wall before (and another peak at the ‘after’)…

Easy Entry Upgrade with DIY built-in coat hooks and wooden crates via @Jenna_Burger, www.jennaburger.com

The supplies I used for this project were:

  • MDF (medium density fiberboard) Board(s) cut to fit the alloted space
  • Drillable Anchors (if you can’t find a stud)
  • 1-1/2″ Wood Screws
  • Decorative Coat Hooks
  • Liquid Nails or Wood Glue
  • Drill and/or Screwdriver
  • Wood Putty / Filler

Duration of Project: 4 hours (1-2 days because of drying time for paint)
Project Difficulty: Easy to Medium
How Many People Needed: 1

To get started, I cut (2) MDF boards to size to fit the wall.  I had a few pieces leftover from a previous project, which I trimmed to fit snug on the wall from the wall edge to the door moulding.  If you’re starting the project from scratch and purchasing the boards from a home improvement store, then bring the measurements of your wall to the store and they will custom cut your pieces – this will definitely save you time and a few headaches!

Once I had the MDF boards cut, it was time to attach them to the wall.  My plan of action??  Determine the placement of the boards.  Add liquid nails to the back of each board to hold it in place, then…

Easy Entry Upgrade with DIY built-in coat hooks and wooden crates via @Jenna_Burger, www.jennaburger.comfuzzy pic – not so pretty, sorry.  You get the picture though

…making sure they were level and plumb, I was ready to…

Easy Entry Upgrade with DIY built-in coat hooks and wooden crates via @Jenna_Burger, www.jennaburger.com

…DRILL!  Once the placement of the boards was determined, I found the locations of the studs and drilled 4 holes through the board into the wall.  If you can’t find a stud, then use anchors so the boards are securely attached.

Easy Entry Upgrade with DIY built-in coat hooks and wooden crates via @Jenna_Burger, www.jennaburger.comI didn’t mention this earlier, but I installed 2 boards at different heights – One board was set lower for the kids coats and one board was set higher for the adult coats.

Once both boards were in place, I wanted to achieve a seamless look at the edges where the board meets the wall, so I used wood filled to fill in the gaps and holes.

Then it was time to paint the boards.  This step was probably the hardest because as much as I wanted to make this a fun and funky spot, I also didn’t want to draw any more attention than needed.  After much thought, I decided to simply paint the boards the same color as the existing wall, so it would  blend in, but also provide the function that our family needed.

Easy Entry Upgrade with DIY built-in coat hooks and wooden crates via @Jenna_Burger, www.jennaburger.com

To add the finishing and most important touches, I completed my built-in coat rack with hooks.

Installing the hooks was real easy!

Easy Entry Upgrade with DIY built-in coat hooks and wooden crates via @Jenna_Burger, www.jennaburger.com

Easy Entry Upgrade with DIY built-in coat hooks and wooden crates via @Jenna_Burger, www.jennaburger.com

And my newly created coat hooks were complete!

Easy Entry Upgrade with DIY built-in coat hooks and wooden crates via @Jenna_Burger, www.jennaburger.com

Since this project was completed, the remainder of the space got a makeover too, including a new floor and freshly painted mouldings.

Once those DIY projects were complete, I wanted to make the space even more functional so I added wooden crates.  I purchased the already stained wood crates from a local thrift store, but I’ve seen similar unfinished styles at AC Moore and Micheals.

I stacked 2 wood crates in the corner and one to the right to create a stepped effect.  The crates are ideal for holding / storing bins, baskets, boots, bookbags, and last minute run-out-the-door essentials.

Easy Entry Upgrade with DIY built-in coat hooks and wooden crates via @Jenna_Burger, www.sasinteriors.net

What I love about the wooden crates is that they can be moved, rearranged, or simply taken away in no time.  But right now, they are the perfect addition for our newly well-functioning entry!

Easy Entry Upgrade with DIY built-in coat hooks and wooden crates via @Jenna_Burger, www.jennaburger.com

Even though it’s essentially a small space at 30″ wide, it’s SO USEFUL!

I also added this cute sign that I found at Hobby Lobby and thought it had such a darling saying, “Do the kindest things in the kindest ways”…  something we strive for everyday!

Easy Entry Upgrade with DIY built-in coat hooks and wooden crates via @Jenna_Burger, www.jennaburger.com

This spot has really been a great addition to our front entry.

Do you have a large mudroom?  If not, how have you maximized your front entry space?  Do you have any built-ins or do you have built-in coat hangers?

How-To Stain a Wood Deck

For the past few years, we knew something major had to happen with our exterior wood deck, but with SO much work (most of it do-it-yourself projects) to do in other areas of the yard, it kept being put on the back-burner.  Well… Baby didn’t want to be put in the corner no more (I know, that was cheesy), so this year was the year for a makeover.  And boy does she look smokin’…

How to Stain a Wood Deck - Before and After Wood Deck Makeover

I think (well, actually I know) one of the hesitations of the deck was the process.  Well, so I thought.  Honestly, it was so much easier and more manageable than I ever thought possible.  One of the major reasons for that was the use of a hand sprayer. WOW, was spraying easier than hand rolling and/or brushing.  We did that last year with the exterior fence and boy did it take ALL SUMMER LONG.

With a sprayer, the stain is applied (slightly) thicker and the coverage is much more even.  But best of all, it takes way less time and is much less labor intensive.

Before we get to any more of the process or the after pictures, here is what the deck looked like before.

How to Stain a Wood Deck - Before and After Wood Deck Makeover

How could a deck get so bad?  I dunno!  Living in this house for only 3 years, I have no clue as to when the last time the deck was done.  Also come to find out, the deck was previously painted, not stained.  Paint on the outside (especially if it’s not the right paint) does not last nearly as long as stain.  Also if you take a look, the spindles were white and after looking closely, they were only primed.  What I suspect happened, is that when the deck was painted last, someone got lazy, and only went as far as painting the deck surface and the handrail around.  Geesh.

Learning from that, for this before and after deck makeover project, we decided to use Cabot Solid Stain.  Because we were applying it over a painted surface and didn’t want to sand down to the raw wood, a solid stain seemed like the best choice.  Cabot is known for their quality wood products, so there was no doubt that they’d definitely get the job done (after being a disaster for so long)!

How to Stain a Wood Deck - Before and After Wood Deck Makeover

Supplies for staining a deck:

  • Stain (I used a solid stain, but also available are wood tone finishes, semi-transparent finishes, and semi-solid finishes)
  • Tools to clean / prep the deck surface (I used a power washer, as well as a bristle brush to get dirt off, as well as flaking wood chips)
  • Sprayer (this is a great one that I would recommend <=affiliate link)
  • Plastic wrap (for protecting areas you don’t want stained)

1. To start off it’s a must to give the deck a good cleaning.  Whether previously coated or bare wood, cleaning the wood deck surface is the MOST IMPORTANT step of the staining process.  A few weeks ago, I borrowed our neighbors power washer and went to town on it.  It was amazing how much dirt and mildew washed away with a quick sweep of the hose. Plus all the chipped and peeling paint was stripped right off.  Because of the power washers strength, it really made a nice clean surface for staining.

How to Stain a Wood Deck - Before and After Wood Deck Makeover

A brush like this with firm bristles is great for removing excess dirt and peeling wood chips.  This was used right before the staining process started.

How to Stain a Wood Deck - Before and After Wood Deck Makeover

2. The house and areas we didn’t want touched were covered with clear plastic wrap.

How to Stain a Wood Deck - Before and After Wood Deck Makeover

3. With the wood deck clean and completely dry, we started staining using a hand sprayer.

How to Stain a Wood Deck - Before and After Wood Deck Makeover

JUST LIKE with spray painting, the key to hand spraying is to:

  • Shake Shake Shake the stain before applying
  • Spray about 7-10″ away for the surface
  • Move back and forth in a steady, rapid motion in the same direction as the wood grain
  • Don’t concentrate the nozzle in any one place at any given time
  • Start spraying in a conspicuous spot (in case is spatters at the start), then continue in a consistent sweep
  • Wear a mask – the fumes aren’t great to breathe in

Most importantly (which has nothing to do with hand spraying, but with staining in general), read the directions.  Apply only the recommended number of coats and be sure not to overapply.

How to Stain a Wood Deck - Before and After Wood Deck Makeover

I will be honest, we had someone help us with the deck (due to lack of time) and he used a more powerful hand sprayer.  Even though it’s smaller, the one I mentioned above would still work great for a deck or fence.  Same rules applies.

And then it was done.

How to Stain a Wood Deck - Before and After Wood Deck Makeover

Let the SUMMER BEGIN!

How to Stain a Wood Deck - Before and After Wood Deck Makeover

I can not wait to get this deck filled with my Summer Essentials – a spot to  eat, a spot to grill, and of course a spot to relax!

How to Stain a Wood Deck - Before and After Wood Deck Makeover

The details on the stain…

I wanted a darker color for the deck so it would stand out against the neutral taupe / beige siding.  As I mentioned before, I decided on a solid stain because I wanted to skip the process of stripping the deck.  I chose Burnt Hickory for the color.  It’s perfect.  I was worried that it would be too dark, but it’s just the right depth of color that I was looking for.

O, you just wait to see what’s coming…  It’s going to be a party deck before you know it!

How to Stain a Wood Deck - Before and After Wood Deck Makeover

Huge difference, right?!

And about 24-48 hours, the deck was ready to use and being transformed as we speak.  Many more deck details to come.  Overall, the process of staining the deck wasn’t at all as difficult as I had envisioned.  Yes it was time consuming.  Yes, it was laborious.  But all well worth it to get this finished look!

Have you ever stained a deck or fence before?  If so, how was your experience?  And how was the result?

Disclosure: Cabot has provided me product for my project.  No one told me what to create, what to buy, how to use the product, or what to write.  All opinions are 100% mine! I truly believe Cabot has a great selection of wood staining products.

Powder Room Remodel: Repairing Wall and Hanging Wallpaper

Between baseball, a birthday party, and celebrating Mother’s Day (shout out to all the moms out there – hope you had a great day), there was very little time to actually get anything major accomplished on the DIY homefront this weekend.  BUT, somehow with 5 minutes here and 10 minutes there, I was able to squeeze in a few trips to Lowe’s (for supplies) and a few moments to hang wallpaper.  And thankfully with those spare moments, I actually got alot done and I feel like I’m making progress – even though it’s slow.

owder Room Remodel: Patching holes and hanging wallpaper - Follow along on this bold transformation #powderroomremodel

Since announcing the plans for the powder room and sharing details on the removal of the toilet and pedestal sink, the room has really taken a drastic turn – for the good. When I left you last, there was a huge hole in the wall from where the tile backsplash was removed and the wall colors were still orange and beige.  Well not anymore.

Before I could even think about wallpapering, the hole had to be repaired.  I’ll admit, I haven’t had the best of luck patching holes and achieving a flawless finish.  It’s definitely an art.  I’m good, but not great.  (need a great tutorial on patching holes in the wall?  check out Sawdust Girl).  THANKFULLY, most of the hole will be covered with the new vanity, so I wasn’t super obsessed with making it perfect and smooth.  To start, I grabbed  a 2′ x 2′ piece of sheetrock from Lowe’s, cut it to fit tightly in the hole (a tight fit is key), and spackled the edges.  This isn’t the best way of patching a hole, but it’s the lazy way I took – again because I know it’ll be covered with the vanity.

It took a few days for multiple thin layers of spackle and drying time before I could give the wall a good sanding.  The hand sander gave a really nice smooth finished surface.

Powder Room Remodel: Patching holes and hanging wallpaper - Follow along on this bold transformation #powderroomremodel

Once the walls were smooth and clean, I was able to paint and wallpaper the room.

I started out with painting the corners and edges at the window and door of the 3 non-wallpapered walls.

Powder Room Remodel: Patching holes and hanging wallpaper - Follow along on this bold transformation #powderroomremodel

The color is Blue Mystery by Valspar and it’s almost an exact match to the background color of the wallpaper.  Even though it’s blue, it has a deep purple / violet hue.  It’s actually a very different blue than my office, but with the foyer in between the two spaces, you can’t notice the differing tones.

Powder Room Remodel: Patching holes and hanging wallpaper - Follow along on this bold transformation #powderroomremodel

Once the walls were done, it was time to get down and dirty with wallpapering!

Powder Room Remodel: Patching holes and hanging wallpaper - Follow along on this bold transformation #powderroomremodel

How-To Wallpaper using Paste

I had thought the wallpaper I chose was a pre-pasted wallpaper (wallpaper that has paste and is activated with water) but when I added water to the back of my sample piece, I quickly learned it wasn’t.  So this was my first time wallpapering using paste.  I was apprehensive at first, but it actually wasn’t at all as difficult as I thought it would be. I wrote a tutorial a long time ago on How-To Hang Prepasted Wallpaper, if you want to check that out.

Supplies:

  • Wallpaper of your choice.  I chose Amy Butler Lacework in Midnight.
  • Wallpaper Paste
  • Smoothing Took
  • Sharp Razor or blade
  • Other handy tools for wallpapering are: a tape measure, a laser level, a pencil

Powder Room Remodel: Patching holes and hanging wallpaper - Follow along on this bold transformation #powderroomremodel

1. To start, I found the center of the wall and made a mark.  Then knowing the width of the roll (20.2″), I determined how far over the edge would need to start (1/2 of the overall which is 10.1″).  I made another mark and used my laser level to make marks all the way up the wall (which will be the location for the edge of the wallpaper).

Powder Room Remodel: Patching holes and hanging wallpaper - Follow along on this bold transformation #powderroomremodel

2. After determining where the wallpaper edge would be placed, I added the wallpaper paste to the center section of the wall using a brush.

Powder Room Remodel: Patching holes and hanging wallpaper - Follow along on this bold transformation #powderroomremodel

* There are several techniques to hanging wallpaper, but I thought it would be best to follow the steps that came with my wallpaper roll.  Another method that is readily used is to apply the paste to the wallpaper back, fold over both ends of the strip (being careful not to crease the paper) so that they meet in the middle.  This gives the paste a chance to activate.  Again, the instructions with my wallpaper said to apply the paste directly to the wall, which is what I did.  If you want to see more on the other application, I found this helpful step by step method.

3. After the paste was applied, I took the end of the wallpaper roll (leaving about 3″ extra at the top) and adhered it to the wall aligning the edge with the mark I made on the wall.  Then continued to roll it out down the wall.

Powder Room Remodel: Patching holes and hanging wallpaper - Follow along on this bold transformation #powderroomremodel

4. As I was adhering the paper to the wall, I used the smoothing tool to eliminate the bumps, wrinkles, and air bubbles.  It’s best to start at the top and move down the wall, as well as from the center of the paper and smooth out towards the edges.  You want to press firmly, but not too hard so all the glue seeps out.  Alittle glue seepage is okay and expected.

Powder Room Remodel: Patching holes and hanging wallpaper - Follow along on this bold transformation #powderroomremodel

5. Once the first panel was hung, it was time to hang the second adjacent sheet.  The same steps should be taken, but this time it’ll be key to align the seams so the design / pattern matches (especially with the paper I was using).

Powder Room Remodel: Patching holes and hanging wallpaper - Follow along on this bold transformation #powderroomremodelphoto credit: my 7 year old!

6. Once the paper is up and in place, it’s time to trim – the ceiling, edges, and base. Using a sharp blade / razor, follow the crease / edge and gently cut the paper.  It might be damp from the paste, so try not to pull the paper because it’ll rip.  Scissors also help.

Powder Room Remodel: Patching holes and hanging wallpaper - Follow along on this bold transformation #powderroomremodel

I also had to trim around the light fixture…  that’s to come.

Powder Room Remodel: Patching holes and hanging wallpaper - Follow along on this bold transformation #powderroomremodel

And the result is…

…a beautiful, bold focal wall!

Powder Room Remodel: Patching holes and hanging wallpaper - Follow along on this bold transformation #powderroomremodel

The quality of this paper is amazing.  Comparing it to the previous time when I wallpapered, this paper is alot heavier which hides many of the imperfections on the wall – score!

Powder Room Remodel: Patching holes and hanging wallpaper - Follow along on this bold transformation #powderroomremodel

Not to shabby going from this…  to this…

Powder Room Remodel: Patching holes and hanging wallpaper - Follow along on this bold transformation #powderroomremodel

Plan of Action for #powderroomremodel:

  • Choose and buy sink
  • Choose and buy toilet
  • Choose and buy faucet
  • Remove sink
  • Remove toilet
  • Repair hole with new sheetrock
  • Repair floor @ sink and toilet
  • Hang wallpaper
  • Paint
  • Add crown moulding (yes, my 1st moulding ever)
  • Assemble sink
  • Install sink and faucet
  • Install toilet
  • Accessorize – mirror, pictures, etc.

7 items crossed off the list since last time.  Now that’s progress!

But there’s still more to come. Stay Tuned.

Have you ever hung wallpaper?  What method did you use?  Was it pre-paste or the kind where you had to add the paste?

Craft Room: Progress Update 1

This morning, I mentioned that I was headed out early for a site visit to check on the progress of the mega craft room /office space that I’ve been working on for the last few months.  It’s a local project which I shared details about a few weeks ago and the transformation has been amazing.

In the last post about this project, the construction hadn’t even begun, but since then alot has happened, including:

  • Removal of the popcorn ceiling
  • Removal of old carpet and installation of new hardwood floor (in this room and throughout the entire house)
  • Removal of old window treatments
  • New recessed lighting / hi-hats
  • New painted walls
  • New crown moulding
  • And last, but not least GORGEOUS NEW BUILT-INS!

Here are some progress pictures…

Craft Room: Progress of Client Project _ Designed by @Jenna_Burger

Still in progress, but better than before…

Creative and Inspiring Craft Room Mood Board by @Jenna_Burger, WWW.JENNABURGER.COM

Crazy that it’s the same space, right?

Here are some more teasers…

The turquoise backs are gorgeous and all those cubbies are going to give plenty of room for storage!

Wait until you see what is going on the sides of that awesome built-in. {Major Goodness}

Craft Room: Progress of Client Project _ Designed by @Jenna_Burger

This is a view from the craft studio into the office.  It used to be a small doorway, but now it’s a large opening that lets in a huge amount of light and gives a unified flow to the overall space.

Craft Room: Progress of Client Project _ Designed by @Jenna_Burger

More turquoise.  This is just the beginning of how fabulous this room is going to look…

Craft Room: Progress of Client Project _ Designed by @Jenna_Burger

And the bench.  A 6′ long X 30″ deep heavenly haven.  Don’t you want one of these for your home??  And the little book nook is adorbs!

Craft Room: Progress of Client Project _ Designed by @Jenna_Burger

Last but not least, a few of the details.

Like the chandelier…

Craft Room: Progress of Client Project _ Designed by @Jenna_BurgerDoes it get better?!

And this darling fuschia C-table.  How can you not love it.  The fabulous contractor that I’m working with built-in using these Ana White plans. I so want one for myself!

Craft Room: Progress of Client Project _ Designed by @Jenna_Burger

More updates to come soon!

DIY: Vertical Pallet Garden

The warmer weather has got me movin’ and groovin’ outdoors.  This past weekend I got my DIY mojo on for this months Lowe’s challenge and created (what I think) is something pretty cool.  Check out my newly created Vertical Pallet Garden using colorful pots…

DIY: Vertical Pallet Garden by @Jenna_Burger, WWW.JENNABURGER.COM

Though the flowers are finally starting to peak through around the yard, I was in need of color NOW to start decorating my front porch for Spring.  I, of course, hit up my local Lowe’s garden center to get my color fix.  It’s still the early days of Spring, so the selection (at my local Lowe’s in NY) was limited, but I was able to find a few perennials for shaded areas that would be ideal for under the front covered porch.  I chose a few colorful perennials & vines because they could easily be transplanted to the garden at the end of the season (smart & savvy thinking).

Pallets have been all-the-rage for a while, but I just don’t get tired of them – probably because they’re free.  I’ve created so many DIY projects with pallets and I just love their old, worn texture and aesthetic.  When thinking about this seasons porch, my major desire was to add height.  Height = drama, and that was my goal. 

DIY: Vertical Pallet Garden by @Jenna_Burger, WWW.JENNABURGER.COM

For this project, the materials I used were:

  • Pallet (which I snagged – with their permission of course – for free in the back on my local Lowe’s)
  • (4) Eye hooks for 100 lbs+
  • 3′ of metal chain
  • Plastic pots (I used lime green and turquoise from Lowe’s)
  • Drill with 1/4″ drill bit
  • 3″ S hooks (found in the outdoor section of Lowe’s)
  • Vise Grip

DIY: Vertical Pallet Garden by @Jenna_Burger, WWW.JENNABURGER.COM

Here’s the DL (downlow for short) on how I created the Vertical Pallet Garden

1. At the top of the pallet (slats oriented horizontally), screw in (1) eye hook at about 2-3″ in from each end. It’s best to start out by using a large nail to start the hole.  Once the hole is started, screw in the eye hooks with the help of a vise grip to get leverage.  Unless you’re the Hulk, it’ll probably be impossible with just your bare hands.

2. With the Misters help, we then unlinked one of the chain links and linked it through the eye hook. (one side only – the other side has to wait until hung)

DIY: Vertical Pallet Garden by @Jenna_Burger, WWW.JENNABURGER.COM

3. Heading over to the house, we installed the eye hooks (using a drill to start the hole) through the siding and into the house about 2″ below the ceiling plane at the same distance apart as the hooks in the pallet.

DIY: Vertical Pallet Garden by @Jenna_Burger, WWW.JENNABURGER.COM

4. Once the eye hooks were in, we took the loose end of the chain of the pallet, slipped it through the eye hooks, and secured the chain on the other side.

DIY: Vertical Pallet Garden by @Jenna_Burger, WWW.JENNABURGER.COM

The pallet base is complete!

DIY: Vertical Pallet Garden by @Jenna_Burger, WWW.JENNABURGER.COM

Then it was time to create the “garden”.

5. Using varying sized plastic pots in fun colors, drill a 1/4″ hole about 1″ down from the top rim. Using a 3″+/- S hook, slip it through the hole.

DIY: Vertical Pallet Garden by @Jenna_Burger, WWW.JENNABURGER.COM

6. Plant the pretty flowers…

DIY: Vertical Pallet Garden by @Jenna_Burger, WWW.JENNABURGER.COM

…And it was complete!

DIY: Vertical Pallet Garden by @Jenna_Burger, WWW.JENNABURGER.COM

DIY: Vertical Pallet Garden by @Jenna_Burger, WWW.JENNABURGER.COM

DIY: Vertical Pallet Garden by @Jenna_Burger, WWW.JENNABURGER.COM

The vertical pallet garden adds so much color to the front porch.

DIY: Vertical Pallet Garden by @Jenna_Burger, WWW.JENNABURGER.COM

S-hooks make it easy to move the flower pots around or bring them into the sun.

DIY: Vertical Pallet Garden by @Jenna_Burger, WWW.JENNABURGER.COM

A beautiful focal point for the porch.

DIY: Vertical Pallet Garden by @Jenna_Burger, WWW.JENNABURGER.COM

If you’re wondering about the pretty white wreath, that was a DIY project that was featured on Jen’s blog.  It was created for Valentine’s Day, but I took off the paint chip flowers and just hung the wreath plain and simple.  Who knows how I will transform it for another holiday or season to come.

DIY: Vertical Pallet Garden by @Jenna_Burger, WWW.JENNABURGER.COM

I’m still working on the rest of the porch since it’s still in need of more color and pizazz.  By late May, I hope to have that done and ready to share.  Right now we’re still getting alot of rain and most nights are still way too chilly to get my gardening-on.

DIY: Vertical Pallet Garden by @Jenna_Burger, WWW.JENNABURGER.COM

I couldn’t be more thrilled with the outcome of this fun and easy DIY project.  It’s brought gorgeous height and beautiful color to my Spring front porch.

To see more creations of mine using pallets, click on the links below:
How-To Make a Pallet Shelf
Monogrammed Pallet Chevron Tray
Pallet Picture Holder
Eclectic Family Gallery Wall

Disclosure: I am part of the Lowe’s Creative Team and was provided with a Lowe’s gift card to purchase items for my project.  I was also compensated for my time to use the products.  No one told me what to create, what to buy, how to use the product, or what to write.  All opinions are 100% mine!

DIY: Stenciled Shower Curtain using Drop Cloth

I hope you’re having a wonderful week so far.  Now that I’m coming off my amazing moment high and getting back into my DIY groove, I’m excited to show you the new stenciled shower curtain panel that I recently made for the kids bathroom.

You may have seen a sneak peak of the shower curtain a few weeks ago when I shared some Spring updates.  A few of you even commented saying you loved the color choice (I do too).

It’s bright.

It’s bold.

It’s an eye-catcher…

DIY: Stenciled Shower Curtain Using Drop Cloth Material - super simple & inexpensive to create! @Jenna_Burger, SASinteriors.net

…And I made it myself.  It was super easy, inexpensive, and something you can absolutely do too!

The materials I started off with were:

  • 6′ x 9′ Canvas drop cloth (from Lowe’s)
  • Stencil – I used the same design from Cutting Edge Stencils that I used in the foyer
  • Paint – Valspar Pantone Emerald – #PN9055
  • Shower tension rod
  • Ball style shower curtain hooks
  • Foam roller
  • Tape measure
  • Scissors

Before I begin, here’s my beef with the typical store bought shower curtains… 

They’re too short.

Every shower curtain on the market is 72″ x 72″.  I like my shower curtains to sit just slightly above the floor, but then there is SO much space left above the curtain area, so it looks strange and you can see the showerhead.  You know how I feel about window panels being placed as high as they can go, well I feel the same with shower curtains.  When I redid my master bathroom, I ended up using two curtain panels to create a shower curtain.  It was an awesome solution! Since the panels were taller than a typical shower curtain, they heightened the space allowing the room to feel much larger.

That being said, this DIY drop cloth shower curtain is 7′ tall; much higher than the norm and there is only about 12″ from the top of the panel to the ceiling plane versus 24″+.

NOW, let’s begin.  Here’s how I made this dynamic shower curtain…

1. The canvas drop cloth size I found at Lowe’s was the perfect size (6′ x 9′), so there was essentially no trimming needed.  I started off by laying out the large panel on a flat surface – my kitchen /dining area is a large open space and is the ideal spot for big projects. 

I placed the stencil in the upper corner of the drop cloth and secured it with painters tape.

DIY: Stenciled Shower Curtain Using Drop Cloth Material - super simple & inexpensive to create! @Jenna_Burger, WWW.JENNABURGER.COM

2. Using the vibrant Emerald color and a foam roller, I carefully rolled the color over the stencil putting enough pressure on the roller so the paint adhered to the fabric, but not too much so the paint seeped under the stencil.  Believe me, up close it’s not perfect.

DIY: Stenciled Shower Curtain Using Drop Cloth Material - super simple & inexpensive to create! @Jenna_Burger, WWW.JENNABURGER.COM

DIY: Stenciled Shower Curtain Using Drop Cloth Material - super simple & inexpensive to create! @Jenna_Burger, WWW.JENNABURGER.COM

3. Once the first section was done, I waited about 1-2 minutes and then carefully lifted the stencil and positioned it in the right place next to the previously painted area.  The Cutting Edge Stencils designs are awesome because they create each of the stencils so it easily matches up as you move it along your painting surface.

DIY: Stenciled Shower Curtain Using Drop Cloth Material - super simple & inexpensive to create! @Jenna_Burger, WWW.JENNABURGER.COM

4. I worked my way across and down. And then…

DIY: Stenciled Shower Curtain Using Drop Cloth Material - super simple & inexpensive to create! @Jenna_Burger, WWW.JENNABURGER.COM

…realized I made a huge boo-boo!  At first, I didn’t put anything under the drop cloth and when I went to reposition it, I realized the paint seeped through.  UGH!  Thankfully it was still damp and the steamer took the paint right off.

Lesson Learned: Put something under your drop cloth before painting!

DIY: Stenciled Shower Curtain Using Drop Cloth Material - super simple & inexpensive to create! @Jenna_Burger, WWW.JENNABURGER.COMYou live and learn!

5. After the debacle, I was back on track!  Once all the stenciling was done, it was time to make the large panel into a shower curtain.   With the 6 end, I took the top edge and rolled it over about 4″ (alittle more or less is fine), and ironed a crease.  This edge will create the top part of the shower curtain.

DIY: Stenciled Shower Curtain Using Drop Cloth Material - super simple & inexpensive to create! @Jenna_Burger, WWW.JENNABURGER.COM

6. Once the crease was created, I took it over to the sewing machine and sewed the edge.  Take a look at the graphic for the specific spot to sew – this is important!

DIY: Stenciled Shower Curtain Using Drop Cloth Material - super simple & inexpensive to create! @Jenna_Burger, WWW.JENNABURGER.COM

7. Once the edge was sewn,  I layed the large panel out on the floor again.  I took the 12 ball style shower hooks and equally positioned them along the newly created hemmed edge.

DIY: Stenciled Shower Curtain Using Drop Cloth Material - super simple & inexpensive to create! @Jenna_Burger, WWW.JENNABURGER.COM

8. I marked the locations of where the ball style hooks layed.  Again, make sure they are equally spaced.

DIY: Stenciled Shower Curtain Using Drop Cloth Material - super simple & inexpensive to create! @Jenna_Burger, WWW.JENNABURGER.COM

9. Then it was time to create the hole for the ball style hook to fit into. Only trim through the first layer, not through the finished side of the panel.

DIY: Stenciled Shower Curtain Using Drop Cloth Material - super simple & inexpensive to create! @Jenna_Burger, WWW.JENNABURGER.COM

10.  Slip the hook into the hole. If you decide to tackle this project, you could create a true button opening so the fabric doesn’t fray, but I took the easy way out and didn’t, hehe.

DIY: Stenciled Shower Curtain Using Drop Cloth Material - super simple & inexpensive to create! @Jenna_Burger, WWW.JENNABURGER.COM

DIY: Stenciled Shower Curtain Using Drop Cloth Material - super simple & inexpensive to create! @Jenna_Burger, WWW.JENNABURGER.COM

It’s almost finished!

11. Once the hooks were in place, I put the curtain on the shower curtain rod.  This was the part of the project where I decided the exact length of my newly created shower curtain.  If you remember before, I mentioned I purchased a 9′ long piece of canvas drop cloth, so it definitely needed to be trimmed a bit.  Once hung, I put a few pins in to mark the finished length that I wanted.

DIY: Stenciled Shower Curtain Using Drop Cloth Material - super simple & inexpensive to create! @Jenna_Burger, WWW.JENNABURGER.COM

12. Leaving about 4″ extra to create a bottom hem, I trimmed the excess fabric.

DIY: Stenciled Shower Curtain Using Drop Cloth Material - super simple & inexpensive to create! @Jenna_Burger, WWW.JENNABURGER.COM

13. Lastly, I ironed and sewed the bottom hem so the crease was at the exact spot that I marked with the pins.

DIY: Stenciled Shower Curtain Using Drop Cloth Material - super simple & inexpensive to create! @Jenna_Burger, WWW.JENNABURGER.COM

And then it was done!  Trimmed, sewn, and sitting high on the wall.  Perfecto.

DIY: Stenciled Shower Curtain Using Drop Cloth Material - super simple & inexpensive to create! @Jenna_Burger, WWW.JENNABURGER.COM

The kids bathroom is right at the top of the stairs so this is the first sight you see. (another reason why I wanted something taller than the typical too-low shower curtains).

It surely is dynamic, fun, and unexpected!

DIY: Stenciled Shower Curtain Using Drop Cloth Material - super simple & inexpensive to create! @Jenna_Burger, WWW.JENNABURGER.COM

What a breathe of fresh air!  Don’t ya think?!  Canvas drop cloth is a favorite of mine to work with and I’m thrilled with the outcome of the project.

Here are more DIY projects I created using canvas drop cloth:
Placemats with Decorative Top Stitch
Drop Cloth Table Runner
Faux Roman Shade using Drop Cloth
Christmas Stockings
Simple Lined Window Panels with Drop Cloth Lining
Personalized Envelope Pillow