
A Simple Idea for Customizing Store Bought Curtain Panels

After more work this past weekend on the master bedroom, I can say it’s almost done and I couldn’t be happier with the overall refresh.

Everything in the space has been upcycled, repurposed, or DIYed, so essentially little $$$ (money) has been spent on jazzing it up – that’s my favorite kind of room makeover.

Today, I’m going to share the details on the new window curtain panels.  Now, you know I went darker with the focal wall, so that meant the layers in the space needed to go lighter to create balance and contrast.

I found pretty, but basic cream-colored solid velvet rod pocket curtain panels at Lowes and thought they’d be a perfect base for the room.  Of course, I couldn’t just leave them as-is and had to customize them to give them a designer, custom look.
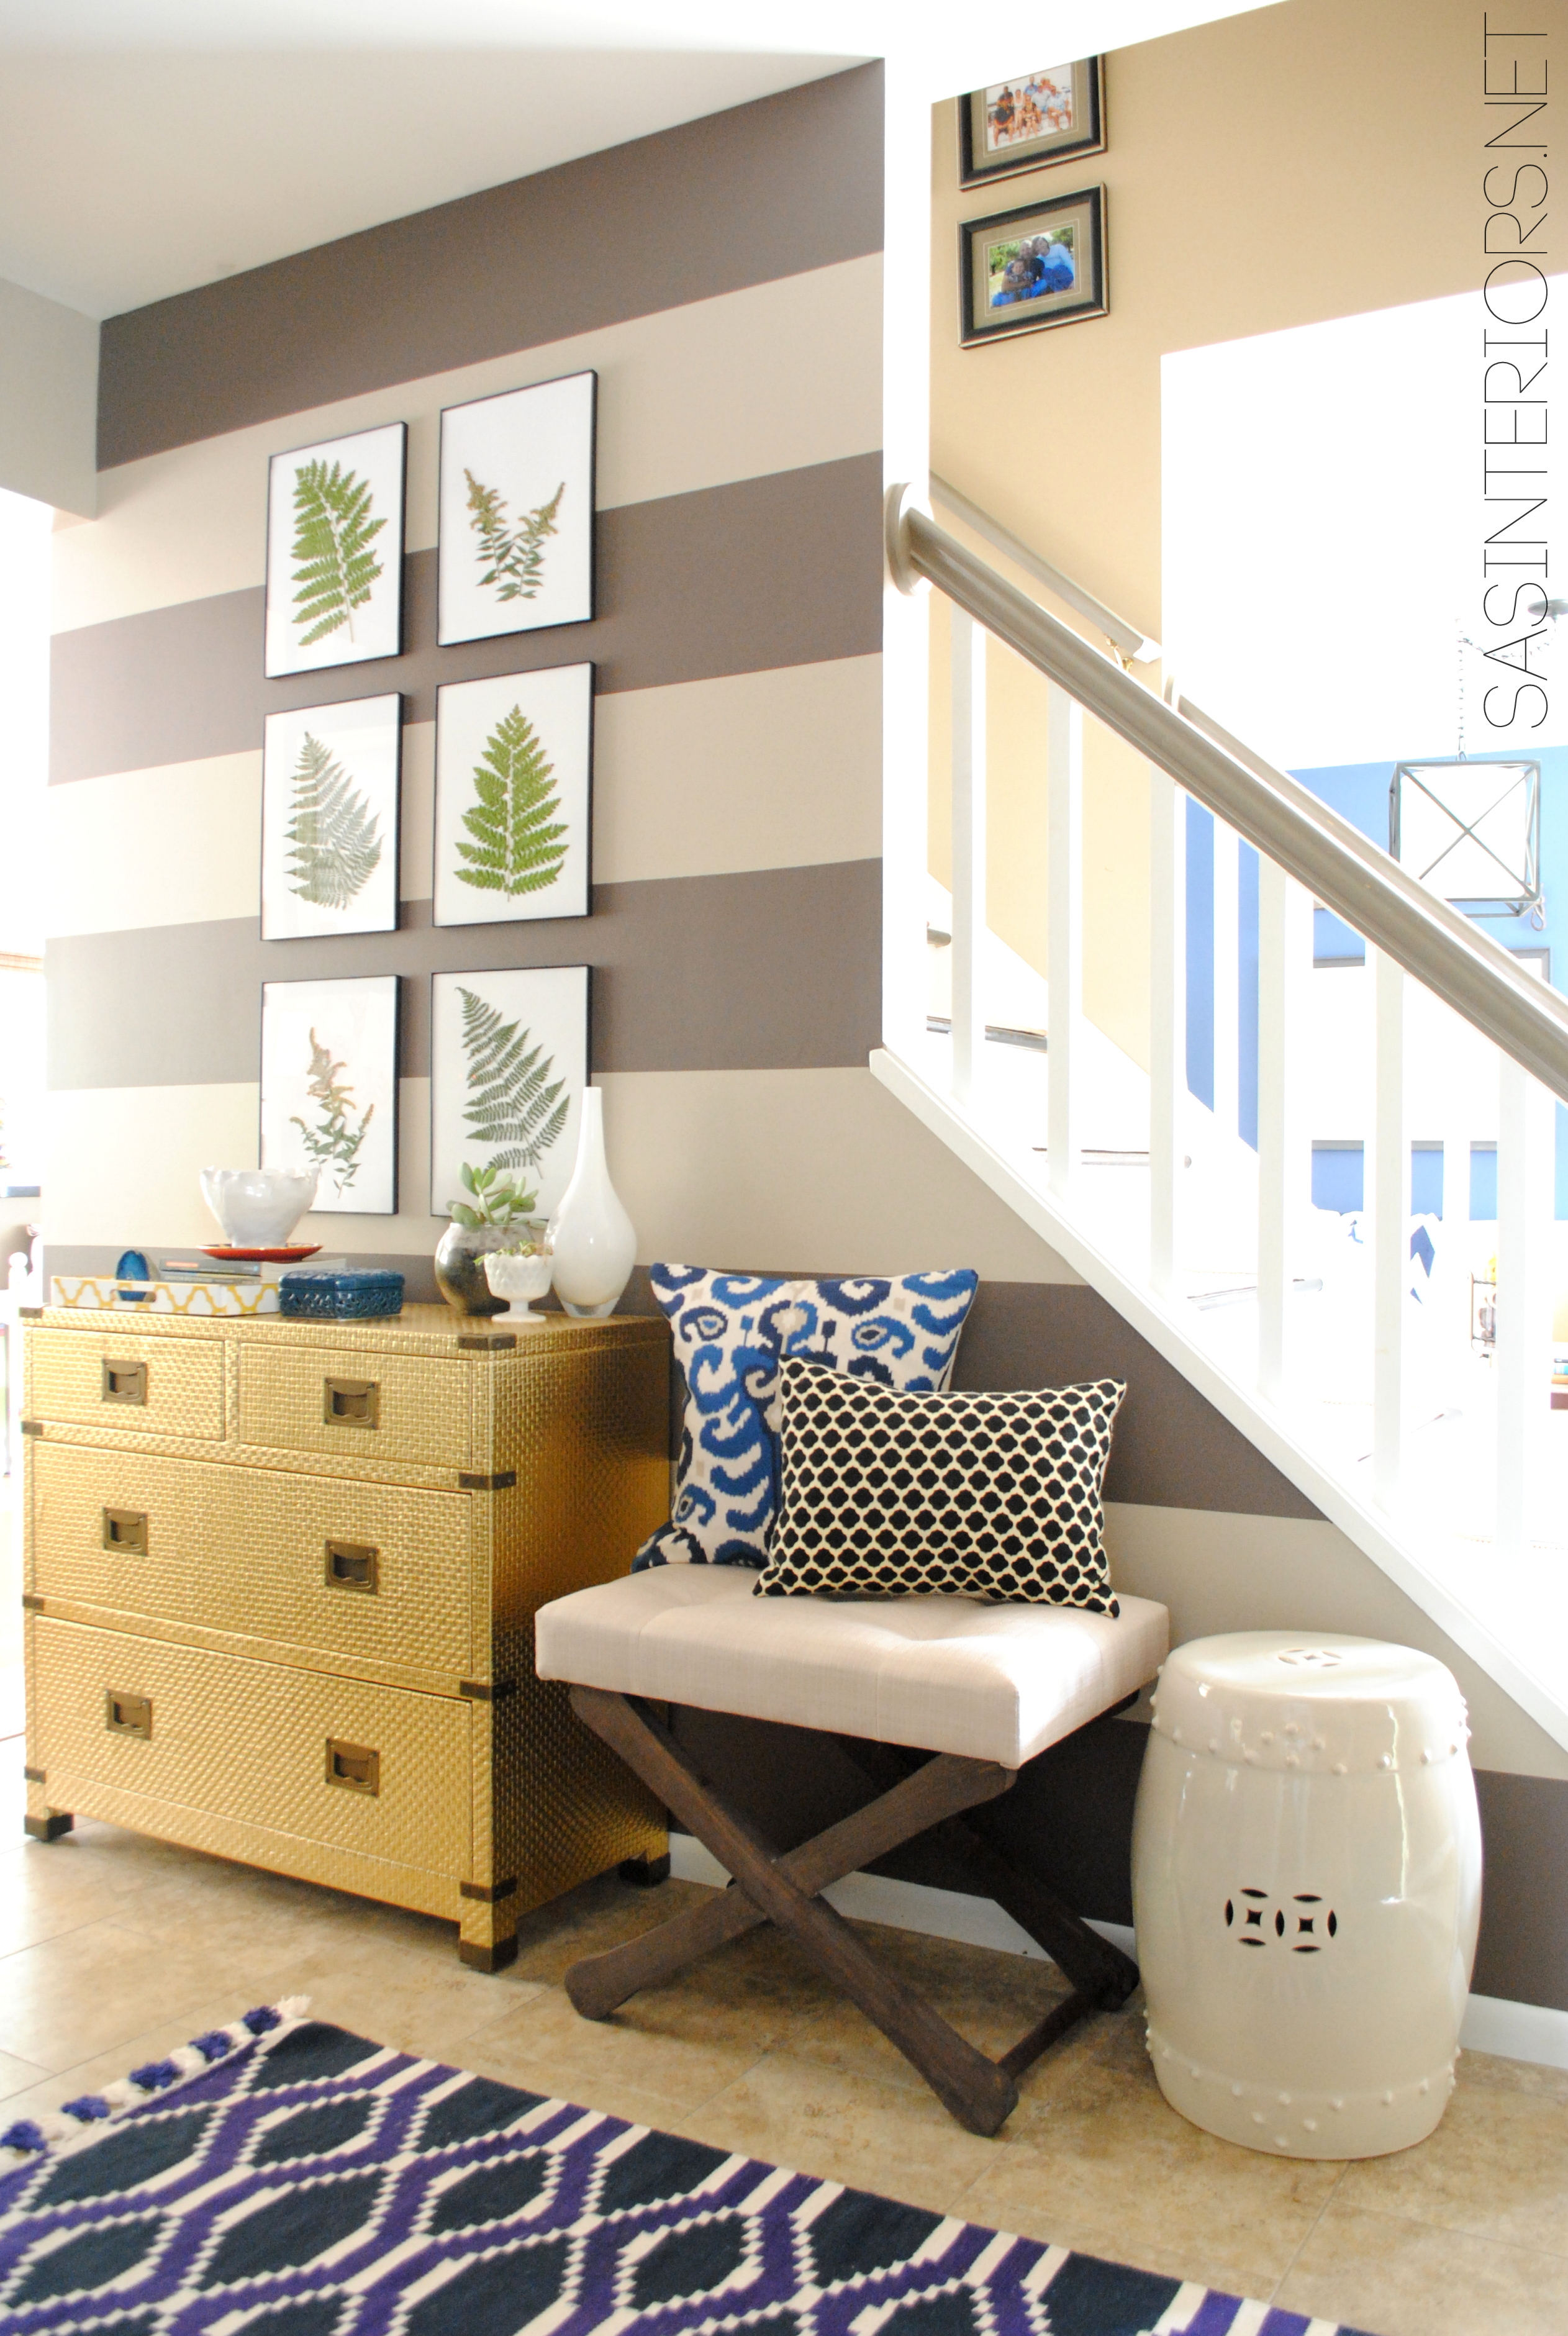
This is the result…

Add a leading edge to customize any store bought window curtain panel - Tutorial by @Jenna_Burger, www.sasinteriors.net

I forgot to snap a picture of the packaging, but believe me the ‘before’ was a simple cream-colored curtain. AND each of them were a wrinkled mess. Here is a peak at what they looked like.

Store Bought curtains 'before'

Plain Jane.

Now the ‘How-To‘ on  jazzing them up to give a custom, designer-look…

Materials Used:

  • Store Bought curtain panel(s)
  • Fabric for leading edge – 1 yd. was enough for 3 panels
  • Matching thread for leading edge fabric
  • Sewing machine
  • Iron
  • Measuring tape
  • Misc / typical sewing materials + supplies

When shopping for a leading edge fabric, I found a deep plum colored material that coordinated perfectly with some of the other accents in the room.  I purchased 1.5 yds, but only used about 1 yd.

Once I determined that I wanted to have a 3″ leading edge, I layed out the fabric and marked off, then cut every 4-1/2″.

Here is the breakdown: 3″ finished leading edge + 1/2″ seam on side edge + 1″ seam on the other edge = 4-1/2″

Add a leading edge to customize any store bought window curtain panel - Tutorial by @Jenna_Burger, WWW.JENNABURGER.COM

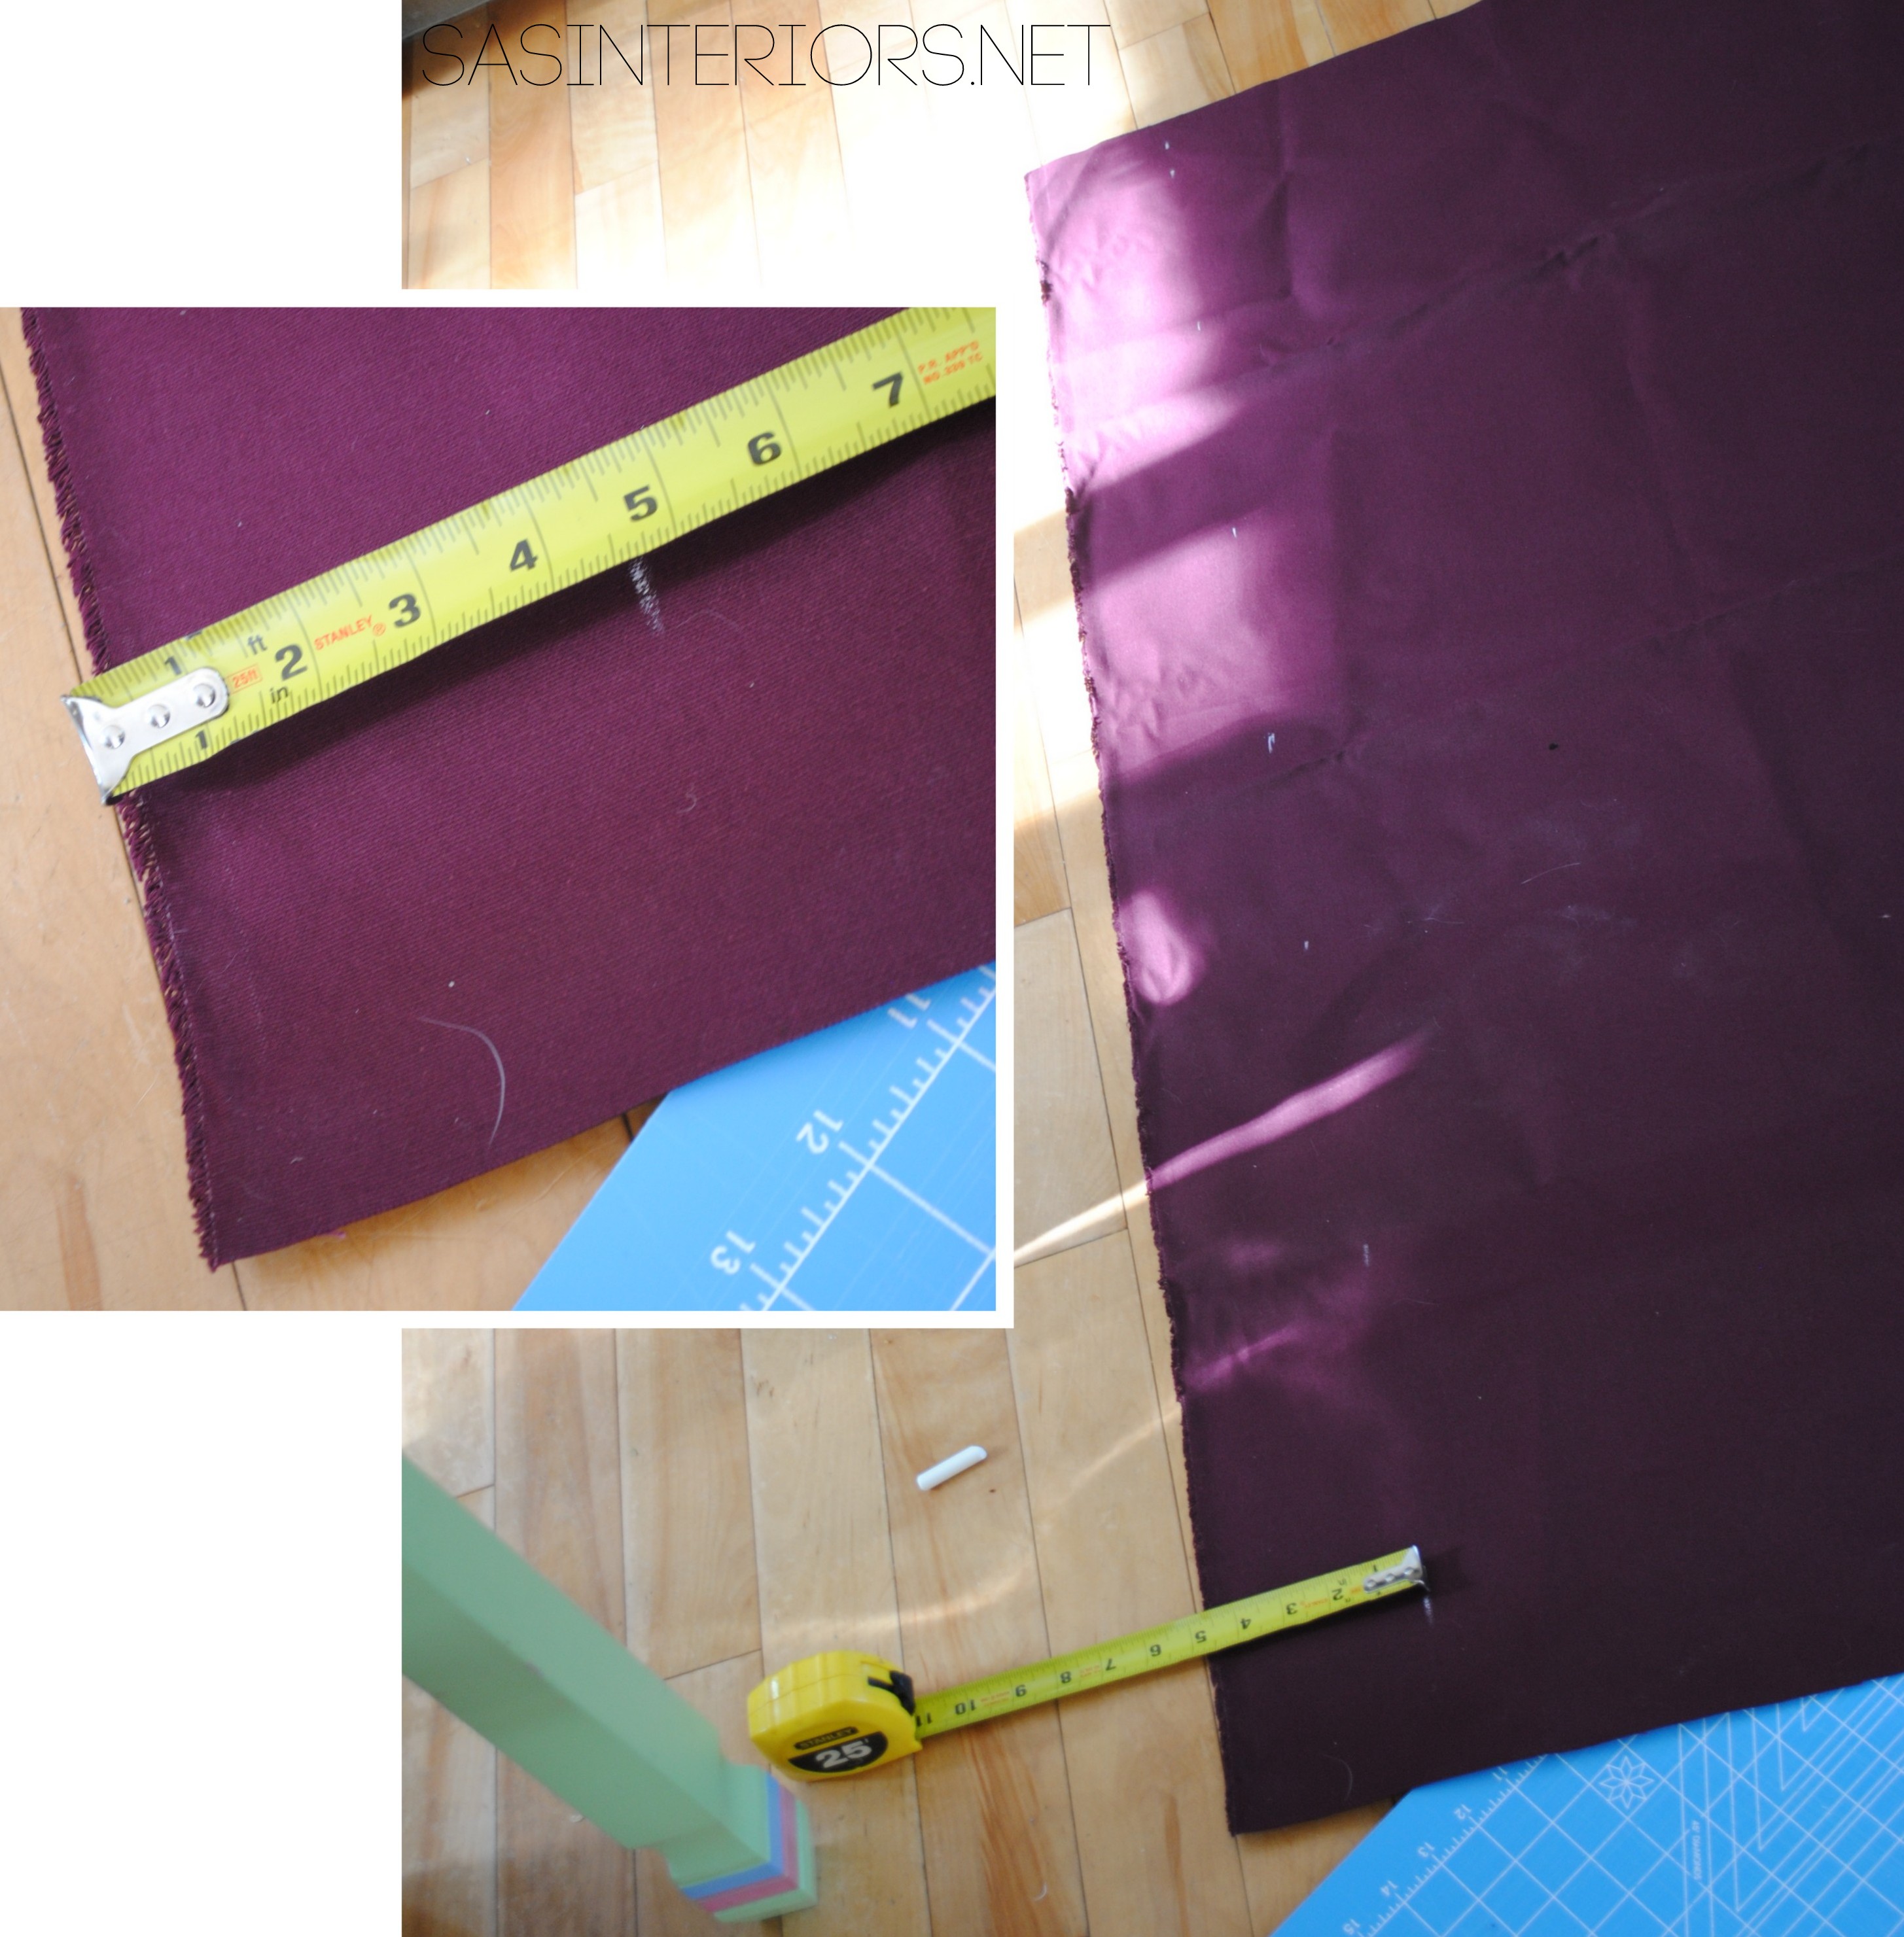
I used chalk to make the 4-1/2″ line, but a straight edge could also be used.  Then using the same straight edge or a scissor, cut the line.

Add a leading edge to customize any store bought window curtain panel - Tutorial by @Jenna_Burger, WWW.JENNABURGER.COM

One strip of fabric won’t be enough length needed to create the leading edge, so two strips will need to be sewn together to create one long strip (then depending on your panel length, you should have a longer strip than panel).

For my 3 panels, I cut 6 strips that were each 4-1/2″ wide, then put 2 of the ends together and sewed them.

Add a leading edge to customize any store bought window curtain panel - Tutorial by @Jenna_Burger, WWW.JENNABURGER.COM

Add a leading edge to customize any store bought window curtain panel - Tutorial by @Jenna_Burger, www.sasinteriors.net

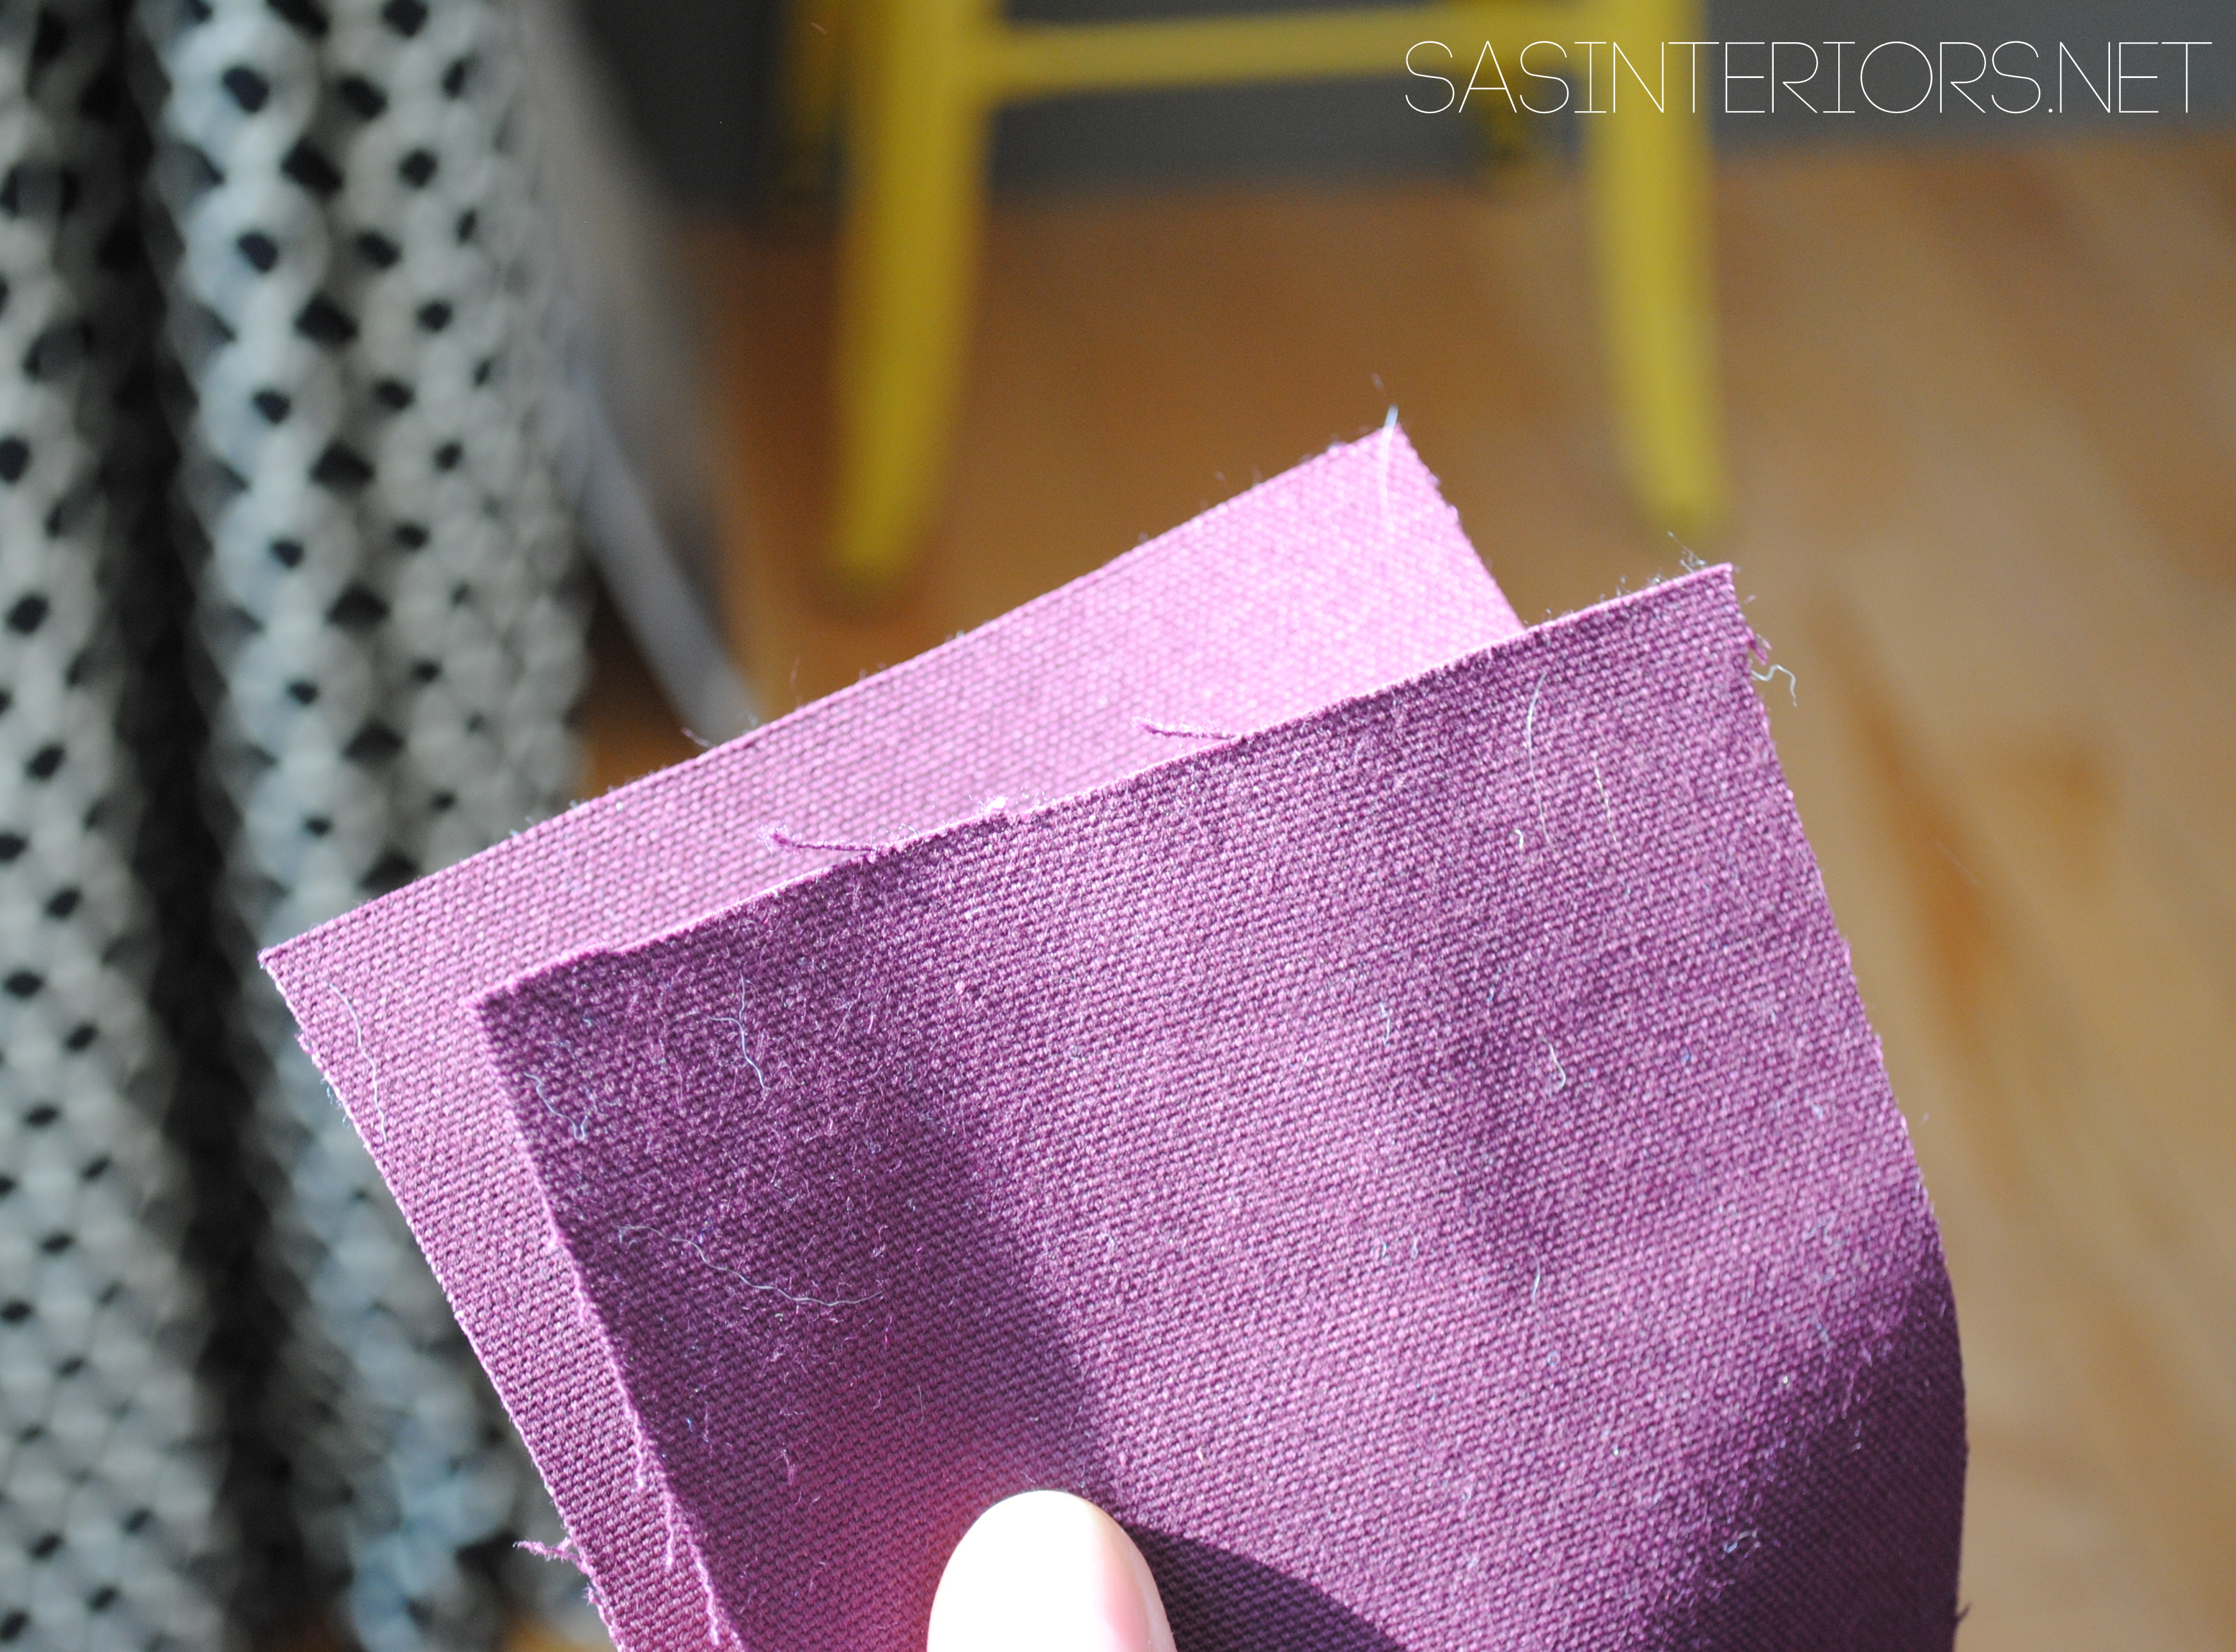
Once the longer 3 strips were made, it was time to iron the edges to create (1) side that has a 1/2″ seam and (1) side that has a 1″ seam.

I used a tape measure to make sure my 3″ was consistent throughout the entire strip.

Add a leading edge to customize any store bought window curtain panel - Tutorial by @Jenna_Burger, www.sasinteriors.net

Once the 3 strips were ironed, it was time to attach them to the curtain panel.

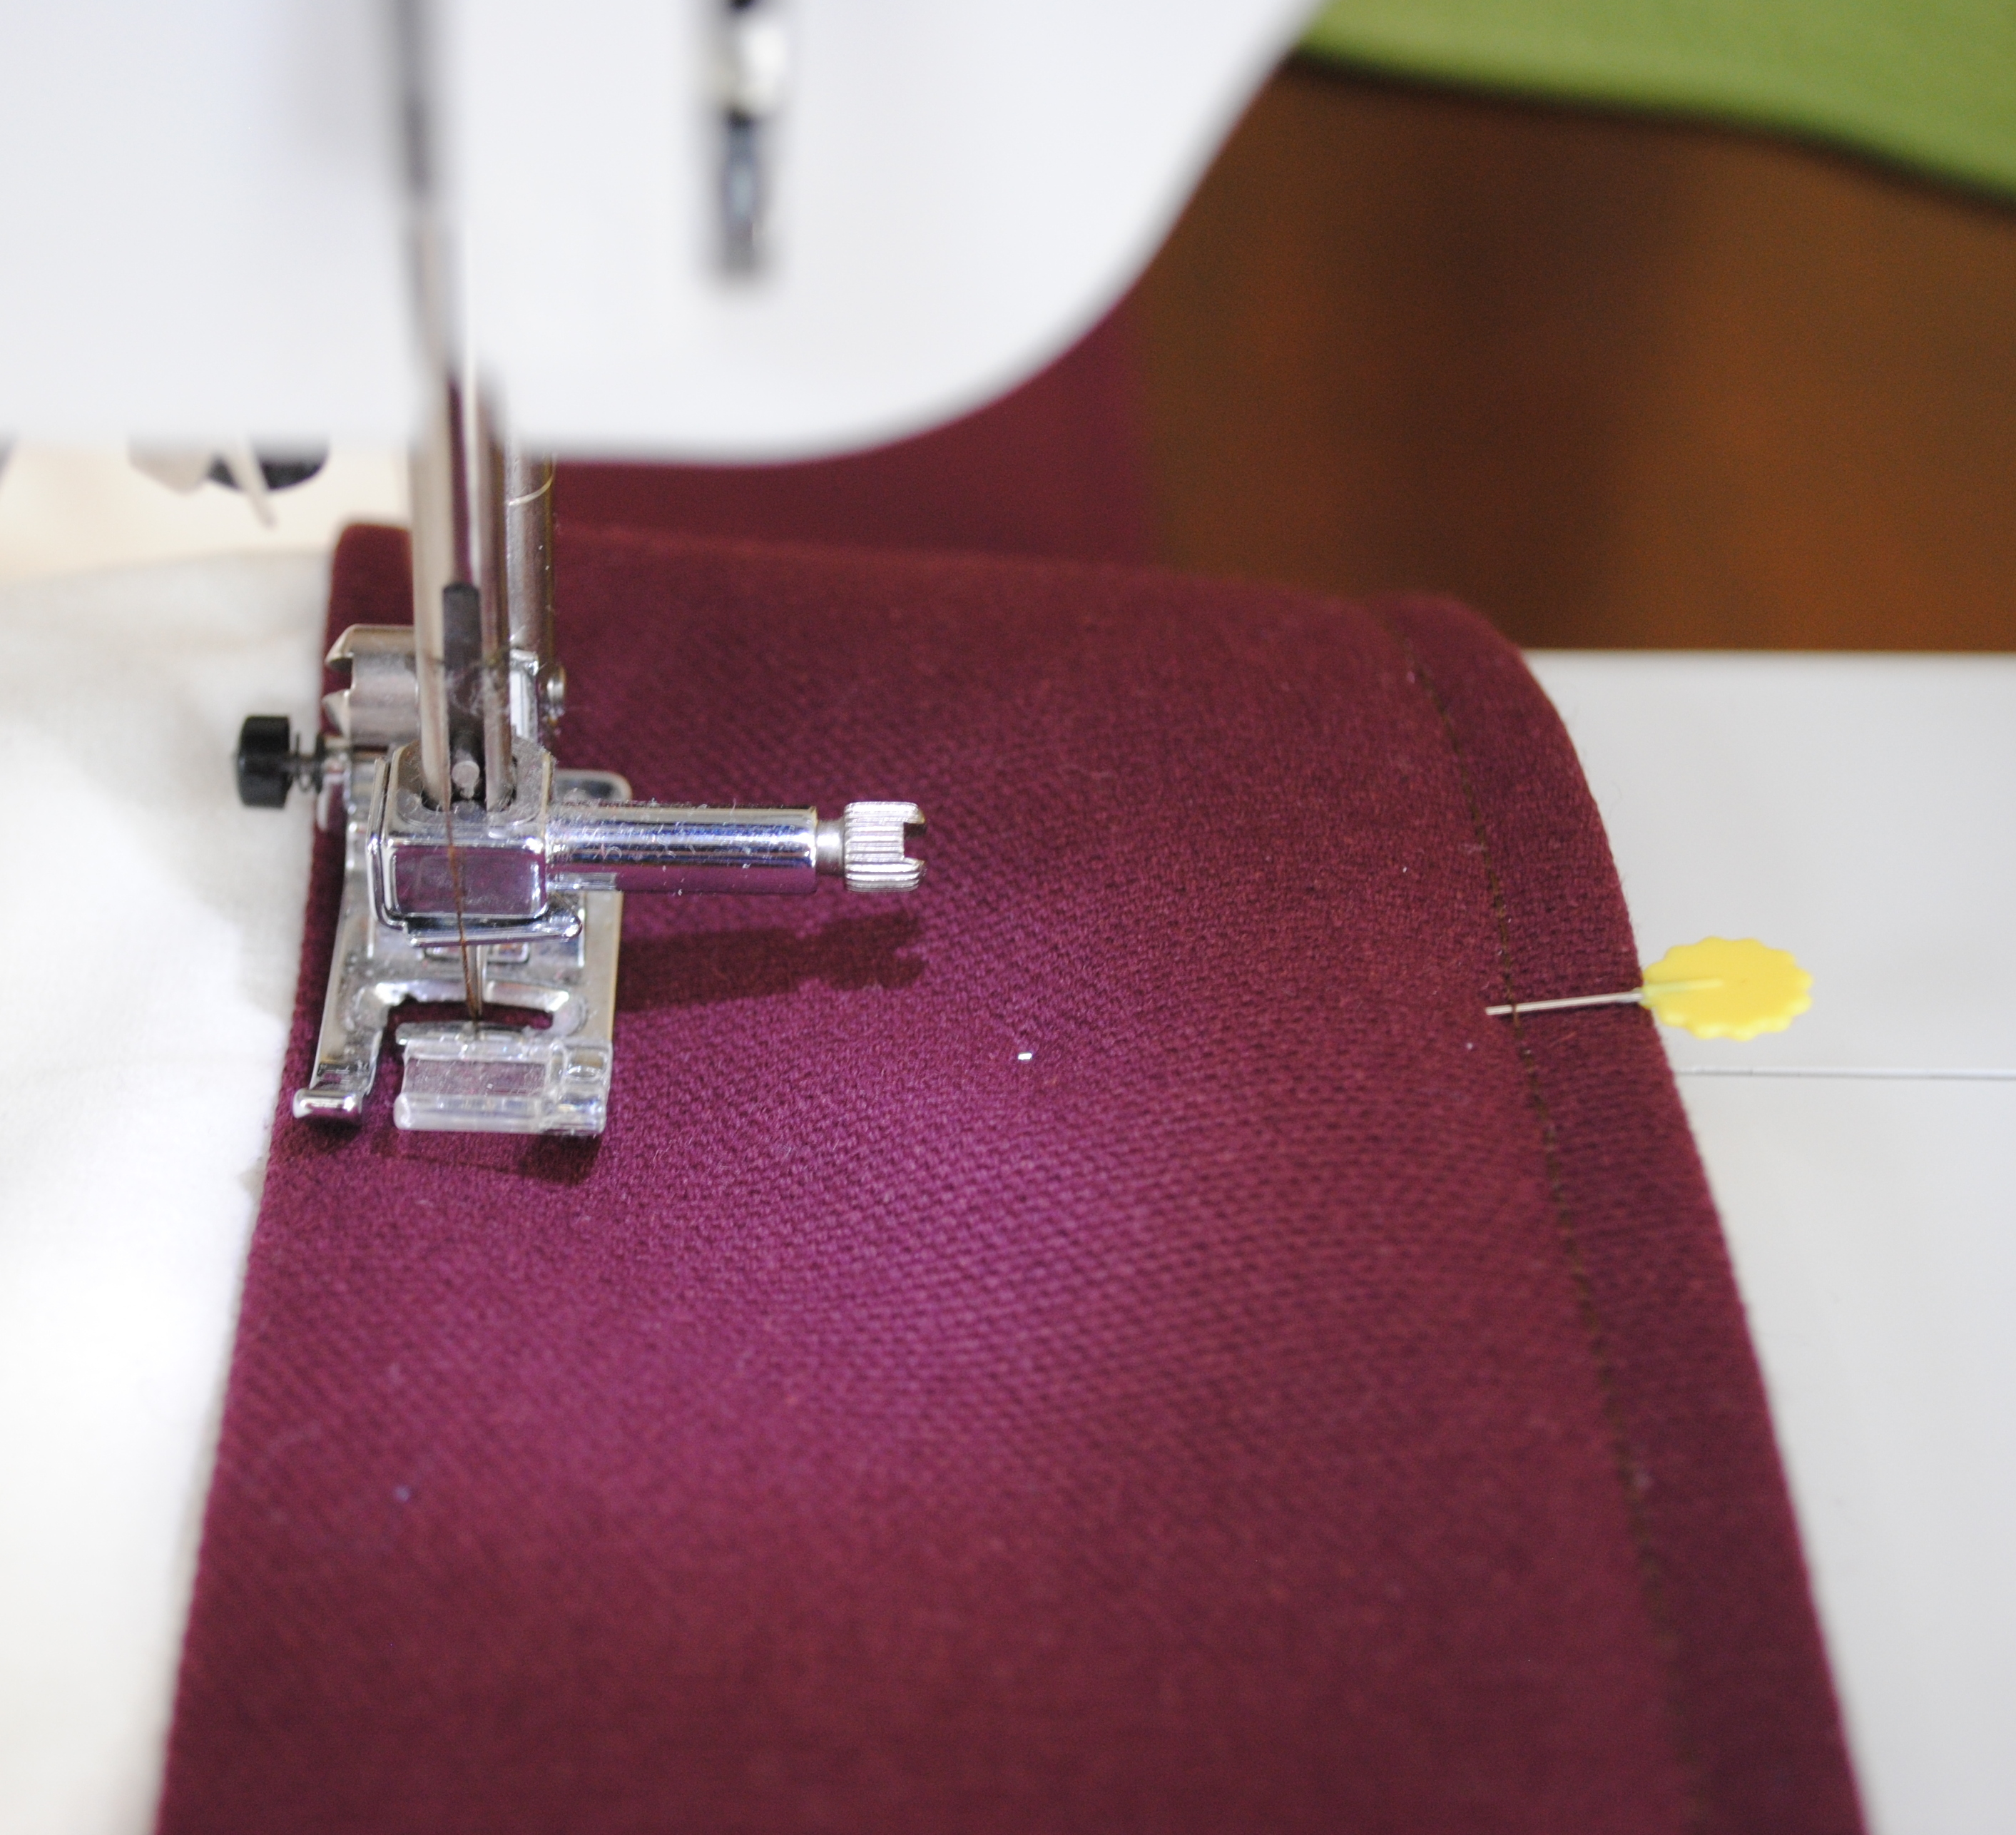
I started off by placing the curtain panel and the leading edge fabric face down, leaving extra contrast fabric at the top and bottom.  Then I tucked the edge of the curtain panel into the 1″ folded side of the leading edge fabric and pinned it in place.

Add a leading edge to customize any store bought window curtain panel - Tutorial by @Jenna_Burger, www.sasinteriors.net

It was time to sew.

I started by sewing the edge of the curtain to the edge of the contrast fabric.

Add a leading edge to customize any store bought window curtain panel - Tutorial by @Jenna_Burger, www.sasinteriors.net

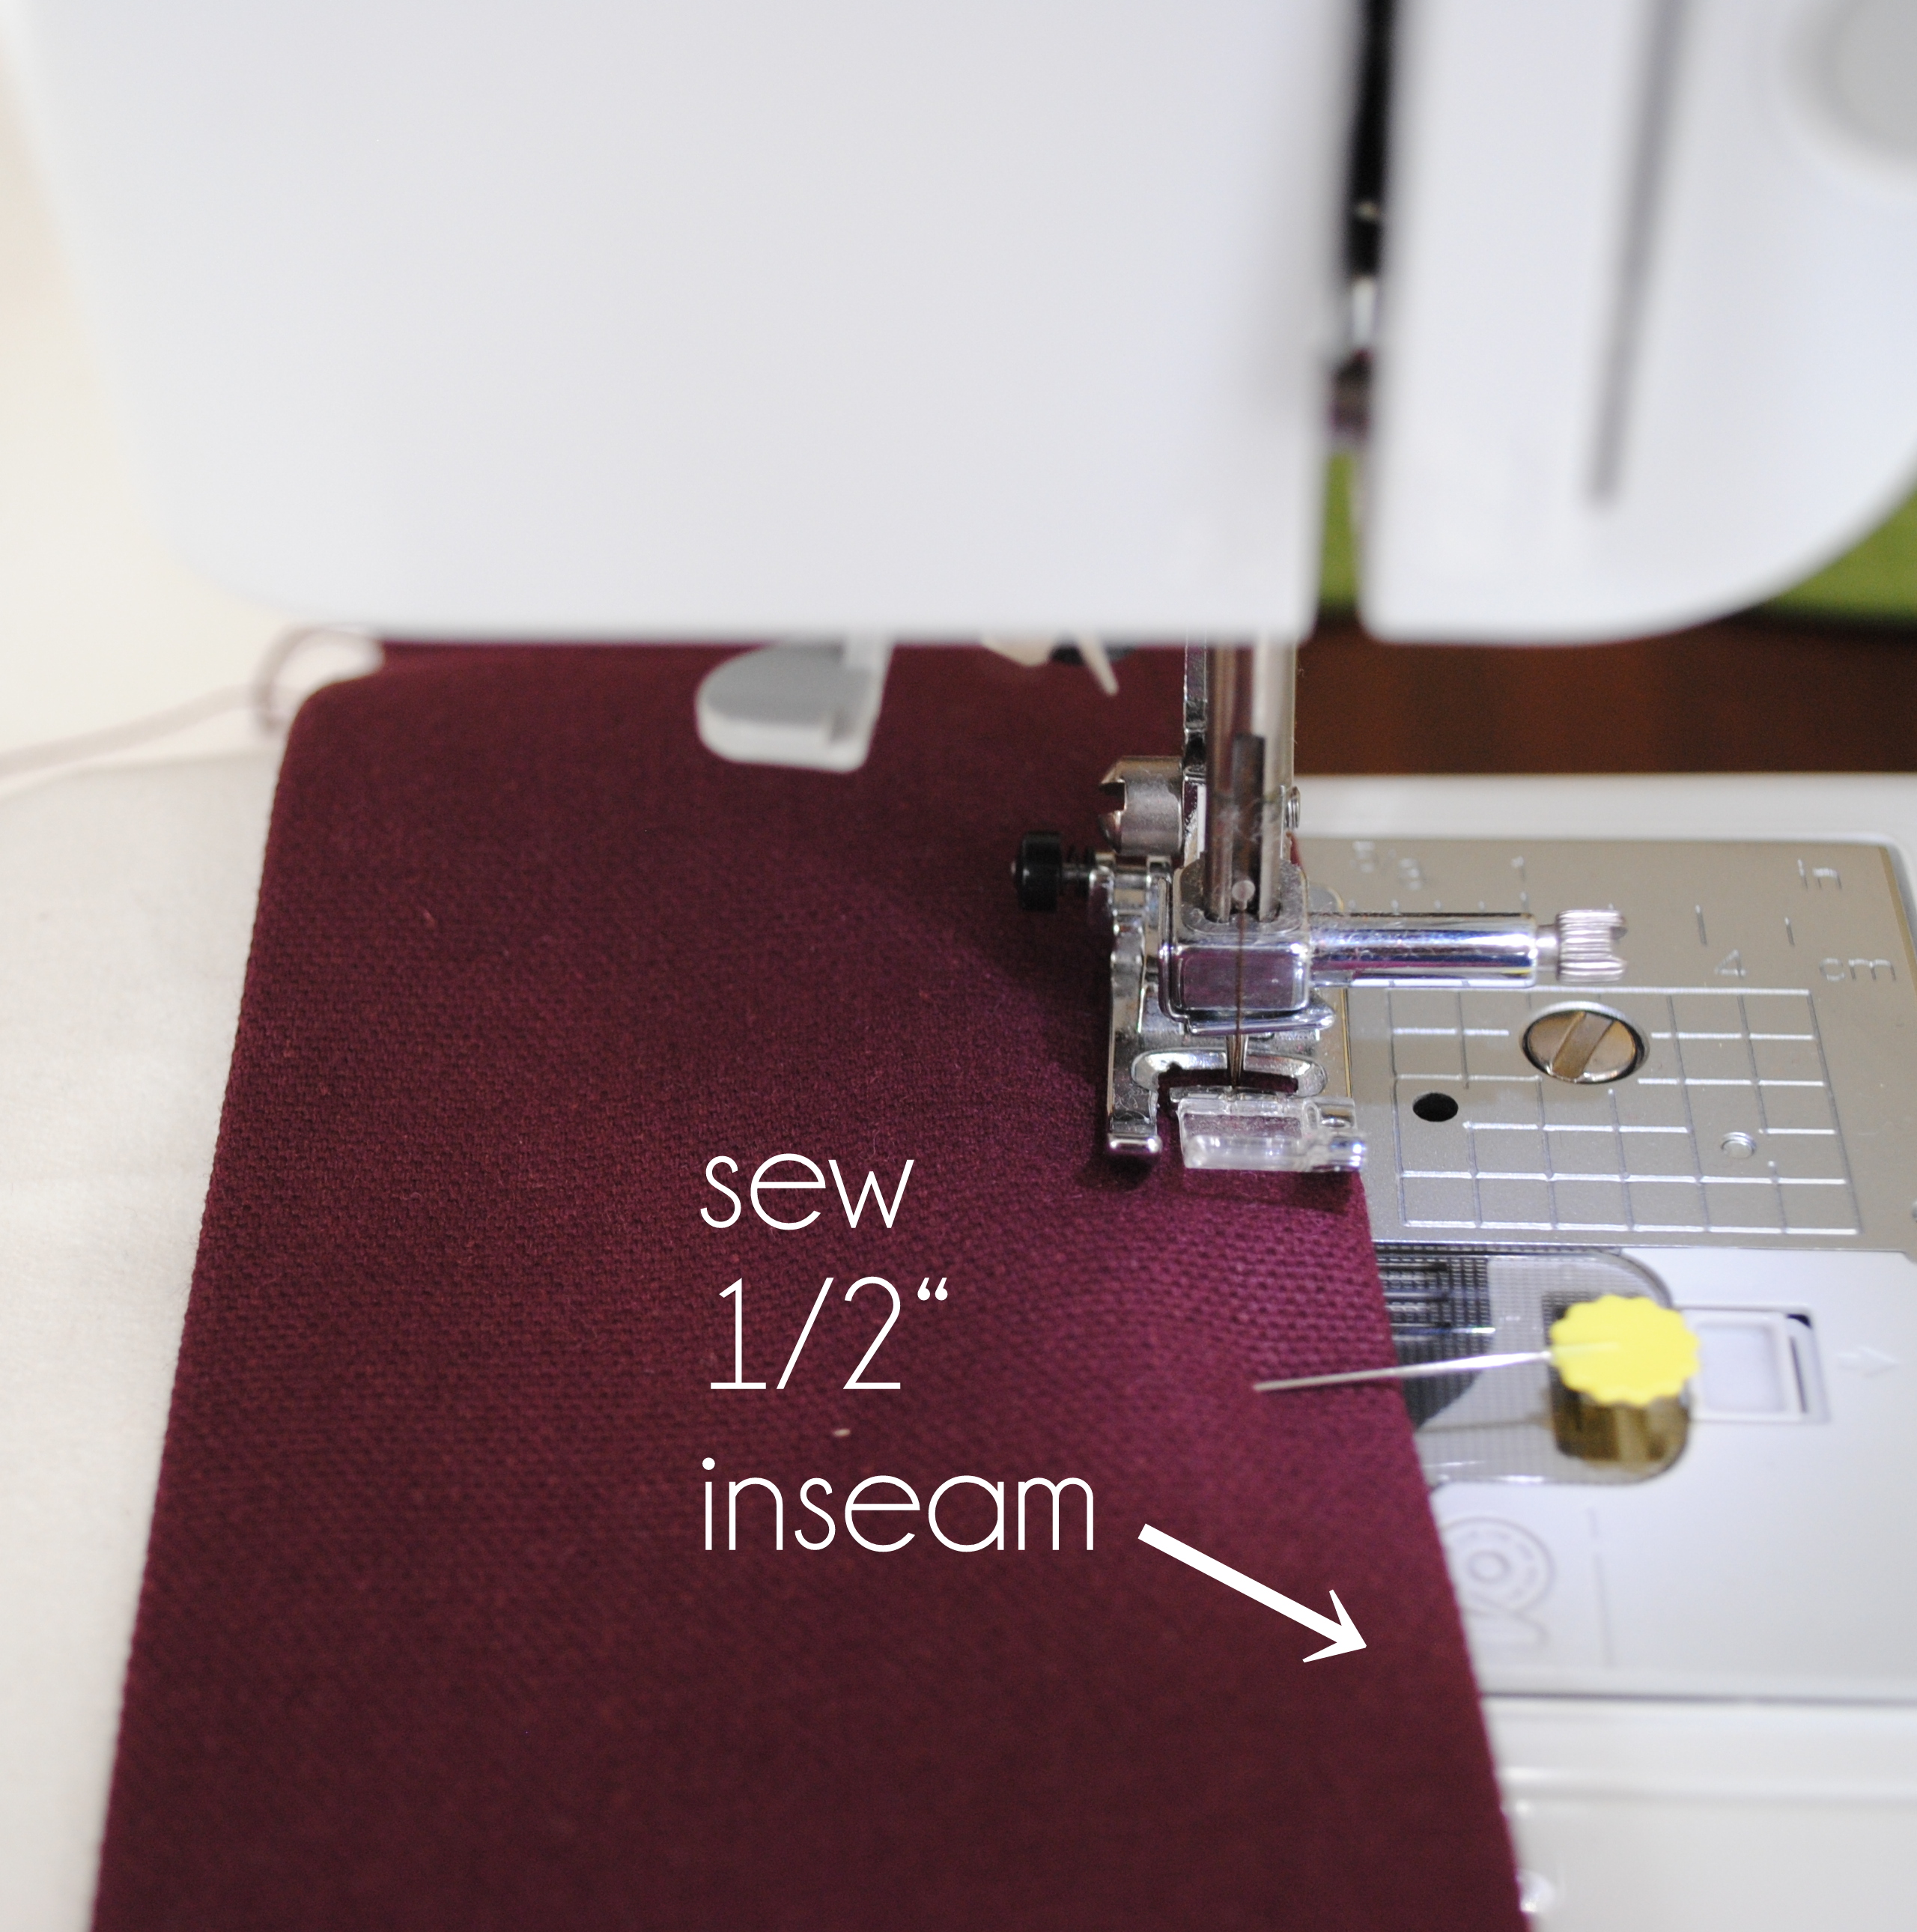
Then I sewed the other edge.

Add a leading edge to customize any store bought window curtain panel - Tutorial by @Jenna_Burger, www.sasinteriors.net

Once each side was done, I was ready to deal with the 2 ends at the top and bottom of the curtain.  At each end, I folded over the extra fabric and sewed.

Add a leading edge to customize any store bought window curtain panel - Tutorial by @Jenna_Burger, WWW.JENNABURGER.COM

Once the top and bottom were sewed, I trimmed the extra threads, and the panel was complete!

Add a leading edge to customize any store bought window curtain panel - Tutorial by @Jenna_Burger, www.sasinteriors.net

Instead of using the rod pocket, I used rings with clips to hang the panels.

Here is a good closeup view and you can see how the leading edge fabric is sewed all the way around onto the edge of the curtain panel.

Add a leading edge to customize any store bought window curtain panel - Tutorial by @Jenna_Burger, WWW.JENNABURGER.COM

Add a leading edge to customize any store bought window curtain panel - Tutorial by @Jenna_Burger, www.sasinteriors.net

The windows in my bedroom are large and here is a peak at how the space is all coming together…

Add a leading edge to customize any store bought window curtain panel - Tutorial by @Jenna_Burger, WWW.JENNABURGER.COM

Add a leading edge to customize any store bought window curtain panel - Tutorial by @Jenna_Burger, WWW.JENNABURGER.COM

Add a leading edge to customize any store bought window curtain panel - Tutorial by @Jenna_Burger, WWW.JENNABURGER.COM

It feels great to have this space almost complete – Finally after almost 2 years!

If you want to see some more ideas and inspiration on creating / embellishing curtain panels, take a look at these past posts:
How-To Make a Simple Lined Window Panel
Drop Cloth Curtain Panel with Leading Edge Detail
How To Add Decorative Trim to Curtains {for cheap}
How-To Hem Curtains
Adding Stripes to Curtains using Paint
The Right (and Wrong) Way to Hang a Curtain
10 Online Resources for Affordable Curtains

Have you ever jazzed up typical curtain panels? Or do you stick with the store-bought style? Have you had window panels custom made?  Was it worth the cost for custom? It really is amazing what can be done with a little fabric and/or trim!
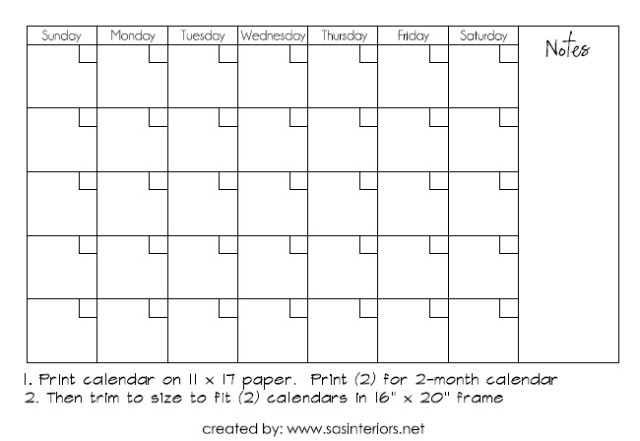
 

Desk Makeover using Make Your Own Chalk Finish Paint

OK, so let me start off by saying, THIS. IS. MY. FAVORITE. FURNITURE. TRANSFORMATION. yet

And the kicker is, I have a lot of furniture purging planned for the Spring and this desk was on the to-go list.  Can you believe I was going to sell this beauty?!

Here’s the before and after + a few closeup shots.  I’ll share the details of the transformation on the other side…

Before and After Desk Makeover using Make Your Own Chalk Finish Paint. Transformation by @Jenna_Burger, WWW.JENNABURGER.COMPretty crazy that it’s the same piece, right?!  And I am in love with the color.

So this month’s Lowe’s challenge for the Creative Team was to create / transform something using make your own chalk finish paint.  Since I’m in the midst of my master bedroom makeover and this desk was about to go curbside, I thought it was the perfect opportunity to jazz it up. If the result wasn’t right, nothing lost, nothing gained.

The desk was purchased years ago from the Bombay company (during my dark-furniture-all-over days) and it’s served it’s purpose well, but I was ready to say adios.

The making of my own chalk paint made me a bit nervous, since I’ve only used the premade mix by Annie Sloan and that took a bit of getting used to (more for the wax application than the actual paint).  But, I decided to jump right in.

Before and After Desk Makeover using Make Your Own Chalk Finish Paint. Transformation by @Jenna_Burger, WWW.JENNABURGER.COM

Here are the supplies I used:

  • Latex flat paint (I used Valspar Signature latex)
  • Plaster of Paris
  • Stir sticks
  • Plastic bucket
  • Water (cool, not warm)
  • Measuring Cup ( do not reuse for food)
  • Sealer – wax or polyurthetane

Before and After Desk Makeover using Make Your Own Chalk Finish Paint. Transformation by @Jenna_Burger, www.sasinteriors.net

Here is the formula I used:

  • In a mixing cup, add 1 cup of latex paint
  • Then add 1/3 cup Plaster of Paris + 1/3 cup cold water
  • Mix all together until the Plaster of Paris is fully dissolved

The mix will make enough chalk paint to apply about one coat to an average-sized 6 drawer dresser.  I ended up using only 1/4 of the mix and apply 2-3 coats, so it makes a lot.  Chalk paint goes a lot further than typical paint.

Once the formula was mixed, I was ready to paint!

Before and After Desk Makeover using Make Your Own Chalk Finish Paint. Transformation by @Jenna_Burger, WWW.JENNABURGER.COM

It’s important not to have too much paint on the brush, especially when painting furniture.  It’s better to apply thinner coats.  When applying too much paint at once, drips and runs could develop in the corners and crevices of the furniture.

Before and After Desk Makeover using Make Your Own Chalk Finish Paint. Transformation by @Jenna_Burger, WWW.JENNABURGER.COM

If that happens, no worries.  Get as much paint off the brush as possible and drag out the “puddled” paint so it thins out and covers more of the furniture surface.

Before and After Desk Makeover using Make Your Own Chalk Finish Paint. Transformation by @Jenna_Burger, WWW.JENNABURGER.COM

I forgot to mention this neat tid-bit about the desk… it actually opens up to a writing surface.

Before Desk

The difficult part was deciding where to start and stop the paint because I did not want to paint the inside – too difficult.

In the end, I chose a start and stop point for where the paint would go.  At first I was only going to paint the legs, but wasn’t thrilled with the look.  Here is a peak…

Before Deskpainting on the counter is so much easier than on the floor!

So in the end, I decided to paint the top as well, leaving only the line of the desk that opens, the original stained finished.  It actually makes for a more interesting piece – well, I think.

Here’s the top with one coat of chalk finish paint.

Before and After Desk Makeover using Make Your Own Chalk Finish Paint. Transformation by @Jenna_Burger, WWW.JENNABURGER.COM

2 coats later (3 in some spots), the desk was complete…

Before and After Desk Makeover using Make Your Own Chalk Finish Paint. Transformation by @Jenna_Burger, WWW.JENNABURGER.COM

And ready to display in my room…

Before and After Desk Makeover using Make Your Own Chalk Finish Paint. Transformation by @Jenna_Burger, WWW.JENNABURGER.COM

I sealed the entire desk with wax that I had on-hand.   Others that have used their own chalk finish paint have used clear finishing wax (Lowes link) or polyurethane.

If you want to read more on applying wax, head over to this post

Applying Clear Wax

The revamped desk fits perfectly next to my existing dresser with a new gallery wall above (more details on that coming soon – I’m still finishing it up)

Before and After Desk Makeover using Make Your Own Chalk Finish Paint. Transformation by @Jenna_Burger, WWW.JENNABURGER.COM

The chair wasanother furniture transformation from a few years ago and I just recently added a new cushion using black and white striped fabric from The Online Fabric Store.  The furry looking throw draped over the chair back is actually fabric that I plan on making some fun pillows with.

Check out what this space looked like before…

Master Before

BIG DIFFERENCE!

Let me show you a few more ‘after’ shots…

Before and After Desk Makeover using Make Your Own Chalk Finish Paint. Transformation by @Jenna_Burger, WWW.JENNABURGER.COM

What do you think?

What’s your favorite part of my desk?  The new color? The lines of the desk? Or the ‘secret’ compartment of the writing desk?  For me, it’s all fun, but I think I love the paint color the best.  By the way, the color is Benjamin Moore Martini Olive.  Lowe’s color matched it for me and used their Valspar Signature Latex paint.

Benjamin Moore Martini Olive

Before and After Desk Makeover using Make Your Own Chalk Finish Paint. Transformation by @Jenna_Burger, WWW.JENNABURGER.COM

My thoughts on making my own Chalk Finish Paint.

I really like it!  Comparing it to other chalk finish paints, it is very similar and obviously the cost is a lot less AND you can make any color you’d like.  With other chalk finish paints there are only about 30-40 different colors to choose from.  When making your own, your color choices are limitless.  The cost is also significantly less because the Plaster of Paris is about $6 and a quart of paint is about $15-20.  Since only one cup is needed, a sample pod / tester most likely would have been enough for this project.  Also, I could have used a latex color that I already had on hand (in my stash).  Comparing the application process, it’s very similar and the finish result is about the same.  A dull, chalky (but not grainy) finish is what you will get.  Waxing is important when using any chalk finish paint because it seals the color and finish. I’ve also heard of people using polyurethane as a sealer, but I have never tried that.

Why chalk finish paint?

I feel the advantage of using chalk finish paint is the elimination of sanding, prepping, and priming the existing wood.  When using chalk finish paint, you can simply start the painting process directly over the stained or painted finish.  *If a piece of furniture has a hi-gloss, then I would recommend sanding and possibly priming first so you have a thorough base to paint.

I hope you enjoyed my adventure of making my own chalk finish paint.  I love trying out new things and this is a winner!  Have you used chalk finish paint?  Have you made your own or have you used a premade mix?  Would you try this on a piece of furniture?


Lowes Winter 2014 badge


To gather even more unique, fun, and creative ideas for your indoor and outdoor Winter spaces, I would definitely suggest downloading the Lowe’s Creative Ideas app on your iphone and/or ipad.  I’m always checking out the FREE app for great seasonal + do-it-yourself inspiration. And even better, this Pallet Christmas Countdown creation will be featured in the upcoming Winter guide – how cool, right?!


 Also consider following Lowe’s on Facebook, Pinterest, and Instagram as well.

Disclosure: I am part of the Lowe’s Creative Team and was provided with a Lowe’s gift card to purchase items for my project.  I was also compensated for my time to use the products.  No one told me what to create, what to buy, how to use the product, or what to write.  All opinions are 100% mine!

Valentine Wreath with Paint Chip Flowers

Thanks all for loving my printables so much – I didn’t realize what a hit they’d be.  I guess next time I should have more confidence…  Weren’t all the other printables along the Blog Hop super cute as well?  I am still in the romance mood (that sounded corny), and wanted to share with you a wreath I created last year.  It was originally featured on Jen’s blog, but I wanted to give it a refresh and share it all with you.  It’s one of my favorites to-date!

Come see how I made this Valentine Wreath with Paint Chip Flowers

Valentine Wreath with Paint Chip Flowers created by @Jenna_Burger, WWW.JENNABURGER.COM

It wasn’t difficult to make at all and the flower petals were actually a bit calming to create.

The supplies I used for this wreath creation were:

  • Grapevine wreath ( I got mine on sale at AC Moore for $2.50)
  • Eucalyptus leaves
  • White spray paint (I used a gloss finish)
  • Paint chip samples in an array of pinks and reds
  • Hot glue gun
  • A heart punch or scissors to manually cut out hearts

I started off with the paint chip flowers.

Using paint chip samples in a range of colors from pinks to reds to purple, and a 1.5″ heart-shaped hole punch, I cut out about 40 hearts. I got this decorative paper punch at AC Moore for less than $10, but as an alternative, you could cut hearts out with plain ole’ “old school” scissors. The hearts may not result as exact, but the idea is still the same.

Valentine Wreath with Paint Chip Flowers created by @Jenna_Burger, WWW.JENNABURGER.COM

Then I cut a piece of felt about 3″ round (any heavier material will work as well), laid out 6 hearts around the outer edge, and secured them with a nice-sized dab of hot glue.

Valentine Wreath with Paint Chip Flowers by @Jenna_Burger of WWW.JENNABURGER.COM featured on tatertotsandjello.com

Then for the inner hearts, I curled the top edge using a pencil to create the look of a flower.

Valentine Wreath with Paint Chip Flowers by @Jenna_Burger of WWW.JENNABURGER.COM, featured on tatertotsandjello.com

I layered (4) ‘curled’ hearts in the center, on top of the outer edge of hearts. To complete each flower creation, I added a small 3 dimensional piece of paint chip for the center of the “flower”.

After making a few more flowers of different sizes (they don’t all have to be this large size – differing sizes make it more interesting), I added them to the wreath. Having the back of the flowers on felt, allows the ease of adding them to the wreath. With a dab of hot glue, I attached the felt-backed flowers to the wreath. Once Valentine’s Day is over, the flowers can easily be removed from the wreath, and different embellishments can be added for other holidays or occasions.

Valentine Wreath with Paint Chip Flowers created by @Jenna_Burger, WWW.JENNABURGER.COM

This wreath truly was a joy to create and took only about an hour to make (I add the eucalyptus & spray painted the wreath Day 1 which took about 15 minutes, then made the flowers and attached them Day 2 which took about 30 minutes).

Valentine Wreath with Paint Chip Flowers created by @Jenna_Burger,WWW.JENNABURGER.COM

Valentine Wreath with Paint Chip Flowers created by @Jenna_Burger, WWW.JENNABURGER.COM

This festive Valentine wreath would be great hanging on a front door or inside the home. I have it above my fireplace – it’s the perfect centerpiece above my mantel.

Valentine Wreath with Paint Chip Flowers by @Jenna_Burger of WWW.JENNABURGER.COM, featured on tatertotsandjello.com

Super cute, right?!

I like it so much because it doesn’t scream Valentine’s Day.  It could really take you right through the Spring months.  Wouldn’t it also look good with fall colored paint chips – Ooo, that gives me an idea!

Want to see some more of my Vday creations?  Here are a few:

> The valentine burlap wreath with felt flowers that I created a few years ago

click on image for tutorialValentine Burlap Wreath with Felt Flowers created by @Jenna_Burger of WWW.JENNABURGER.COM

> My ‘love’ connection wood sign.  Do you see lame / dorky or wow, she’s really creative?

click on image for tutorialValentines Love Connection Wood Sign created by @Jenna_Burger, WWW.JENNABURGER.COM

Do you decorate for Valentine’s day?

Central Command Center Revamped (again)

The year has been a little slow going for me.  With the 2 week christmas break for the kids + a couple involved (but uber-exciting) client projects + computer issues (my laptop keyboard stopping working due to a virus – UGH), I’m a bit behind.  BUT, I’ve got something good for you…  My Revamped (again) Central Command Center. 

Family Central Command Center - Design it to fit your family needs! Created by @Jenna_Burger, WWW.JENNABURGER.COM. Featured in Better Homes and Gardens "I Did It"

I Did It again.

This is the 3rd time I revamped our family central command center (the previous posts can be found here and here).  Our hub of the home.  The 30″ wall that keeps our family on track so we know where we are going when.

So why did I change it once again?  Because our family needs have changed in the last year.  Over time, I found that there were elements on the CCC that we weren’t using and I found that there were other things that we needed.  Keep on reading and I’ll tell you all the particulars about the changes…

But before I share the 411 on the details, you might not know a little something.  Our central command center (the previous version) is featured in this month’s (January 2014) Better Homes and Gardens magazine on the last page in the “I Did It” section.  If you want to read more about the article + some behind-the-scenes footage, take a look at this post.

@Jenna_Burger featured in the I Did It section of Better Homes and Gardens January 2014

So onto the revamped (again) command center.

One of the major needs for our family (actually more so the needs of the 2 kids) were a spot to put ALL THE IMPORTANT PAPERS that they receive from school.  Even though we are a “paper-less” school, a lot of 8.5 x 11’s come home each day.

When making the decision to revamp the CCC, I was on the lookout for some file folders.  Obviously since the wall is small, I couldn’t get anything that was overly large.  After a little searching and waiting, I found a great 3 file wire bin on Joss and Main.  The size was just right, so I snagged it.

Each of the kids now has one opening and there is enough room for a few small folders for the different kinds of papers that come home (ie: school, sports, religion, etc).  A cute little label front in an apple green hue pulls it all together and adds a splash of color.

Family Central Command Center - Design it to fit your family needs! Created by @Jenna_Burger, WWW.JENNABURGER.COM. Featured in Better Homes and Gardens "I Did It"

So as you might notice from the before CCC, the black bins came down (after we redid the foyer, they weren’t needed anymore), and we reduced the amount of clipboards from 4 to 2.  The clipboards that remain now contain our grocery list and a peek at the week ahead.  The other 2 charts that went away – the chore chart and the reward chart – were relocated to another spot.  BUT, I’m still going to share ALL the chart printables with you – see below.

The top of the CCC also had a few changes.  I reduced the amount of inspiration framed images to one and replaced the others with a round wall clock.  I realized other than the oven clock, we didn’t have any other place to tell time.  Plus, an actual wall clock (which I scored at Target for less than $10) is great for learning versus the typical digital style.

The 2-month personalized calendar is still in use – a definite MUST-HAVE for our family to run!

Family Central Command Center - Design it to fit your family needs! Created by @Jenna_Burger, WWW.JENNABURGER.COM. Featured in Better Homes and Gardens "I Did It"

One more change…  The corkboards.  Aren’t they adorable with the ikat pattern?!  They are by Nate Berkus available at Target and each square panel was about $10.  I put 2 together to make a rectangular look.  With the previous command center, I didn’t have a place to pin ‘stuff’ like invitations, announcements, cards, etc.  That was a major need, so now we have that.

Family Central Command Center - Design it to fit your family needs! Created by @Jenna_Burger, WWW.JENNABURGER.COM. Featured in Better Homes and Gardens "I Did It"

The glass jar pipe clamp pen/pencil holders are still in tact and they are great + uber-functional.

Family Central Command Center - Design it to fit your family needs! Created by @Jenna_Burger, WWW.JENNABURGER.COM. Featured in Better Homes and Gardens "I Did It"

And that’s about it for the updates.

The result…

Family Central Command Center - Design it to fit your family needs! Created by @Jenna_Burger, WWW.JENNABURGER.COM. Featured in Better Homes and Gardens "I Did It"

And a breakdown of the changes I made for the revamped 2014 central command center…

Family Central Command Center - Design it to fit your family needs! Created by @Jenna_Burger, WWW.JENNABURGER.COM. Featured in Better Homes and Gardens "I Did It"

Here’s an interesting before + after.  The blank slate I started with 2 years ago and how it looks now…

Family Central Command Center - Design it to fit your family needs! Created by @Jenna_Burger, WWW.JENNABURGER.COM. Featured in Better Homes and Gardens "I Did It"

It’s truly amazing how such a small wall can be used to the max.  From floor to ceiling, side to side, this wall is 100% functional!

Okay, so I mentioned earlier in the post that I’d share the printables that I created for this wall.  Some I still use and some I don’t, but were featured in the magazine article.

Calendar

Personalized Calendar Printable created by @Jenna_Burger, WWW.JENNABURGER.COM

Click to Print: Calendar Printable (for personal use only)

Grocery List / Weekly Menu

Grocery List / Weekly Menu Printable created by @Jenna_Burger, WWW.JENNABURGER.COM

Click to Print: Grocery List (for personal use only)

Chore Chart

Chore Chart Printable created by @Jenna_Burger, WWW.JENNABURGER.COMClick to Print: Chore Chart_2014 (for personal use only)

Reward Chart

Reward Chart created by @Jenna_Burger, WWW.JENNABURGER.COM

Click to Print: Reward Chart (for personal use only)

Peek at the Week ahead

Peek at the Week ahead created by @Jenna_Burger, WWW.JENNABURGER.COM

This is a printable I created for the BHG photoshoot, but the idea for this printable came from Jen at I Heart Organizing.  I would never want to take someone’s idea and present it as mine, so I’m not sharing a copy of this for you to download.  Instead I encourage you to print the one she created (which is much cuter than mine) or be inspired and create your own.  Click here for Jen’s Peek at the Week Printable.

If you have any trouble downloading the printables, please let me know.  I don’t often create printables, so I hope they are easy to print.  From my end, they look good to go!

Later this week I will be guest posting about ways to create a command center in your home over at the Style Spotters blog on the Better Homes and Gardens website.  Be sure to check it out and of course, I will share a link.

In the meantime, cheers to 2014 and getting organized + making life simpler for the New Year!

DIY: Personalized Word Christmas Ornament

One week to go and Christmas will be here. Can you believe it?

As you know, my home has been decorated for quite a few weeks, but I have still been working on new holiday projects here and there to add to this years decor.   Once the house is ‘set’, I still enjoy adding new and unique touches for the season.

Since adding in a second tree this year, which is more of a pretty tree versus the sentimental traditional tree we decorate as a family, I’ve had fun with the gold + brown theme.  Along with the ball ornaments, I’ve added in some gold feathers (yes gold + feather in one combo: heaven) and just this past weekend, I jazzed it up even more with my latest DIY creations, word Christmas ornaments

DIY: Word Christmas Ornament using a Gold Sharpie by @Jenna_Burger, WWW.JENNABURGER.COM

Super fun, right?!  I got the idea from seeing a beautiful vignette in the Garnet Hill catalog.  I didn’t see the ornaments for sale (not like I would buy them anyway because they’d probably be $10+) and decided to create my own version.

I started off by grabbing a box (set of 6) of clear bulbs and a gold Sharpie marker at AC Moore.  With my 50% off coupon, I ended up getting both items for a few cents over $6.  Not bad for 6 ornaments, which = about $1/ornament…

DIY: Word Christmas Ornament using a Gold Sharpie by @Jenna_Burger, WWW.JENNABURGER.COM

Before putting pen to glass, I wanted to find the perfect font and words to write.  I decided on the words Joy, Peace, Shine, Merry.  All words that are meaningful around Christmas.  For the font, there was a toss up between Jenna Sue and Channel.

Jenna Sue and Channel font

In the end, I decided on the Channel font because I thought bigger and bolder would be better, plus it’s a little more forgiving – I’ll tell you why in a moment…

I started out by copying the script font from the computer screen to the ornament.

The result…  Not exact, but pretty close.

DIY: Word Christmas Ornament using a Gold Sharpie by @Jenna_Burger, WWW.JENNABURGER.COM

For each word, I started out with one line, then embellished each letter with thicker lines.  This type of font is more forgiving because you can layer and add onto each letter instead of it being a ‘one shot deal’.

DIY: Word Christmas Ornament using a Gold Sharpie by @Jenna_Burger, WWW.JENNABURGER.COM

Once the first layer of gold Sharpie was dry, I added another layer for a second coat.

DIY: Word Christmas Ornament using a Gold Sharpie by @Jenna_Burger, WWW.JENNABURGER.COM

Each ornament took about 8-10 minutes, so within about 40-60 minutes, I was done with the project.

DIY: Word Christmas Ornament using a Gold Sharpie by @Jenna_Burger, WWW.JENNABURGER.COM

All 4 unique and personalized ornaments would be perfect for a gift.  Any words could be used.  Maybe each ornament could say a member of the family or something silly about the holidays…

Once I was done, the ornaments were ready to immediately hang since Sharpie’s take no time to dry.

DIY: Word Christmas Ornament using a Gold Sharpie by @Jenna_Burger, WWW.JENNABURGER.COM

DIY: Word Christmas Ornament using a Gold Sharpie by @Jenna_Burger, WWW.JENNABURGER.COM

DIY: Word Christmas Ornament using a Gold Sharpie by @Jenna_Burger, WWW.JENNABURGER.COM

DIY: Word Christmas Ornament using a Gold Sharpie by @Jenna_Burger, WWW.JENNABURGER.COM

DIY: Word Christmas Ornament using a Gold Sharpie by @Jenna_Burger, WWW.JENNABURGER.COM

  So what do you think?  A project you’d consider tackling?  What type of project does it inspire you to make?

Christmas in a Minute: Vintage-Inspired JOYful Sign

Happy Monday!  What a busy week upon us with Thanksgiving, Hanukkah, and the official start to the holiday season.  As the crazy Christmas sprint begins, I’m thinking simple, easy, and quick.  So this weekend, I created this fun + easy vintage-inspired JOYful sign.  Scraps of wood and a little bit of paint makes this a simple and very inexpensive creation.  It would be great for the mantel, outside patio, or as a gift.

Here’s the breakdown…

Christmas in a Minute: Vintage-Inspired JOYful Sign created by @Jenna_Burger, WWW.JENNABURGER.COM

Simple-to-follow tutorial on how to create a JOY sign

1. Cut the wood to your desired height and width. I used leftover pallet scraps to create this sign, but you could also use new wood instead.  I like the old pallets because they’re free, plus they have a distressed, worn look, which means no “beating up” the new wood.

2. Create the sign and sand.  If you have more than one piece of wood, you’ll need to attach them from the back.  Across the two pieces of pallet boards, I nailed two smaller pieces of pallet scraps on the back so the sign stayed together. Then I gave the wood a good sanding on the top and sides.

3. Paint the sign.  I painted the base of the sign with plain ole’ white paint leaving some of the raw wood to show through.

4. Outline letters.  I freehand sketched the letters J – O – Y on the sign.  You could use a stencil or silhouette if you wanted.

5. Paint the letters. Then I filled in the letters with red craft paint.  I used about 3-4 coats, but it dried quickly.  To give an even more distressed look, I gently went over the surface with a piece of sandpaper (by hand).

And that’s it.  Pretty simple, right?!

Pallet Christmas Countdown

Christmas is a comin’!

In less than 10 days, we’ll be counting down the 25 days till the arrival of Christmas.  To make the countdown a bit more fun and bearable, since for every child (and maybe a few adults) thinks the 25 days leading to the special day are SO LONG, I created a Countdown Calendar in the shape of a tree using my favorite material, pallets and a few other leftover scraps of wood.  Check it out…

Christmas Countdown Calendar using pallets and scraps of leftover wood.  Created by @Jenna_Burger, www.sasinteriors.net

Isn’t it so colorful?  The ornaments truly make it come alive.

When Lowe’s challenged the Creative Team to come up with something for the Holidays, I was so excited to create something unique and perfect to celebrate the coming holiday.  Last year, my December project was a creation for holding cards and this year, I wanted to create something just as dynamic.  When thinking about a project, I realized we didn’t have a countdown calendar, so that’s what this years project would be.

The project started out by taking 10 steps outside to the garage.  Yup, this creation was put together using only materials I already had on hand.  This is what I gathered…

  • Pallet and wood scraps – the more dented and imperfect, the better
  • Nails (3/4″ – 1″ deep)
  • Number stencil
  • Black Sharpie
  • Hammer
  • Circular Saw
  • (25) Colorful ornaments

1. I first started out by looking through my wood scrap pile and leftover pallet scraps.  I collected a bunch of pieces all in different colors and sizes.  The more imperfect the better.

Then I took some time and put a drawing together to figure out how many rows of wood would be needed and how the 25 ornaments would sit on the “tree”.  In the end, 7 tiers worked best and 2 of the rows have 4 nails, creating the 25 spots.

A little math is needed, but it wasn’t tough…

Christmas Countdown Calendar using pallets and scraps of leftover wood.  Created by @Jenna_Burger, WWW.JENNABURGER.COM

2. Now that the hardest part was over (a little mathematical equations), I laid out the pieces of wood to determine what looked nice next to each other and then the widths of each tier.

On the backs, I then labeled each row.

Christmas Countdown Calendar using pallets and scraps of leftover wood.  Created by @Jenna_Burger, www.sasinteriors.net

3. Then using a circular saw, I cut each piece to form the “tree” shape. Once that was complete, I added a scrap piece of wood to the backs of the pieces to attach them together.

Hammer, hammer, hammer using 3-4/” – 1″ nails.

Christmas Countdown Calendar using pallets and scraps of leftover wood.  Created by @Jenna_Burger, www.sasinteriors.net

I added a few more pieces of scraps (old paint sticks, to be specific) to the back.  This looks kinda messy, but hey, who’s lookin’ at the back???

Christmas Countdown Calendar using pallets and scraps of leftover wood.  Created by @Jenna_Burger, www.sasinteriors.net

No more looking at the back.  Let’s turn it over to the front where it’s prettier looking.

Now to the nails + the numbers.

4.  By eye (no more math needed), I marked the locations for the 25 ornaments.  Then I added a nail at each location leaving about 1/2″ exposed for the ornament to hang.

Christmas Countdown Calendar using pallets and scraps of leftover wood.  Created by @Jenna_Burger, www.sasinteriors.net

5. Once the nails were in, it was time for the numbers.  Using stencils I had from a previous Martha Stewart project, I outlined the numbers with a black sharpie.  Again, the more imperfect the better.

Christmas Countdown Calendar using pallets and scraps of leftover wood.  Created by @Jenna_Burger, www.sasinteriors.net

Once the numbers were done, the project was complete.  And here’s the result…

Plain + Decorated.

Christmas Countdown Calendar using pallets and scraps of leftover wood.  Created by @Jenna_Burger, WWW.JENNABURGER.COM

I love how it came out…

Christmas Countdown Calendar using pallets and scraps of leftover wood.  Created by @Jenna_Burger, WWW.JENNABURGER.COM

It’s so colorful and brings such whimsy to our holiday home decor.

Christmas Countdown Calendar using pallets and scraps of leftover wood.  Created by @Jenna_Burger, WWW.JENNABURGER.COM

Christmas Countdown Calendar using pallets and scraps of leftover wood.  Created by @Jenna_Burger, WWW.JENNABURGER.COM

The kids love it too and they can’t wait for the 1st of December to arrive to start adding an ornament each day.  While we wait, the ornaments that all came from this years Lowe’s collection, sit in the brass light turned container.

Christmas Countdown Calendar using pallets and scraps of leftover wood.  Created by @Jenna_Burger, WWW.JENNABURGER.COM

Christmas Countdown Calendar using pallets and scraps of leftover wood.  Created by @Jenna_Burger, WWW.JENNABURGER.COM

I hope you enjoyed my latest creation as much as I.  It was fairly easy to make, and I loved that I was able to create it using materials I already had.  How much better does it get?!  The anticipation and excitement leading to Christmas day can be a bit challenging, but hopefully my countdown calendar makes it a tiny bit more fun.

Christmas Countdown Calendar using pallets and scraps of leftover wood.  Created by @Jenna_Burger, WWW.JENNABURGER.COM

To gather even more unique, fun, and creative ideas for your indoor and outdoor Winter spaces, I would definitely suggest downloading the Lowe’s Creative Ideas app on your iphone and/or ipad.  I’m always checking out the FREE app for great seasonal + do-it-yourself inspiration. And even better, this Pallet Christmas Countdown creation will be featured in the upcoming Winter guide – how cool, right?!

Lowes Creative Team Member

Also consider following Lowe’s on Facebook, Pinterest, and Instagram as well.

 Disclosure: I am part of the Lowe’s Creative Team and was provided with a Lowe’s gift card to purchase items for my project.  I was also compensated for my time to use the products.  No one told me what to create, what to buy, how to use the product, or what to write.  All opinions are 100% mine!

Easiest + Fastest + Cheapest Tree Skirt EVER

Monday Morning Confession: I already started decorating for Christmas.  It might seem early for some, but I have a few surprises up my sleeve that I wanted to prep early for this year.  While many of my daily favorites get tucked away for the next 6 weeks, the holiday decor is once again making it’s debut for another year.  As some ‘old’ traditional elements remain, there are many new projects and vignettes that I’ll be sharing over the coming weeks.  One in particular is my new tree skirt.  Definitely the easiest + fastest + cheapest tree skirt you ever did see…

Easiest, Fastest, + Cheapest Christmas Tree Skirt.  Use 1.5 yd of fabric and wrap around tree.  Follow easy instructions by @Jenna_Burger of WWW.JENNABURGER.COM

For the last few years I’ve wanted a new tree skirt.  I had grand plans of making something beautiful and chic, but honestly it just never happened.  And anyway, is something pretty + most likely expensive, even worth it?  I’ve found over the years that the tree skirt ends up getting thrown around either from the kids or the cats, and then once the presents are added, you don’t even see it.  Well this is in my house anyway. maybe it’s different in your casa…

So after living with no tree skirt for a few days once the tree was up, I thought let me test out this pretty black and white striped fabric.  I threw it under the tree and loved it’s whimsical, non-perfect, simple look.  Plus it cost me nothing. So here we go… The black and white striped fabric I had on-hand was 1 yard, but I would recommend using 1.5 yards or even 2 yards for a fuller look. I placed the fabric in front of the tree.

Easiest, Fastest, + Cheapest Christmas Tree Skirt.  Use 1.5 yd of fabric and wrap around tree.  Follow easy instructions by @Jenna_Burger of WWW.JENNABURGER.COM

Then took the two top corners and wrapped them around the  bottom of the tree so they meet in the back.

Easiest, Fastest, + Cheapest Christmas Tree Skirt.  Use 1.5 yd of fabric and wrap around tree.  Follow easy instructions by @Jenna_Burger of WWW.JENNABURGER.COM

Easiest, Fastest, + Cheapest Christmas Tree Skirt.  Use 1.5 yd of fabric and wrap around tree.  Follow easy instructions by @Jenna_Burger of WWW.JENNABURGER.COM

Lastly, I tucked the bottom corners and all the loose edges underneath.

Easiest, Fastest, + Cheapest Christmas Tree Skirt.  Use 1.5 yd of fabric and wrap around tree.  Follow easy instructions by @Jenna_Burger of WWW.JENNABURGER.COM

Literally, this took all of 30 seconds and it was done.

Easiest, Fastest, + Cheapest Christmas Tree Skirt.  Use 1.5 yd of fabric and wrap around tree.  Follow easy instructions by @Jenna_Burger of WWW.JENNABURGER.COM

By the end of the day, the tree skirt is all dishuffled anyway, so within seconds it looks good again.  There really is no right or wrong to this tree skirt, which makes it perfect for me!

And the best part is, it cost nothing and the fabric can be used for something else after the Holidays.  Next year, I may want a totally different pattern and I won’t be married to something store-bought or a creation that took hours. I hope you enjoyed my 30 second tree skirt creation.  Sometimes the easiest things are the best!

Be sure to check back next Monday when I’ll be partnering with a few Blogging friends who will all be sharing super simple holiday projects for our Christmas in a Minute series.  Cheers to a festive season. xo

Kitchen Organization: Ideas for the Inside of the Cabinet Doors

Happy Monday!  I was feeling a bit under the weather last week which is why the blog and my other favorite places to share + converse on the ‘net’ – IG, FB, etc – were quiet.  I’m still not feeling 100%, but am excited to share something I’ve been working on lately…  getting my kitchen organized.

For me, organization is a never ending battle.  I never feel like everything completely has a home, but I’ve accepted that and continually try to work towards creating a more efficient, more organized home.

When Lowe’s put to me to the challenge this month to tackle the kitchen, I knew it was a win-win.  To start off, I took a step back to analyze how the space could be more organized and user-friendly for cooking and storage.  I made a few moves of pots and pans, but what I really wanted to put-to-good-use was the insides of the kitchen cabinets. All that vertical space going unused?  The ideas started to flow…

Kitchen Organization: Ideas for storage on the inside of the kitchen cabinets by @Jenna_Burger, WWW.JENNABURGER.COM

My kitchen isn’t small, but it isn’t huge either.  With no pantry or extra storage for food, I’m always thinking about how to best store the food / “pantry items” in the cabinets.  For the most part, we eat real food / very little processed food.  That means no snacks that have to be stored for a long period of time because the food I buy has little “shelf time”.  Good for me, that the food we buy takes up less shelf area.  Bad for me, I go food shopping a lot.

Anyway, there is one large cabinet that all the food is stored in.  It’s a large cabinet at about 30″ wide with (2) doors.  Take a look…

Kitchen Organization: Ideas for storage on the inside of the kitchen cabinets by @Jenna_Burger, WWW.JENNABURGER.COMdon’t you just love peaking into other peoples cabinets??? What are they eating?  What do they buy?  We use a lot of coconut oil – 3 jars right there in front.

Great change, right?!  Nothing from this space had to go, but instead everything was reorganized to be easier to get at in an instant.

Let me show you a bit more of what I did…

On the inside of the left cabinet, I lined the inset panel with stylish geometric patterned contact paper.  Similar to what I did for my TV cabinet back in the Summer.  I purchased the roll of contact paper at TJ Maxx for about $5 – what a great score.

Once I aligned the contact paper on the cabinet and pulled off the backing, I used a straight edge to trim the excess.

Kitchen Organization: Ideas for storage on the inside of the kitchen cabinets by @Jenna_Burger, www.sasinteriors.net

Once the contact paper was adhered, it was time to dress it up.

Before my interior cabinet updo, I never had a great place for spice storage, so that was a major need on my list.  I looked around for pre-made styles, but nothing fit the bill just right, so I made my own.  I’ll show you more on that in an upcoming tutorial, but this is the result…

Kitchen Organization: Ideas for storage on the inside of the kitchen cabinets by @Jenna_Burger,WWW.JENNABURGER.COM

For less than $8, I created 2 fit-to-size wood spice racks.

Kitchen Organization: Ideas for storage on the inside of the kitchen cabinets by @Jenna_Burger, WWW.JENNABURGER.COM

At the top of the interior of the cabinet, I added a half round piece of trim, which I then added metal screw-in hooks to.

Kitchen Organization: Ideas for storage on the inside of the kitchen cabinets by @Jenna_Burger, WWW.JENNABURGER.COM

I attached the half round piece of trim + the newly made wood spice holders using a very very very strong adhesive – Loctite Epoxy Instant Mix.  Basically it’s two formulas that mix together and provide a major adhesive mixture. DO NOT TOUCH IT.  I carefully applied the mixture to the back of the trim and spice holder, then placed it on the interior of the cabinet.  I held it in place for about 3-5 minutes until it was completely adhered to the surface.  I will be honest, the wood started to slide a few times, but I was close by and slid it back into place.  There are other epoxy mixtures that dry even quicker – 1 minute of less.

DIY: Wood Spice Rach Holder for inside the kitchen cabinets; Less than $8 to make, in 15 minutes by @Jenna_Burger, WWW.JENNABURGER.COM

It really is the perfect spot to hang many of the kitchen utensils.  Here’s the result…

Kitchen Organization: Ideas for storage on the inside of the kitchen cabinets by @Jenna_Burger, WWW.JENNABURGER.COM

Kitchen Organization: Ideas for storage on the inside of the kitchen cabinets by @Jenna_Burger, WWW.JENNABURGER.COM

Heading over to the other cabinet, the right side, I added a decorative magnetic metal sheet that I found at Lowe’s and adhered it to the inset panel with 3M 77 Multipurpose Adhesive.  I sprayed the adhesive outside on a towel and then ran brought it indoors and positioned it.  All went to plan and my fingers only stuck together a little, phew…

Kitchen Organization: Ideas for storage on the inside of the kitchen cabinets by @Jenna_Burger, WWW.JENNABURGER.COM

Having the magnetic sheet on the inside of the cabinet door has been GREAT! This large vertical spot is great to keep my grocery list, to do’s with the kids, and of course our random chinese fortunes…

Kitchen Organization: Ideas for storage on the inside of the kitchen cabinets by @Jenna_Burger, WWW.JENNABURGER.COM

For the interior of the cabinets, I took everything out and simply organized it all.  Well, it wasn’t simple, but it sure was worth it!  For things that could be grouped – like snacks, baking supplies, medicines, teas, etc. – I added bins and labeled them with washi tape.  So easy.  The bins are from ClosetMaid available at Target and they are leftovers from when I reorganized the kids rooms.  They are the ideal size for a typical kitchen cabinet.

For the rest of the food items, I grouped them and organized them as I saw best for how / when I would use them.  Really no rhyme or reason…

Kitchen Organization: Ideas for storage on the inside of the kitchen cabinets by @Jenna_Burger, WWW.JENNABURGER.COM

On to the other large cabinet, the space that holds ALL the dishes.  Another material that I thought would be extra helpful in staying organized in the kitchen was cork.  I purchased a roll of cork and double layered it, then added it to the inside panel of the cabinet interior, again using the 3M Multipurpose Adhesive.

Kitchen Organization: Ideas for storage on the inside of the kitchen cabinets by @Jenna_Burger, WWW.JENNABURGER.COM

This is such a great spot for the school calendar, plus random coupons, and reminders.  I also use the cork board when following a recipe.  I pin it on the board and it’s right in front ready to follow as I’m prepping.

Also on this inside cabinet, I added another half round trim piece for added storage.  Right now all I have is a pin with a pen hanging, but it can be used for so many other things.  Maybe more kitchen utensils???

Here is the result of my kitchen organization, with all the doors open…

Kitchen Organization: Ideas for storage on the inside of the kitchen cabinets by @Jenna_Burger, WWW.JENNABURGER.COM

Inside and out, I’m loving this space.

If you haven’t been following along with my blog from the beginning, you might not know that I redid the entire kitchen by hand (total down-and-dirty do it yourself) a little over 2 years ago.  It included painting cabinets, painting the countertop, adding backsplash tile, adding decorative brackets,and more.  See the before and after by clicking here.

I’m still on a path for more organization, but I feel one step closer to a more efficient space.  On to the next room…

I truly love using every square inch of a space.  Vertical surfaces often are forgotten as the ideal spot for storage.  If you use all the interiors of your kitchen cabinets, how much more could you store??  Ask yourself.

To gather even more unique, fun, and creative ideas for your indoor and outdoor Fall and Winter spaces, I would definitely suggest downloading the Lowe’s Creative Ideas app on the iphone and ipad.  I’m always checking out the FREE app for great seasonal + do-it-yourself inspiration.

Lowes Creative Idea Network Creator & Influencer

Also consider following Lowe’s on Facebook, Pinterest, and Instagram as well.

 Disclosure: I am part of the Lowe’s Creative Team and was provided with a Lowe’s gift card to purchase items for my project.  I was also compensated for my time to use the products.  No one told me what to create, what to buy, how to use the product, or what to write.  All opinions are 100% mine! Fall Blogger Badge 1

Bring the Outdoors In: How To Create Fern Art

This post brought to you by Apartments.com. All opinions are 100% mine.

While tackling my foyer revamp, I gave a lot of thought as to what type of artwork / wall decor to put above the new gold dresser gorgeousness, as I like to call “her”.  The focal wall that got “dressed up” with new wide horizontal stripes is only about 5′ wide, but whatever was chosen to display needed to make an impact.  I didn’t want it to be personal pictures since we have so many around our house already, but I wanted it to be meaningful and reflect us.  I even reached out to you, my followers, on Facebook asking for suggestions on your favorite Etsy shops.  Even though I didn’t go that route, I now have a few go-to places for the future.

In the end, after much thought, my artwork was right under my nose in my backyard – literally.  After cutting a few wild flowers and ferns for a bouquet I was putting together for our outdoor dining table a few weeks ago, I thought using the ferns as art would be the perfect solution.

Bring the Outdoors in by using ferns and creating art by @Jenna_Burger, www.sasinteriors.net

Our backyard is filled with ferns and wild flowers, so I cut + collected a few different kinds choosing those that appeared to have all their leaves in tact.  No matter if you live in a house, like me, or in an apartment, bringing the outdoors in allows your home to feel more organic and to be ONE WITH NATURE.  A little corny sounding, but true.

No wild flowers in your back yard?  Check out the wooded / more dense areas of a nearby park.  With Fall in full peak, it’s a great time of year for a walk or hike.

Once I had the ferns collected – about 10 good ones – I individually laid each out on a white piece of paper (wax paper is an alternative option).

Bring the Outdoors in by using ferns and creating art by @Jenna_Burger, www.sasinteriors.net

Once all were laid out, I took the stack of ferns + paper and pressed them between 3-4 hardcover, heavy books.  Be sure the entire fern is covered on the paper and be sure that it all gets pressed between the book.  If it doesn’t, the part of the fern / flower sticking out will wilt.

About 3 days later, I took the dried out ferns and started creating the “art”.  I snagged these simple picture frames from AC Moore for about $2 and thought the minimal frame was perfect to let the ferns “speak”.

Bring the Outdoors in by using ferns and creating art by @Jenna_Burger, www.sasinteriors.net

At first, I simply used the white paper to mount the ferns, but after a few days, the paper started to wilt because the ferns were still exuding moisture.  I decided to use a heavier paper and cut out pieces of poster board that fit to size. This did the trick!

Bring the Outdoors in by using ferns and creating art by @Jenna_Burger, www.sasinteriors.net

And then they were ready to hang…

Bring the Outdoors in by using ferns and creating art by @Jenna_Burger, www.sasinteriors.net

Bring the Outdoors in by using ferns and creating art by @Jenna_Burger, www.sasinteriors.net

Bring the Outdoors in by using ferns and creating art by @Jenna_Burger, www.sasinteriors.net

Along with the ferns, I also pressed a few wild flowers.  I love the yellow coloring.  They add a bit of color to the art collection.

Bring the Outdoors in by using ferns and creating art by @Jenna_Burger, www.sasinteriors.net

Bring the Outdoors in by using ferns and creating art by @Jenna_Burger, www.sasinteriors.net

And this is the overall new Foyer space…

Foyer Remodel with newly striped walls, fern art, and layers of colors + texture.  Spaced designed by @Jenna_Burger, WWW.JENNABURGER.COM

It’s so wonderful how the outdoors can be brought in, to enjoy throughout the entire year.  The simplicity and ease of using ferns as art is a pretty + no-cost way to create a beautiful focal point.

Bring the Outdoors in by using ferns and creating art by @Jenna_Burger, WWW.JENNABURGER.COM

As an Apartments.com Brand Influencer, I strive to share ideas + do it yourself projects not only for those who live in homes, but also easy & affordable ideas + creations for apartment dwellers.  Next time you’re looking for something unique + meaningful + free for your walls, turn to the outdoors.

For more great ideas on creating a meaningful home, especially for those who rent, turn to the Renter Resources section on Apartments.com.  It is filled with interesting + useful information to make your dwelling reflect you.

Visit Sponsor's Site