Holiday Mantel and Table Centerpiece

I know I said a couple of weeks ago that I wasn’t in the Christmas Spirit, but now I finally am!   Last weekend, after our bellies were stuffed with Turkey, we started transforming the house from the Fall / Thanksgiving decor over to Christmas.  I’m not sure why I was so reluctant at first and unprepared for the changing season, but o well, it’s past me and I’m excited for some Holiday Cheer!

The center and focal point of our home is the fireplace (yes, the one on the burnt orange wall), and again it has been decked for the Holidays!  I was quite anxious to get started on the mantel because I knew exactly what I wanted to use and how I envisioned it to look.  I was thrilled with the result of my Fall centerpiece creation and wanted to use the log as the focal point for this year’s Christmas mantel.

Here is a simple run-down of how I created the log.

  1. Find a log of any length that you desire (My log is about 4′ long)
  2. Using a 1.5″ drill bit, drill holes into the log every 5-6″
  3. Insert tea lights or battery-operated candles into the holes.
  4. It’s ready to decorate for any season!

Back to the mantel…

Once I placed the log on the mantel, I simply started layering.  I used faux greenery for the base, then added some natural cut greenery from trees in my backyard throughout.

Then, I took faux berries (purchased at the craft store) and incorporated them throughout the greenery.  Because they are bendable, they are easy to work with.  After that came the final touches…  Ornaments, pinecones, and some other branches and twigs from the outdoors.

It was complete in no time!  This Holiday log decor on the fireplace mantel makes for a beautiful focal point.

Once it was complete, I had to add stockings, of course!  As a family of 4, we’ve never had matching stocks and they’ve always been on my to-do list to make.  I whipped out my sewing machine and a few hours later, added beautiful new stockings to the decor!  I’ll share a tutorial on that later in the week.

We really enjoy how the stockings are hung by the chimney with care

These stockings look kind of plain, but I jazzed them up yesterday…stay tuned and I’ll share more this week!

Part 2 of this post

I had to share this with you too…

Before deciding to decorate the mantel using the log, I was actually planning to display it on the dining room table similar to the fall centerpiece.  Since we use our dining table everyday, it was BEAUTIFUL, but not practical because the natural greenery sheds alot (forewarning).  On the fireplace it works because it’s not moved everyday.

Using the same technique as decorating the mantel, I layered greenery, branches, berries, and pinecones, then finished the centerpiece with decorative ornaments.  If you want to see more on this creation, I shared this project on my TV debut on Fox 23.

Complete with the handmade stenciled drop cloth placemats I made a few weeks ago, the table is set for Christmas!

The Holiday decorating continues…I’ve got many more projects and ideas to come during this countdown to Christmas!   If you’re looking for ideas on some do-it-yourself creations, head over to the Holiday section of Daily Do It Yourself.

I link my projects to some of these parties: Skip to My Lou, Dittle Dattle, Between Naps on the Porch, Today’s Creative Blog, Stories of A to Z, All Things Heart & Home, Savvy Southern Style, House of Hepworths, Finding Fabulous, Creation Corner, The Shabby Nest, Tatertots and Jello, Thrifty Decor Chick, Under the Table & Dreaming

Holiday Card Holder

Tis’ the season for cards!  Of course, you might get sent a random card here or there throughout the year for a birthday, anniversary, or special occasion, but there is no time like Christmas when you receive such a flurry of cards all at once.  And aren’t they such a delight to get?!  The anticipation of opening the mailbox each day around Christmas is so exciting!

Yesterday, I shared 15 creative ways to hang those plethora of cards, and today I am sharing my creation.  As I mentioned yesterday, I was in need of some inspiration this year as to how to display my newly received Christmas cards.  After doing a little hunting around the web, I was quickly inspired and created a unique card holder to call my own!

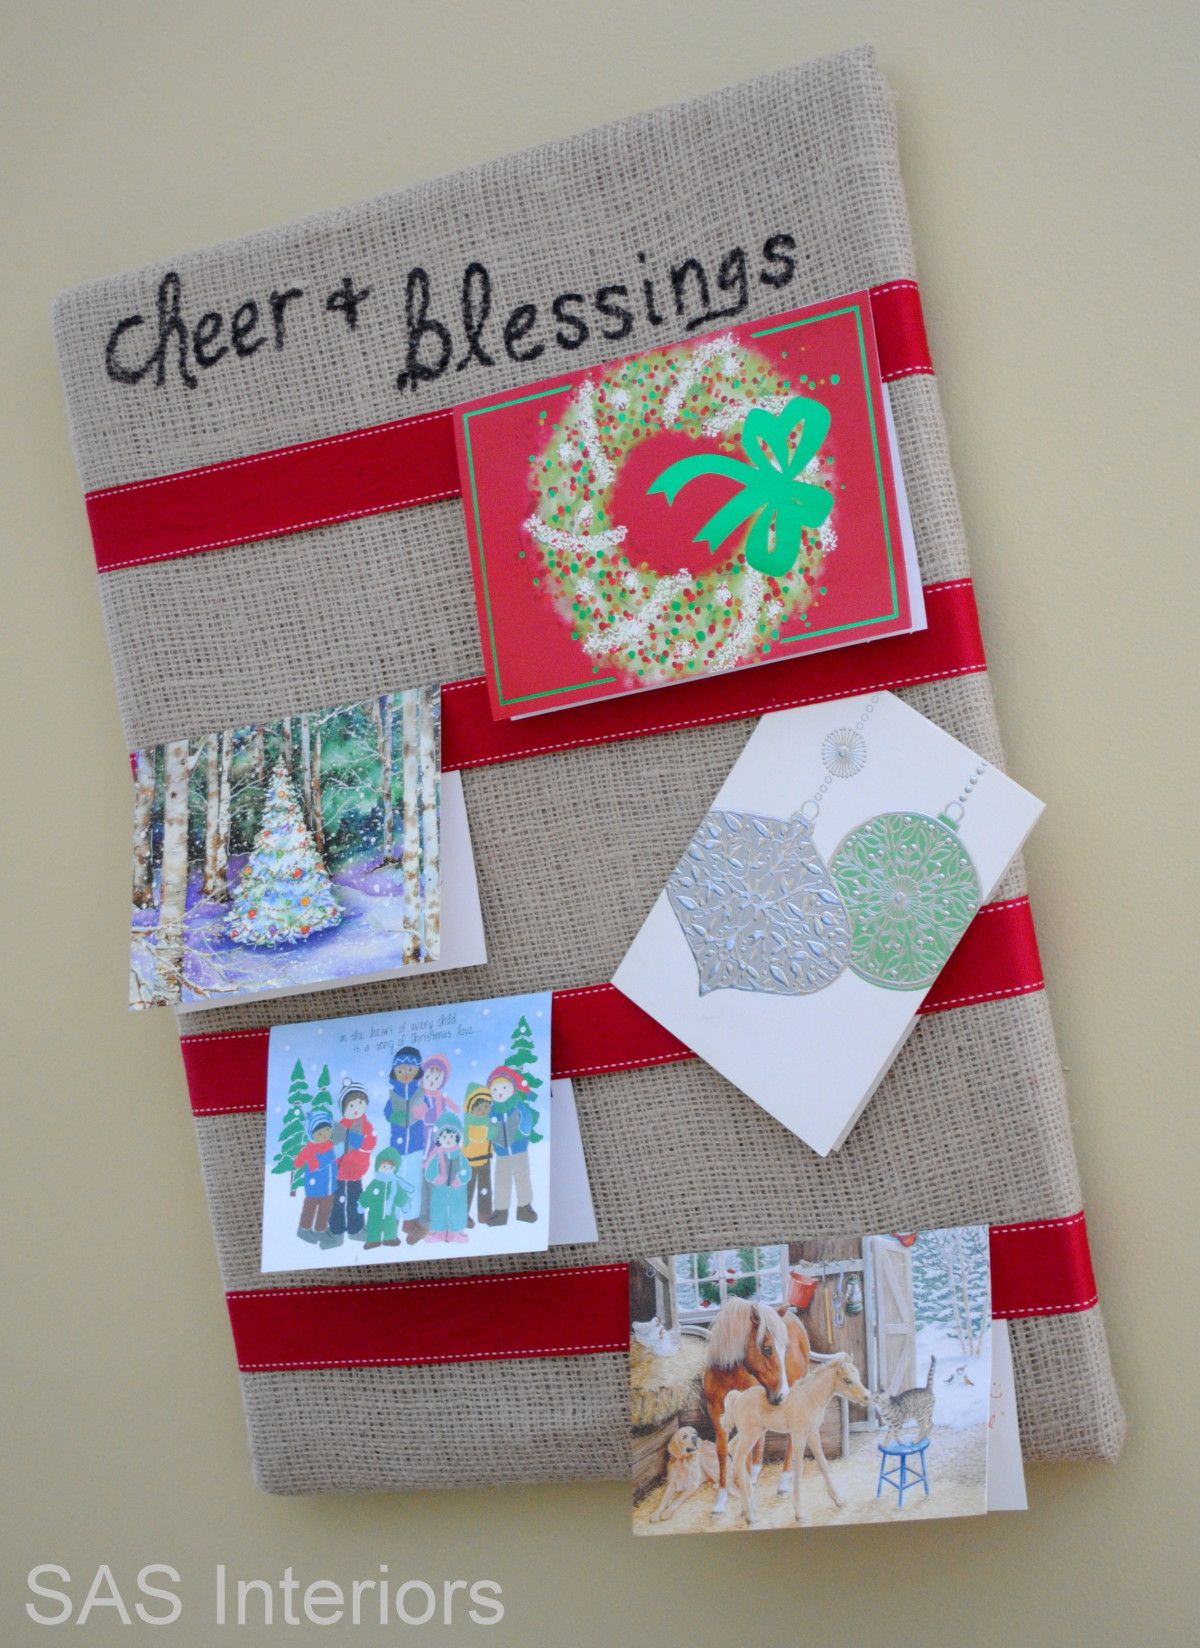
This Holiday card holder was actually very easy to make and only took a few minutes. If you’re interested in making something like this to hold your cards, I used:

  • 18 x 24 cork board (you could also use a picture frame or a flat piece of MDF or wood)
  • Burlap (or other neutral toned fabric)
  • Ribbon (one color ribbon or a few different styles)
  • Staple Gun

1. To start off, I ironed the burlap so it was free of any wrinkles and folded it over, so it was double thick.  (If using a tighter weave fabric, you may not need to make it double thick.  Because burlap has a loose weave, I didn’t want to see through it.)

2. I layed the corkboard on the fabric and secured it on the back with staples.

(I know it’s mess from the back, but you won’t see it)

3. Time to add the ribbon.  I used the same ribbon for the entire project because it’s what I had on hand.  You could also use different style and sized ribbon for a fun look! Before stapling, lay out the ribbon so the layout / design is exactly how you want it.  Then secure on the back with a staple.

4.  You can either hang it or lean it on a table.  I decided to hang the Holiday Card Holder, and made a loop on the back with some extra ribbon.  A few staples later…

…and it was complete!   Now I’ve got the perfect place to hang all the cards that will be delivered throughout the Holiday season!

I added the words: cheer & blessings to show how I truly feel to be sent these beautiful thoughts from people I love.  Using a black Sharpie marker, I added these two words that I am thankful to feel each day!

And don’t you just love that darling Winter Bucket List printable?  You can print it out for yourself to check off all the winter activities you do with your family!

Have you started decorating for Christmas yet?  I’ll have to be honest, I was not ready and excited this year as I usually am, but now that I’ve started transforming the house, I am getting psyched for some Christmas Cheer!

I link my projects to some of these parties: Skip to My Lou, Dittle Dattle, Between Naps on the Porch, Today’s Creative Blog, Stories of A to Z, All Things Heart & Home, Savvy Southern Style, House of Hepworths, Finding Fabulous, Creation Corner, The Shabby Nest, Tatertots and Jello, Thrifty Decor Chick, Under the Table & Dreaming


The Right (and Wrong) Way to Hang Window Drapery Panels

I had planned on sharing another part of my bedroom makeover, but I got tied up in other directions, and didn’t have a chance to complete my next reveal.  But stayed tuned, I hope to wrap it up very soon (see how I said hope – it doesn’t mean it’ll actually happen, but it’s wishful thinking)!

Instead, I have a great post for you that will be informative and eye opening.

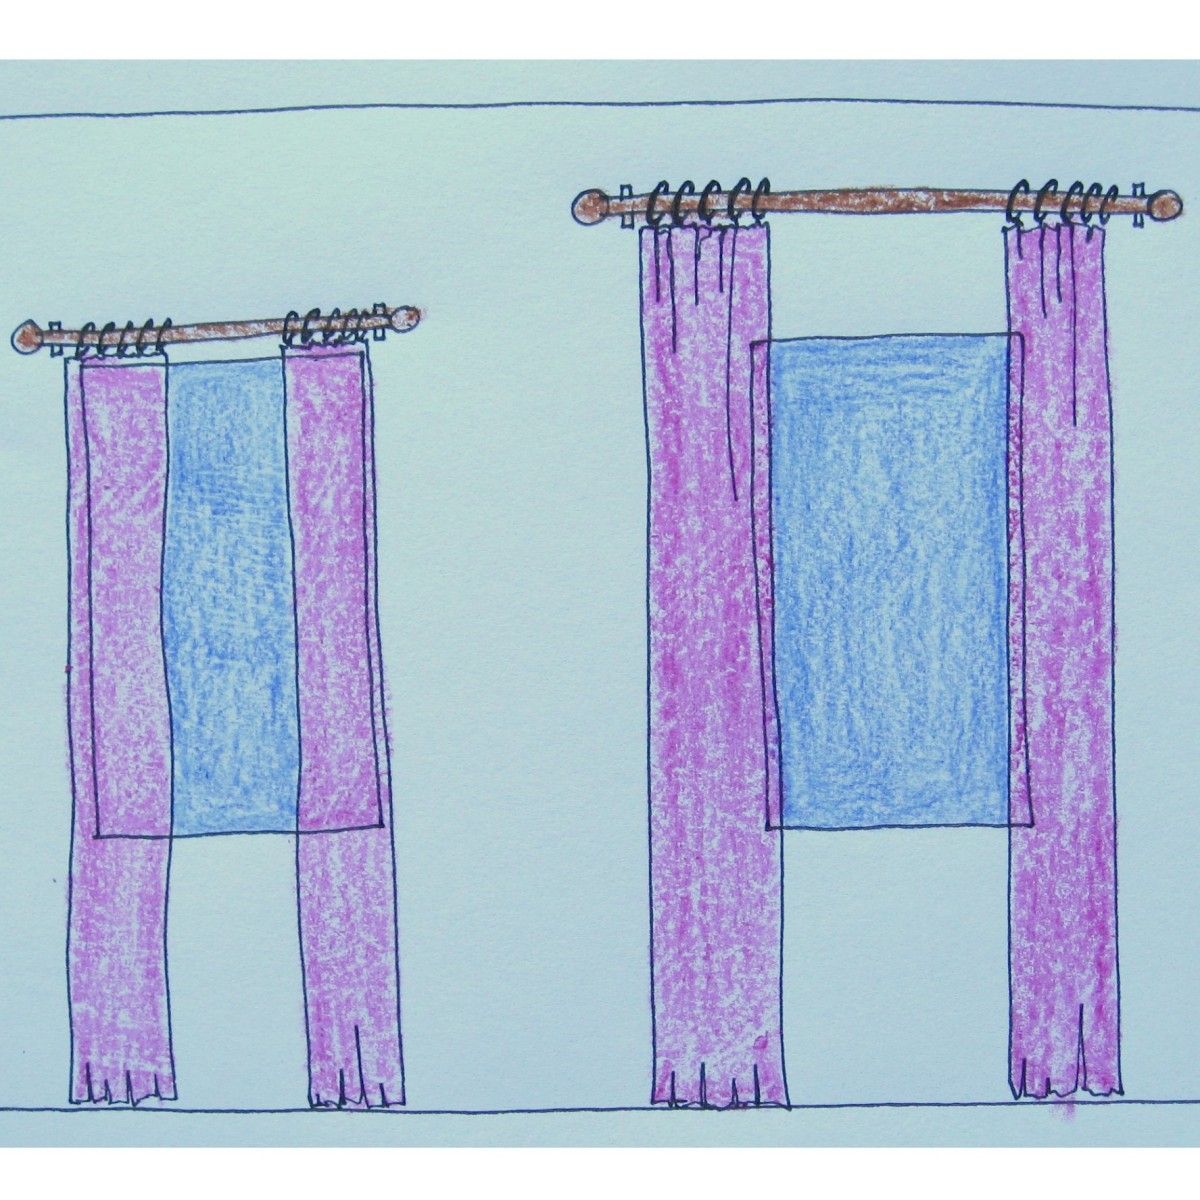
Earlier in the week when I shared my newly made lined window panels, I started to ponder how others think window treatments should be hung.  I sometimes take for granted that homeowners know the tricks that are innate in my brain.  I saw this picture via pinterest, but created my own illustration to visually show the best way to hang window treatments to allow as much natural light to shine through and visually enlarge the space.

Do you see a difference between these two window examples?
(I hope you do)

Which would you choose to be the best way to hang a window drapery panel?  And why is one better than the other?

Well let me share my answer and why!

My illustration starts with two of the same sized windows.

Then we’ll add some window treatments.

On the left side are window drapery panels that mostly cover the window and are hung on a rod that is placed directly above the window trim.

On the right side are window drapery panels that extend out to mostly cover the wall, leaving only about 1-2″ covering the window.  They are placed on a rod that is half way between the window trim and the ceiling

Well if you haven’t realized yet, the right side is the right way to hang window drapery panels.

And this is why~

There is a HUGE amount of additional light that shines through when window drapery panels extend out and are mostly placed on the wall surface.  Here’s an illustration showing the amount of light entering the space (seen in blue) for each window example.

This illustration shows how much of the window drapery fabric is covering the window (seen in red).  Only a sliver of fabric covers the window on the right side, but a huge amount of fabric is covering the left side.

And here is an overall illustration of how the draperies look side-by-side.

Positioning window treatments more on the wall than over the window, not only allows for more natural light, but it also heightens the room and visually widens the window.

Take a look at some real-life examples.

Let’s first start with the WRONG way of hanging window panels.

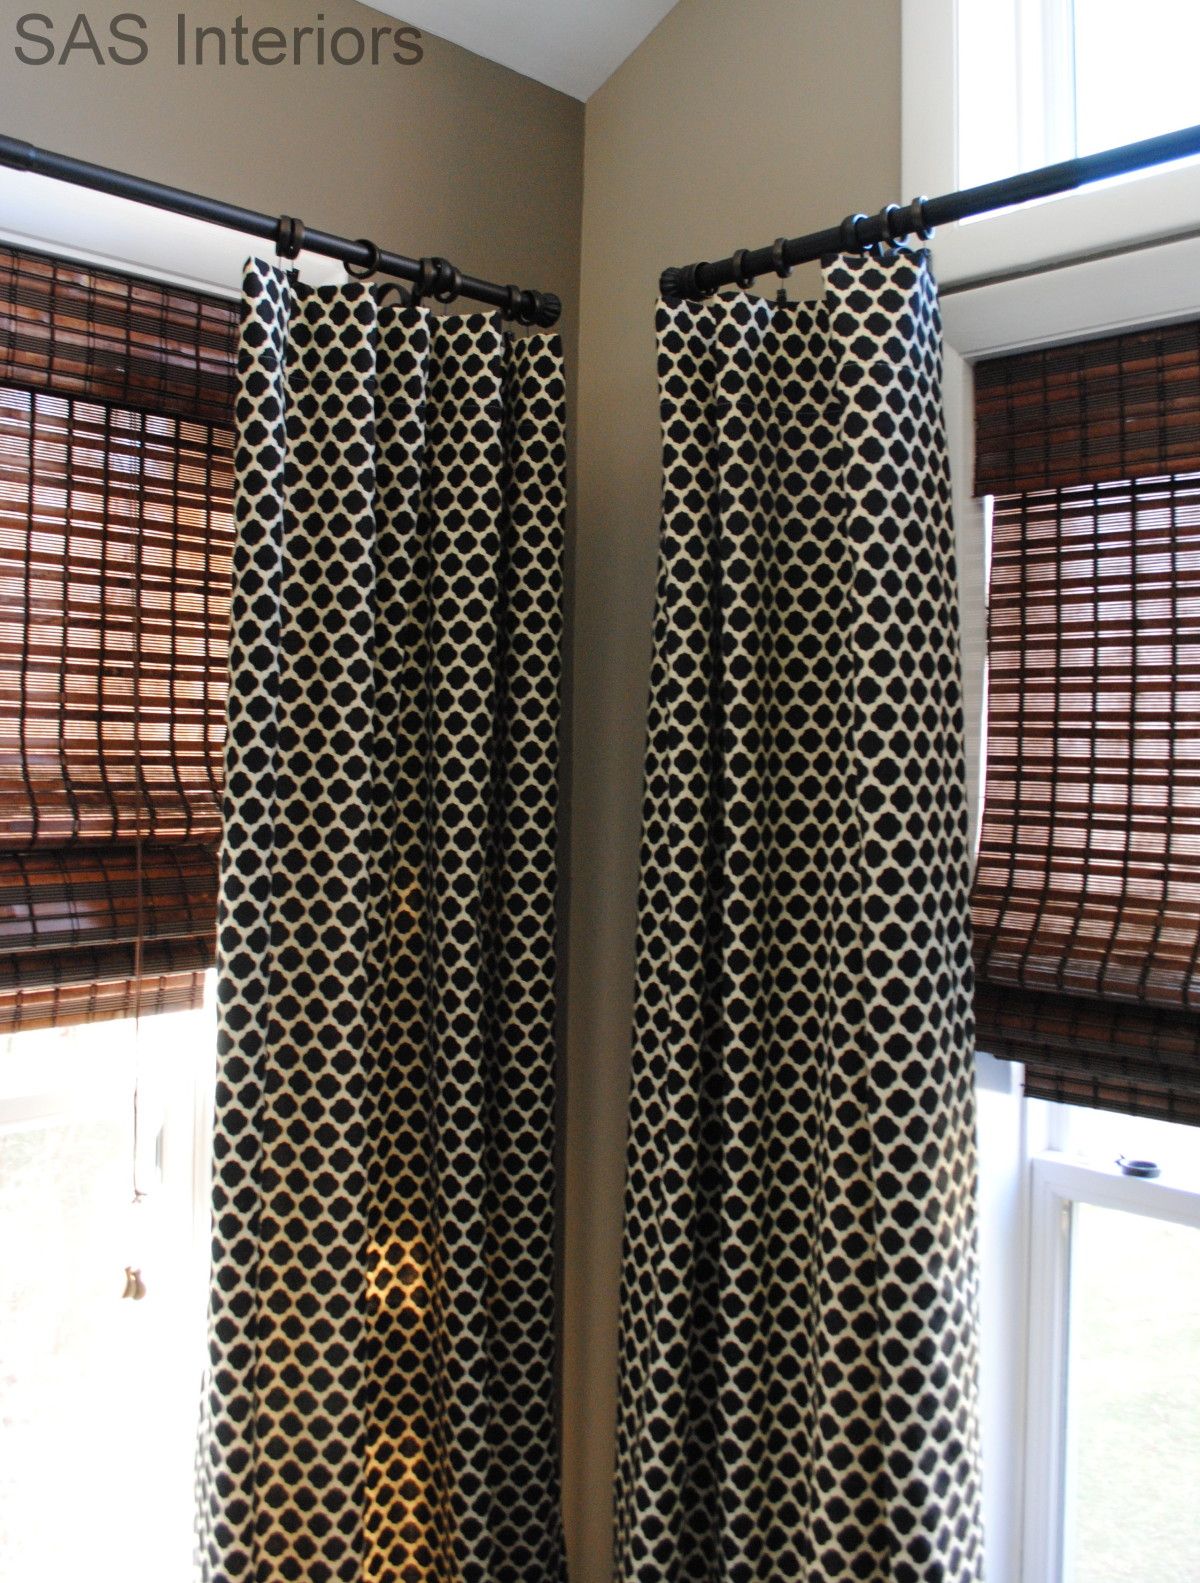
The window hardware is smartly placed to bring the eye up, but the window panels cover the window WAY TOO MUCH – unless you don’t want to see your neighbors this is NOT the way to hang drapes. (via Southern Living)

In this example the drapery hardware is placed on the window frame, so the panels appear to be hovering over the door allowing only a small amount of light to shine through. (via ChicColes)

Now let’s check out the RIGHT way to hang drapery panels.

* Allow in a HUGE amount of natural light
* The higher placed hardware heightens the room and allows the eye to be drawn up
* The window feels wider

How are the window treatments hung in your home?


DIY: How to Make Simple Lined Window Drapery Panels

For the past few months, I’ve been thinking about doing some updates to my bedroom.  There’s nothing “wrong” with it, but some of the elements – window treatments, pillows, pictures – have been around for a while and you know me, I always need something to change or update!

First thing on the list?  Window Treatments.

The ‘before’ window panels were from our previous home and the length has always been an issue since I repurposed them in this space.  They are beautifully lined panels from Pottery Barn (with matching pillow covers), but I was just ready for a change!

This is how they looked before~

Well actually the window treatments were the second on the list, first came the fabrics.

After having a concept in my head, I was on the search for new fabrics.  I was stuck on the color of dusty-gray-blue.  Because my interiors are mostly on the warm side, I wanted to bring in some cooler tones.   I combed the net, searched in fabric stores, and found nothing that appealed to me.  Then I made a random trip to Joanne Fabrics one day, and found this fabric which was very inspiring, but totally not the dusty-blue that I had desired.

O well, I loved it and a few fabrics later, I was out the door and ready to start my transformation.

Before I begin the step-by-step tutorial,  I wanted to mention that I decided to line the window treatments, but it isn’t a must for drapery panels.  Even though they were not going to be functional, meaning I wasn’t planning on moving them each day/night to block the light, I still wanted them to have a more substantial feel and heavier weight.  I decided to use drop cloth material because it was the least expensive and I knew from my other projects that drop cloth would really give the panels more substance and hang better.

Making Lined Drapery Panels

1. I started off by measuring the height from the floor to my existing drapery rod.  Once the height was determined, I added about 12″ of additional fabric which gave me some “play” for alterations in later steps.  I layed out the fabric and using my cutting board, clear ruler, and fabric cutter, to measure the length of fabric needed for three panels.

FYI: At this point, measuring does not need to be perfect, because it will be altered later.  That’s the beauty of these panels!

The measurement from my floor to the drapery rod was: 78″, but to allow for enough fabric I made each panel 90″

2. Once the main fabric is cut, lay the right side of your main fabric onto the right side of the lining fabric (in my case, I used drop cloth material because it was the least expensive.  For $16, I got one piece of drop cloth that was 9′ x 12′).

Before cutting, make sure ALL YOUR FABRICS ARE IRONED!  Once ironed, use your main fabric as a template and cut the lining fabric to the same size.

3. Once both fabrics are IRONED and CUT, pin around the edge of the entire panel.

4. Similar to making a pillow, sew around the 4 sides, except leave a 6-8″ opening at one of the shorter ends, so you can pull the right sided fabric through.

After sewing around, pull the fabric through to the right side.

5.  Once pulled through to the right side,  iron all the edges and seams so the panel is nice and crisp! Now that the main part of the lined drapery panel is complete, they are ready to be hung and altered.  There are numerous ways to hang window panels, but I decided to use a basic rod and hang the panels using clip rings.

6. To determine the height for the window panel, measure from the floor to the top of the clip (not to the top of the ring).  Take the unfinished side of your panel and clip the rings to it.  Then adjust the height of the panel up or down, so the panel either just hits / skims the floor OR leaves a slight puddle on the floor (I decided to have them just hit the floor).

The one side of the panel is still unfinished (that’s okay), and here’s how it will look from the back.

Now let’s finish this up…

7. It’s time to trim and finish the top.  Measure down about 4-5″ from the crease where the rings are clipped to.  Trim the rest.

8. (a) With the rings left on, remove the panel from your rod and head back to the ironing board. (b) First, iron in between the rings to get a crisp line.  Then remove the rings and iron the entire crease.  (c) Open the crease and fold over the top edge twice creating a finished edge. (d) Close the crease, iron and pin edge so it can be sewn.

8. Then sew along the bottom edge of the “flap”.

Reinstall the drapery rings and the lined window panels are complete and ready to hang.

The wall of windows and the entire view of the three lined window panels…

One more time…here is the before and after~

And if you didn’t notice, I got rid of the sheers and replaced them with functional wood roman shades – such a better look!

I’m still in the midst of this master bedroom makeover and I’ll be sharing more soon, so stay tuned!

I link my projects to some of these parties: Skip to My Lou, Dittle Dattle, Between Naps on the Porch, Today’s Creative Blog, Stories of A to Z, All Things Heart & Home, Savvy Southern Style, House of Hepworths, Finding Fabulous, Creation Corner, The Shabby Nest, Tatertots and Jello, Funky Junk, Under the Table & Dreaming

DIY: Child’s Play Kitchen

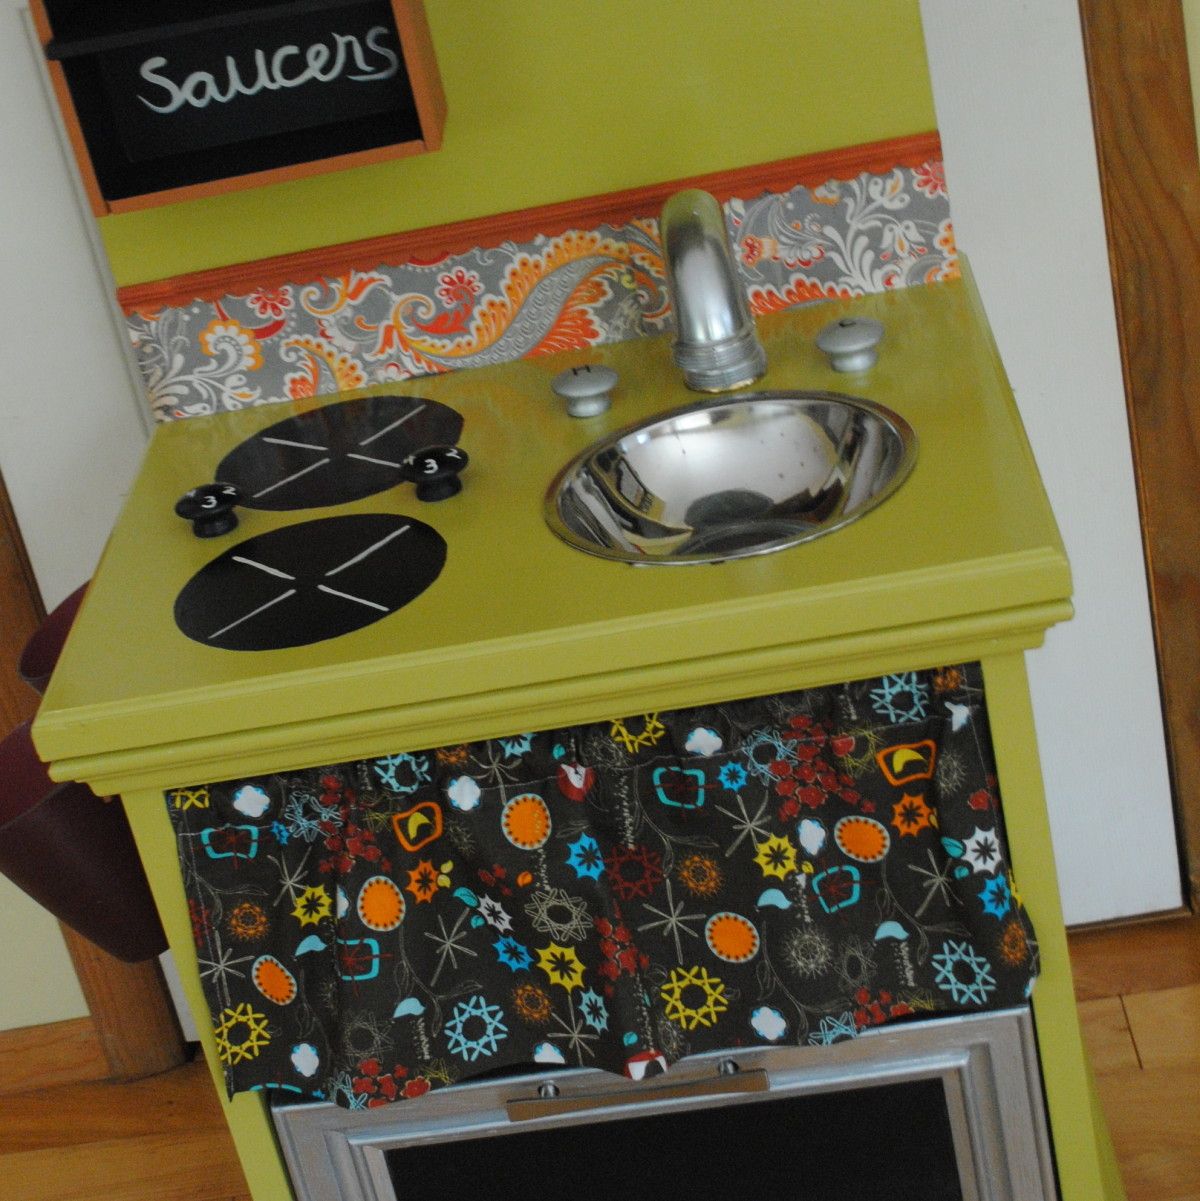
Aside from blogging, working, and being a mom and wife, I have spent every waking moment of my spare time over the last two weeks, making this…

I didn’t buy it this way.  I made it! I actually can’t believe it myself.  This is what I started with – a wood nightstand with two drawers.

My daughter turned two last month and she really loves to play with pretend food, so I searched and hunted for a play kitchen for her birthday.  I  found a few I liked, but they were either too expensive or too big, so after some thought, I decided to make one on my own.  I DIY everything else, so I was up for the challenge.  In searching for real kitchens on Pinterest, I came across a few pretend kitchens.  Using some ideas that I had seen, and knowing the desired size I was looking for, I’ve been on the hunt for a nightstand for quite some time.  Thankfully my mom came to the rescue a few weekends ago and brought me this beauty.  It was actually difficult for me to transform this nightstand because it was in great shape and looked really nice.  But that thought went out of my head in 5 seconds!  In no time, I was off and working…

What’s great about DIYing, is that you can search for inspiration, and then add your own unique creativity, to make a one-of-a-kind piece.  To make a play kitchen there are a gazillion things you can do and include, but hopefully with my creation, I’ll inspire you to make your own.

That being said, I will spare you the {play by play} details, and instead show some highlights throughout the process.

Thankfully for my anniversary, the mister got me some new tools, and ALL of them came in handy for this project!  I started off sanding the nightstand with an orbital sander.  Once it was nice and smooth, I applied one coat of primer, followed by using my new jigsaw to cut our the hole for the sink.  {MISTAKE} I should have made ALL the cuts and holes before I painted, because what happened?  The dust got into the paint (but, of course).  No problem though, I just sanded the surface one more time.   Mishaps can be rectified!  And there’s a sneak peak of the paint.

Moving on… 

I made a tall back piece out of MDF board and used “L” brackets to secure it to the nightstand top.

Then came the paint.  I chose to use a mustard-yellow hue with a touch of green undertone – Valspar Wasabi. Then the accents of burnt orange and deep purple (sounds kind of like the rest of my house, doesn’t it?).  To make the paint dry as smooth as possible, I added Flood Floetrol (also used in my kitchen makeover) which is a must when trying to achieve a smooth, even finish.

At this point, I was spending many hours in the garage and I’m sure my neighbors thought I was crazy!

I completed the painting phase of the kitchen, by adding two coats of satin Polyurethane.  Once the paint was finally dry, which took longer than I thought because we had some ultra humid days, I was ready to add the details.  To create the backsplash, I used leftover scraps from the personalized calendar and added a few coats of Mod Podge to harden the surface.  Then I finished it off by adding a decorative scalloped edge wood piece at the top.

Then came time to create the burners.  Using a round kitchen bowl, I outlined two circles and filled them with black chalkboard paint.  Right before that, I drilled the holes for the sink faucet handles and the burner handles (learned my lesson from last time… drill, THEN paint).

Once everything was dry, I attached the faucet handles and burner handles to the top of the kitchen by using screws from underneath.  By not tightening the screws too much, the handles can actually turn.  Then with white paint, I free-handed the burner coils and numbers on the burner handles, and added the H & C with a black Sharpie.

This is the work surface area of the kitchen all complete.

And the last part to this kitchen was the faucet.  That was a little tricky, because the mister and I were perplexed on how to fasten it onto the kitchen top.  If you remember back a week ago, I showed you this picture~

Yes, that is a P-Trap for the bathroom and using a little metallic silver spray paint, it transformed into a sink faucet.

For the “oven drawer” I also used this same spray paint and the black chalkboard paint in the center.  Looks pretty real to me.  Wouldn’t you say?  And then completed the look with a quick hand-sewn valance that sits in place of the top drawer.

What’s really nice about this kitchen is that it has ALOT of storage.  All their play “things” can be hidden away.

This is the result of the kitchen.  After many long days and endless hours, it really was a joy to create!

And one last time just to show you again where this cute little kitchen started…

This is different than the typical Interior Design and Decorating ideas and inspiration that I like to share on my blog, but it was fun creating something that is a little more “out of the box” for me.  I hope you enjoyed!

5 Minute Autumn Centerpiece

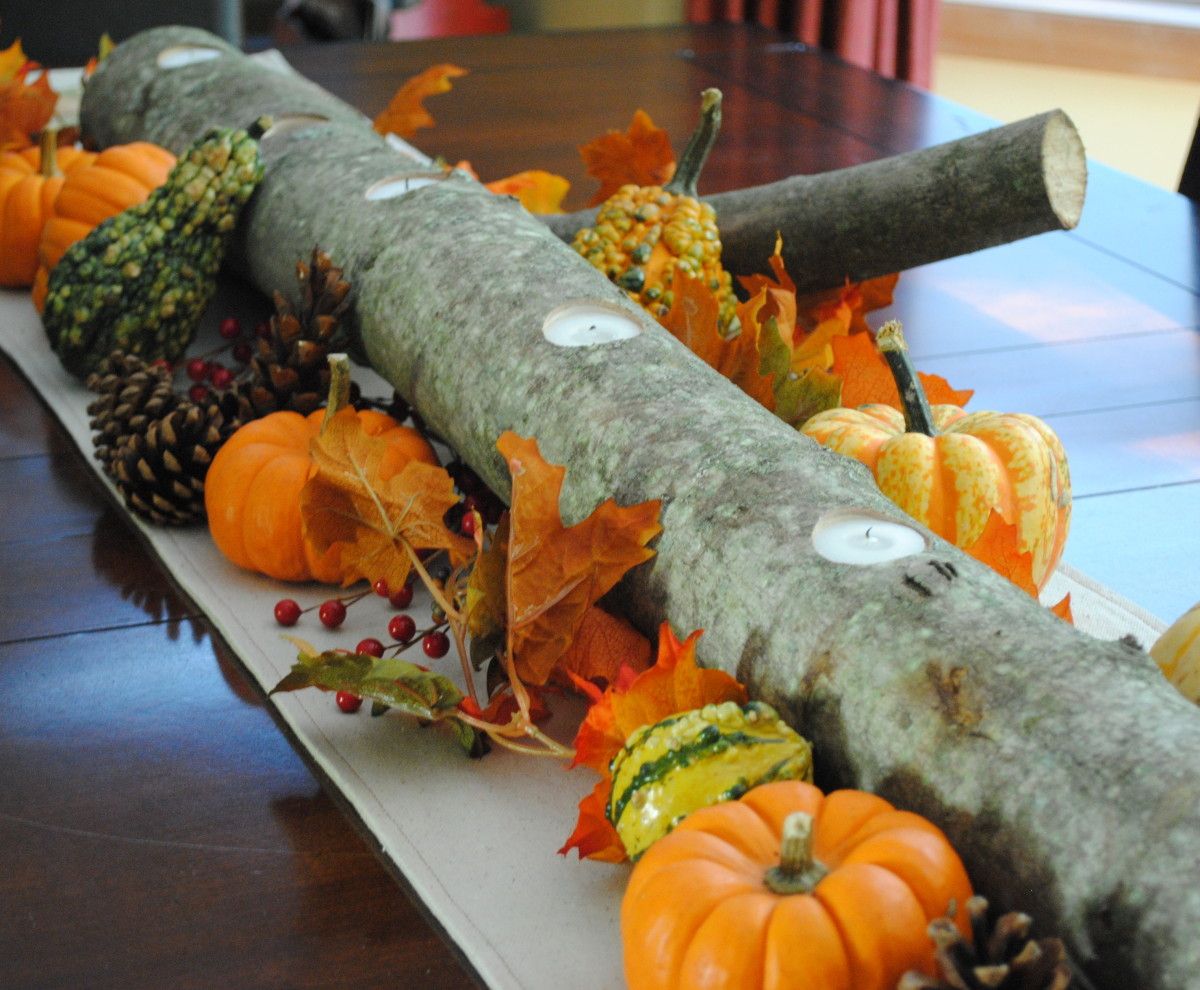
This past weekend when I got my DIY groove back, I made a centerpiece for my dining table that literally took less than 5 minutes and cost nothing!  The pictures, staging, and post took longer than the actual project.  Thankfully I am SO pleased with the results and now my dining table is complete for the Fall season.  Here’s a sneak peak of the final outcome, but let me take you through the steps so you can make one for your table!

Log Centerpiece that takes minutes to create and can be used for so many holidays & occasions!  Designed by @Jenna_Burger of www.sasinteriors.net

A few weeks ago, while going for an evening walk around the neighborhood, there were a pile of cut down trees on the side of the road ready for the next day’s garbage pickup.  I couldn’t stop myself, and ended up grabbing this 4′ beauty and piled it into the Radio Flyer wagon along with the two kids (the remainder of the trip home sure was tight for the kiddos).

As soon as I set my eyes on this log, I knew exactly what I wanted to do – make a centerpiece with tea lights.  I envisioned a simple, yet sophisticated backdrop that can be updated and changed throughout the seasons and holidays!

Unfortunately, it sat and sat in my garage for too long.  Then this weekend, my husband FINALLY got a drill bit that was large enough (1.5″ diameter) to drill into the log to create what I was desiring – My centerpiece creation was finally coming to fruition.

The mister and I drilled 6 holes about 10″ apart, and it was done!  Finito!!  It was that easy and it took less than 5 minutes to create this beautiful centerpiece.

And here it is.  Complete and shining bright!

So simple, yet so beautiful!

I had planned on putting it on my dining table and leaving it alone.  I thought it would “speak” for itself and it’s organic appeal would shine.  I still plan on doing that since we eat at this table everyday, but I also wanted to see how it would look all “dressed up”.  Soooo I took some of the Fall decor from the other vignettes I created and embellished this new log centerpiece.

I surrounded the log centerpiece with varying sizes of sugar pumpkins, pinecones, berries, and artificial leaves – perfect for a Thanksgiving table!

I was so happy to finally get this project complete and I love how it turned out.  How do you decorate your table for Fall?

I link to these parties: Cottage Instincts, Skip to My Lou, Dittle Dattle, Between Naps on the Porch, Today’s Creative Blog, Stories of A to Z, The Lettered CottageAll Things Heart & Home, Savvy Southern Style, House of Hepworths, Shabby Chic Cottage, Finding Fabulous, Creation Corner The Shabby Nest, Tatertots and Jello, Funky Junk, Under the Table & Dreaming
Trash to Treasure: Nursery Lamp Makeover

It’s always fun to make treasure out of trash!

A few weeks ago I was visiting a friend and sharing with her my experience on revamping a recent lamp project.  In turn she said she had acquired a lamp that was from her husband’s childhood, but had no idea what to do with it.  After a trip to the basement to scrounge through a few boxes, she came back with quite the “trash”.  It really wasn’t trash, it was just in desperate need of a makeover to give it new life.

To keep it in the family, her desire was to put it in her son’s room and I had the perfect idea!

Once I got the lamp home, I took it apart from head to toe and snapped a picture, just in case I forgot how to reassemble it later.  The lamp needed to be rewired and since I had just finished my How-To Rewire a Lamp tutorial, I was experienced enough to make the proper updates.  As you can see from the before pictures, the brass had tarnished from age and the colors were drear and in need of a revamp.

I started off by hand sanding each part of the lamp to give it a fresh start before painting.  The horse was a little tricky to sand, but I was able to get into some of the grooves…

Armed with “my staples” (not real staples, I mean spray paints), I was ready and off to transform this little horsey!

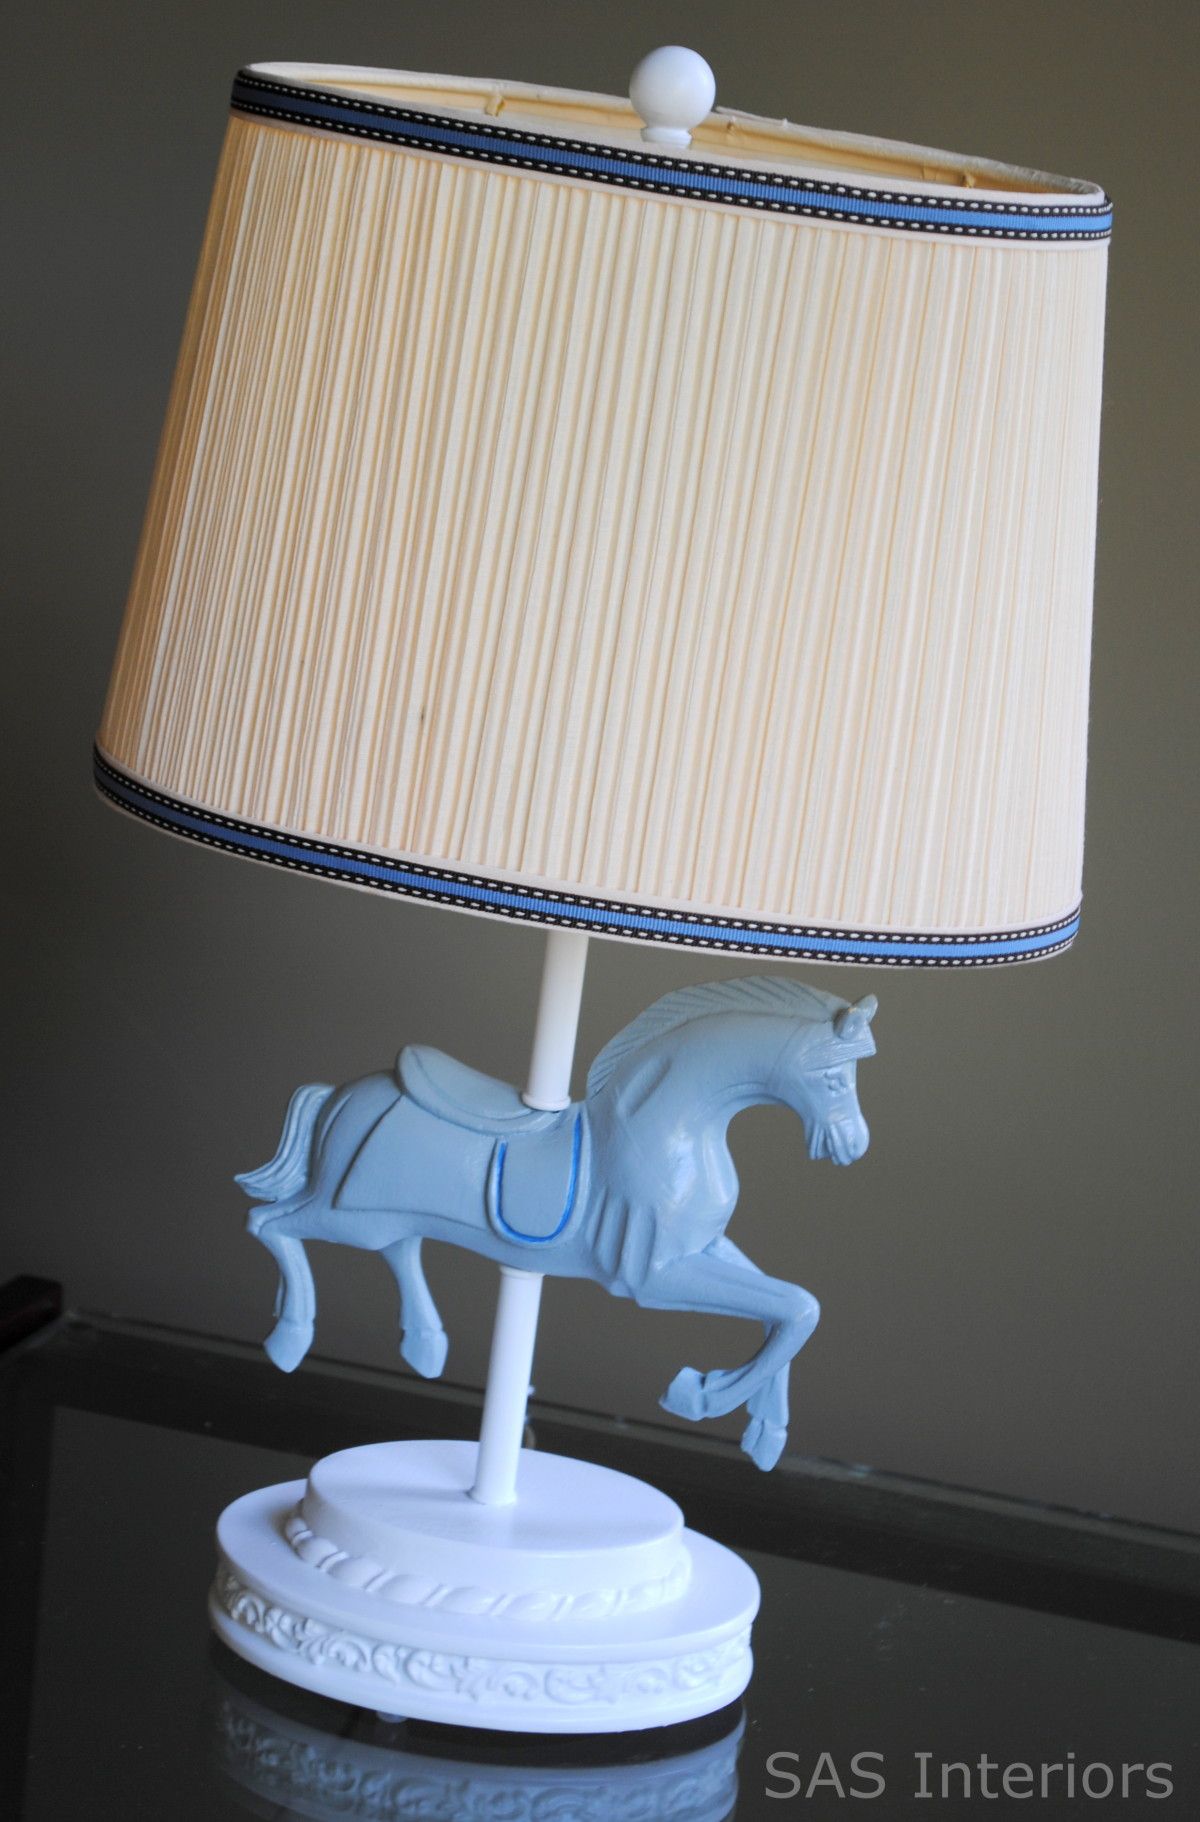
Ba-bye colored horse – Now you’re going to be a horse of a different color.  I spray painted the horse with 3 coats of Rust-oluem Winter Gray (same color as my lamp revamp), the other parts of the lamp (base and tubing) white, and finished it with a top coat of crystal clear enamel.

I had mixed feelings about the lampshade.  I actually had planned on replacing the old shade with a new crisp, white style.  I even bought a new one but it didn’t seem to be the perfect fit.  The existing shade was oval shaped to match the lamp base.  So I said, O heck with it, let’s reuse the shade and simply dress it up by giving it new life with a stylish ribbon.

Before being completely done with this Lamp reVamp, the horse was missing something… he needed a bit of color, so with a small brush and cobalt blue paint, I outlined the edge of it’s saddle to add the perfect finishing touch.  And then…

… it was done!

Again, here is the before…

And here is how the trash was turned into treasure…

Thankfully my friend LOVED the lamp and was so happy to add this new treasure to her son’s bedroom!  What treasures have you made from trash?

Fall Wreath with Fabric Flowers

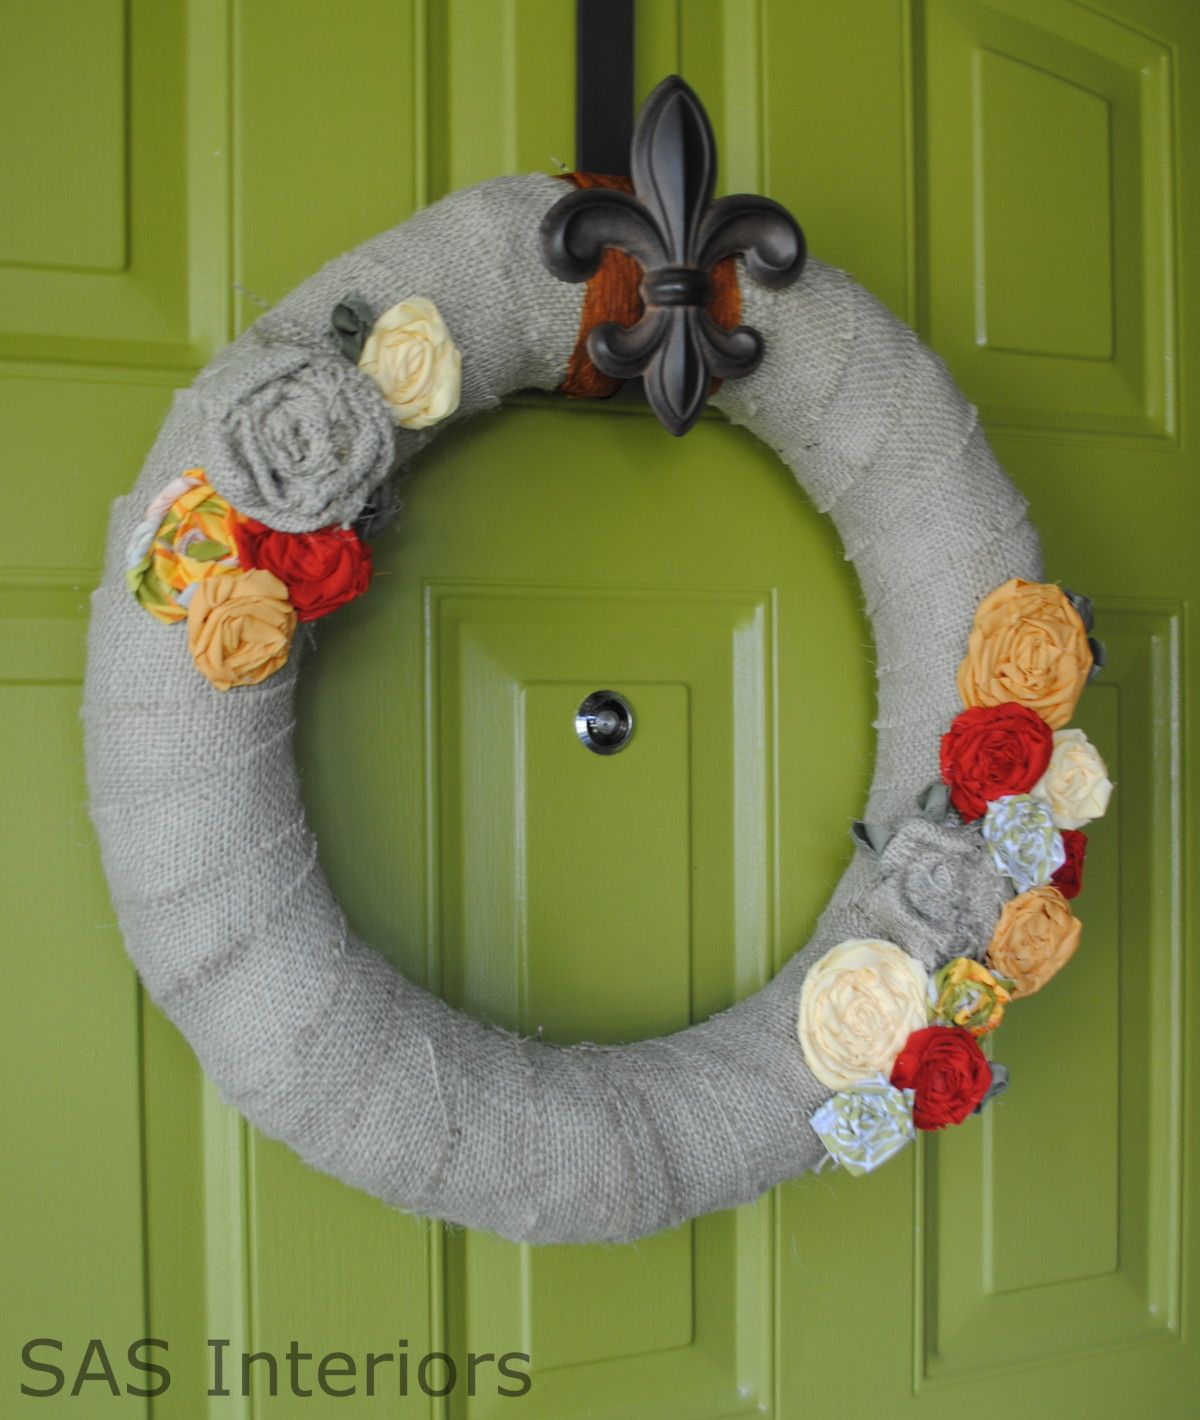
Fall is right around the corner and what better way to celebrate a new season than to don a new wreath on the front door.  The front door is often thought of as the “mouth” of a home, the entry point of comfort, happiness, and where great opportunities begin. For me the front door, signifies the “entrance of”, so let’s enter this new season with my new Autumn Wreath.

I loved last year’s wreath because it was different and unique, but for a long time, I’ve wanted to jump on the bandwagon and make a burlap round wreath with fabric flowers.  I was going to make this style wreath in the Spring, but made another wreath instead. So finally the time came, when that wreath came down and this new colorful one went in it’s place.

1. To start off, I purchased a round straw wreath from AC Moore which cost just under $3.  (FYI: I left the plastic cover on)

2. I dismantled my Valentine Burlap Wreath and used the burlap from it, to create this wreath.  I was a little tired of that wreath and plan on making something new and different for next V-day.  But I still have the felt flowers and plan on using them again somewhere on something!

If you are starting with new burlap, cut 3″ wide strips (the length doesn’t matter).  Dab alittle hot glue on the back side of the wreath and wrap the burlap around, creating an overlapping pattern (see picture) .  Then again,  dab alittle hot glue on the back of the wreath to complete and hold the burlap strip in place.

3. Continue wrapping the burlap around and around and around (don’t get dizzy…), until the entire wreath is covered!

DONE! Onto creating the fabric flowers…

How-To Make Fabric Flowers

4. Cut 1/2 – 3/4″  strips of fabric. The length of the fabric will depend on how large you want the flower to be.  I created varying sized flowers to give an overlap effect – keep on reading to find out what I’m chattin’ about…

(fuzzy picture sorry 🙂 – I was working on this project kind of late into the evening)

5. Starting from the end of the fabric (which will be the center of your flower), twist and bunch it together, while wrapping it around and around. After about 2 turns, dab alittle hot glue to hold it together.

6. Continue twisting and bunching around and around, and occasionally dab on some hot glue to hold the flower in place.

Continue until you have the perfect sized flower that you want!

7. Once your flower is complete, flip it over and add a backing.  You can use any heavy fabric material or felt is good too.  I had this heavy twill fabric left over from my Chair Makeover

And you’re done! Make as many fabric flowers as your little heart desires!  Use solid colors. Use patterned fabric. Make them different sizes.  I’ll warn you, it’s quite addicting!  I’ve got a few other thoughts on what I want to make more fabric flowers for (headbands, pins, necklaces, etc. – so many ideas, so little time).

Here’s a little grouping ~ so PUR-TAY!

Onto making the wreath with these pretty little additions!

Ta-Da

Layering the Flowers – I first placed the larger flowers on as a base, and layered the smaller flowers on top.  To give a 3-dimensional look, I raised some of the smaller flowers by hot gluing burlap underneath to give them more height.

Here’s a closeup~

And this is how it looks on my apple green colored door~

Any time I show pictures of my front door, I always get the burning question ~ What color is that?

So here’s the info: Valspar Olive Tree WV34010

Welcome, please come and stay awhile.  Want to Tour the rest of my home? Visit HERE

Have you created a beautiful Autumn wreath?  Share it with me and I’ll include it in my Wreath Inspiration Roundup!

DIY: Coffee Sack Ottoman

I’m always looking for something to update and I love finding ordinary things and changing their use to be a little more unusual.  Guess that’s what a DIYer is all about.  Yesterday, I shared some very creative ways to recycle and repurpose burlap coffee sacks.  A while ago, I scored some old coffee sacks from a local coffee shop and once my creative juices started to flow, I had just the idea – an ottoman for my living room.  It was a perfect way to show the coffee sack stamping and detailing!  After scoring an ottoman (which was in desperate need of a makeover) at a garage sale for $5, I gathered the rest of my supplies, and set off to begin the project.

Thankfully the ottoman was sturdy and overall, in good condition, so I knew with a little TLC, this little guy could look pretty again!

These are the burlap coffee sacks (or you can buy coffee sacks) that I picked up on my random Saturday morning excursion in downtown Saratoga Springs (and they were free!  The mister just asked for them, and all of a sudden we were the owner of 4 coffee sacks).

The legs of the ottoman screwed into the bottom frame, so I was able to easily remove them, along with the fabric.  The original ottoman legs were an orange-stained oak – not my cup of tea and a little different than the rest of the woods in my home.  I prefer a darker look, so I chose to use a Jacobean finish.

I first gave the legs a good standing ~

Then, it was time to apply the Jacobean stain.  I wanted to achieve a dark finish, so I did not wipe the stain off – I waited (a long time) for it to completely dry.  If you prefer the tone of the Jacobean stain, but desire a lighter, more transparent look, then you can rub the stain off with a soft cloth.  I applied 3 coats to get the look I wanted and it took about 3-4 days for the legs to completely dry.

Like my makeshift drying rack? I used the wire basket from our old refrigerator during the Kitchen Makeover.

In the meantime, I moved on to cutting the burlap coffee sacks to reupholster the ottoman top ~

Then reupholstered the top using a staple gun ~

Almost done…

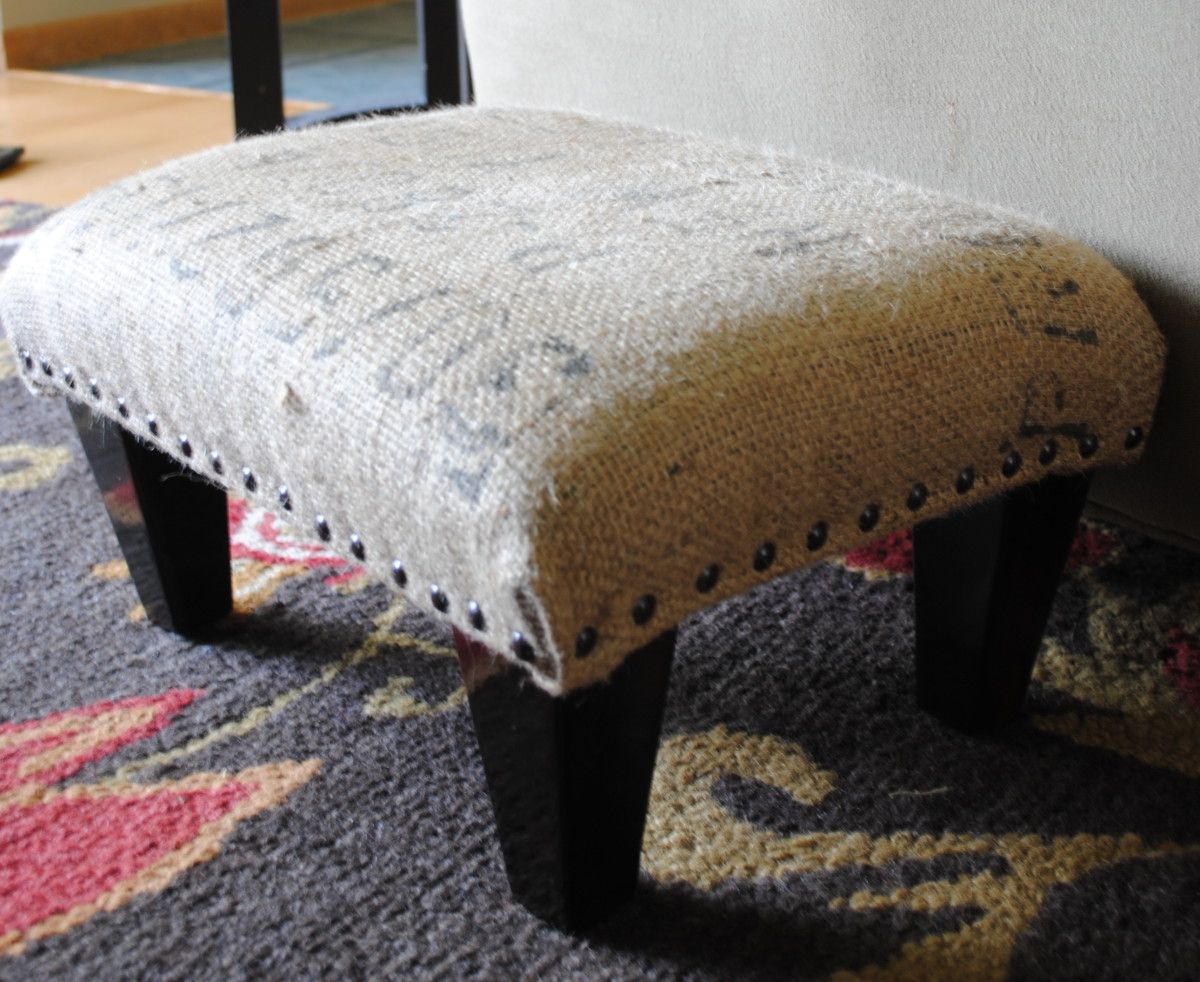
After the legs dried (which took a loooong time), they were ready to reattach.  At that point, I was happy with the ottoman, but it still needed something.  Hmmm…  how about nail heads?  Yes, that would be the finishing touch that it needed!

It took me quite a long time to find upholstery nails.  Then this kind blogger helped me out and mentioned that Ace Hardware and Home Depot carry them.   Really?  AH and HD…never would have thought it, but she was right.  Thess upholstery nails were just what I needed to complete this makeover.  They were $1.37/pack and I used 3 packs.

To attach the upholstery nailheads, I started off at one corner and then gently nailed in each one into the wood base.  It’s important to keep them evenly separated and in-line, as much as possible.

Then I continued around the entire base~

One important part of this reupholstery project is how I finished the corners.  Especially because the burlap is very heavy, the corners were quite tricky.  I actually had finished the ottoman top, was unhappy with the result, and reworked them.

Here is my first attempt that I wasn’t happy with~

And here is the final, reworked look.  Instead of wrapping the fabric to the side (as seen above), I pulled it underneath, so the finished corner had a clean look. Like this~

And it’s complete!

One more picture of the before~

And here it is now… a comfy place to put my feet up!

Do you think it could be a Ballard Designs Knock-off?

Have you used burlap coffee sacks for any of your DIY projects?  Do you have any projects in mind using these found treasures?  If you want to check out more creative projects using coffee sacks, check out this post ~ Coffee Sack Creations and check out my pins on Pinterest.

DIY: Personalized Dry Erase Calendar

Last week I shared some inspirational ideas on creating a Central Command Center, as well as my new CCC spot.  One of the features in my newly organized space is the personalized dry-erase calendar that I made.  I had previously purchased a dry-erase board from Tar-Jay, but it was just too small to write all the activities and notes to keep my family on track for the month ahead.

We needed something that had space for our daily schedule, as well as a place for notes, like:
bring books to the library by Tuesday or
pick up the dry cleaning after 6 on Friday or
don’t forget to buy MILK!

Hopefully with this new and much larger calendar, tasks and plans won’t fall through the cracks…


Last week right after finishing this CCC wall, we had some friends over for a bbq.  While enjoying our cocktails, the husband shouts out while pointing to the calendar, “That’s exactly what we need, where did you buy that?”

My response, “I didn’t buy it, I made it”

His response, “really?” … (he totally wasn’t believing it!)

But I really did make it myself and so can you… for less $15! I started off with a 16″ x 20″” frame from AC Moore.  The Portrait frames are always on sale for 40 or 50%, so I scored this for about $13.

At the time of purchase, I wasn’t sure how I was going to pull this calendar together, but I knew I wanted to add some color and pizazz.  I found some pretty scrapbook paper (which was also on sale) for $0.40 a sheet. I loved their modern designs and vibrant hues… a perfect compliment to the kitchen and dining space. (I have a lot of paper leftover, which I will definitely be using for another project!)

Then using the Excel program, I was able to make a calendar and print it on 11 x 17 paper.  I also made a separate sheet for notes.  Using the cells in Excel, it’s really easy to create.  Are you an excel user?  It’s one of my favorite programs to use ~ weird, I know.

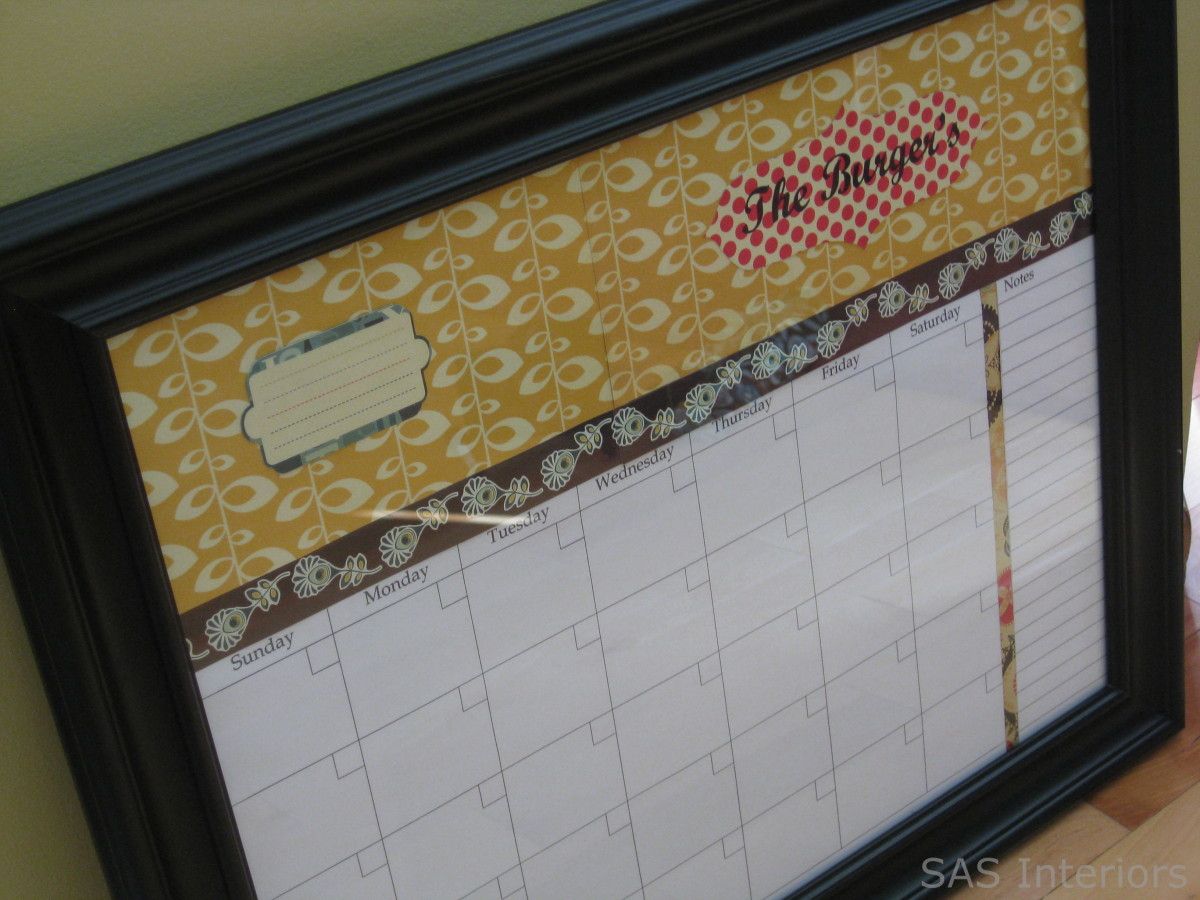
Using my good ole’ imagination, along with my pretty paper and magic scissors, I created my personalized dry erase calendar.

To add a bit of personalization, I included our family name – Burger – to the top, using one of the stylish papers and my printer.  No silhouette machine here… ( I would love one though!)

I have to admit, this vibrant red polka-dot paper wasn’t the best choice for writing our name on, but O well, it works.  A quieter background would have been better – you learn from your mistakes, right?  That’s what is great about this personalized calendar… I can continually change the background and it’ll only cost pennies!

Here it is, complete and ready to be used!

After Post Note: I’ve received ALOT of questions about writing directly on the glass.  Just like a dry erase board, a dry erase marker can be used to write on the glass and it’s easy to clean with the felt end tip, a paper towel, or even your finger. DO NOT USE A SHARPIE – that will not erase!

It wasn’t up on the wall for five minutes and was already filled out…

And if you missed my new Central Command Center, here’s a peak and you can read this {post}.

In making this calendar, I was inspired by the personalized calendar that Beth created using one of her favorite go-to resources.  Check out her post {here}. Thanks Beth!

How do you stay organized?  Do you have a ‘go-to’ spot in your home where everything is layed out for the whole family? Do you have a family calendar? or a Central Command Center?  I have to admit, it sure is nice to be organized (at least in one area of my house, ha)!