Tag: DIY

Monogrammed Chevron Pallet Tray

As a Blogger, finding support throughout the blogging community is important for blog growth, friendship, and creative inspiration. For the past several weeks, I’ve joined forces with a few fabulous DIY bloggers and we’ve been helping each other with various aspects of blogging.  Along with our helpful “chats”, we were given a Blogging Challenge by Beckie of Infarrantly Creative to create a DIY project using specific materials – additional items could be added, but it was a must to use the required five.

What did I create you ask?

Well take a look… (and then keep on reading for the details)

Included in our Blogging 2 Better group was Monica & Jess of East Coast Creative, Allison of House of Hepworths, Brook of Being Brook, and Kim of Sand & Sisalall incredibly talented and inspiring women and friends!

To begin, this is the list of items that we were required to use, and actually I pretty much just stuck to the list and didn’t use many additional items.

Fun, but definitely challenging!  I was quite nervous at first trying to think about what to create with these 5 items and then it came to me…  A tray that would be perfect to bring items in and out while BBQing (or even just to display on the coffee table – you know I love trays).

Once I had the idea, my project was quickly underway, especially since I already had a stash of pallets in my garage for a few other projects.

Item #1 – Pallet

To start off, I determined the size of the tray that I wanted to make (17″ x 17″), so the Mister and I measured (4) 17″ long pallet pieces.

Using the reciprocating saw, we buzzed right through that wood :-/

I’m always leary about using the BIG TOOLS (even though my friend Brittany has empowered me with the right skills), but I helped out and made a boo-boo when cutting. No problemo – the Mister came to the rescue with his Band Saw and cleaned the edges right up.  In no time the (4) pieces of pallet were ready to make into a box.

Lining up the corners of the pallet planks, we hammered 2 nails into each corner.

Onto the bottom of the tray…

The only material used that wasn’t on the list was a piece of 1/8″ thick plywood that I used for the bottom of the tray.  Once the pallet “frame” was made, we measured the distance to the outer edges and cut it using the Band Saw.

Once the plywood was cut to the right dimensions, we nailed it onto the bottom of the pallet “frame”.

I gave the overall tray a quick sanding, and within 20 minutes it was done!

Now onto the fun part…  Using my second and third required items, fabric and Mod Podge, I lined the bottom of the tray with a brown and white chevron fabric.

To start off, I spread a nice coat of Mod Podge along the entire bottom of the tray.

Item #2 Mod Podge

Then I added the fabric onto the glue-y surface and made sure to get it nicely in the corners as well.  Make sure the fabric size is larger than the surface because in the next step, I’ll show you how I trimmed it.

Item #3 – Fabric

Once the fabric was well stuck to the Mod Podge, it was time to trim the fabric (this can be done before the glue underneath is dry).  Using a very sharp blade, I dragged it along the edge of the tray to trim the excess fabric.

Once the fabric was cut, I add a layer of Mod Podge OVER the fabric – no worries, it will dry clear!

Once the Mod Podge was dry (fully about 1 day later), it was time to add my last 2 items – the stencil and the color coral.

Using a new Word Doc, I found a font I liked (credit valley) and printed a large letter ‘B’ in lowercase for Burger (my last name).  Then I cut it out with a scissor and traced the outline on the fabric.

Item #4 – Stencil

Then filled in the stencil with a beautiful color coral (it needed about 4 coats, but it didn’t take long).

Item #5 – Coral

And here it is all complete!  My Blogging 2 Better Challenge was done and I was quite happy with the result.  What do you think?  Perfect for the indoors or out!

And you of course have to check out the other B2B Challenge Projects using the same materials.  It’s truly amazing how they’re all SO DIFFERENT!

Rustic Industrial Storage Bins by Monica & Jess of East Coast Creative Blog

Dangle Earring Frame by Allison of House of Hepworths

Fabric Wall Art by Brook of Being Brook

Pallet Art Surfboard by Kim of Sand & Sisal

I’m sure you know all these ladies, but if not, you are REALLY missing out!  Be sure to visit each of their great Challenge projects, as well as their daily DIY creations.

I link my projects to some of these parties: Skip to My Lou, Dittle Dattle, Between Naps on the Porch, Today’s Creative Blog, Stories of A to Z, All Things Heart & Home, Savvy Southern Style, House of Hepworths, Finding Fabulous, Creation Corner, The Shabby Nest, Tatertots and Jello, Thrifty Decor Chick, Tip Junkie

Outdoor Sculpture Made From Trash

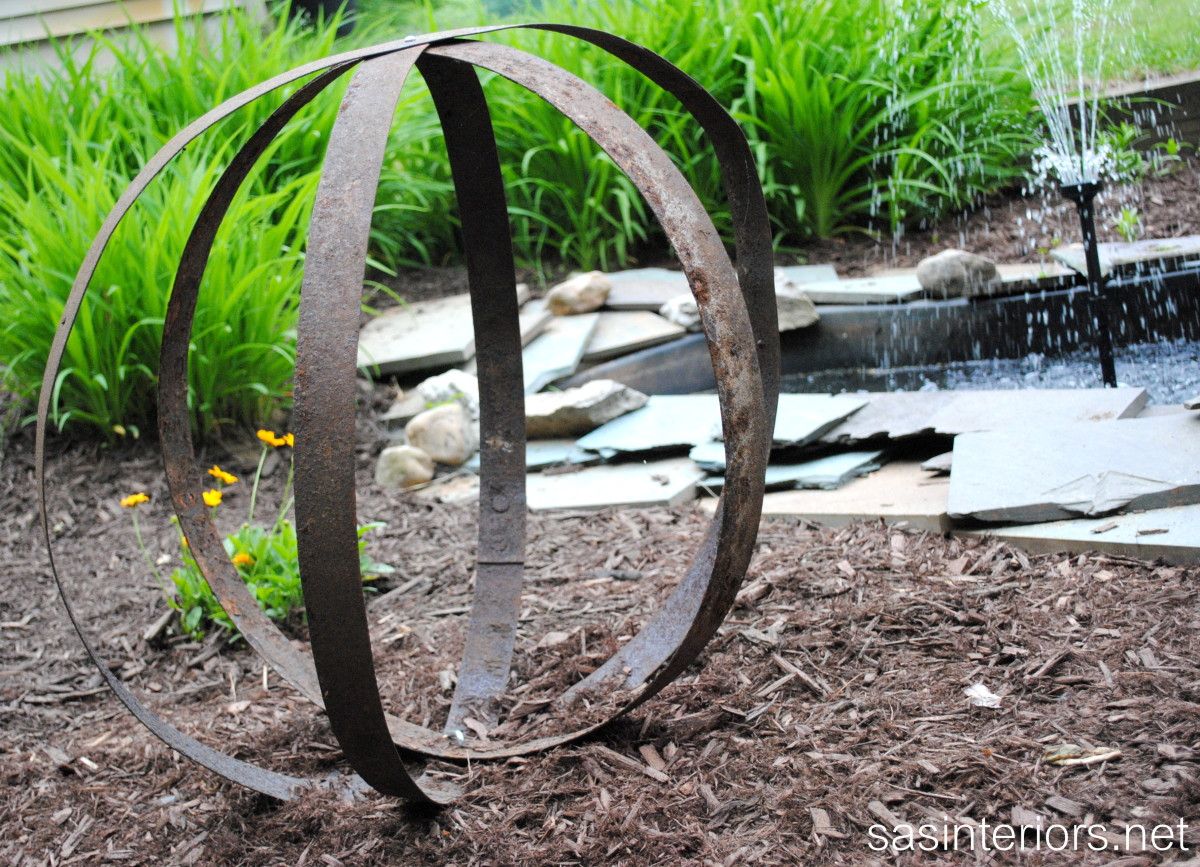
DIY: Outdoor Sculpture using metal straps from an old barrel. Big impact with little work + no cost!

I hope you had a wonderful weekend!  It was a half rainy, half sunny weekend in my neck of the woods, so I took the opportunity to do some thrifting with my mom on Saturday and then some major DIYing on Sunday.  I actually worked on about 6 different DIY projects and am super psyched to share some of them over the next week or two.

One project in particular is a new outdoor sculpture that now sits in my garden that I made using, well…  trash.  It’s kinda crazy, but I love it!

Before the cleanout began for the sideyard makeover (which I’ve mentioned here and there over the last few months), there was an old wood barrel planter sitting in the corner, falling apart, and in desperate need for the trash.  When the time came for the barrel to hit the garbage, there was a DIY fairy that sat on my shoulder telling me to keep the corroded metal straps that once, long ago, kept the barrel together.


I had NO IDEA what I would do with them, but in the shed they went… for about two months… until the revelation hit me… How about making them into a sculpture??  Hmmm… That could work!

There was part of the garden on the sideyard that was bare and instead of planting more flowers, the vacant spot was perfect for my new-found idea.

How to Make the Trash Turned Sculpture

This sculpture took minutes to make – probably less than 10 minutes in all!  Using a drill with a metal drill bit, the Mister and I worked together and drilled 2 holes in each ring.  The holes were placed directly opposite of each other.

Once all the holes were drilled, we aligned the top and bottom holes of each ring.  We secured the rings at the top with a nut and bolt, and for the bottom, we used a 6″ tent stake which went into the ground.

And that was it!  I rotated the rings until the positioning was just right, and then sat back to admire this trash to treasure.

So what do you think?  Pretty neat, right?
What treasures have you made from trash?

I link my projects to some of these parties: Skip to My Lou, Dittle Dattle, Between Naps on the Porch, Today’s Creative Blog, Stories of A to Z, All Things Heart & Home, Savvy Southern Style, House of Hepworths, Finding Fabulous, Creation Corner, The Shabby Nest, Tatertots and Jello, Thrifty Decor Chick, Tip Junkie

Painted Two-Toned Desk + Tips on Painting Furniture

I’m just about finished with the updates for my son’s bedroom makeover.  It hasn’t been a huge overhaul, but with rearranging the furniture, adding colorful stripes on the wall, and hanging new DIY pallet shelves, this space has received a welcome refresher.  In the midst of moving around the beds and dresser, I realized  my little man is at the age where he really needs a desk to work at and hold all his creative supplies.

If you remember back quite a long time ago, I purchased a beauty of a desk off Craigslist.  It lived in my family room ever since (over 6 months), but wasn’t “right”.  Then pufff… I had an idea – it would be perfect for my son’s room.


And this is the evolution of the Craigslist Desk…

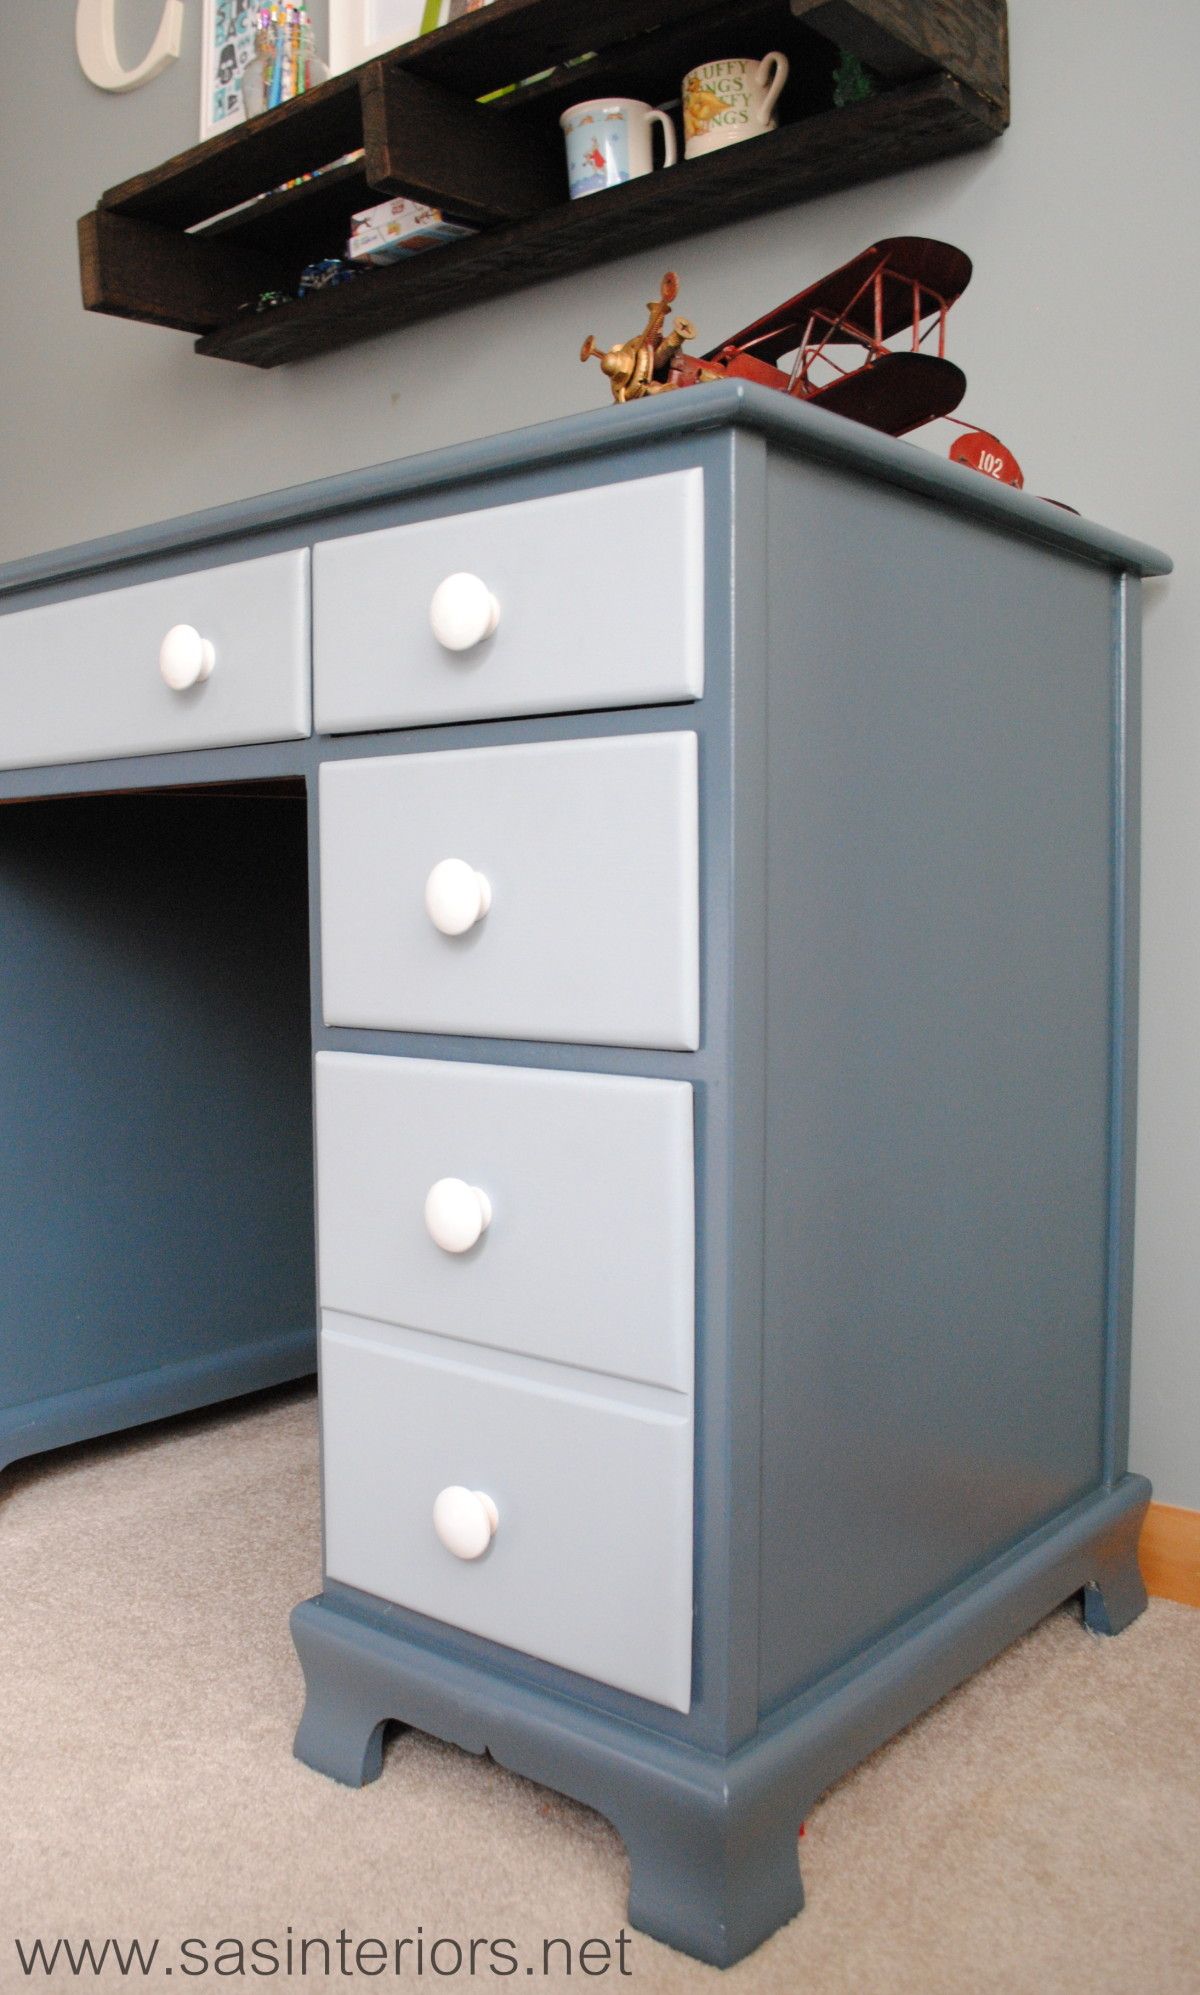
It started off as a stained executive desk typical of the 1940s and is in really great condition.  The only thing it needed was a little makeover to update it and bring it back to life to mesh with today’s decor style.

In knowing that the desk would live in my son’s room, I wanted to do it right.  With my lack of patience, I sometimes skip steps or rush, but with this desk makeover I took my time so the result would be something he could live with for many years.

Supplies: Onto the makeover – here’s my arsenal of supplies…

1. Fill Holes & Sand: I started off removing the hardware, which I decided to replace with simple knobs.  Then I filled all of the scratches, holes, and nicks with wood filler.   And the last step before painting was to sand the overall desk surface with my orbital sander using a 120 grit sandpaper (medium coarse), then a 220 grit sandpaper (very fine coarse).

2. When the sanding was complete, I cleaned off the entire surface with a damp rag before I started priming.

3. Primer: Once the desk was completely dust-free, I added one coat of primer with my favorite Kilz Primer which blocks the stain and allows for a well-prepared surface to paint.

4. Secret Agent: With every painting job, I always add my favorite “formula” to eliminate brushstrokes – Floetrol.  It always works like a charm to achieve a clean, brushstroke-free surface! (And I wasn’t even paid to say that – I truly just love it 😉

Desk Colors:

  • Desk Top & Frame – Dutch Boy High Seas
  • Drawer Fronts – Dutch Boy Hurricane Cliffs

5. Paint: After the one coat of primer, I added the first coat of paint, which I used both a brush and roller.  On the top and flat surfaces of the desk, I used a 5″ wide small roller and for the difficult crevices and edges, I used my favorite 1.5″ wide Purdy brush.  *Sometimes, I used the brush first and went over it with the roller.  The roller makes for a smooth surface to avoid brushstrokes.

6. Then onto painting the drawers.  I wanted this desk to be a little playful and not just one color, so I decided to use a lighter color blue on the drawer fronts.

7. Polyurethane: The last painting step was to add a coat of polyurethane – truly the most important part in finishing any piece of furniture!  I usually use water-based clear satin polyurethane, but since I knew this desk would be getting lots of use in the years to come, I decided to use an oil-based polyurethane, which really is more durable (hands-down).

8. Hardware: Once the painting was complete, I drilled one hole in each drawer front for the new knobs, which were originally natural that I spray painted white.  The knobs went in and the desk was complete.

To add a little unexpected fun to the desk, I added a drawer liner that has a geometric pattern with green, blue, and turquoise colors.  My son was quite surprised when he opened the drawers to find this hidden treasure!

And once again here is the before and after…

And these are just a few important tips to remember when painting furniture:

 Do you like painting furniture? Have you painted anything lately?

Traditional to Transitional Spoon Rack Revamp

As you know, I have a little obsession (well more than a little – little would be an understatement) with transforming and updating the decor around my home.  Most of the furniture or accessories though, have been of little or no value, which always makes me less apprehensive about jumping into a project.  If I mess up, who cares!  There are many pieces that I would love to change, but feel I don’t have the skill set (yet) and would be very upset if the result was NOT what I envisioned.

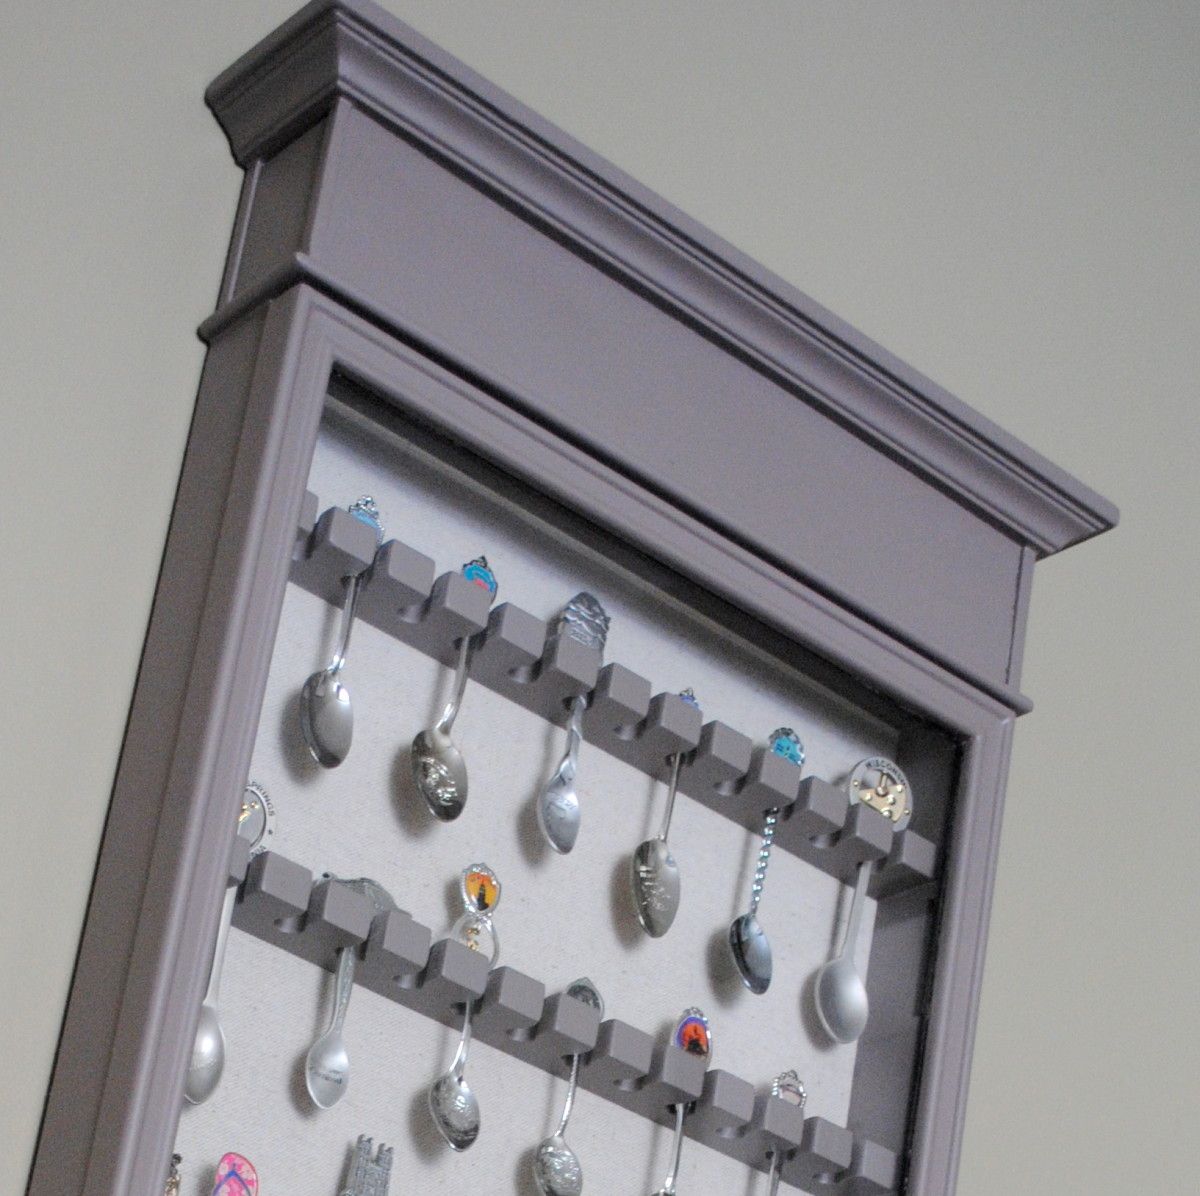
BUT, recently I took a (reluctant) leap of faith, and changed a special piece… my spoon rack, that houses my growing collection of spoons from our family trips and travels.  It’s a special piece and I was quite apprehensive about touching it, but I really was just tired of the traditional style with heavy black wood and red velvet fabric backing.  The style needed an update for my decor and I couldn’t look at it anymore without wanting to give it a lighter, simpler overhaul.

Well, here “she” is.  It was quite the process to get “her” to this point, but I have to say, I am quite satisfied.

I actually wrote about my spoon collection and my special spoon rack when I first started blogging.  It’s kind of dorky and a bit of a cliche to collect spoons, but other than my memories and pictures, the only tangible connection from our family trips are these spoons and they’re a pleasant reminder of the places we’ve been.

I purchased the spoon rack about 7 years ago from the Bombay Company, which I don’t think is even in business anymore.  At the time, the style went well with my aesthetic and I really liked how different this spoon rack looked compared to what was typical.  But recently, my style has been going more casual and less ornate, so a change was a must.

The before… And the after…

Thankfully, this year the Winter has been non-existent and a few weeks ago, the weather was so nice that I was able to work on this project outdoors.  I hadn’t planned on tackling the tranformation till Springtime, but when the opportunity allowed, I jumped on the chance!

I started off sanding all the surfaces with my orbital hand sander, as well as using sandpaper by hand to get in the nooks and crannies.

Then, I applied one coat of primer to all the surfaces to allow for a good base before painting.

All primed and ready to paint!

I was originally going to paint the spoon rack the same color as my kitchen cabinets, since my plan was to put the rack in the adjacent room, and the two spaces would tie together.  After giving it some thought, painting it would have been ALOT OF WORK.  So spray paint was the answer.  Thin, Slow, Even Strokes always leads to spray painting success!

My spray paint color of choice for this project? Thorny Brush in Satin (a taupe hue)

After completely spray painting the frame, I tackled the glass door.  This was a little trickier, but using painters tape around the edge and foil in the center, I was able to spray paint the outer edge without getting any paint on the glass. Once it was dry, I ripped off the tape (carefully, of course).

**CONFESSION** ~ I should have taken my own advice.  At first, I DIDN’T use foil for the center and after putting on the tape, just started spray painting.  SHAME, SHAME. Paint got on the glass.  THANKFULLY, I have a quick fix = Brillo and a sharp knife.  Using an abrasive brush or pad (like Brillo), gently scrub the paint off the glass, but steer clear of the edges.  For those tough parts, a sharp knife is perfect to scrape off the paint.

The last step to finish up this spoon rack overhaul was to change the fabric back.  Originally, I thought about using a bright color, then I thought about a fun and funky fabric, but in the end I wanted the spoons to “speak”, so decided on a quiet linen fabric.

What a change!  Once it was complete, I gave a HUGE *sigh* of relief!!  The spoons got to go back to their home.

It’s complete and hung on the wall {happy}!

Throughout the process, I quietly cursed a few times and bit my fingernails alot, but in the end, I am quite happy with the result!  I’m proud of myself for taking a chance on something that I was so unsure about.

Have you transformed or upcycled any projects recently?  Have you ever changed a piece of furniture or decor that you truly treasured? and if so, what was the result?

I link my projects to some of these parties: Skip to My Lou, Dittle Dattle, Between Naps on the Porch, Today’s Creative Blog, Stories of A to Z, All Things Heart & Home, Savvy Southern Style, House of Hepworths, Finding Fabulous, Creation Corner, The Shabby Nest, Tatertots and Jello, Thrifty Decor Chick, Under the Table & Dreaming

DIY: Holiday Photo Cards

It’s that time of year when the post office is at it’s peak with the hustle and bustle of people sending out packages and waiting on line for stamps to mail their Holiday cards.  I usually design my cards in early November and mail them out right after Thanksgiving (this year though, I was a little late).

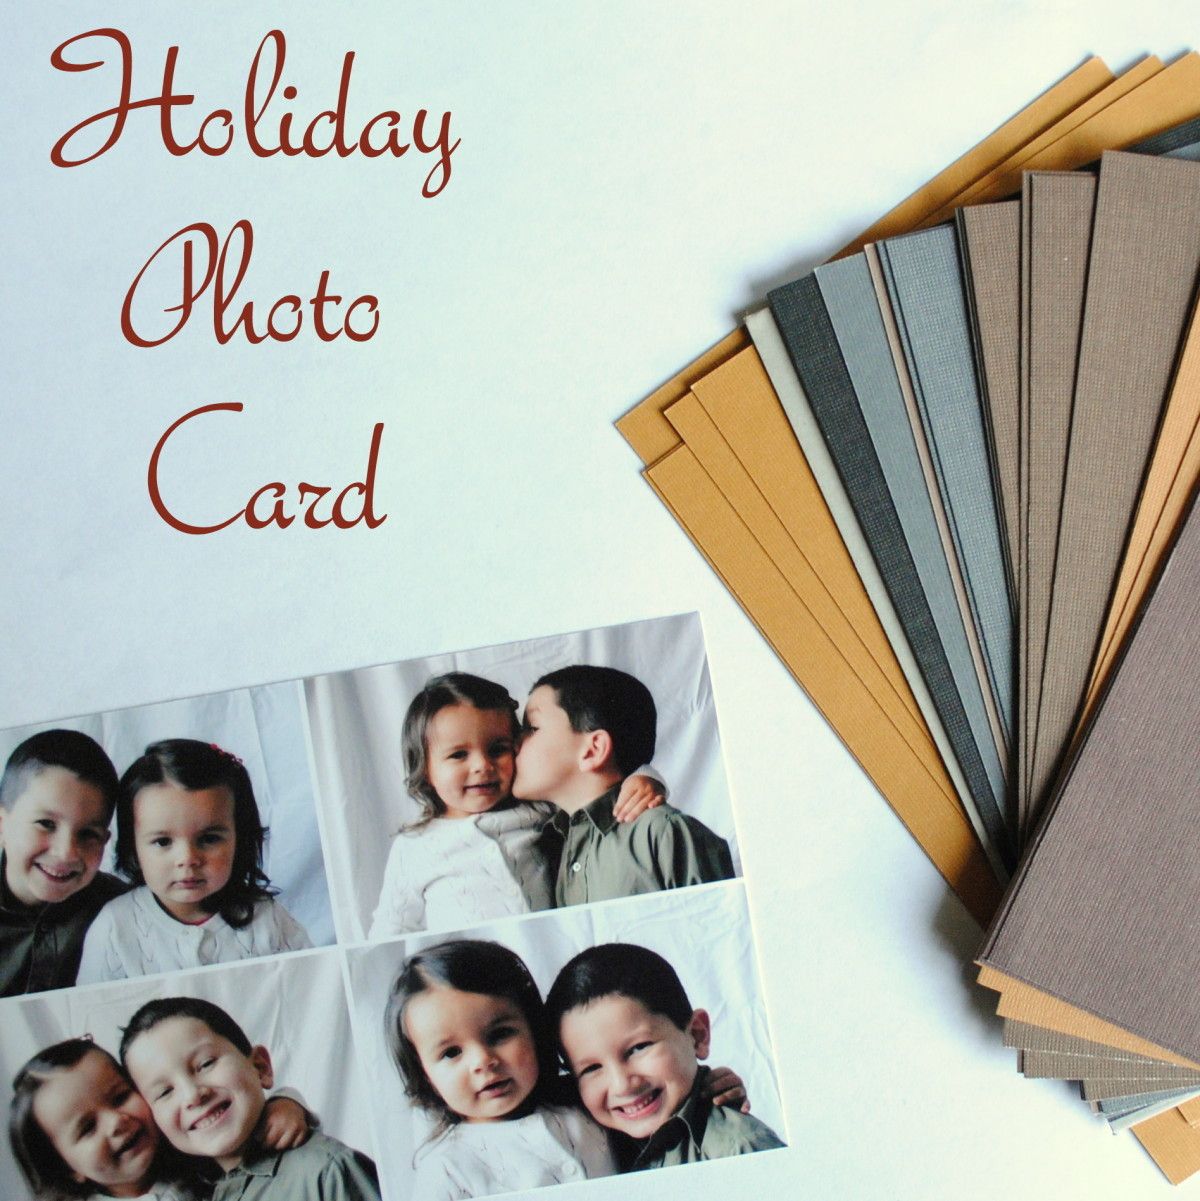
Because I have young kids and we have family near and far that we don’t often get to see throughout the year, I like to design and send a photocard, but they can often be expensive.   In being somewhat of a frugal person, I decided to make my own Holiday photocards this year (and honestly, I like the result better than the plug-your-picture-in-and-print style).

After a long photo session with the kids (which I was the photographer of), I used the free program, Picasa, to make a collage of pictures that would be perfect for the card.  I had them printed at Walmart for .09 cents each (x 40), which ended up costing me just over $3.00.

I was originally thinking of using white index cards to mount them on, but then I was able to find really heavy and pretty card stock that was slightly larger than the picture.  The card stock came in an assortment of earth tone colors, and was the perfect backdrop for the photo montage.

Using Aleene’s Tacky Tape Runner, I added three rows to the back of the picture to make a tacky surface so it would stick to the card stock.

This is the back of the photo, where you can see the three rows of Tacky Tape that I added.  I originally planned to use a gluestick to adhere the picture to the card stock, but this tape was SO MUCH BETTER!  It was easy to apply to the picture and then it adhered very well to the card stock surface.

I actually was lucky enough to receive this Tacky Tape from Aleene’s, along with some other “tacky” products that they offer. (and I mean “tacky” in a good way, not the overboard-ugly-too much way!)

Then flip the card onto the cardstock, and it’s complete!

Write something on the back, and they will be ready to mail!

We don’t really have an Aunt Betty…  I just wrote this out for the tutorial 🙂

If you’re interested in trying out products by Aleene’s to create your own creation, their products are available at Michael’s stores or online at www.Ilovetocreate.com.  I know you will be happy with the result of your project when you use their products – I sure was!

My Holiday cards are in the mail…  Are yours?

All the opinions in this post are 100% mine! Full post disclosure here

I link my projects to some of these parties: Skip to My Lou, Dittle Dattle, Between Naps on the Porch, Today’s Creative Blog, Stories of A to Z, All Things Heart & Home, Savvy Southern Style, House of Hepworths, Finding Fabulous, Creation Corner, The Shabby Nest, Tatertots and Jello, Funky Junk, Under the Table & Dreaming

If you’d like to see more projects by other bloggers using the Aleene’s products, click on the links below:


Holiday Mantel and Table Centerpiece

I know I said a couple of weeks ago that I wasn’t in the Christmas Spirit, but now I finally am!   Last weekend, after our bellies were stuffed with Turkey, we started transforming the house from the Fall / Thanksgiving decor over to Christmas.  I’m not sure why I was so reluctant at first and unprepared for the changing season, but o well, it’s past me and I’m excited for some Holiday Cheer!

The center and focal point of our home is the fireplace (yes, the one on the burnt orange wall), and again it has been decked for the Holidays!  I was quite anxious to get started on the mantel because I knew exactly what I wanted to use and how I envisioned it to look.  I was thrilled with the result of my Fall centerpiece creation and wanted to use the log as the focal point for this year’s Christmas mantel.

Here is a simple run-down of how I created the log.

  1. Find a log of any length that you desire (My log is about 4′ long)
  2. Using a 1.5″ drill bit, drill holes into the log every 5-6″
  3. Insert tea lights or battery-operated candles into the holes.
  4. It’s ready to decorate for any season!

Back to the mantel…

Once I placed the log on the mantel, I simply started layering.  I used faux greenery for the base, then added some natural cut greenery from trees in my backyard throughout.

Then, I took faux berries (purchased at the craft store) and incorporated them throughout the greenery.  Because they are bendable, they are easy to work with.  After that came the final touches…  Ornaments, pinecones, and some other branches and twigs from the outdoors.

It was complete in no time!  This Holiday log decor on the fireplace mantel makes for a beautiful focal point.

Once it was complete, I had to add stockings, of course!  As a family of 4, we’ve never had matching stocks and they’ve always been on my to-do list to make.  I whipped out my sewing machine and a few hours later, added beautiful new stockings to the decor!  I’ll share a tutorial on that later in the week.

We really enjoy how the stockings are hung by the chimney with care

These stockings look kind of plain, but I jazzed them up yesterday…stay tuned and I’ll share more this week!

Part 2 of this post

I had to share this with you too…

Before deciding to decorate the mantel using the log, I was actually planning to display it on the dining room table similar to the fall centerpiece.  Since we use our dining table everyday, it was BEAUTIFUL, but not practical because the natural greenery sheds alot (forewarning).  On the fireplace it works because it’s not moved everyday.

Using the same technique as decorating the mantel, I layered greenery, branches, berries, and pinecones, then finished the centerpiece with decorative ornaments.  If you want to see more on this creation, I shared this project on my TV debut on Fox 23.

Complete with the handmade stenciled drop cloth placemats I made a few weeks ago, the table is set for Christmas!

The Holiday decorating continues…I’ve got many more projects and ideas to come during this countdown to Christmas!   If you’re looking for ideas on some do-it-yourself creations, head over to the Holiday section of Daily Do It Yourself.

I link my projects to some of these parties: Skip to My Lou, Dittle Dattle, Between Naps on the Porch, Today’s Creative Blog, Stories of A to Z, All Things Heart & Home, Savvy Southern Style, House of Hepworths, Finding Fabulous, Creation Corner, The Shabby Nest, Tatertots and Jello, Thrifty Decor Chick, Under the Table & Dreaming

Holiday Card Holder

Tis’ the season for cards!  Of course, you might get sent a random card here or there throughout the year for a birthday, anniversary, or special occasion, but there is no time like Christmas when you receive such a flurry of cards all at once.  And aren’t they such a delight to get?!  The anticipation of opening the mailbox each day around Christmas is so exciting!

Yesterday, I shared 15 creative ways to hang those plethora of cards, and today I am sharing my creation.  As I mentioned yesterday, I was in need of some inspiration this year as to how to display my newly received Christmas cards.  After doing a little hunting around the web, I was quickly inspired and created a unique card holder to call my own!

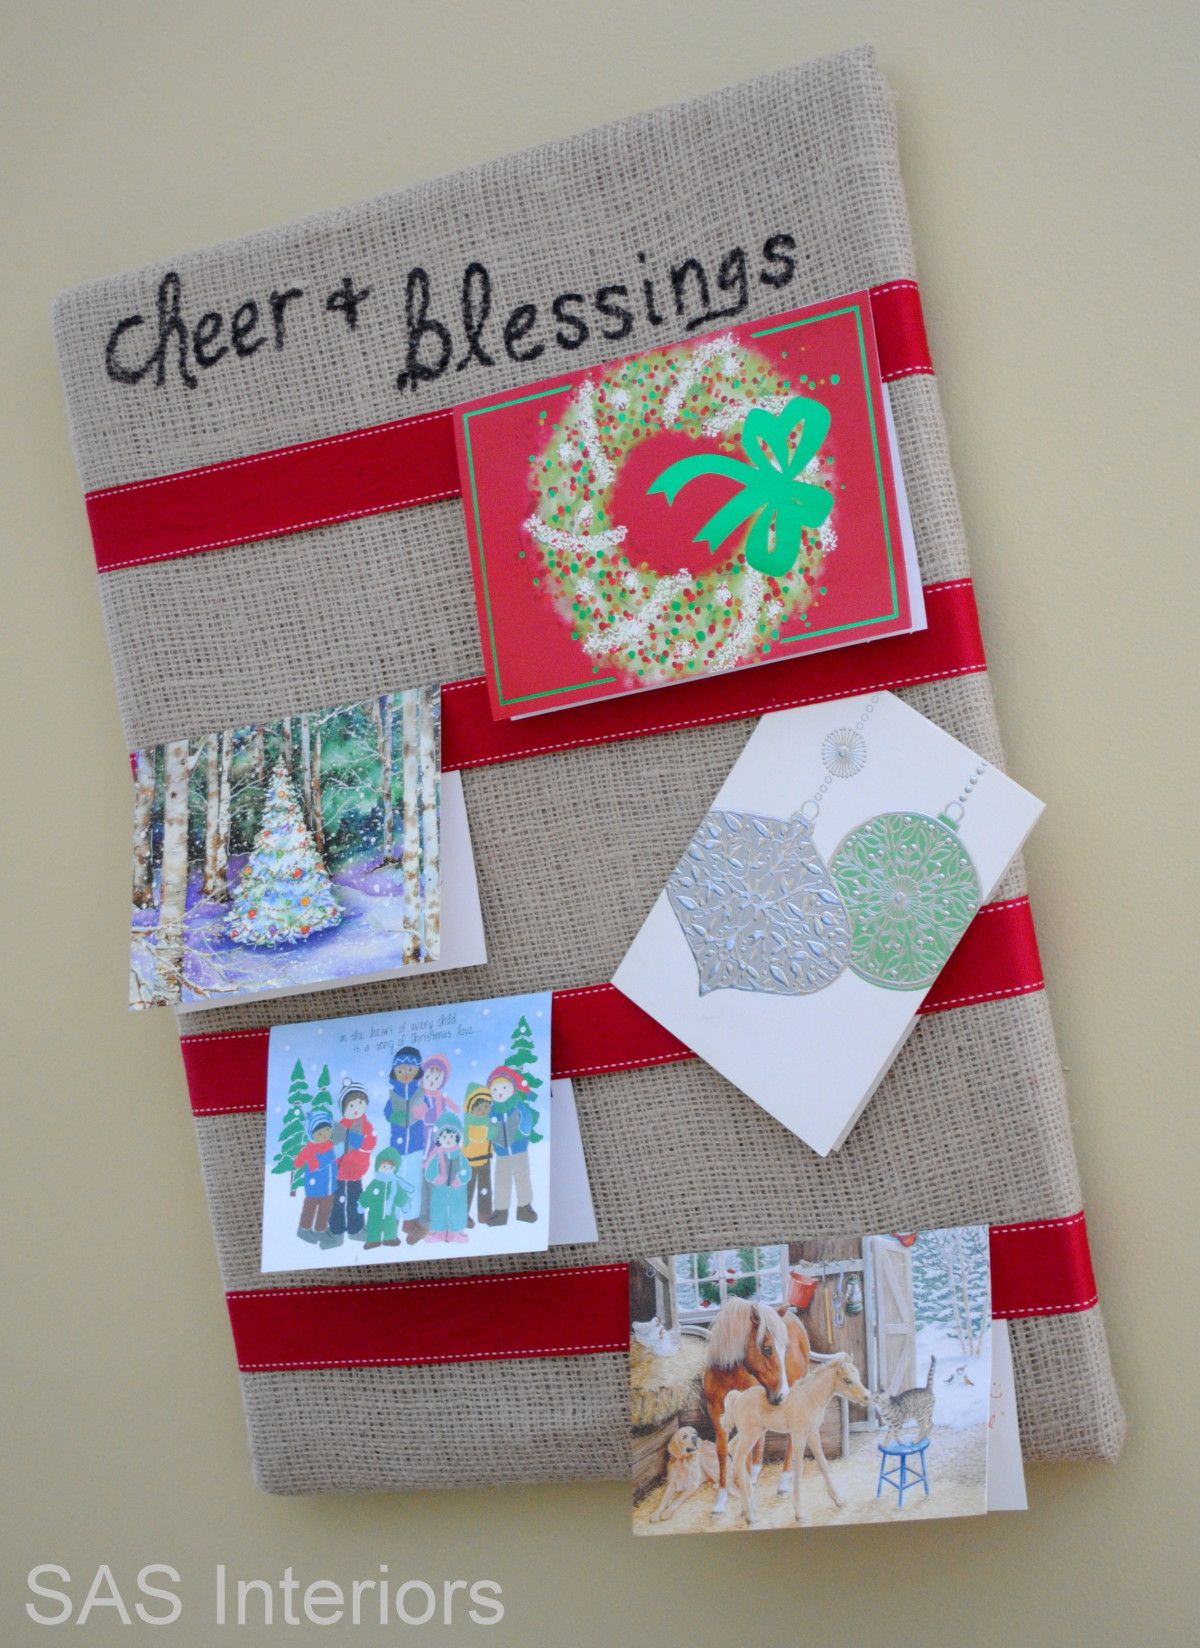
This Holiday card holder was actually very easy to make and only took a few minutes. If you’re interested in making something like this to hold your cards, I used:

  • 18 x 24 cork board (you could also use a picture frame or a flat piece of MDF or wood)
  • Burlap (or other neutral toned fabric)
  • Ribbon (one color ribbon or a few different styles)
  • Staple Gun

1. To start off, I ironed the burlap so it was free of any wrinkles and folded it over, so it was double thick.  (If using a tighter weave fabric, you may not need to make it double thick.  Because burlap has a loose weave, I didn’t want to see through it.)

2. I layed the corkboard on the fabric and secured it on the back with staples.

(I know it’s mess from the back, but you won’t see it)

3. Time to add the ribbon.  I used the same ribbon for the entire project because it’s what I had on hand.  You could also use different style and sized ribbon for a fun look! Before stapling, lay out the ribbon so the layout / design is exactly how you want it.  Then secure on the back with a staple.

4.  You can either hang it or lean it on a table.  I decided to hang the Holiday Card Holder, and made a loop on the back with some extra ribbon.  A few staples later…

…and it was complete!   Now I’ve got the perfect place to hang all the cards that will be delivered throughout the Holiday season!

I added the words: cheer & blessings to show how I truly feel to be sent these beautiful thoughts from people I love.  Using a black Sharpie marker, I added these two words that I am thankful to feel each day!

And don’t you just love that darling Winter Bucket List printable?  You can print it out for yourself to check off all the winter activities you do with your family!

Have you started decorating for Christmas yet?  I’ll have to be honest, I was not ready and excited this year as I usually am, but now that I’ve started transforming the house, I am getting psyched for some Christmas Cheer!

I link my projects to some of these parties: Skip to My Lou, Dittle Dattle, Between Naps on the Porch, Today’s Creative Blog, Stories of A to Z, All Things Heart & Home, Savvy Southern Style, House of Hepworths, Finding Fabulous, Creation Corner, The Shabby Nest, Tatertots and Jello, Thrifty Decor Chick, Under the Table & Dreaming


5 Minute Autumn Centerpiece

This past weekend when I got my DIY groove back, I made a centerpiece for my dining table that literally took less than 5 minutes and cost nothing!  The pictures, staging, and post took longer than the actual project.  Thankfully I am SO pleased with the results and now my dining table is complete for the Fall season.  Here’s a sneak peak of the final outcome, but let me take you through the steps so you can make one for your table!

Log Centerpiece that takes minutes to create and can be used for so many holidays & occasions!  Designed by @Jenna_Burger of www.sasinteriors.net

A few weeks ago, while going for an evening walk around the neighborhood, there were a pile of cut down trees on the side of the road ready for the next day’s garbage pickup.  I couldn’t stop myself, and ended up grabbing this 4′ beauty and piled it into the Radio Flyer wagon along with the two kids (the remainder of the trip home sure was tight for the kiddos).

As soon as I set my eyes on this log, I knew exactly what I wanted to do – make a centerpiece with tea lights.  I envisioned a simple, yet sophisticated backdrop that can be updated and changed throughout the seasons and holidays!

Unfortunately, it sat and sat in my garage for too long.  Then this weekend, my husband FINALLY got a drill bit that was large enough (1.5″ diameter) to drill into the log to create what I was desiring – My centerpiece creation was finally coming to fruition.

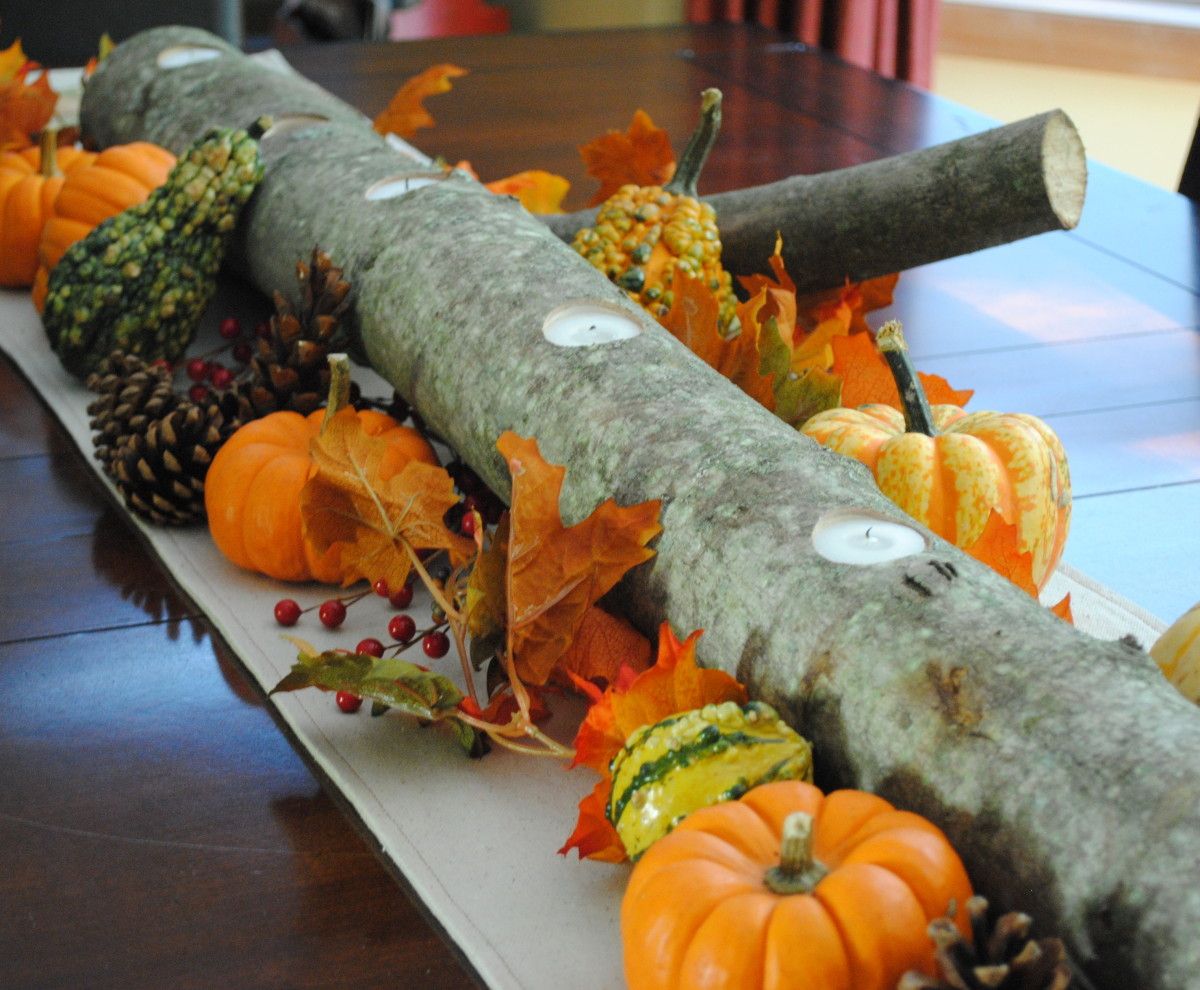
The mister and I drilled 6 holes about 10″ apart, and it was done!  Finito!!  It was that easy and it took less than 5 minutes to create this beautiful centerpiece.

And here it is.  Complete and shining bright!

So simple, yet so beautiful!

I had planned on putting it on my dining table and leaving it alone.  I thought it would “speak” for itself and it’s organic appeal would shine.  I still plan on doing that since we eat at this table everyday, but I also wanted to see how it would look all “dressed up”.  Soooo I took some of the Fall decor from the other vignettes I created and embellished this new log centerpiece.

I surrounded the log centerpiece with varying sizes of sugar pumpkins, pinecones, berries, and artificial leaves – perfect for a Thanksgiving table!

I was so happy to finally get this project complete and I love how it turned out.  How do you decorate your table for Fall?

I link to these parties: Cottage Instincts, Skip to My Lou, Dittle Dattle, Between Naps on the Porch, Today’s Creative Blog, Stories of A to Z, The Lettered CottageAll Things Heart & Home, Savvy Southern Style, House of Hepworths, Shabby Chic Cottage, Finding Fabulous, Creation Corner The Shabby Nest, Tatertots and Jello, Funky Junk, Under the Table & Dreaming

Fall Wreath with Fabric Flowers

Fall is right around the corner and what better way to celebrate a new season than to don a new wreath on the front door.  The front door is often thought of as the “mouth” of a home, the entry point of comfort, happiness, and where great opportunities begin. For me the front door, signifies the “entrance of”, so let’s enter this new season with my new Autumn Wreath.

I loved last year’s wreath because it was different and unique, but for a long time, I’ve wanted to jump on the bandwagon and make a burlap round wreath with fabric flowers.  I was going to make this style wreath in the Spring, but made another wreath instead. So finally the time came, when that wreath came down and this new colorful one went in it’s place.

1. To start off, I purchased a round straw wreath from AC Moore which cost just under $3.  (FYI: I left the plastic cover on)

2. I dismantled my Valentine Burlap Wreath and used the burlap from it, to create this wreath.  I was a little tired of that wreath and plan on making something new and different for next V-day.  But I still have the felt flowers and plan on using them again somewhere on something!

If you are starting with new burlap, cut 3″ wide strips (the length doesn’t matter).  Dab alittle hot glue on the back side of the wreath and wrap the burlap around, creating an overlapping pattern (see picture) .  Then again,  dab alittle hot glue on the back of the wreath to complete and hold the burlap strip in place.

3. Continue wrapping the burlap around and around and around (don’t get dizzy…), until the entire wreath is covered!

DONE! Onto creating the fabric flowers…

How-To Make Fabric Flowers

4. Cut 1/2 – 3/4″  strips of fabric. The length of the fabric will depend on how large you want the flower to be.  I created varying sized flowers to give an overlap effect – keep on reading to find out what I’m chattin’ about…

(fuzzy picture sorry 🙂 – I was working on this project kind of late into the evening)

5. Starting from the end of the fabric (which will be the center of your flower), twist and bunch it together, while wrapping it around and around. After about 2 turns, dab alittle hot glue to hold it together.

6. Continue twisting and bunching around and around, and occasionally dab on some hot glue to hold the flower in place.

Continue until you have the perfect sized flower that you want!

7. Once your flower is complete, flip it over and add a backing.  You can use any heavy fabric material or felt is good too.  I had this heavy twill fabric left over from my Chair Makeover

And you’re done! Make as many fabric flowers as your little heart desires!  Use solid colors. Use patterned fabric. Make them different sizes.  I’ll warn you, it’s quite addicting!  I’ve got a few other thoughts on what I want to make more fabric flowers for (headbands, pins, necklaces, etc. – so many ideas, so little time).

Here’s a little grouping ~ so PUR-TAY!

Onto making the wreath with these pretty little additions!

Ta-Da

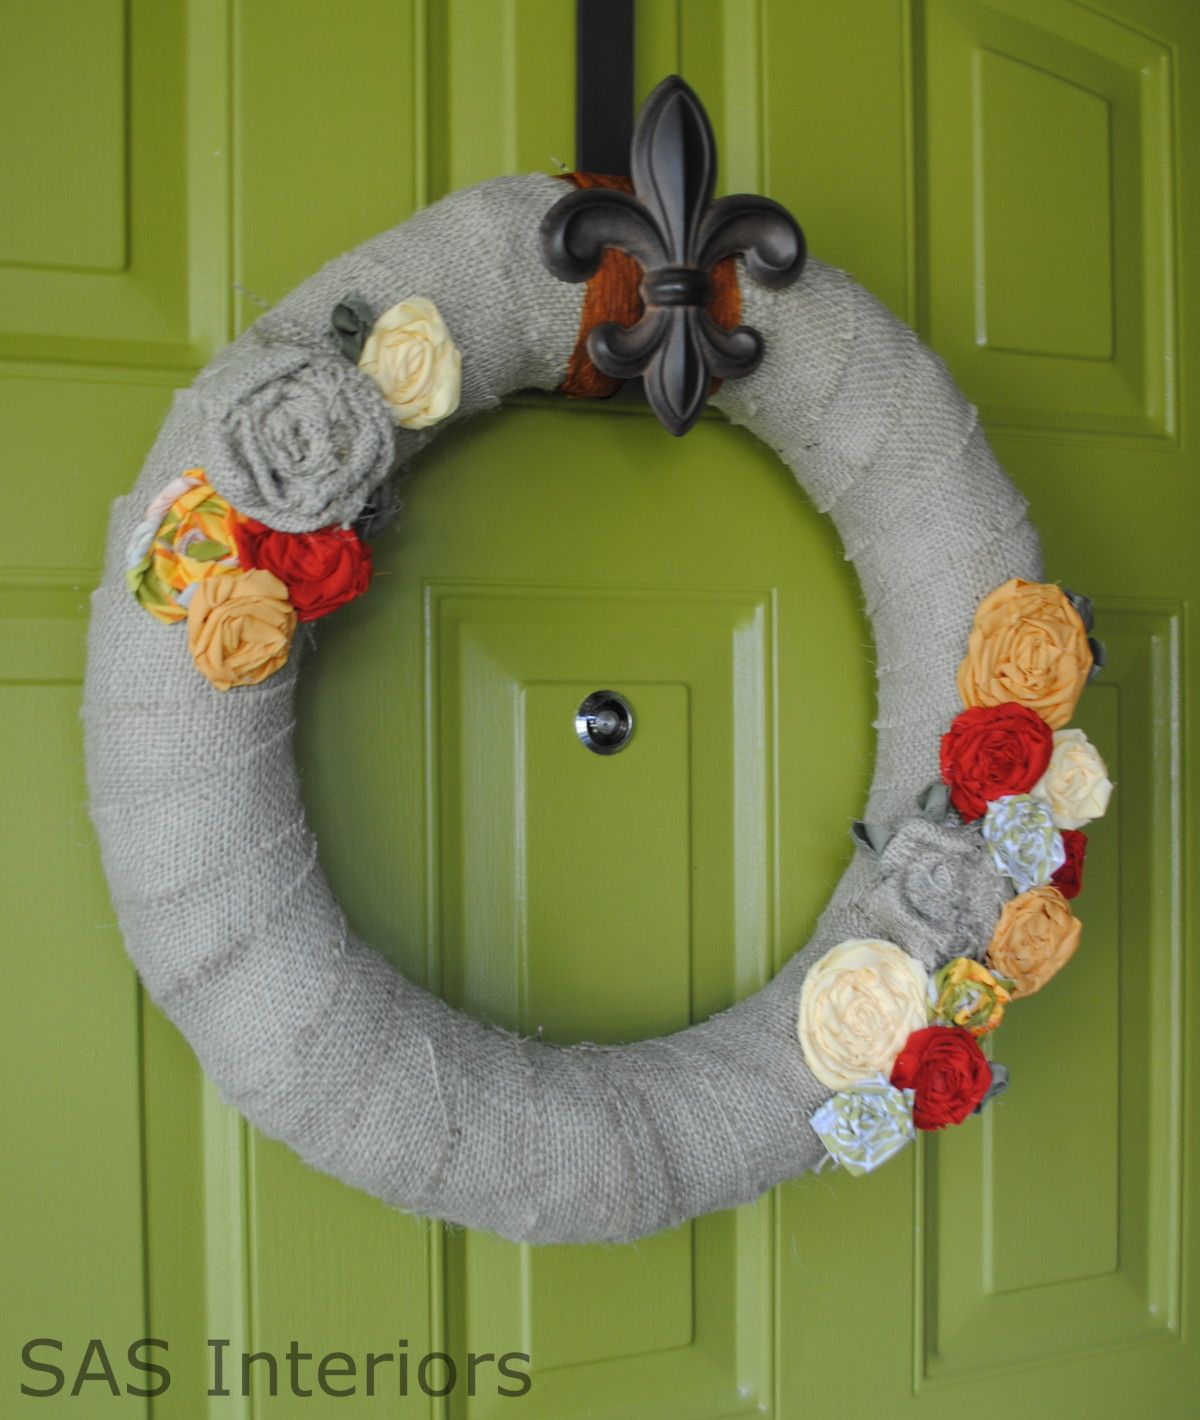
Layering the Flowers – I first placed the larger flowers on as a base, and layered the smaller flowers on top.  To give a 3-dimensional look, I raised some of the smaller flowers by hot gluing burlap underneath to give them more height.

Here’s a closeup~

And this is how it looks on my apple green colored door~

Any time I show pictures of my front door, I always get the burning question ~ What color is that?

So here’s the info: Valspar Olive Tree WV34010

Welcome, please come and stay awhile.  Want to Tour the rest of my home? Visit HERE

Have you created a beautiful Autumn wreath?  Share it with me and I’ll include it in my Wreath Inspiration Roundup!

DIY: Cabinet Makeover with Glaze Overlay

Last week I shared my latest DIY: How-to Stencil project where I transformed one of the walls in my foyer.

Did you happen to notice the cabinet in the pictures?

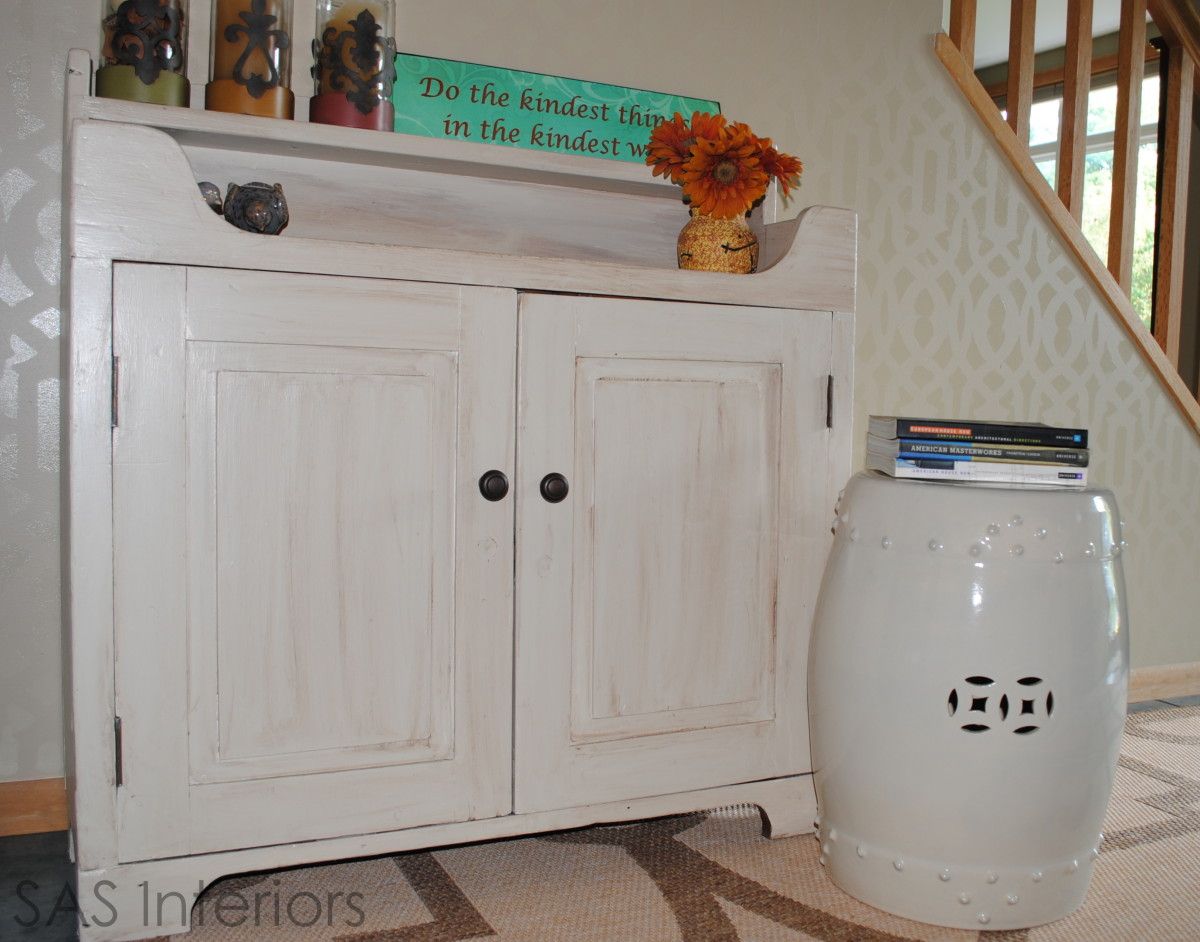
It’s new.  Well not really “new” in the sense of just bought, but new to the place it now sits.  AND it just got a huge makeover!

This cabinet is about 40 years old.  My mom had it for about the first 35 years and I’ve had it for the last 5 (it’s had quite the life so far).  On a random day, a few weeks ago, the cabinet was looking quite sad, so I said, “let’s give you a makeover”!  And I did!!

To step back in time, this is how she looked before ~

Quite sad and in need of some L-O-V-E!

Here’s how I made her over

1. I’m often known to be a bit lazy and skip over steps, but after learning my lessons from other projects, this time I used a PRIMER!!

KILZ Premium Primer, Sealer, Stainblocker was what I turned to for this project.  It blocks heavy stains from showing through the paint (especially since the new color was light).

2. I applied the one coat of Primer using a good quality synthetic brush, then painted the cabinet with an off-white color.

Need help finding the right brush for your paint project?  Check out {this} post.

3. To cover this dark cabinet, I had to used 3 coats.  The 3rd wasn’t really necessary, but I wanted to make sure it was completely sealed and covered!

At this point, I thought I was done.  Just like a woman with a much-needed dye job, I had transformed this old cabinet into a new beauty.  But she was looking a little bland…she really needed highlights.

Yes, that would be the trick to make her fabulous!

After much thought, I decided to use a glaze overlay.  I had never before attempted a glaze, so I really didn’t know what I was doing. I thought I needed a special product for glaze, but I was wrong….

4. Here’s the glaze effect on the right and the plain painted door on the left.

How-to Glaze Furniture

5. Using the brown paint from my fireplace (Benjamin Moore Chocolate), I diluted it with water ~ about 3 parts water to 1 part paint.  Taking a dry brush, I lightly applied the watered down paint onto the cabinet.  (This must be done in SMALL SECTIONS because you need to move quickly).  Then using a paper towel (or rag), I wiped away the paint and what’s left was a lightly covered brown glaze.

* Note: It’s important to wipe the paper towel / rag in one direction (preferably in the direction of the grain).

Here is a closeup of the glazed cabinet~

6. Once the entire piece of furniture is glazed, you may want to go back and add a little more detail at the edges with a smaller paint brush.

With the addition of new hardware, she now sits beautifully in my foyer

Some colorful Spring accessories complete the look

Do you like glaze over a cabinet to give a distressed look?  Have you ever glazed a cabinet before?  If so, what technique did you use?