
Tag: DIY

DIY: Personalized Word Christmas Ornament

One week to go and Christmas will be here. Can you believe it?

As you know, my home has been decorated for quite a few weeks, but I have still been working on new holiday projects here and there to add to this years decor.   Once the house is ‘set’, I still enjoy adding new and unique touches for the season.

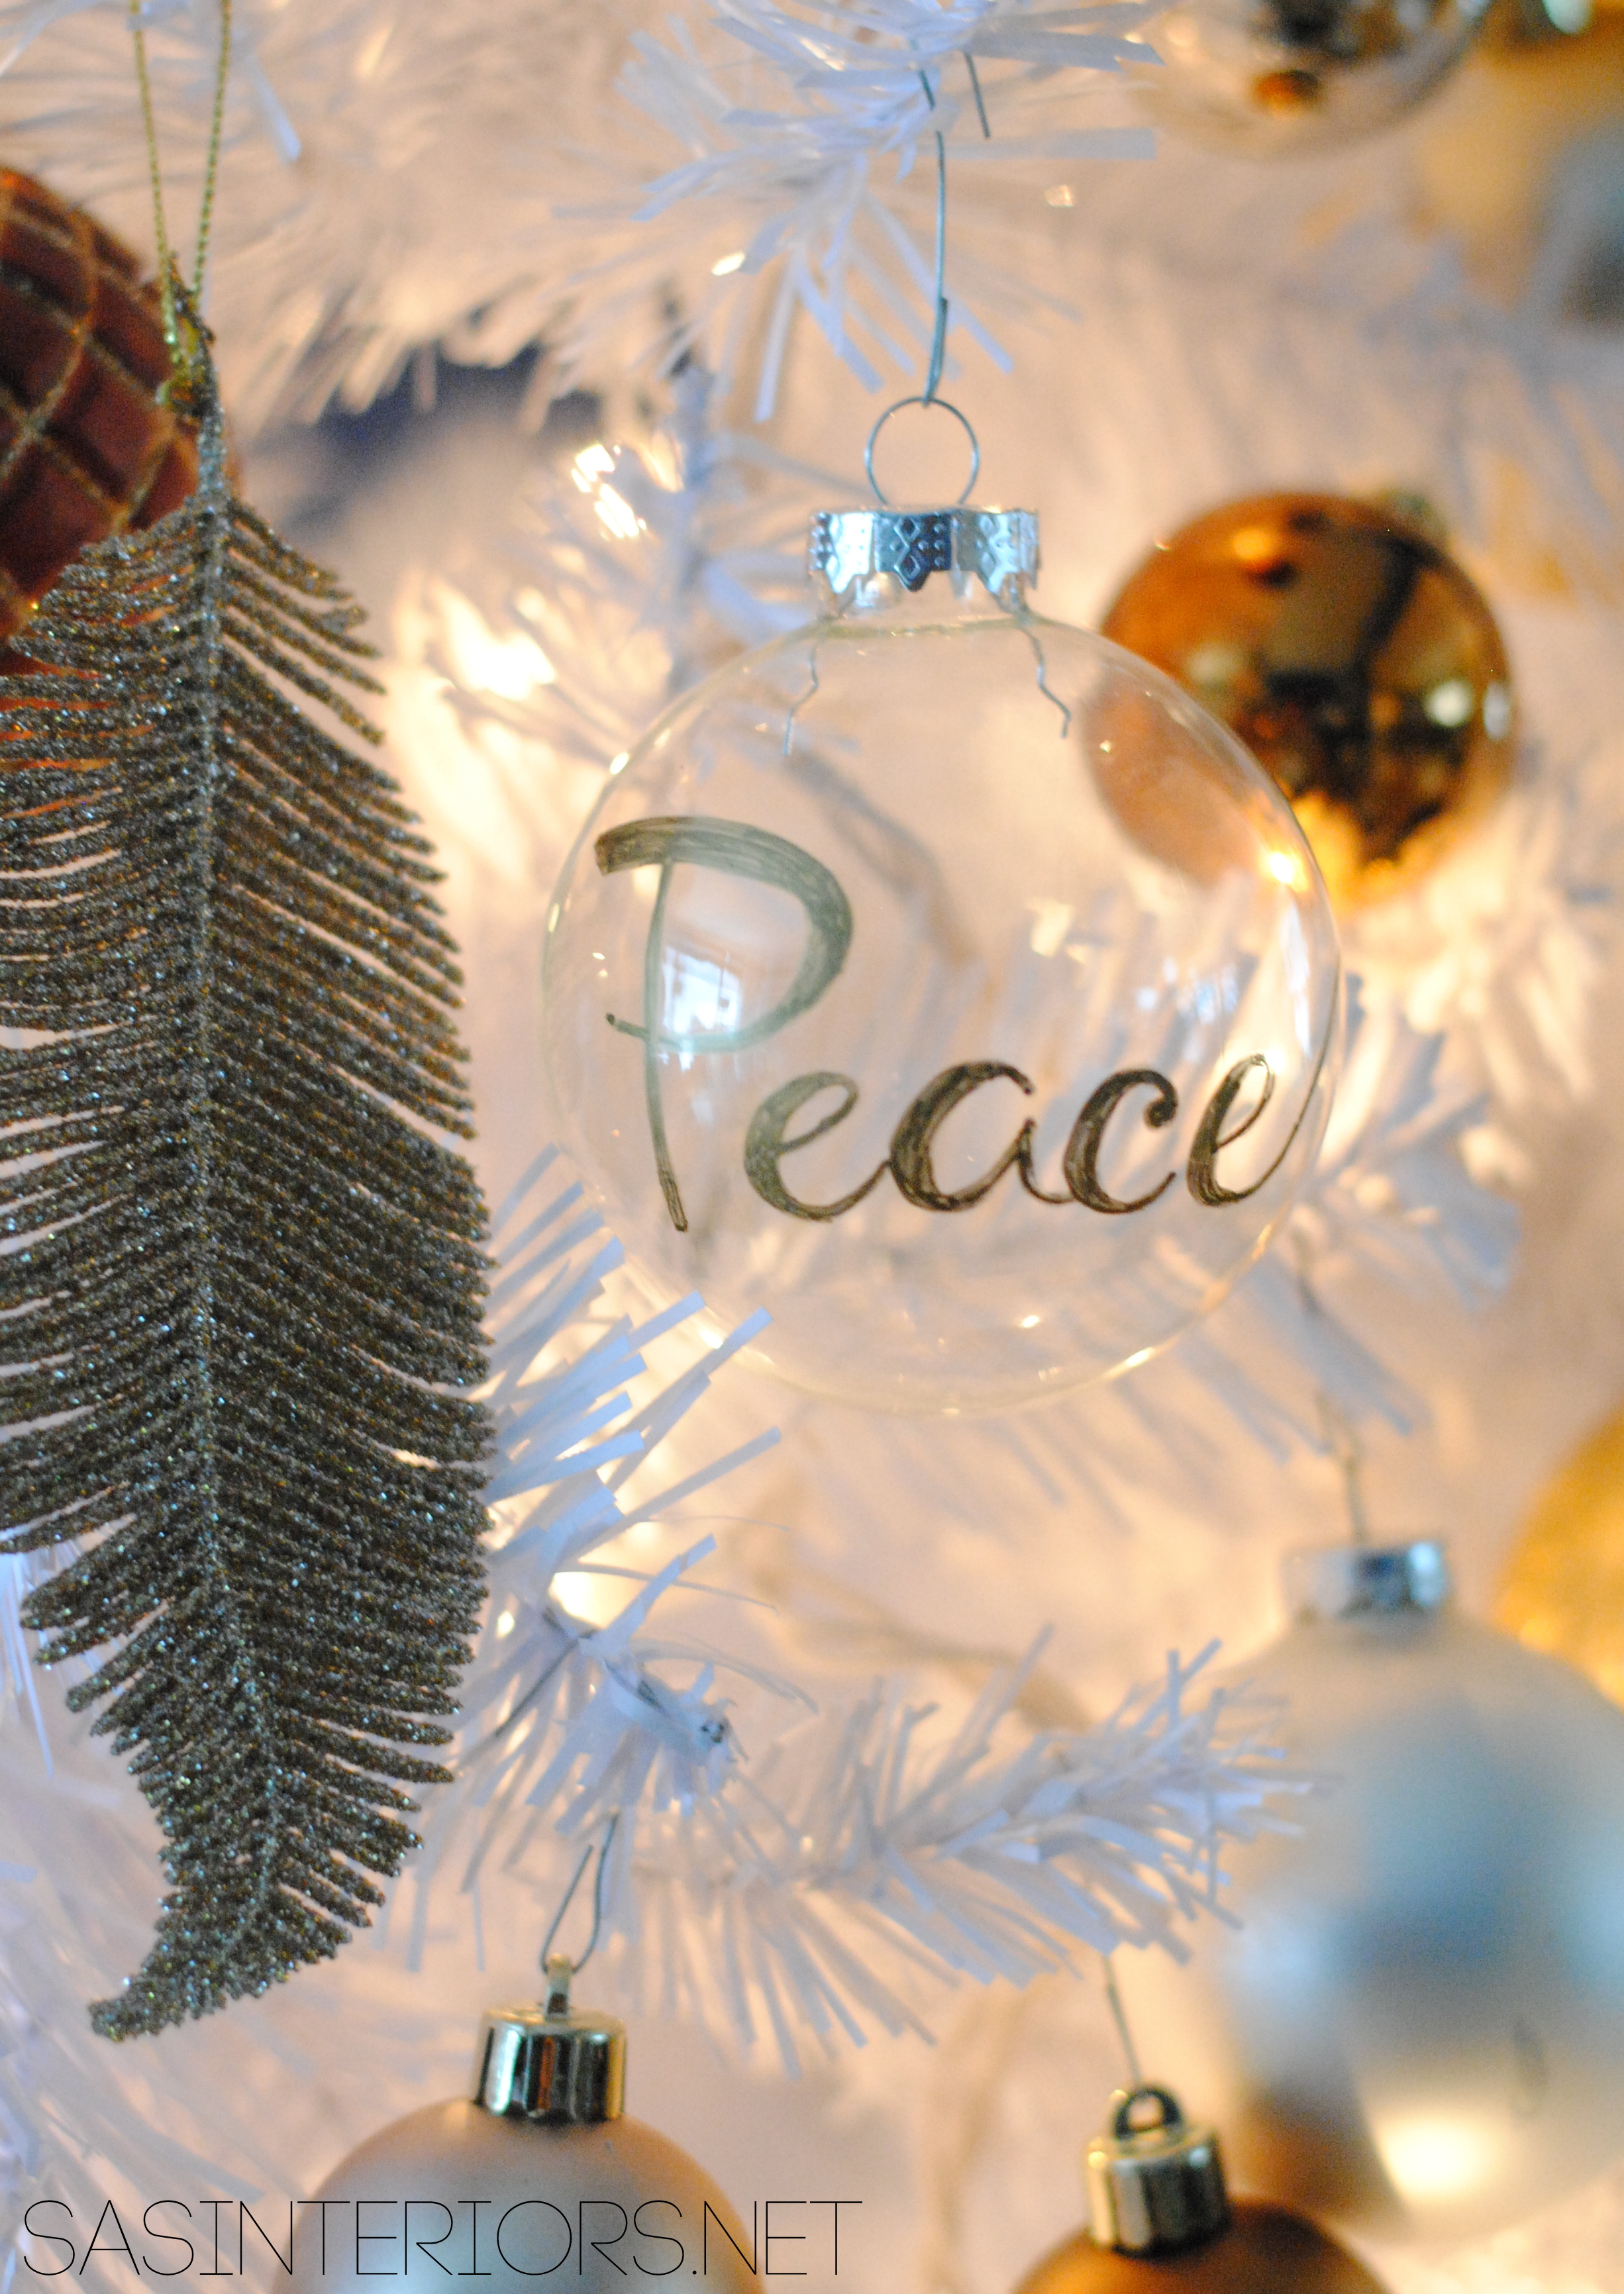
Since adding in a second tree this year, which is more of a pretty tree versus the sentimental traditional tree we decorate as a family, I’ve had fun with the gold + brown theme.  Along with the ball ornaments, I’ve added in some gold feathers (yes gold + feather in one combo: heaven) and just this past weekend, I jazzed it up even more with my latest DIY creations, word Christmas ornaments

DIY: Word Christmas Ornament using a Gold Sharpie by @Jenna_Burger, WWW.JENNABURGER.COM

Super fun, right?!  I got the idea from seeing a beautiful vignette in the Garnet Hill catalog.  I didn’t see the ornaments for sale (not like I would buy them anyway because they’d probably be $10+) and decided to create my own version.

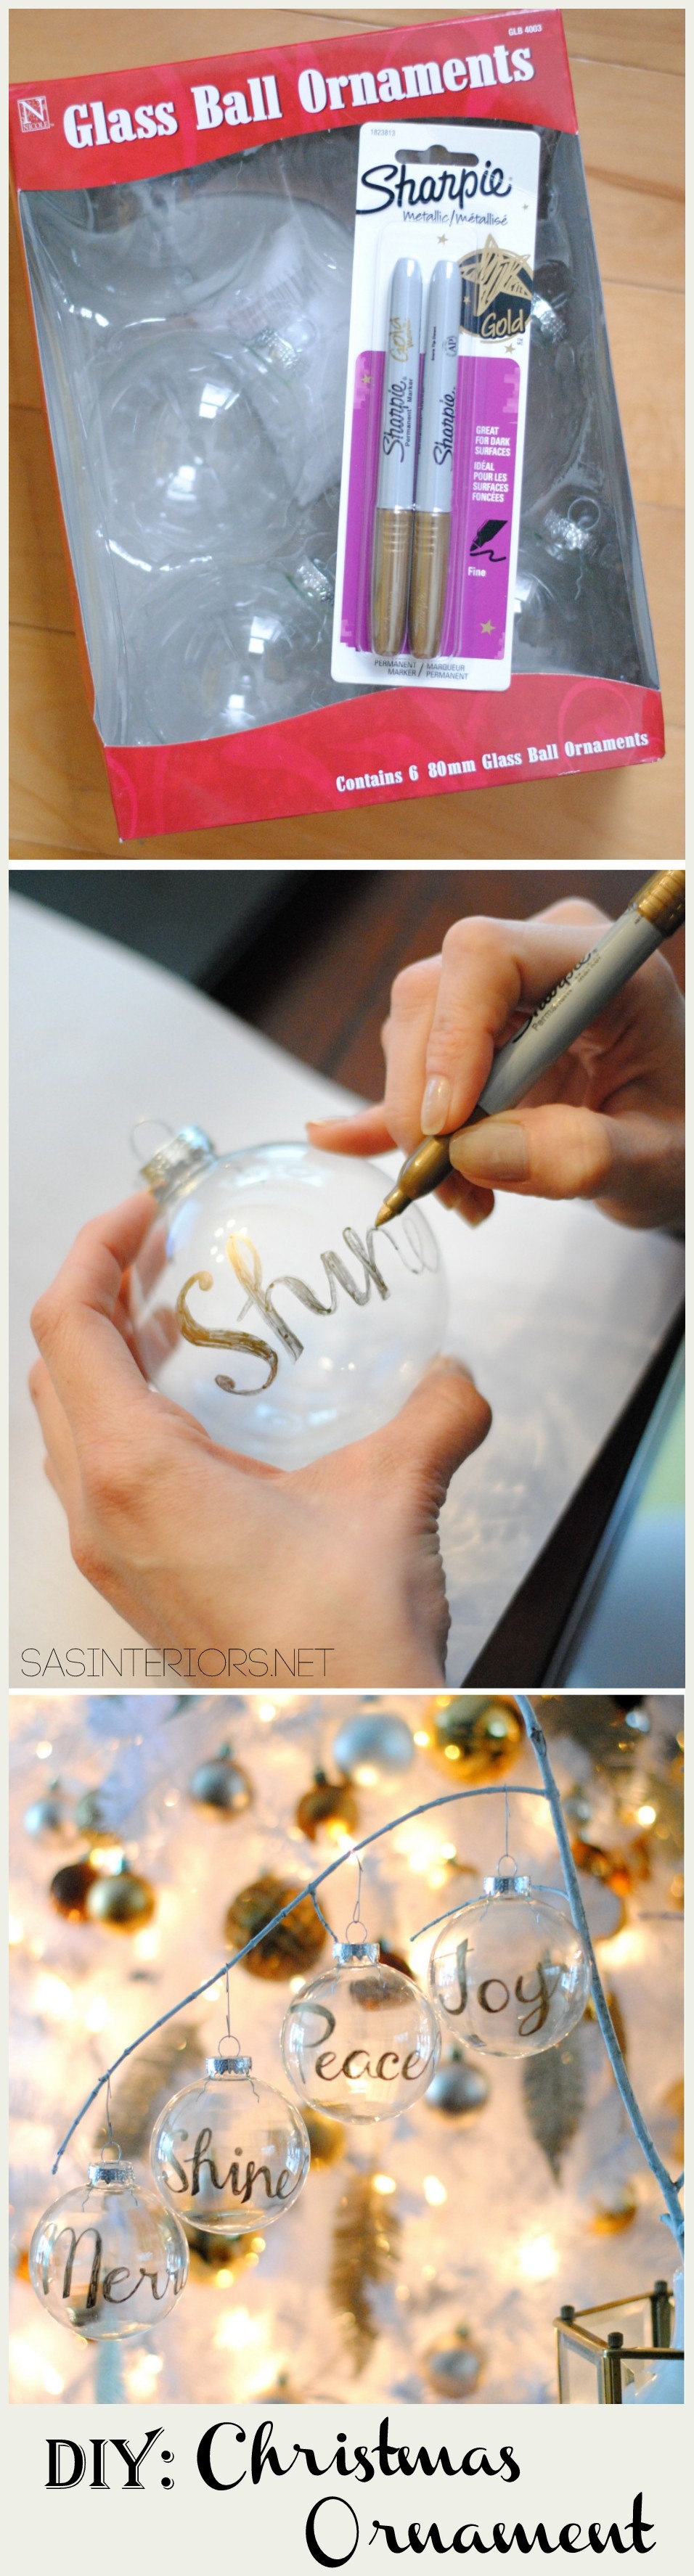
I started off by grabbing a box (set of 6) of clear bulbs and a gold Sharpie marker at AC Moore.  With my 50% off coupon, I ended up getting both items for a few cents over $6.  Not bad for 6 ornaments, which = about $1/ornament…

DIY: Word Christmas Ornament using a Gold Sharpie by @Jenna_Burger, WWW.JENNABURGER.COM

Before putting pen to glass, I wanted to find the perfect font and words to write.  I decided on the words Joy, Peace, Shine, Merry.  All words that are meaningful around Christmas.  For the font, there was a toss up between Jenna Sue and Channel.

Jenna Sue and Channel font

In the end, I decided on the Channel font because I thought bigger and bolder would be better, plus it’s a little more forgiving – I’ll tell you why in a moment…

I started out by copying the script font from the computer screen to the ornament.

The result…  Not exact, but pretty close.

DIY: Word Christmas Ornament using a Gold Sharpie by @Jenna_Burger, WWW.JENNABURGER.COM

For each word, I started out with one line, then embellished each letter with thicker lines.  This type of font is more forgiving because you can layer and add onto each letter instead of it being a ‘one shot deal’.

DIY: Word Christmas Ornament using a Gold Sharpie by @Jenna_Burger, WWW.JENNABURGER.COM

Once the first layer of gold Sharpie was dry, I added another layer for a second coat.

DIY: Word Christmas Ornament using a Gold Sharpie by @Jenna_Burger, WWW.JENNABURGER.COM

Each ornament took about 8-10 minutes, so within about 40-60 minutes, I was done with the project.

DIY: Word Christmas Ornament using a Gold Sharpie by @Jenna_Burger, WWW.JENNABURGER.COM

All 4 unique and personalized ornaments would be perfect for a gift.  Any words could be used.  Maybe each ornament could say a member of the family or something silly about the holidays…

Once I was done, the ornaments were ready to immediately hang since Sharpie’s take no time to dry.

DIY: Word Christmas Ornament using a Gold Sharpie by @Jenna_Burger, WWW.JENNABURGER.COM

DIY: Word Christmas Ornament using a Gold Sharpie by @Jenna_Burger, WWW.JENNABURGER.COM

DIY: Word Christmas Ornament using a Gold Sharpie by @Jenna_Burger, WWW.JENNABURGER.COM

DIY: Word Christmas Ornament using a Gold Sharpie by @Jenna_Burger, WWW.JENNABURGER.COM

DIY: Word Christmas Ornament using a Gold Sharpie by @Jenna_Burger, WWW.JENNABURGER.COM

  So what do you think?  A project you’d consider tackling?  What type of project does it inspire you to make?

Easiest + Fastest + Cheapest Tree Skirt EVER

Monday Morning Confession: I already started decorating for Christmas.  It might seem early for some, but I have a few surprises up my sleeve that I wanted to prep early for this year.  While many of my daily favorites get tucked away for the next 6 weeks, the holiday decor is once again making it’s debut for another year.  As some ‘old’ traditional elements remain, there are many new projects and vignettes that I’ll be sharing over the coming weeks.  One in particular is my new tree skirt.  Definitely the easiest + fastest + cheapest tree skirt you ever did see…

Easiest, Fastest, + Cheapest Christmas Tree Skirt.  Use 1.5 yd of fabric and wrap around tree.  Follow easy instructions by @Jenna_Burger of WWW.JENNABURGER.COM

For the last few years I’ve wanted a new tree skirt.  I had grand plans of making something beautiful and chic, but honestly it just never happened.  And anyway, is something pretty + most likely expensive, even worth it?  I’ve found over the years that the tree skirt ends up getting thrown around either from the kids or the cats, and then once the presents are added, you don’t even see it.  Well this is in my house anyway. maybe it’s different in your casa…

So after living with no tree skirt for a few days once the tree was up, I thought let me test out this pretty black and white striped fabric.  I threw it under the tree and loved it’s whimsical, non-perfect, simple look.  Plus it cost me nothing. So here we go… The black and white striped fabric I had on-hand was 1 yard, but I would recommend using 1.5 yards or even 2 yards for a fuller look. I placed the fabric in front of the tree.

Easiest, Fastest, + Cheapest Christmas Tree Skirt.  Use 1.5 yd of fabric and wrap around tree.  Follow easy instructions by @Jenna_Burger of WWW.JENNABURGER.COM

Then took the two top corners and wrapped them around the  bottom of the tree so they meet in the back.

Easiest, Fastest, + Cheapest Christmas Tree Skirt.  Use 1.5 yd of fabric and wrap around tree.  Follow easy instructions by @Jenna_Burger of WWW.JENNABURGER.COM

Easiest, Fastest, + Cheapest Christmas Tree Skirt.  Use 1.5 yd of fabric and wrap around tree.  Follow easy instructions by @Jenna_Burger of WWW.JENNABURGER.COM

Lastly, I tucked the bottom corners and all the loose edges underneath.

Easiest, Fastest, + Cheapest Christmas Tree Skirt.  Use 1.5 yd of fabric and wrap around tree.  Follow easy instructions by @Jenna_Burger of WWW.JENNABURGER.COM

Literally, this took all of 30 seconds and it was done.

Easiest, Fastest, + Cheapest Christmas Tree Skirt.  Use 1.5 yd of fabric and wrap around tree.  Follow easy instructions by @Jenna_Burger of WWW.JENNABURGER.COM

By the end of the day, the tree skirt is all dishuffled anyway, so within seconds it looks good again.  There really is no right or wrong to this tree skirt, which makes it perfect for me!

And the best part is, it cost nothing and the fabric can be used for something else after the Holidays.  Next year, I may want a totally different pattern and I won’t be married to something store-bought or a creation that took hours. I hope you enjoyed my 30 second tree skirt creation.  Sometimes the easiest things are the best!

Be sure to check back next Monday when I’ll be partnering with a few Blogging friends who will all be sharing super simple holiday projects for our Christmas in a Minute series.  Cheers to a festive season. xo

Bring the Outdoors In: How To Create Fern Art

This post brought to you by Apartments.com. All opinions are 100% mine.

While tackling my foyer revamp, I gave a lot of thought as to what type of artwork / wall decor to put above the new gold dresser gorgeousness, as I like to call “her”.  The focal wall that got “dressed up” with new wide horizontal stripes is only about 5′ wide, but whatever was chosen to display needed to make an impact.  I didn’t want it to be personal pictures since we have so many around our house already, but I wanted it to be meaningful and reflect us.  I even reached out to you, my followers, on Facebook asking for suggestions on your favorite Etsy shops.  Even though I didn’t go that route, I now have a few go-to places for the future.

In the end, after much thought, my artwork was right under my nose in my backyard – literally.  After cutting a few wild flowers and ferns for a bouquet I was putting together for our outdoor dining table a few weeks ago, I thought using the ferns as art would be the perfect solution.

Bring the Outdoors in by using ferns and creating art by @Jenna_Burger, www.sasinteriors.net

Our backyard is filled with ferns and wild flowers, so I cut + collected a few different kinds choosing those that appeared to have all their leaves in tact.  No matter if you live in a house, like me, or in an apartment, bringing the outdoors in allows your home to feel more organic and to be ONE WITH NATURE.  A little corny sounding, but true.

No wild flowers in your back yard?  Check out the wooded / more dense areas of a nearby park.  With Fall in full peak, it’s a great time of year for a walk or hike.

Once I had the ferns collected – about 10 good ones – I individually laid each out on a white piece of paper (wax paper is an alternative option).

Bring the Outdoors in by using ferns and creating art by @Jenna_Burger, www.sasinteriors.net

Once all were laid out, I took the stack of ferns + paper and pressed them between 3-4 hardcover, heavy books.  Be sure the entire fern is covered on the paper and be sure that it all gets pressed between the book.  If it doesn’t, the part of the fern / flower sticking out will wilt.

About 3 days later, I took the dried out ferns and started creating the “art”.  I snagged these simple picture frames from AC Moore for about $2 and thought the minimal frame was perfect to let the ferns “speak”.

Bring the Outdoors in by using ferns and creating art by @Jenna_Burger, www.sasinteriors.net

At first, I simply used the white paper to mount the ferns, but after a few days, the paper started to wilt because the ferns were still exuding moisture.  I decided to use a heavier paper and cut out pieces of poster board that fit to size. This did the trick!

Bring the Outdoors in by using ferns and creating art by @Jenna_Burger, www.sasinteriors.net

And then they were ready to hang…

Bring the Outdoors in by using ferns and creating art by @Jenna_Burger, www.sasinteriors.net

Bring the Outdoors in by using ferns and creating art by @Jenna_Burger, www.sasinteriors.net

Bring the Outdoors in by using ferns and creating art by @Jenna_Burger, www.sasinteriors.net

Along with the ferns, I also pressed a few wild flowers.  I love the yellow coloring.  They add a bit of color to the art collection.

Bring the Outdoors in by using ferns and creating art by @Jenna_Burger, www.sasinteriors.net

Bring the Outdoors in by using ferns and creating art by @Jenna_Burger, www.sasinteriors.net

And this is the overall new Foyer space…

Foyer Remodel with newly striped walls, fern art, and layers of colors + texture.  Spaced designed by @Jenna_Burger, WWW.JENNABURGER.COM

It’s so wonderful how the outdoors can be brought in, to enjoy throughout the entire year.  The simplicity and ease of using ferns as art is a pretty + no-cost way to create a beautiful focal point.

Bring the Outdoors in by using ferns and creating art by @Jenna_Burger, WWW.JENNABURGER.COM

As an Apartments.com Brand Influencer, I strive to share ideas + do it yourself projects not only for those who live in homes, but also easy & affordable ideas + creations for apartment dwellers.  Next time you’re looking for something unique + meaningful + free for your walls, turn to the outdoors.

For more great ideas on creating a meaningful home, especially for those who rent, turn to the Renter Resources section on Apartments.com.  It is filled with interesting + useful information to make your dwelling reflect you.

Visit Sponsor's Site

DIY: Drop Cloth Curtain Panels with Leading Edge Detail

I’ll be honest, none of the window curtain panels in my home cost more than $50.  Yet all are custom made.  Not by an uber-expensive fabricator, but by me.

Store-bought and/or custom-made curtain panels can be very pricey, but the same look (or better) can be achieved by making your own.  And guess what, it’s not difficult…

DIY: Drop Cloth Window Panels with Leading Edge Detail. High-end look for less than $20 to make. via @Jenna_Burger, WWW.JENNABURGER.COM


As the calendar turns and another Fall approaches, Lowe’s put The Team to the test this month to create a new window treatment for the home.  I was in need (well more like a want) of new window panels for the dining room, so I knew it was the perfect spot to get my craft on.

I desired something simple, so instead of stopping at the curtain aisle for a typical drape, I headed towards the paint aisle and landed in the drop cloth section.  confession: I can close my eyes and always find the drop cloth section… I’ve confessed my love for drop cloth before, but honestly it is The. Best. Material. hands down.  You can do so much with drop cloth material.  It’s not just for painters!!

Anyway, onto the new panels…

1. At Lowes, I chose a 6 ft. x 9 ft. size panel (about $10), then cut it in half to make (2) 3 ft. x 9 ft. pieces.

Drop Cloth

2. The panels are heavy enough, so I didn’t feel that a lining was needed, so I simply squared off the edges (drop cloth isn’t always perfectly straight), folded over the edges, and sewed all around.

DIY: Drop Cloth Curtain Panels

3. Once the panels were complete, it was time to add the decorative leading edge.  I chose a navy blue light cotton fabric which was the perfect contrasting complement to the lighter color of the drop cloth material.

And yes, that says $3 for the yard.  In all these panels cost about $13!

DIY: Drop Cloth Window Panels with Leading Edge Detail. High-end look for less than $20 to make. via @Jenna_Burger, WWW.JENNABURGER.COMThe color of the fabric is showing royal blue in this pic, but it is more navy in actuality.

4. I layed out the fabric length-wise and cut as many 4″ strips as I could.

DIY: Drop Cloth Window Panels with Leading Edge Detail. High-end look for less than $20 to make. via @Jenna_Burger, WWW.JENNABURGER.COMagain showing royal blue…  but it’s not.

5. Then I folded over the two side edges 1/2″ each and ironed the seam flat.

DIY: Drop Cloth Window Panels with Leading Edge Detail. High-end look for less than $20 to make. via @Jenna_Burger, WWW.JENNABURGER.COMThat’s the true color. I swear!

Sidenote: Because of the panel length (a typical panel can be from 84-96″ long), you may need to attach fabric strips to achieve one long strip. I did and before folding over and ironing the seam, I attached two strips and then I had enough length.  Once sewn, iron the seam flat.

DIY: Drop Cloth Window Panels with Leading Edge Detail. High-end look for less than $20 to make. via @Jenna_Burger, WWW.JENNABURGER.COM

6. Once the seams were ironed, it was time to attach the decorative edge to the drop cloth panel. I decided to have 1″ of drop cloth exposed, then add the navy blue accent.  I first pinned the navy fabric in place and sewed all along the edges using the same color thread.

DIY: Drop Cloth Window Panels with Leading Edge Detail. High-end look for less than $20 to make. via @Jenna_Burger, WWW.JENNABURGER.COM

DIY: Drop Cloth Window Panels with Leading Edge Detail. High-end look for less than $20 to make. via @Jenna_Burger, WWW.JENNABURGER.COM

And that’s it.  A high-end look for $13!

The result…

DIY: Drop Cloth Window Panels with Leading Edge Detail. High-end look for less than $20 to make. via @Jenna_Burger, WWW.JENNABURGER.COM

The panels are hung by clip rings and have slight puddle at the bottom.  They are the perfect addition for my dining space.

Other ideas + ways to achieve a high-end look for less…

  • You don’t have to use drop cloth to create a similar window curtain panel.  A similar detailed edge can be added to a store-bought curtain, similar to what I did in my daughter’s room.  In her space, I actually added the decorative fabric to the outside edge of the curtain panel instead of on top of the fabric.  The typical store-bought panel wasn’t long enough, but the added fabric made it the ideal length.

How-To Add Decorative Trim to Curtains {for cheap}

  • If you are using a thinner fabric to create a window panel and want to have a heavier panel that will allow less light to shine through, check out what I did in my bedroom.  Using drop cloth material (AGAIN), I took a regular weight cotton fabric and lined them.  Depending on the fabric pattern, a decorative edge could be added to these style panels as well.

DIY: How to Make Simple Lined Window Drapery Panels

Ideas are limitless for what you can create for your windows!

Thanks to Lowe’s, I was able to create my most recent creation for less than $15.  So next time your combing the paint aisle to grab some spray paint, don’t forget to check out the drop cloth section.  Your mind will go bonkers with all that can be created!

Excited for the Fall and ready to tackle some home improvement and DIY projects?  Lowe’s has it all.

Fall Badge Rectangle

Sign up for their free Lowe’s Creative Ideas Magazine, which is filled with ideas + inspiration!  Plus you can always follow them on Pinterest and Instagram for even more great ideas!

Disclosure: I am so grateful to be apart of the Lowe’s Creative Team and was provided with a Lowe’s gift card to purchase items for my project.  I was also compensated for my time to use the products.  No one told me what to create, what to buy, how to use the product, or what to write.  All opinions are 100% mine!

What have you made using drop cloth? Have you ever thought of jazzing up your window curtain panels to create a custom look?


Powder Room Remodel Reveal

The powder room remodel is finally complete!

I hope you weren’t holding your breathe because it’s been 2 + months since my last progress postBoy, did I surely leave you hangin’…

BUT (and it’s a big but), it’s all worth it because this is the result >

Powder Room Remodel {REVEAL} #powderroomremodel

Big Time Awesome!

And just to remind you where we started, here is the before >

Powder Room Remodel {REVEAL} #powderroomremodel

And before that (when we moved in to the house), this is what the space looked like >

Before Powder Room Remodel

A bit scary, don’t ya think?!

Back to the progress…

Since the last post when I shared the steps of fixing the wall from the previous tile and hanging the wallpaper, we were busy with >

  • Hanging crown moulding (1st time ever, wow it was tough)
  • Hanging the new light (twice because the 1st one that I thought I loved, I really didn’t)
  • Painting the crown moulding
  • Putting together and installing the vanity
  • Installing the toilet
  • Hanging the mirror
  • Choosing and changing the pictures
  • Designing and installing the custom roman shade
  • Touch ups!

O, well now I know why it took me 2 months to show you the reveal.  That was alot.  Here are some progress pictures along the way…

Powder Room Remodel {REVEAL} #powderroomremodel

Alot happened to this small space.  The most challenging was absolutely the installation of the crown moulding.  It was the first time that the Mister and I ever tackled installing moulding and it was tough.  We made lots of mistakes day after day, and in the end called in a friend who has major talent for woodworking.  He’s not a professional woodworker, but someone who does it as a hobby and is quite knowledgeable and maticulous.  Anyway, he really made the bathroom what it is because without, the space wouldn’t have the same depth and pizazz.

If you’re familiar with installing moulding, our crafty guy used the coping method, which results in really tight corner joints.  Once the moulding was installed, there was very little need for wood filler.  With the time it took to do this simple bathroom (about 3-4 hours), I couldn’t imagine doing a large room or an overall house.  I’ve been drawing mouldings for client homes for years, but now I have the appreciation of how difficult it is to actually install.  Not sure I’ll be doing that again any time soon…

Want to learn more on the coping technique for crown moulding? Check out this post I found.

Anyway, it’s complete and I’m in love with the overall space.  Want to see more of the reveal?  I bet you do.  Go…

Powder Room Remodel {REVEAL} #powderroomremodel

The vibrant and eye-popping Amy Butler wallpaper sets the tone for the room.  It’s surely the statement of the space and the one element that started the design.  From the mirror to the vanity to the framed pictures on the wall, everything is very simple so the wallpaper can ‘speak’.

Powder Room Remodel {REVEAL} #powderroomremodel

Pretty white accessories fill the space, along with black and white framed images from my travels.  Both are beautifully set against the deep blue walls.

Powder Room Remodel {REVEAL} #powderroomremodel

The new roman shade is another amazing element in the room.  I designed it and the creative folks at Tonic Living fabricated it.  They are amazing. They offer an array of services for creating window treatments, pillows, futon covers, and more.  Their offering of fabrics is huge and very much in-trend.

Powder Room Remodel {REVEAL} #powderroomremodel

This was the sketch I sent them and you see the result…Window Treatment sketch

The top of the shade sits right under the bottom of the crown moulding and when fully lowered, you see the full border design.  The fabric is a heavy white linen and the border detail is a 2″ thick navy ribbon.

Powder Room Remodel {REVEAL} #powderroomremodel

The mirror was definitely the most difficult selection to choose.  I wanted something that was interesting, but minimal so the wallpaper behind would still shine through.  I finally decided on this mirror from Lowe’s and am thrilled with the overall look.  I like it’s round shape that emulates the flowers in the wallpaper, as well as it’s frameless design.

Powder Room Remodel {REVEAL} #powderroomremodel

The vanity and faucet are another element of the room that I adore.  The Moen faucet is the same style and finish that I used in my master bathroom.  It has great lines and works beautifully in the space. Plus the major awesome part is the finish doesn’t leave spots.  Read more about it here!

Powder Room Remodel {REVEAL} #powderroomremodel

More details…

Powder Room Remodel {REVEAL} #powderroomremodel

Powder Room Remodel {REVEAL} #powderroomremodel

The light fixture is a $17 steal from Lowe’s (on their website it’s more $$$).   I had previously chosen another light, but wasn’t thrilled with the look once home.  Actually this fixture is also hung upside down.  When I held it in place before install, the junction box was very high on the wall and a fixture hanging down was more appropriate.  My genius husband came to the rescue and said, “Why don’t we install it upside down?”  And that’s what we did.  You would never know and it looks great!

Powder Room Remodel {REVEAL} #powderroomremodel

Powder Room Remodel {REVEAL} #powderroomremodel

And I think my most favorite part of the new space is how I can enjoy it from so many other parts of my home…

This is my view from the office / family room looking through the foyer and into the new powder room.

Powder Room Remodel {REVEAL} #powderroomremodel

Here is a recap of all the elements in the newly created powder room:

Thank you for taking the tour of my new powder room.  What a refreshing new space to see and enjoy when you enter our home.

DIY: Rope Wrapped Vases + Glass Jars

Earlier this week, I excitedly announced that I recently partnered with Apartments.com to share simple solutions for small space living.  Specifically, I will be showcasing tips and strategic ideas for overcoming the obstacles and hurdles of apartment life to create an inviting, stylish, and most of all, functional space.  Additionally, each month I will be creating a DIY project that is perfectly fit for an apartment and/or small space.  Like this…

DIY: Rope Wrapped Vases perfect for creating & displaying in an apartment and/or small space #apartment #diy #apartmentliving

Do-It-Yourself + Apartment Life isn’t always an easy combo.  In my book a DIY project/craft best suited for an apartment has to be the following:

-> Easy to create using simple supplies (no major power tools here)

-> Easily moveable – something that can be repositioned and/or moved to another room.  In a small space, a few accessory moves will make the entire place feel fresh and new.

-> Unique, interesting, one-of-a-kind (of course)

For my first DIY project, Apartments.com put me to the challenge of creating something for the Summer.  Not to tricky.  To me, Summer brings to mind words like beach, sand, sun, sea, nautical, light, bright, airy…

For the project, I wanted to create something using the word nautical, which then in turn rope material came to mind, thus the creation of rope wrapped vases.  Knowing that I already had a plethora of glass vases and glass jars around the house, I started out by shopping my home.  How much better does it get not to have to spend a dime?!

TIP: In a small space, storing extra of anything, especially home decor accessories, isn’t easy.  My suggestion would be to have one shelf, one box, or one ‘spot’ where you can keep extra accessories or home type elements to rotate with what you currently have throughout your home.  When I shop, I usually purchase items because I love them and they have meaning, versus buying something just to buy.  But that means when I get it home, I might not use it right away.  Having a small place to store items like vases, baskets, extra candles, etc. will allow you to always have the ability to freshen up your space in no time without the need to go out and search/buy for something meaningless.  The box or shelf you choice is perfect because it will allow you to stay within the designated area.  Small spaces surely don’t allow for excess.

Vases and used glass jars (sauce or salsa jars are my favorites) or mason jars are always keepers for my accessory shelf.  At the moment they might not be of use, but I know they will always come in handy in the future.  For this project, I went right to the shelf and found a collection of 5 glass jars of varying heights and sizes.

DIY: Rope Wrapped Vases perfect for creating & displaying in an apartment and/or small space #apartment #diy #apartmentliving

Instead of wrapping all the vases/glass jars in the same rope, I decided to use rope, twine, and jute of different sizes and colors.

These 3 styles I got at Lowes >

DIY: Rope Wrapped Vases perfect for creating & displaying in an apartment and/or small space #apartment #diy #apartmentliving

Using my hot glue gun, I dabbed a bit of the hot glue at the point where I wanted to start and then attached the end of the twine.

4

Then I wrapped and wrapped and wrapped around the glass jar.  Every so often I added another dab of hot glue to be sure that the twine / jute / rope was secure.

DIY: Rope Wrapped Vases perfect for creating & displaying in an apartment and/or small space #apartment #diy #apartmentliving

The large rope was my favorite because it gave the glass vase some great texture.

DIY: Rope Wrapped Vases perfect for creating & displaying in an apartment and/or small space #apartment #diy #apartmentliving

Each jar / vase is a different height and size, so I made each one even more unique with the color and/or application of the rope.  Some got fully covered in rope where others only a portion of the ‘body’ got covered.  It adds an interesting, one-of-a-kind quality.

For the largest vase of all, I fully covered it in rope and then added a little color (white to be specific – some say it’s not technically a color) with a splash of spray paint. To do this, I decided the area that I wanted to spray paint and covered the rest.  I used painters tape along with a piece of paper (a staples bag to be exact, lol – it was the perfect size), flipped over the vase so the top was on the ground, and started to spray.  A few coats later, it was done.

DIY: Rope Wrapped Vases perfect for creating & displaying in an apartment and/or small space #apartment #diy #apartmentliving

The result >

DIY: Rope Wrapped Vases perfect for creating & displaying in an apartment and/or small space #apartment #diy #apartmentliving

And the entire collection >

On the mantel.

DIY: Rope Wrapped Vases perfect for creating & displaying in an apartment and/or small space #apartment #diy #apartmentliving

On the dining table.

DIY: Rope Wrapped Vases perfect for creating & displaying in an apartment and/or small space #apartment #diy #apartmentliving

Outdoors.

DIY: Rope Wrapped Vases perfect for creating & displaying in an apartment and/or small space #apartment #diy #apartmentliving

Simple vases and glass jars changed into creative decor for little money and little time = a perfect DIY for an apartment dweller. No matter where you live, creative do it yourself projects can be tackled.  It might take a little more planning, but a fun and successful result can be accomplished!

As I mentioned the other day, I’ve recently been working with a NYC E-Design client on a bedroom makeover.  She shared some great insight with a brief Q & A into Life in an Apartment, and also tackled the same project I did.  I thought it would be fun and interesting to see how my rope wrapped vase collection looked in a home, and hers in an apartment.  She used differing glass vases with the same rope.  Take a look…

DIY: Rope Wrapped Vases perfect for creating & displaying in an apartment and/or small space #apartment #diy #apartmentliving

DIY: Kids Play + Camping Tent

Happy July!

For me, it officially feels like Summer has begun.  The kids are out of school now for just about a week, and the Summer sun is setting in (despite all the rain we’ve been having).  The kids and I have been enjoying fun outings each day, while also spending some down-time at home just relaxing.  Often on those home-bound days, the hours creep by with boredom, so when Lowe’s put me up to the challenge this month to create something related to DIY camping, I thought of the perfect solution…

a kids play + camping tent.  They can use it as a tent to play in during the day, as well as a spot to sleep in once the sun sets and the stars peak.

Kids Play + Camping Tent - 10 dollars to make +10 minutes to create! Super simple creation that your kids will love!

The the best part about this tent is that it only took about $10 to make + 10 minutes to create!  I made two, so the cost and time were double.

Supplies for (1) Tent:

  • (4) 1 x 2 piece of wood at 42″ long ($2.16)
    • At Lowe’s I had them cut down (1) 1 x 2 x 8 which cost $1.08 into my (2) 42″ long pieces
  • (1) 3/4″ diameter dowel at 48″ long ($2.85)
  • 2.5 total yards of fabric ($2.25/yard x 2.5 = $5.63)
  • 1.5 total yards of ribbon (leftovers)
  • Drill with a 3/4″ drill bit

This tent is really easy to create, and what’s even better is that you can put it up and take it down very easily with each use.   I made it so it can be easily assembled and just as easy to disassemble for storage.  More on that later…

1. (2 minutes)

To start off, I drilled a 3/4″ hole at each end of the 1 x 2 piece of wood.  The Mister and I set up a “drilling station” by creating two piles of stacked wood so the 1 x 2 could bridge across the top.  As an alternative, you can drill through your piece of lumber with a scrap piece underneath.  Either method will work.

One hole of each piece will be for the peak of the tent, while the other hole will be for the ribbon to tie through.  Keep reading and it’ll all come together…

Kids Play + Camping Tent - 10 dollars to make +10 minutes to create! Super simple creation that your kids will love!

2. (1 minute)

Once the holes were drilled, I fed one end of the dowel through two of the 1 x 2’s, then fed the other end of the dowel through the other two 1 x 2’s.

Kids Play + Camping Tent - 10 dollars to make +10 minutes to create! Super simple creation that your kids will love!

Note: The drill bit size needs to match the dowel size, so it fits snug.  I used a 3/4″ dowel and a 3/4″ drill bit.  The dowel needs to be snug in the 1 x 2’s so it stays in place, yet is still easily adjustable.

And the frame was done!

Onto the fabric.

3. (2 minutes)

Many fabric comes in a 44/45″ width, so the sides don’t need to be hemmed (if you want to hem them you can, but I didn’t).  To start off, I folded over one end of the fabric and sewed.

Kids Play + Camping Tent - 10 dollars to make +10 minutes to create! Super simple creation that your kids will love!

4. (2 minutes)

I draped the fabric (with one finished edge) over the tent frame.  I lined up the finished edge side with the bottom of the legs, so I could determine how much needed to be trimmed off the other side – be sure to leave enough fabric to fold over and sew (about  1″ extra inch).

Using my Jar O’ Ribbons, I picked out 4 fun colors.

Kids Play + Camping Tent - 10 dollars to make +10 minutes to create! Super simple creation that your kids will love!

5. (2 minutes)

To secure the fabric to the frame,  I added ribbon.  I cut (4) 12-15″ long pieces of ribbon, and sewed the center of it to the right side of each corner using a fun stitch.

Kids Play + Camping Tent - 10 dollars to make +10 minutes to create! Super simple creation that your kids will love!

After cutting the loose threads, it was complete!

I draped the fabric over the dowel, attached the 4 ribbons through the 4 bottom holes, and secured. (1 minute)

Kids Play + Camping Tent - 10 dollars to make +10 minutes to create! Super simple creation that your kids will love!

Kids Play + Camping Tent - 10 dollars to make +10 minutes to create! Super simple creation that your kids will love!

And the dual play + camping tent was complete.

Kids Play + Camping Tent - 10 dollars to make +10 minutes to create! Super simple creation that your kids will love!

It’s just as easy to disassemble as it is to assemble!  Plus it folds right up to store away.  I put all the legs together, wrapped the fabric around them, and secured it at both ends with the attached ribbon.

Kids Play + Camping Tent - 10 dollars to make +10 minutes to create! Super simple creation that your kids will love!

Kids Play + Camping Tent - 10 dollars to make +10 minutes to create! Super simple creation that your kids will love!

The details.

Kids Play + Camping Tent - 10 dollars to make +10 minutes to create! Super simple creation that your kids will love!

Kids Play + Camping Tent - 10 dollars to make +10 minutes to create! Super simple creation that your kids will love!

Kids Play + Camping Tent - 10 dollars to make +10 minutes to create! Super simple creation that your kids will love!

Kids Play + Camping Tent - 10 dollars to make +10 minutes to create! Super simple creation that your kids will love!

My kids are having such a fun time with their new creations.

Day for Play…

Kids Play + Camping Tent - 10 dollars to make +10 minutes to create! Super simple creation that your kids will love!

And night for camping… (well kinda.  it didn’t last the whole night).

Kids Play + Camping Tent - 10 dollars to make +10 minutes to create! Super simple creation that your kids will love!

Either way, they are fun, easy to make, and are perfect for some Summer Fun!

Kids Play + Camping Tent - 10 dollars to make +10 minutes to create! Super simple creation that your kids will love!

DIY: Outdoor Pallet Sofa

Despite the drear weather lately, the deck decor is coming together!

We power washed, we prepped, we stained, we built…

…an outdoor pallet sofa!

It is heaven.  Take a look (or just come on over to enjoy…)

A Summer Essential for the patio or deck: an Outdoor Pallet Sofa - Easy to make and costs less than 5 dollars!

And guess what’s the best part?  It cost less than $5.

Thankfully pallets are readily available in our neck of the woods (for free).  I usually snag mine from the back of my local Lowe’s – thanks Lowe’s, you’re the best!

After staining the deck, I knew I wanted something nice and comfy to fill the space right outside of our dining room slider.  It used to look like this before…

Deck before the super awesome makeover

But went to this with a little TLC…

A Summer Essential for the patio or deck: an Outdoor Pallet Sofa - Easy to make and costs less than 5 dollars!

Here’s how:

I got 4 pallets that were all about the same size (40″ x 30″) and made 2 “sofas”.  If you’re wanting to make something similar, then you can make yours as small or large as you desire.  If you’ve got a big patio or deck to fill, think about making a humungo sectional. How cool would that be?!

A Summer Essential for the patio or deck: an Outdoor Pallet Sofa - Easy to make and costs less than 5 dollars!

Using 4″x4″ posts from the fence we took out last year, we cut the legs using a compound miter saw (this is a favorite of mine <= affiliate link).

Determine the height of the legs:  A typical seat height is 18-20″, so we measured the height of the cushion we bought (4″ high) + the pallet thickness (5″ high), so the legs needed to be 10″.

Cutting the legs for the Pallet Sofa

To attach the legs, we used flat brackets (mending plate <= affiliate link) and braced them from the leg to the pallet edge.

Attaching the legs to the pallet sofa

Outdoor pallet sofa legs

To attach the back pallet, we used (3) 90 degree L-brackets (corner brace <= affiliate link)  for each “sofa”, so 6 in all.

Attaching the back of the pallet sofa

Then it was complete.  That’s how easy these bad-boys are to make,  But I will warn you…  THEY ARE HEAVY.  So you will definitely need some muscles & braun to lift and move the pallet sofas.

Once they were in place, we were in love!

Check out my little guy chilaxin’…

A Summer Essential for the patio or deck: an Outdoor Pallet Sofa - Easy to make and costs less than 5 dollars!

Heaven.

A Summer Essential for the patio or deck: an Outdoor Pallet Sofa - Easy to make and costs less than 5 dollars!

A Summer Essential for the patio or deck: an Outdoor Pallet Sofa - Easy to make and costs less than 5 dollars!

One more step we could have taken, but haven’t (yet or maybe never) is to paint or stain the pallets.  They certainly don’t need to be left the raw wood, it just depends on the look you desire.

A Summer Essential for the patio or deck: an Outdoor Pallet Sofa - Easy to make and costs less than 5 dollars!

A Summer Essential for the patio or deck: an Outdoor Pallet Sofa - Easy to make and costs less than 5 dollars!

I’m sure you’re wondering about the cushions. Right?  Boy, they were difficult to find.  I found lots of cushions, but they were all too $$$.  The tricky part was the seat depth of the pallet sofa which is 30″.  It’s the perfect spot for lounging and napping (you’ll never want to get up), but finding a cushion to fit was rough.  In the end, I ended up finding these oversized seat-with-back-cushions at Lowes.  They were a bit pricey at $55/each, but they are mega thick and durable.  They’ve been left in the rain a few times and survived, thankfully.  With the cushy back, they fit just right for the 30″ depth.

A Summer Essential for the patio or deck: an Outdoor Pallet Sofa - Easy to make and costs less than 5 dollars!

With 3 cushions across, they were just the right size to allow for some extra room on the ends of the pallets to rest a drink & drink tray.

A Summer Essential for the patio or deck: an Outdoor Pallet Sofa - Easy to make and costs less than 5 dollars!

Even though it’s been practically raining every day, I have been totally loving our new deck space.  Many a days ahead will be spent snoozing lounging!  A more thorough deck tour to come – I promise!  Until then, you’ve gotta make this pallet sofa!

Craft Room: Progress Update 1

This morning, I mentioned that I was headed out early for a site visit to check on the progress of the mega craft room /office space that I’ve been working on for the last few months.  It’s a local project which I shared details about a few weeks ago and the transformation has been amazing.

In the last post about this project, the construction hadn’t even begun, but since then alot has happened, including:

  • Removal of the popcorn ceiling
  • Removal of old carpet and installation of new hardwood floor (in this room and throughout the entire house)
  • Removal of old window treatments
  • New recessed lighting / hi-hats
  • New painted walls
  • New crown moulding
  • And last, but not least GORGEOUS NEW BUILT-INS!

Here are some progress pictures…

Craft Room: Progress of Client Project _ Designed by @Jenna_Burger

Still in progress, but better than before…

Creative and Inspiring Craft Room Mood Board by @Jenna_Burger, WWW.JENNABURGER.COM

Crazy that it’s the same space, right?

Here are some more teasers…

The turquoise backs are gorgeous and all those cubbies are going to give plenty of room for storage!

Wait until you see what is going on the sides of that awesome built-in. {Major Goodness}

Craft Room: Progress of Client Project _ Designed by @Jenna_Burger

This is a view from the craft studio into the office.  It used to be a small doorway, but now it’s a large opening that lets in a huge amount of light and gives a unified flow to the overall space.

Craft Room: Progress of Client Project _ Designed by @Jenna_Burger

More turquoise.  This is just the beginning of how fabulous this room is going to look…

Craft Room: Progress of Client Project _ Designed by @Jenna_Burger

And the bench.  A 6′ long X 30″ deep heavenly haven.  Don’t you want one of these for your home??  And the little book nook is adorbs!

Craft Room: Progress of Client Project _ Designed by @Jenna_Burger

Last but not least, a few of the details.

Like the chandelier…

Craft Room: Progress of Client Project _ Designed by @Jenna_BurgerDoes it get better?!

And this darling fuschia C-table.  How can you not love it.  The fabulous contractor that I’m working with built-in using these Ana White plans. I so want one for myself!

Craft Room: Progress of Client Project _ Designed by @Jenna_Burger

More updates to come soon!

Powder Room Remodel – Phase 1: Removing the Existing Toilet and Pedestal Sink

My feet are sore and my fingers have a few blisters, but it’s well worth the pain for how much work around the house was accomplished this past weekend.  It was the first days of really nice weather and aside from a baseball game and a birthday celebration, much of the weekend was spent cleaning out the garage, sprucing up the exterior, and starting the powder room remodel.

I shared details of my plans for the powder room a few weeks ago and was thrilled to finally get started. To begin the process the old had to come out before the new goes in, so the Mister and I got our tools out and got to work on removing the existing toilet and pedestal sink. I actually didn’t know the process of how to remove either plumbing fixture, but thankfully the Mister has done this before and helped me out – of course with a few bumps along the way – can’t be a DIY project without…

Powder Room Remodel- Phase 1: Tutorial on how to remove an existing toilet and pedestal sink. It's not as difficult as it may seem. Pin NOW, check out later. @Jenna_Burger, WWW.JENNABURGER.COM #powderroomremodel

Do you know where and how to start the process of removing a toilet and sink?  If not, this post is for you! Keep on reading, but I’ll worn you, this tutorial is ultra detailed, but the pictures aren’t pretty.

Removing an existing toilet.

1. Turn off the water supply.  The oval valve at the side or back of the toilet is the water supply.  Using a vice grip or adjustable wrench, turn the valve so you turn off the water.  Then flush the toilet a few times to empty the tank.  Using old rags, put them in the tank and/or bowl to soak up any left over water.  It’s best to use gloves during the process as the toilet bowl isn’t a pretty place.

Powder Room Remodel- Phase 1: Tutorial on how to remove an existing toilet and pedestal sink. It's not as difficult as it may seem. Pin NOW, check out later. @Jenna_Burger, WWW.JENNABURGER.COM #powderroomremodelYup, that’s a closeup of my toilet… Not something you probably expected to see on a Monday mornin’

2. Remove the tank bolts. Remove the (2) plastic caps on each side of the toilet base.  Once exposed, you will see the tank bolts, also sometimes referred to as “Johnny Bolts”.  Remove the nut, which is easiest to do using a vice grip or adjustable wrench, and the bolt will be exposed.

Then carefully loosen the toilet, rocking it from side to side to loosen the wax seal, and lift it up. Residual water may spill, but that’s fine.

 Powder Room Remodel- Phase 1: Tutorial on how to remove an existing toilet and pedestal sink. It's not as difficult as it may seem. Pin NOW, check out later. @Jenna_Burger, WWW.JENNABURGER.COM #powderroomremodel

I warned you this post wasn’t pretty, BUT it sure will be helpful when you want to upgrade that sad looking toilet.  There surely isn’t a need to hire a plumber because you CAN do it yourself.

Powder Room Remodel- Phase 1: Tutorial on how to remove an existing toilet and pedestal sink. It's not as difficult as it may seem. Pin NOW, check out later. @Jenna_Burger, WWW.JENNABURGER.COM #powderroomremodel

3. Remove the old wax. Once the toilet is lifted, the existing wax will need to be removed.  Using a putty knife, scrape away the wax from the pipe flange. It’s definitely important to use gloves too (of course we didn’t, but I suggest you do).

Powder Room Remodel- Phase 1: Tutorial on how to remove an existing toilet and pedestal sink. It's not as difficult as it may seem. Pin NOW, check out later. @Jenna_Burger, WWW.JENNABURGER.COM #powderroomremodel

We also removed the tank bolts and plan on replacing them when we install the new toilet.

Here is the hole, free and clear of wax.

Pretty sight, right?

NOT! But at least you now know it’s not that difficult of a process.

Powder Room Remodel- Phase 1: Tutorial on how to remove an existing toilet and pedestal sink. It's not as difficult as it may seem. Pin NOW, check out later. @Jenna_Burger, WWW.JENNABURGER.COM #powderroomremodel

If there is a time lapse between removing and installing a new toilet, it is very important to plug the drain opening with a rag to prevent sewer gases leaking into your home.

Removing an existing pedestal sink.

Toilets are toilets, and are fairly similar, but there are a range of sink configurations, so I’m sharing the details of my situation, but yours may be different.

The process of removing our pedestal sink was tricky because we could not get our hand in the back to turn off the water supply.  After years of wear, the valve had rusted making it very difficult to turn off.  So what did we do?  We broke the sink.  Not what we anticipated doing, but it had to be done.

Powder Room Remodel- Phase 1: Tutorial on how to remove an existing toilet and pedestal sink. It's not as difficult as it may seem. Pin NOW, check out later. @Jenna_Burger, WWW.JENNABURGER.COM #powderroomremodel

After that we…

1. Turn off the water supply. Just like the toilet, turn the oval valve at the back of the sink so the water is shut off.  Remove the nut from the water supply.  Then put a bucket under the drain trap to collect any residual water, and loosen the nut to remove the trap.

Powder Room Remodel- Phase 1: Tutorial on how to remove an existing toilet and pedestal sink. It's not as difficult as it may seem. Pin NOW, check out later. @Jenna_Burger, WWW.JENNABURGER.COM #powderroomremodel

Disconnect any additional plumbing connections and remove the sink.  For us, we had to unscrew the sink bowl section of the pedestal from the wall and then remove the tile backsplash I added a few years ago.  New sheetrock will need to be installed before anything else.

Powder Room Remodel- Phase 1: Tutorial on how to remove an existing toilet and pedestal sink. It's not as difficult as it may seem. Pin NOW, check out later. @Jenna_Burger, WWW.JENNABURGER.COM #powderroomremodel

And this is the result…

Powder Room Remodel- Phase 1: Tutorial on how to remove an existing toilet and pedestal sink. It's not as difficult as it may seem. Pin NOW, check out later. @Jenna_Burger, WWW.JENNABURGER.COM #powderroomremodel

Powder Room Remodel- Phase 1: Tutorial on how to remove an existing toilet and pedestal sink. It's not as difficult as it may seem. Pin NOW, check out later. @Jenna_Burger, WWW.JENNABURGER.COM #powderroomremodel

The entire room will look pretty in no time…

Powder Room Makeover Phase 1: Tutorial on how to remove an existing toilet and pedestal sink. It's not as difficult as it may seem. Pin NOW, check out later. @Jenna_Burger, WWW.JENNABURGER.COM #powderroomremodel

Plan of Action for #powderroomremodel:

  • Choose and buy sink
  • Choose and buy toilet
  • Choose and buy faucet
  • Remove sink
  • Remove toilet
  • Repair hole with new sheetrock
  • Repair floor @ sink and toilet
  • Hang wallpaper
  • Paint
  • Add crown moulding (yes, my 1st moulding ever)
  • Assemble sink
  • Install sink and faucet
  • Install toilet
  • Accessorize – mirror, pictures, etc.

That’s quite a list for a little space…

Please tell me you’ve found this post helpful.  The Mister thought I was kinda insane for taking pictures of a toilet, one of the ickiest parts of the home.  I know it’s not the prettiest post ever, but who knows when it’ll come in handy.

Before you read this post did you know the details on how to remove a toilet or sink?  Not to difficult, right?!

Happy Monday to ya!