
Year: 2013

Before and After: Kitchen Makeover

I hope your week is going well and you’ve had some time to shop!

A few weeks ago, I shared a teaser about a kitchen that I just finished up for a local Client. The transformation is pretty spectacular and the space not only looks amazing and is now completely updated, the way it functions is SO much better.

Before and After Kitchen Makeover by @Jenna_Burger, SASinteriors.net

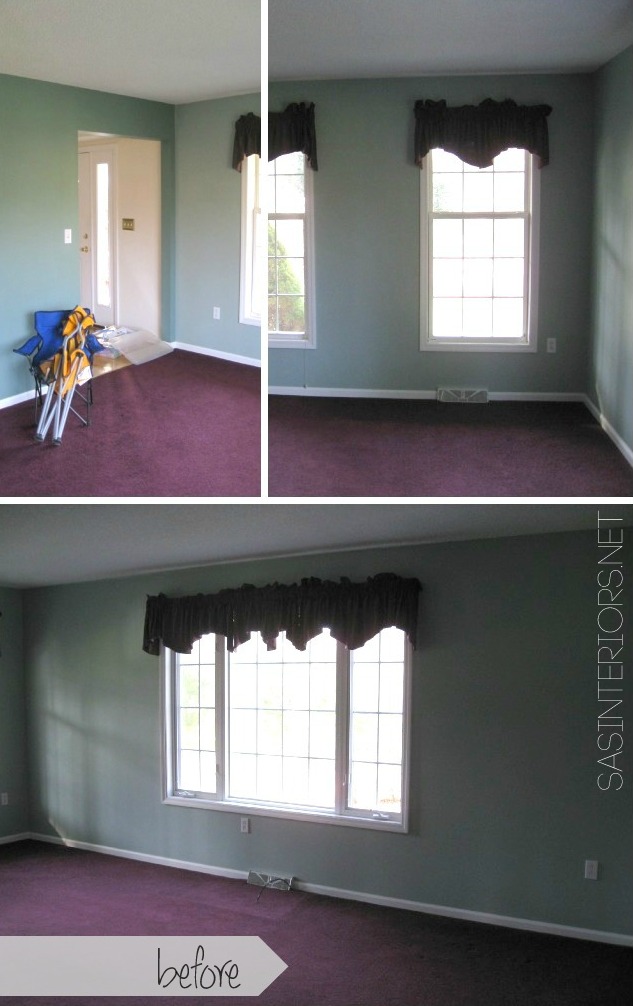
Here is the breakdown of what needed to change with the old kitchen…

Before and After Kitchen Makeover by @Jenna_Burger, SASinteriors.net

To start off, the Client and I evaluated what was wrong with the kitchen and how it was not functioning the best way possible. We discussed widening the space by adding an addition to the outside wall, but the cost would have been way too much. We discussed moving the sink location to the outside wall, but decided the current placement was better. In the end, the only large appliance to be relocated was the refrigerator, since ‘before’, it dominated the main focal wall. Other details that had to be addressed were:

1. The unused space above the upper cabinets

  • There was about 12″ of unused space, so we brought the new cabinets to the ceiling plane which allowed for additional storage, plus the taller cabinets heightened the entire room.

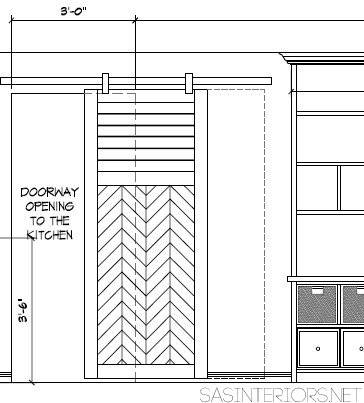
2. We removed the angled wall & countertops

  • The wall that separates the living room and kitchen was extended to define each space more. The layout is still an open concept, put eliminating the angled wall allowed for more definition and cabinet space.

3. The cabinets were dated

  • Enough said about that! The client wasn’t sad to say bye-bye to the old white cabinets.

4. Same with the countertop – dated!

  • The turquoise blue countertop wasn’t a color that they wanted to keep, so that also had to go!

5. The placement of the large refrigerator was dominating the main focal wall

  • Figuring out a new location was tricky! In the end, there was a pipe chase on the other side of the room that was boxed out around 1 pipe. It was crazy that this crucial floor area was going unused. After calling in a plumber and electrician to move the pipe location, the new-found floor area resulted in the new home of the refrigerator.

6. With the refrigerator location moved, wall space was freed up for more cabinetry = more storage!

  • The unused wall space next to the ‘before’ refrigerator allowed us to create a beautiful “china-style” cabinet.

7. Last, but certainly not least was the removal of the “popcorn” ceiling.

  • “Popcorn” ceilings create shadows resulting in the space feeling not as high as it actually is. It’s a pain to take down, but well worth it. For this Kitchen Makeover, the clients tackled it themselves (using Brittany’s tutorial) and they did a damn good job!

So that’s it in a nutshell.

The transformation is incredible.

The cabinets are all from Lowe’s and the team there was very helpful. I worked with the Client every step of the way in choosing the three-toned cabinet colors and all of the other selections. The Lowe’s team was great at helping us with all the nitty-gritty cabinet sizes and options.

AFTER

Before and After Kitchen Makeover by @Jenna_Burger, SASinteriors.net

Before and After Kitchen Makeover by @Jenna_Burger, SASinteriors.net

Before and After Kitchen Makeover by @Jenna_Burger, SASinteriors.net

Before and After Kitchen Makeover by @Jenna_Burger, SASinteriors.net

Before and After Kitchen Makeover by @Jenna_Burger, SASinteriors.net

Before and After Kitchen Makeover by @Jenna_Burger, SASinteriors.net

Before and After Kitchen Makeover by @Jenna_Burger, SASinteriors.net

Before and After Kitchen Makeover by @Jenna_Burger, SASinteriors.net

Before and After Kitchen Makeover by @Jenna_Burger, SASinteriors.net

Before and After Kitchen Makeover by @Jenna_Burger, SASinteriors.net

Tackling a kitchen makeover is quite an endeavour, but if planned out correctly from the start, the process doesn’t have to be overly grueling. My best advice is to plan ahead and choose / purchase all the new selections before anything in the space is touched.

This is BIG!

I can not contain my excitement anymore and am bursting at the bubble to share 2 BIG announcements

First, I’m psyched to tell you that Joss and Main has asked me back for a third run at hosting an exclusive Curator Collection.  My first time hosting was last Summer and it was a blast, then in December I collaborated with 9 other past Curators for a Holiday Collection, and starting this Sunday (3/17) at 9pm will be my latest and best Collection to date.

The Collection that I put together for Joss and Main last Summer was based more on my personal style, Classic Eclectic design. For this new and upcoming Collection, it’s all about COLOR!

sas_fe

Upon finishing my home office / family room, I know this Collection had to reflect my passion and love for bright and vibrant hues.  I still love a great neutral, but layering in color is a must in my book.  If you love pops of color, then this new Collection I have created for you, will not disappoint.

I should take a step back for a moment.  Have you heard of Joss and Main?

If not, no worries.  Joss and Main is an online site that offers new events every day pertaining to different styles / themes which last for a limited time – so you have to act fast; you snooze, you loose.  Items include housewares, gifts, furniture, accessories and much more at prices discounted up to 70% off retail. Major SCORE!  Joss & Main is a members-only site, but no worries because their membership is FREE and here is your exclusive invitation from me.

Here is a sneak peak at just a few of the many colorful pieces you will see…

Joss and Main Curator Collection featureing SASinteriors.net starting 3/17 @ 9pm

My BIG EVENT goes live the evening of Sunday, March 17 (yes, St. Patty’s day) so mark your calendars!  Are you as psyched as I?! I’m hoping you’ll sign up now so you’ll be ready to shop-till-ya-drop.

Want more?

A little more news to come your way, and honestly it’s a really big moment for me.

I’ve been reluctant to share this in case it’s all a dream, but I received the A-OK that it’s actually happening, so…

A few of my projects are going to be featured in Better, Homes, and Gardens magazine. SCREAMING.

Here are the details.  I was given the contact information of one of the BHG scouts, who after contacting, I found out lives in my town. CRAZY, right?!  I sent her a ton of pictures of my home, as well as a few client homes.  In the end, my kitchen, master bathroom, and a clients kitchen were chosen to be in a future issue of the BHG Special Interest magazine called Kitchen and Bath Makeovers.  Additionally, my home office / family room was selected to be in the BHG Special Interest magazine, Storage, which specializes in organization and storage solutions.

BHG Feature

Can you believe it?  Boy this year has been so amazing thus far.  My FIRST for Women magazine feature this month, and now this.  It’s surely a dream.  Anyway, I just got the go-ahead that the crew will be arriving for styling and photographing the second week of April and it will take almost an entire week.  WOW!  My lil’ ole’ house in a big magazine.  Now that the word is out there, I’ll obviously keep y’all updated as the date nears and more details come my way.

In the end, I owe it all to you, my amazing readers, who keep me chugging along each and every day.  Thank you all!

Now, make sure to sign up for the Joss and Main sale.  I wouldn’t want you to miss out…

DIY: Modern to Industrial-Style Coffee Table

Since the home office / family room reveal, I’ve shared quite a few of the DIY projects that went into creating the room.  One in particular that I’ve been excited to share because it is an upcycled piece is the coffee table.

When initially thinking about the aesthetic for the room, I wanted to bring in some darker tones.  The walls are darker and rich, while all the white elements make a great layered contrast, but some texture, wood, and something deeper was still needed.  At the same time, I’m a big fan of industrial-style furniture and have always adored the varying patterns and “rough”, but somewhat refined look.  So…

Taking the modern glass-top table that has a dark metal frame,  I updated it to create the industrial-style table that I was desiring.

DIY: Modern to Industrial-Style Coffee Table.  Easy upgrade by removing glass and adding stained wood planks.  By @Jenna_Burger, sasinteriors.netHere’s a before shot…

DIY: Modern to Industrial-Style Coffee Table.  Easy upgrade by removing glass and adding stained wood planks.  By @Jenna_Burger, sasinteriors.net

Using something similar to this coffee table from Home Decorators, I decided to make my own using similar textured and stained wood.

Inspirational industrial style coffee table

Here’s what I did…

Using my mad-math skills, I determined how many planks I needed for the top surface (then doubled it for the bottom surface).  After triple checking my numbers (yes, I’ve made mistakes in the past- hehe), I figured out that I needed (2) 1 x 4’s and (2) 1 x 4’s  that needed to be trimmed (X2 – for the bottom surface).  Thanks to Lowe’s, they made all the cuts so I was ready to start working right away once I brought the wood home.

To get the look similar to the inspirational table, I used dark walnut stain.

DIY: Modern to Industrial-Style Coffee Table.  Easy upgrade by removing glass and adding stained wood planks.  By @Jenna_Burger, sasinteriors.net

Using a lint-free rag (confession: I think I used a towel, but it wasn’t the best choice.  lint-free it better), I added the stain and quickly (instantly) wiped it away.  If I had left the stain on the wood longer, more would have seeped into the grain resulting in a darker stain finish, which was not what I wanted.

DIY: Modern to Industrial-Style Coffee Table.  Easy upgrade by removing glass and adding stained wood planks.  By @Jenna_Burger, sasinteriors.net

Within just a few minutes, the staining was done.  Because the process was a simple ‘wipe-on wipe-off’, it went really fast. I let the planks fully dry for about 24 hours before bringing them into the house.

DIY: Modern to Industrial-Style Coffee Table.  Easy upgrade by removing glass and adding stained wood planks.  By @Jenna_Burger, sasinteriors.net

The next day, I took the glass out of the frame…

DIY: Modern to Industrial-Style Coffee Table.  Easy upgrade by removing glass and adding stained wood planks.  By @Jenna_Burger, sasinteriors.net

… and replaced it with the wood planks.

DIY: Modern to Industrial-Style Coffee Table.  Easy upgrade by removing glass and adding stained wood planks.  By @Jenna_Burger, sasinteriors.net

What a different look.  I was loving it right away!  Then it was time to style…

DIY: Modern to Industrial-Style Coffee Table.  Easy upgrade by removing glass and adding stained wood planks.  By @Jenna_Burger, sasinteriors.net

I just thought I’d add that the wood planks are only leaning on the metal frame.  They aren’t attached at all so if some point in the future I want it to be glass again, the switch back is easy!

DIY: Modern to Industrial-Style Coffee Table.  Easy upgrade by removing glass and adding stained wood planks.  By @Jenna_Burger, sasinteriors.net

Gorgeous accessories on top always complete the look.

And a huge basket underneath was the perfect storage solution for magazines.

DIY: Modern to Industrial-Style Coffee Table.  Easy upgrade by removing glass and adding stained wood planks.  By @Jenna_Burger, sasinteriors.net

Thanks for checking out my DIY update project where I took my once modern coffee table and made it into an industrial-style piece.  After having this coffee table for 10 years (originally purchased from Crate and Barrel), I’m thrilled that I was able to create a solution to continue using it instead of bringing in something new.

If you haven’t seen the rest of the space, it’s a must.  Click {here} to see it all!

Do you like industrial style furniture?  How have you upcycled a piece of furniture to change the look?

I link my projects to some of these parties: Skip to My Lou, Dittle Dattle, Between Naps on the Porch, Today’s Creative Blog, Stories of A to Z, All Things Heart & Home, House of Hepworths, Finding Fabulous, The Shabby Nest, Serenity Now, Tatertots and Jello, Thrifty Decor Chick, Tip Junkie

Creative Vision Board: Inspiring & Vibrant Craft Room

I’ve been working on some really fun client projects lately, and one in particular is a mega craft room / office space.

The client recently moved into the home and instead of using the formal dining room for it’s true purpose, they decided to transform the space into a totally functional craft room and office.  The space will be used for work purposes, as well as some major crafty creating!

Construction is about to begin in a few weeks, but here’s the ‘before’ of how the space currently looks…

Creative and Inspiring Craft Room Mood Board by @Jenna_Burger, sasinteriors.net

Thankfully it won’t be like this for much longer because we have some major goodness coming.

I shared a sneak peak of colors last week on my FB page, but here is what we envision for the space…

Creative and Inspiring Craft Room Mood Board by @Jenna_Burger, sasinteriors.net

Fanta-bulous, right?!

Color. Color. Color. is going to fill this room in no time.  I have been loving the color combo of turquoise, citron, and raspberry, and I knew this was the perfect space to try and test my rich & vibrant color vision.

The following steps to come are:

  • removing the carpet
  • removing the popcorn ceiling
  • removing the dated window treatments

then…

  • painting the walls a neutral gray
  • adding layers of color through accessories
  • doing a few light construction modifications
  • installing new recessed lighting and decorative lighting
  • adding a whole bunch of gorgeous built-ins!

The built-ins are going to totally make this space.  Here is a small peak at the drawings I created for this project:

Creative and Inspiring Craft Room Mood Board by @Jenna_Burger, sasinteriors.net

The door design, which has changed slightly from the drawing above, is going to be mega!  We’re having two custom rolling doors built and the design will be similar to this inspirational image…

Creative and Inspiring Craft Room Mood Board by @Jenna_Burger, sasinteriors.net

I can’t wait to share more details as the project develops.  Stay Tuned!


How-To Make a GIANT Inspiration Board

Pinterest is a favorite for many (including me) who want to organize and keep their online inspiration in one place.

As a visual person though, I feel there is nothing like seeing and holding a picture in hand.  I still buy and subscribe to magazines.  I still tear out pictures and reference them when looking for inspiration.

Until recently, I didn’t have a “place”, a specific go-to spot, for all my collected loves.

I needed something! Thus the creation of my mega, giant, humongous, and amazing inspiration board…

HUGE, Giant Inspiration Board created by @Jenna_Burger, sasinteriors.net

I am in heaven.  This newly created inspiration board is not only functional, but the pictures that are displayed are gorgeous and make the space colorful and fun.

Here’s how I made it.

I started with these supplies:

  • MDF board (I used MDF because I had a large leftover piece from an old upholstered headboard.  A large thick piece of unwarped plywood could also be good for this project)
  • Fabric (I chose a neutral linen-like fabric which was $4/yd – I bought 3 yards)
  • Decorative Nailheads (I purchased them at Hobby Lobby for $2 for 50)
  • Sewing Machine
  • Screws and Anchors (I prefer plastic toggle drywall anchors – see below for a picture)
  • Painters Tape
  • Measuring Tape
  • Drill
  • Screwdriver
  • Level (optional, but very helpful)

1. I started off making sure the MDF board was the right size for the wall. The size was perfect, 3′-9″ X 4′-6″, and didn’t need to be cut.  If you’re using this tutorial as inspiration, you can create any size inspiration board that fits your space.

HUGE, Giant Inspiration Board created by @Jenna_Burger, sasinteriors.net

One of the biggest obstacles with making this GIANT Inspiration Board was the difficulty of hanging it.

No doubt, this size board is HEAVY!   Drilling through the board was out of the question because it is covered in fabric and hanging it from wire wouldn’t make the back flush with the wall, which is the look that I desired.

SOoooo…  Onto a different solution.  The basic idea that I came up with was to drill 3 holes into the back of the board that would hang on to 3 screws in the wall.

Let’s take a look at the step by step…

2. After determining and marking the height at which I wanted the board to hang, I layed the board face down so the back was exposed.  I took a piece of painters tape and added it to the back of the board making sure it was completely level with the top of the board.  The tape does not have to go from edge-to-edge, but I made sure each end was within 12″ of the side.

With a permanent marker, I marked three places on the tape – they do not have to be evenly spaced.

HUGE, Giant Inspiration Board created by @Jenna_Burger, sasinteriors.net

3. Using a drill, I carefully drilled about 3/4 of the way through the MDF back (I DID NOT go through to the front).

HUGE, Giant Inspiration Board created by @Jenna_Burger, sasinteriors.net

4. Once the 3 holes were drilled, I removed the piece of tape and put it on the wall at the height I had determined before.  Also I made sure to hang the tape so it was placed horizontally correct – my board is centered on the wall, but that might not be the case for your creation.  Be sure to hang it vertically (up and down) and horizontally (left and right) correct.

Something to watch out for…

A laser helps with this part, but if you don’t have one, measure down from the ceiling so that all 3 marks are at the same height.

Also, when the board was laying down, the marks went 1,2,3.  Now the marks will be 3,2,1 because of how the board will fit onto the wall.  It will make more sense once you’re in the midst of it.

HUGE, Giant Inspiration Board created by @Jenna_Burger, sasinteriors.net

5. Once the wall was marked with the three locations, I drilled the holes.  Then added plastic toggle drywall anchors (which hold mega weight) and then the screws.  These are like my all-time favorite anchors and screws!!

HUGE, Giant Inspiration Board created by @Jenna_Burger, sasinteriors.net

HUGE, Giant Inspiration Board created by @Jenna_Burger, sasinteriors.net

6. Once the screws were secure, it was time to put on the board.  It takes alittle time figuring where the holes meet the screws, but if you measure right and take your time (which thankfully we did), it should work perfectly and be level!

Unfortunately I don’t have a picture of us hanging the board since it was a 2-man job and the kiddos were already asleep (they are my backup photographers), but here’s the result (and part of the next step)…

It’s hanging + straight – YES!

HUGE, Giant Inspiration Board created by @Jenna_Burger, sasinteriors.net

Before hanging this bad-boy on the wall, I covered it in fabric.  I chose a loose natural linen-like cotton.  Because of the width of the board, I needed to piece the fabric together to make one large piece.  I ended up cutting and sewing 4 pieces of equal sized fabric.  The result was fairly good, but my lines were slightly wavey.  Toss it up to DIY, right?!

Anyway, to jazz up the board (and distract the eye from my wavy lines), I decided to use decorative nail head trim and follow the lines of the seams horizontally and vertically.

7. To start off, I used painters tape and made a level line from top to bottom and then from left to right following the seam.

HUGE, Giant Inspiration Board created by @Jenna_Burger, sasinteriors.net

8. On that edge of the tape, I hammered in the nails with a mallet (a hammer will do but sometimes the metal on metal ruins the nailheads), then removed the tape.

HUGE, Giant Inspiration Board created by @Jenna_Burger, sasinteriors.net

And now was the point of happiness!

I could finally fill up my inspiration board with all the things I love…

HUGE, Giant Inspiration Board created by @Jenna_Burger, sasinteriors.net

HUGE, Giant Inspiration Board created by @Jenna_Burger, sasinteriors.net

MDF board is not exactly like cork (obviously).  Pushpins aren’t as easy to push in, but with a bit of muscle and oomph, it works fine.  As an idea, a layer of cork could have been added to the front surface of the MDF before the fabric was wrapped around, to make it more “cushiony” and pinnable.  For me though, it works fine.

HUGE, Giant Inspiration Board created by @Jenna_Burger, sasinteriors.net

If you know me, I LOVE COLOR, and I have a favorite article pinned on my handmade GIANT inspiration board that I ripped out a recent issue of HGTV Magazine…

I adore the glittery gold disco ball.

HUGE, Giant Inspiration Board created by @Jenna_Burger, sasinteriors.net

Now I have lots and lots and lots of room to fill up.  I’m sure it won’t always look this clean.  I actually am in love with some of these other GIANT Inspiration Boards!

HUGE, Giant Inspiration Board created by @Jenna_Burger, sasinteriors.net

I hope you’re inspired by my new HUMONGOUS Inspiration Board!  I’m loving my new home office / family room.  Not only is it inspiring to work in this new space, but I really enjoy flipping through my favorite magazines and actually pinning them I.R.L.

Aside from Pinterest, how do you collect and organize inspirational things?

I link my projects to some of these parties: Skip to My Lou, Dittle Dattle, Between Naps on the Porch, Today’s Creative Blog, Stories of A to Z, All Things Heart & Home, House of Hepworths, Finding Fabulous, The Shabby Nest, Serenity Now, Tatertots and Jello, Thrifty Decor Chick, Tip Junkie

Publication Feature: SAS Interiors Featured in FIRST for Women Magazine

I was thrilled to announce last week that I had a 3-page article published in a local magazine, and I’m just as thrilled to announce that this month I have been published again in a national magazine, FIRST for Women.

My feature in FIRST is new news to you, but not to me.  It was been in the works for quite a while…

It proves to me and hopefully for you, that any article you read or any TV remodel home show you watch, hasn’t been put together over night or even in just one week.  I’m sure all of those amazing makeover shows that we watch where the house has been transformed in 30 minutes, has actually taken months – probably 6+ months – to put together.

Sorry, I digressed…

Anyway, I was contacted by the Decor Director of FIRST back in early November 2012.  I was shocked one afternoon to receive this email:

FIRST for Women Magazine feature

They think “my ideas are just genius” and they wanted to feature my styled bookcases.  Yes, the laminate bookcases that I styled with books, accessories, pictures, and more after I painted them last Summer.

After an ‘Absolutely, thank you so much’ email back, the story was approved for the March issue.  I was elated to say the least.  I just couldn’t believe, my work was that much of interest to actually be featured.  Honestly, I have all of YOU to thank for your continued following and support of my blog.  Without the love of pinning and sharing my work, this never would be possible.

FIRST for Women Magazine feature

After a few rounds of phone interviews and confirmation of my blog and name in mid-December, it was complete and the waiting game began.

All that waiting brings us to this weekend.  The coveted March issue that I’d been waiting to get my hands on was finally on the newsstands.

FIRST for Women Magazine feature

I can be such a dork at times and took a few snapshots (that I shared on instagram and facebook) of when I first saw the magazine at Barnes & Noble.

I was totally pinching myself…

FIRST for Women Magazine feature

And here’s the feature on my styled bookshelves

FIRST for Women Magazine feature

What’s funny is that this bookcase and it’s matching partner (which were separate in this picture), are now side by side in my newly created home office / family room.  I just featured the space last week.

Home Office / Family Room Space

Home Office / Family Room Space

But I will say, the bookcases are still styled the same as they appear in the article.

I know, feel, and believe that this is just the beginning of many more amazing opportunities to come.  Again, thank you so much for your continued support – I can not tell you how much it’s appreciated!

DIY: How-To Hem (no sew) and Add Stripes to Curtains Using Paint

I hope you had a great weekend!  I know it’s Tuesday, but since my husband and kids had off yesterday for President’s Day, it feels like the first day of the week for me.  In spite of having a no-plan weekend, the 3 days flew by and we were majorly busy (new projects, photographing others, food shopping, car buying, etc.).  How does 36 hours fly by that fast?  Anyway, since showing you my newly created home office / family room last week,  I’ve got a slew of DIY projects to share.  First up…

A ‘how-to’ on how I hemmed and created the thin-striped curtain panels (I know a few of you have excitedly been awaiting this tutorial).  I was surprised how easy they were to create and they look like they cost alot of $$$ (but they totally didn’t).

DIY: Tutorial on how to hem a window curtain panel and how-to add stripes using wall paint; Designer look for less by @Jenna_Burger, sasinteriors.net

When the royal blue walls were complete last Summer, I knew white curtains would be a great, striking complement. Thankfully, I had an extra pair of panels from my son’s room that were purchased from Ikea 5+ years ago.

DIY: Tutorial on how to hem a window curtain panel and how-to add stripes using wall paint; Designer look for less by @Jenna_Burger, sasinteriors.net

I wanted to jazz up the white panels a bit though, and at first thought of a leading edge similar to what I created for my daughter’s room.  As more ideas developed, I had seen this living room and pinned it a while back. The thin-striped lines stuck in my head and I knew they would be just the touch to add interest to the stark white panels, yet not overwhelm the room.  I’ve seen many striped fabrics in window panels lately, but I wanted something softer and thought thick horizontal lines would be too heavy for the space since the dark blue walls are dramatic enough.

Inspiration for thin-striped curtain panels

The area for where the new curtain panels were to go, started out like this…

DIY: Tutorial on how to hem a window curtain panel and how-to add stripes using wall paint; Designer look for less by @Jenna_Burger, sasinteriors.net

To begin, I hung the white panels on the dark wood rods that were already in place.

DIY: Tutorial on how to hem a window curtain panel and how-to add stripes using wall paint; Designer look for less by @Jenna_Burger, sasinteriors.net

Nope they didn’t work.

The dark rod blended in too much with the wall, and the panels looked so low and squat.  It totally went against my rule of thumb on how best to hang a curtain.

Onto the idea #2.

Because of the window height, I couldn’t put a decorative rod above (there wasn’t enough room), so instead I bought a $3 basic metal pocket curtain rod.

I created the “pocket” at the top of the curtain (fold over top edge, sew or use fusible tape to create a pocket of about 2″ for the rod to slip through).  Then the panels had to be hemmed at the bottom because they were too long.

Here’s my quick tutorial on How-To Hem a Curtain ~

1. With your curtain hung on the rod, loosely pull the bottom of the panel and add 2-3 pins at the spot where the panel hits the floor plane.

Hint: Don’t pull the panel tawt because if you pin and sew at that point, your panels will result too short.  You want to leave the panel(s) loose, so it just grazes the floor (this is how I feel a curtain panel looks professional.  It’s not a must, but it’s my opinion).

DIY: Tutorial on how to hem a window curtain panel and how-to add stripes using wall paint; Designer look for less by @Jenna_Burger, sasinteriors.net

2. With the 2-3 pins indicating the line for which to hem the panel, I used a measuring tape to keep the same length and added more pins all the way across the width of the panel.DIY: Tutorial on how to hem a window curtain panel and how-to add stripes using wall paint; Designer look for less by @Jenna_Burger, sasinteriors.net

O, and did I tell you the good part about this project – I didn’t use a sewing machine.  I was totally feeling lazy that day! You can of course, but it’s not a must.  That’s a major plus for my non-sewing friends!

3. Using fusible tape, I folded the bottom edge underneath and hemmed at the line of the pins.

DIY: Tutorial on how to hem a window curtain panel and how-to add stripes using wall paint; Designer look for less by @Jenna_Burger, sasinteriors.net

Here’s the result…

Yes, much better!

DIY: Tutorial on how to hem a window curtain panel by @Jenna_Burger, sasinteriors.net

A perfectly tailored window curtain panel that just grazes the floor.  Super easy!

Ok, so now on to the 2nd part of this tutorial…

How-To Add Stripes Using Paint ~

FYI – you could totally skip step one if you have already have the perfect length curtain and you can skip this step if you have no interest in adding stripes.  Just thought I’d share that tid-bit 😉

For this part of the project, I used the following materials:

  • Painters Tape
  • Wall Paint that is the same color as the wall
  • Paint Brush
  • Measuring Tape

DIY: Tutorial on how to hem a window curtain panel and how-to add stripes using wall paint; Designer look for less by @Jenna_Burger, sasinteriors.net

1. To start off, I determined how many stripes I wanted and the width of the stripes.

4 stripes and 1″ wide.

I layed my curtain panel on the floor and using a little math (big UGH), I determined my stripe placement.  Using painters tape (because it’s easy to remove), I marked the 4 stripe locations.

DIY: Tutorial on how to hem a window curtain panel and how-to add stripes using wall paint; Designer look for less by @Jenna_Burger, sasinteriors.net

2. Then I added the painters tape and my measuring tape to create the 1″ wide stripe.

DIY: Tutorial on how to hem a window curtain panel and how-to add stripes using wall paint; Designer look for less by @Jenna_Burger, sasinteriors.net

3. * Important part!

Once the tape is in position, it’s important to press hard on it like you’re burnishing it into the fabric.  You want to make sure the tape is sealed so the paint doesn’t seep underneath. I ‘burnished’ the edge with my nail.

DIY: Tutorial on how to hem a window curtain panel and how-to add stripes using wall paint; Designer look for less by @Jenna_Burger, sasinteriors.net

4. Then using the wall paint that I used in the room (Benjamin Moore Van Deusen Blue), I painted on the stripes using a craft brush.  I did not add anything to the paint to make the medium different.  It’s straight paint on fabric!

DIY: Tutorial on how to hem a window curtain panel and how-to add stripes using wall paint; Designer look for less by @Jenna_Burger, sasinteriors.net

DIY: Tutorial on how to hem a window curtain panel and how-to add stripes using wall paint; Designer look for less by @Jenna_Burger, sasinteriors.net

Once all four stripes were done, I took off the tape.  Some of the areas weren’t completely dry, and that’s okay.

DIY: Tutorial on how to hem a window curtain panel and how-to add stripes using wall paint; Designer look for less by @Jenna_Burger, sasinteriors.net

5. When setting up the stripes for the second panel, I layed both curtains side by side so they were perfectly aligned.  Then, by eye, I created the stripes on panel #2.

DIY: Tutorial on how to hem a window curtain panel and how-to add stripes using wall paint; Designer look for less by @Jenna_Burger, sasinteriors.net

Once they were completely dry, they were ready to hang, and admire! #happygal

DIY: Tutorial on how to hem a window curtain panel and how-to add stripes using wall paint; Designer look for less by @Jenna_Burger, www.JENNABURGER.COM

The bamboo shades (which I got from Payless Decor) are a fantastic compliment to the stark white window panels and white moulding trim.  You may have seen the bamboo shades in other parts of my home (check this post out) and I adore them!  They are of great quality (and an awesome price).  The darker hue and texture (which is kind of difficult to tell in the picture because of the natural light coming through) are just gorgeous.  On my windows you’ll find the tibet color.

DIY: Tutorial on how to hem a window curtain panel and how-to add stripes using wall paint; Designer look for less by @Jenna_Burger, www.JENNABURGER.COM

DIY: Tutorial on how to hem a window curtain panel and how-to add stripes using wall paint; Designer look for less by @Jenna_Burger, www.JENNABURGER.COM

O, and if you like it, would you pin it or share it? Thanks a bunch!

DIY: Tutorial on how-to add stripes using wall paint; Designer look for less by @Jenna_Burger, sasinteriors.net

Have questions?  Don’t be afraid to ask – I’d be happy to help!

Want to see more drapery projects?

Then you might want to check out this post on Adding Decorative Leading Edge Trim to Curtains ~

DIY Tutorial on How-To Add a Leading Edge to a Curtain Panel by @Jenna_Burger, sasinteriors.net

Or this project on How-To Make Curtains from Scratch and Line them with Drop Cloth~

DIY-Window Panels101

Of course you’ll want to know How-To Best Hang Window Drapery Panels, right?

The Right (and Wrong) Way to Hang Curtains

Thanks for checking out my 2-in-1 tutorial!  What a great Tuesday!

 Have you ever tried painting on fabric?  What about embellishing window treatments?  Or even making your own curtains?  Share your creations with me – would love to see them!

I link my projects to some of these parties: Skip to My Lou, Dittle Dattle, Between Naps on the Porch, Today’s Creative Blog, Stories of A to Z, All Things Heart & Home, House of Hepworths, Finding Fabulous, The Shabby Nest, Serenity Now, Tatertots and Jello, Thrifty Decor Chick, Tip Junkie

Publication Feature: SaratogaMama Magazine

It’s an exciting day for me.

My name, my picture, and my home have been published.

The feature is in the premier issue of a local family-related publication called SaratogaMama Magazine run by Colleen Pierre of SaratogaMama.com.

If your local to the Albany / Saratoga  Springs area of Upstate NY, you might have heard of it – SaratogaMama is so helpful to learn about important places, helpful resources, and “what’s happening” in our community.  The article I wrote is about Ideas for Infusing Color into Your Home for Spring.   So no matter where you live you might gather some helpful and creative ideas.  Plus, you can get a little sneak peak at the featured photos of my pad taken by Mark Bolles, a local photographer.

Here’s the feature, which you can read in it’s entirety by clicking {here}.

(left click on image to view larger – these directions are for you mom, lol )Feature Article in SaratogaMama Magazine

Feature Article in SaratogaMama Magazine

Feature Article in SaratogaMama Magazine

Have an enjoyable and creative weekend!  Any exciting plans?

Easily Change a Recessed Light to a Decorative Hanging Fixture

In my quest to make a few easy upgrades in the kitchen (I shared my new bamboo shades earlier in the week), I was really hoping for some sort of decorative fixture.  It was near impossible aesthetically because of the close proximity to the hanging fixtures in the adjacent rooms, plus there are 6 recessed lights (hi-hats) in the space and the layout just wouldn’t allow – I wasn’t wanting to change the space that much for an electrician to come in and rip out the entire ceiling to simply add a pretty new light.

But thenwww.JENNABURGER/wp-content/uploads/2013/02/RecessedLightToFixture2.jpg”>Easily and Inexpensively Convert a Recessed Light to a Hanging Decorative Fixtures by @Jenna_Burger via sasinteriors.net

To easily make the upgrade, I used a Recessed Light Adapter Kit (a.k.a. Recessed Fixture Converter) which quickly and inexpensively allows a recessed light to be converted to any style hanging fixture or pendant.  Think about the possibilities for all those blah hi-hats that can now be WOW – hallways, bathrooms, kitchens…

Easily and Inexpensively Convert a Recessed Light to a Hanging Decorative Fixtures by @Jenna_Burger via sasinteriors.net

To start off, the Mister and I removed the light bulb and the plastic can, so only the sheetrock and wires inside were exposed.  Then we took the new white plate from the conversion kit and installed it as specified in the directions (the electrical wires were still exposed and dangling).

Easily and Inexpensively Convert a Recessed Light to a Hanging Decorative Fixtures by @Jenna_Burger via sasinteriors.net

Then it was time to hang and electrify the fixture.  If you plan on changing out your recessed light, follow the directions that come with the kit!  I am not an electrician and I’m sharing the pictures and steps that I took, but every condition is slightly different.

Easily and Inexpensively Convert a Recessed Light to a Hanging Decorative Fixtures by @Jenna_Burger via sasinteriors.net

The hanging fixture we chose was from Lowe’s and it’s a great accent to the fixtures in the nearby spaces. Cute, right? It was less than $50 so it was a winner in my book. I’ve seen similar for a lot more $$$, so I was a #happygal.

Easily and Inexpensively Convert a Recessed Light to a Hanging Decorative Fixtures by @Jenna_Burger via sasinteriors.net

Within about 20 minutes, the fixture was hung and we stood back to admire.

Easily and Inexpensively Convert a Recessed Light to a Hanging Decorative Fixtures by @Jenna_Burger via sasinteriors.net

Check out how the kitchen has transformed over the years.

All DIY baby!!

Evolution of Kitchen Makeover revamped entirely with DIY projects (no professionals) by @Jenna_Burger via sasinteriors.net

It’s hard to believe how it looked less than 2 years ago.  I’m super happy with the recent revamp of the bamboo shades and the decorative light fixture.  (Who knows what will be next…)

If you want to read more about the DIY Kitchen Makeover, click {here} or feel free to ask me.

Have you ever changed a recessed light to a decorative fixture?  If not, where in your home would you like to?

A Simple Kitchen Window Upgrade

Do you ever feel with a little upgrade, a space in your home that you haven’t quite loved, will finally look exactly how you always hoped?  That little revamp which won’t take long, but the room doesn’t feel “right” without ?

Well, I’ve had that feeling in my kitchen for a while.  The part that needed a redo wasn’t horrible, but I was kind of tired of it.

It’s not the cabinets because I still love them 2 years later.

It’s not the hardware because I still love that too.

But instead it was actually the valance over the windows that I felt blah about.

So the kitchen window got a revamp!

Kitchen Window Revamp - A simple upgrade for a large kitchen window via @Jenna_Burger, sasinteriors.net

I created the previous valance 2 years ago and I never felt it was just right (don’t tell the Mister.  He didn’t see anything wrong with it).  To others, the valance was fine, but for me, it just wasn’t exactly what I envisioned.  Here’s how it looked before (with the old oak cabinets too – crazy to look at)…

Kitchen Valance

Anyway, since I’ve been adding bamboo shades (which I got from favorite resource, Payless Decor) to many of the first floor windows after I painted the mouldings white, it seemed like the most appropriate choice to continue the look + I love the wood texture of the shades against the light yellow wall color and crisp, white mouldings!

Aren’t they gorgeous?!

Kitchen Window Revamp - A simple upgrade for a large kitchen window via @Jenna_Burger, sasinteriors.net

This past weekend while the kids went out for breakfast with their grandparents, I found a few hours of free time to finally hang my new roman shades.  When does that ever happen – free time – huh??  I blasted the music – Katy Perry was my fav choice for this project 🙂 – and got to work.

You might have seen me post this pic on Instagram Saturday afternoon…Kitchen Window Revamp - A simple upgrade for a large kitchen window via @Jenna_Burger, sasinteriors.net

I removed the old valance + there was still a cellular shade from the old owners behind it.  Then in about an hour, I hung the new roman shades.  Usually I always choose inside mount shades because decorative treatments (long drapes) are on the outside, but because the moulding of the kitchen window hits the ceiling and I wanted to allow as much light in as possible, so I decided on an outside mount.  Now the new bamboo shades touch the ceiling.

What do you think?

Kitchen Window Revamp - A simple upgrade for a large kitchen window via @Jenna_Burger, sasinteriors.net

Such a difference and the new shades go so well with the open cabinet.

Kitchen Window Revamp - A simple upgrade for a large kitchen window via @Jenna_Burger, sasinteriors.net

O, and did you notice the new light?  That was an easy switch-aroo that we did a few weekends ago as well.  We changed the hi-hat to a hanging fixture.  I’ll share more on that later this week, so stay tuned…

Kitchen Window Revamp - A simple upgrade for a large kitchen window via @Jenna_Burger, sasinteriors.net

It’s amazing how small things which only take a few hours (or a morning filled with good music), change the entire look of a room.  I am thrilled with the new look of this room.

If you love the look of these gorgeous bamboo shades, they’re from Payless Decor and the color is Tibet.

Kitchen Window Revamp - A simple upgrade for a large kitchen window via @Jenna_Burger, sasinteriors.net

Ahhh… Much Better – #happygirl

What small adjustments have you made in a room of your home to completely change the look? If nothing yet, what changes do you want / hope to make?