Year: 2011

DIY: Cabinet Makeover with Glaze Overlay

Last week I shared my latest DIY: How-to Stencil project where I transformed one of the walls in my foyer.

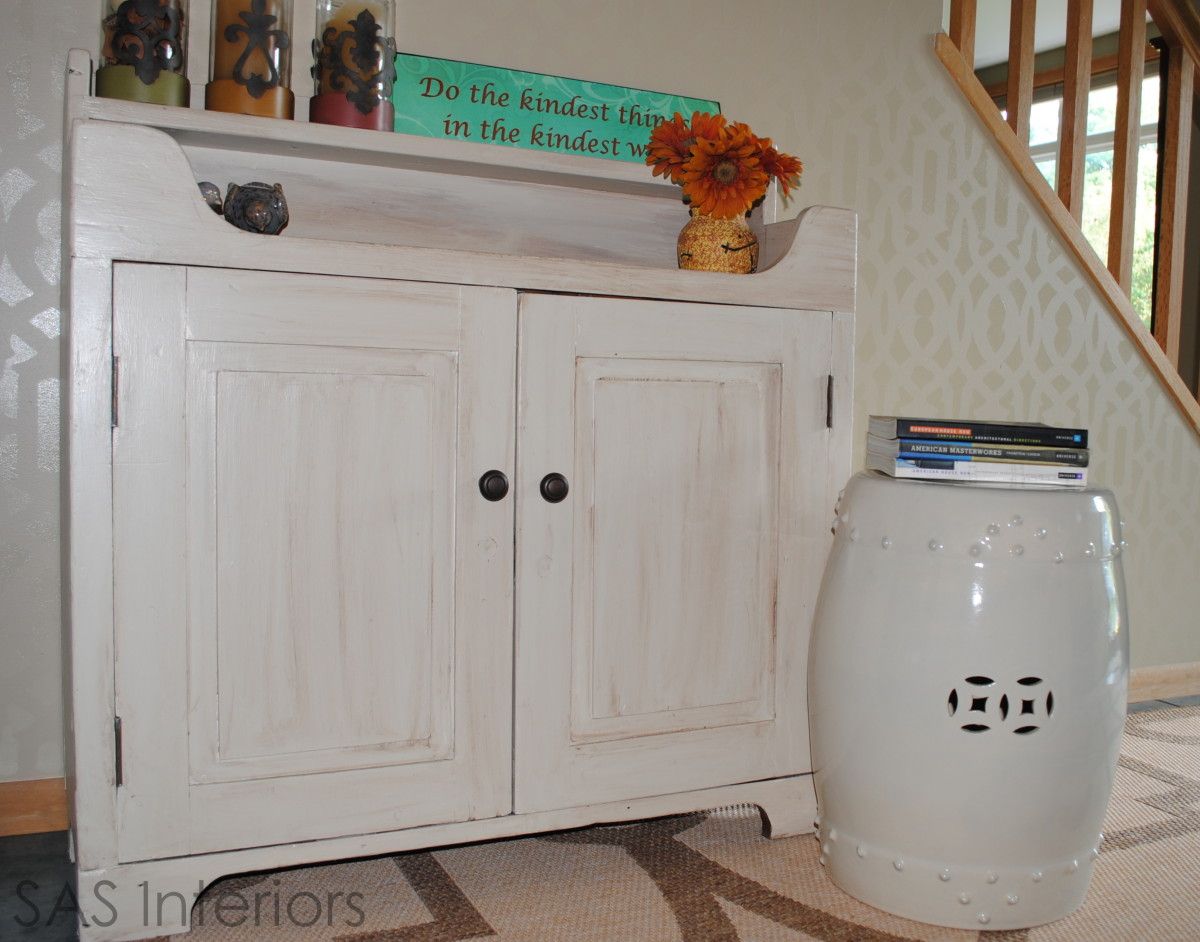
Did you happen to notice the cabinet in the pictures?

It’s new.  Well not really “new” in the sense of just bought, but new to the place it now sits.  AND it just got a huge makeover!

This cabinet is about 40 years old.  My mom had it for about the first 35 years and I’ve had it for the last 5 (it’s had quite the life so far).  On a random day, a few weeks ago, the cabinet was looking quite sad, so I said, “let’s give you a makeover”!  And I did!!

To step back in time, this is how she looked before ~

Quite sad and in need of some L-O-V-E!

Here’s how I made her over

1. I’m often known to be a bit lazy and skip over steps, but after learning my lessons from other projects, this time I used a PRIMER!!

KILZ Premium Primer, Sealer, Stainblocker was what I turned to for this project.  It blocks heavy stains from showing through the paint (especially since the new color was light).

2. I applied the one coat of Primer using a good quality synthetic brush, then painted the cabinet with an off-white color.

Need help finding the right brush for your paint project?  Check out {this} post.

3. To cover this dark cabinet, I had to used 3 coats.  The 3rd wasn’t really necessary, but I wanted to make sure it was completely sealed and covered!

At this point, I thought I was done.  Just like a woman with a much-needed dye job, I had transformed this old cabinet into a new beauty.  But she was looking a little bland…she really needed highlights.

Yes, that would be the trick to make her fabulous!

After much thought, I decided to use a glaze overlay.  I had never before attempted a glaze, so I really didn’t know what I was doing. I thought I needed a special product for glaze, but I was wrong….

4. Here’s the glaze effect on the right and the plain painted door on the left.

How-to Glaze Furniture

5. Using the brown paint from my fireplace (Benjamin Moore Chocolate), I diluted it with water ~ about 3 parts water to 1 part paint.  Taking a dry brush, I lightly applied the watered down paint onto the cabinet.  (This must be done in SMALL SECTIONS because you need to move quickly).  Then using a paper towel (or rag), I wiped away the paint and what’s left was a lightly covered brown glaze.

* Note: It’s important to wipe the paper towel / rag in one direction (preferably in the direction of the grain).

Here is a closeup of the glazed cabinet~

6. Once the entire piece of furniture is glazed, you may want to go back and add a little more detail at the edges with a smaller paint brush.

With the addition of new hardware, she now sits beautifully in my foyer

Some colorful Spring accessories complete the look

Do you like glaze over a cabinet to give a distressed look?  Have you ever glazed a cabinet before?  If so, what technique did you use?
DIY: How to Stencil & Review of Cutting Edge Stencils

Sometimes (actually most of the time) going into a project, I never know what the result will be.  Because most of my projects are real experiments – – that’s why I call my home, My Experimental Playground – – I’m always a little scared “in the moment” anticipating a complete fail (which there have been many).  WELL…  the result of my latest project was surprisingly amazing.

I LOVE IT (now)!  Yet, during the process, was a complete different story….

A few weeks ago, I wrote a post about my love for stenciling and how it’s the new “wallpaper”. In that post I made mention of a company, Cutting Edge Stencils, that offers gorgeous, stylish stencil designs.  I got in contact with them, and they graciously sent me my design of choice, which was the Trellis Allover Stencil, along with all the materials needed for me to try it out and share my results with you!

I chose to use the stencil on one of the prominent walls in my foyer.  The overall wall color in the room is Benjamin Moore Lenox Tan in a flat finish.  For the stencil, I decided to also use Lenox Tan but in a hi-gloss finish.  My thought was this contrast of sheen would give a subtle, but dramatic appearance (and it does)!

So before I share the steps…..

Don’t skip over reading this

The most important part of stenciling is to use the RIGHT materials!  These stenciling instructions are a must to read beforehand – – they are very detailed and will give you ideas of the exact tools you will need.

And the most important TOOL to use is a roller foam with an ultra smooth finish. It has very minimal nap and will give you the best result.  This is KEY to a successful stenciling result.  SO PLEASE USE THE RIGHT TOOLS!

So let’s get started….

Here is a before picture of the wall…. okay, but kind of boring ~

You will need ~

  • Stencil(s)
  • Sample board (Small Wall, poster board, cardboard, or even a pizza box to test out your colors)
  • Latex or acrylic paint
  • Dense foam roller with rounded ends or a stencil brush
  • Painter’s Tape
  • Paper Towels or rag

Note: I stenciled over an existing painted wall, but if you just painted your wall let it dry for 24+ hours before stenciling

1. Clean off the entire wall – remove all items including nails / screws, so the stencil can lay flat.

2. Starting in the corner, lay the stencil on the wall and tape the stencil to the wall with painter’s tape.

3. Using the innovative clip-on Stencil Level (which is included), check that the pattern is level.

4. Pour a small amount of paint on a plate or in a painter’s tray.  Roll it back and forth a few times.

5. Then roll it on a paper towel to get most of the paint off.  Your roller should have no visible paint left ~ it should look almost dry. Less paint is better to avoid seepage under the stencil.

6. Using a light to medium pressure, roll the paint over the stencil.  I lifted the corner edge to sneak-a-peak and noticed that the first coat wasn’t covering enough, so I ended up using two coats (READ BELOW on how to avoid using 2 COATS).  I let the paint dry about 5 minutes between coats.

(this is a picture my son took of me while painting – he did pretty good, right?!)

7. Once the section is done, remove the stencil and reposition the stencil right below the finished print. Use the parts of the design to realign your stencil.  And don’t forget to make sure it’s level!

Finish the rest of the wall and you’re done!

Overall, I am very happy with the result, BUT I have to say it does take some time to get used to.  I tackled one wall, and I’m not sure if I’m ready for a whole room or ceiling.  Check out {these} projects by other bloggers.  Since I’ve previously tackled wallpaper AND now, stenciling, I would say stenciling is a wee-bit easier.  The result is a little more forgiving.

An important note I want to share: I used Behr paint….BIG MISTAKE.    I’m not really a fan of Behr paint (sorry, Behr), because it dries too quickly and then removes the paint from the wall.  I ended up having to use Behr because they were the only company who had a hi-gloss finish and could color match the Benjamin Moore Lenox Tan.    So here was the problem ~ At times during the stenciling, the paint was peeling off the stencil and getting onto the wall.  I spoke with Cutting Edge Stencil about this problem and they never had that happen before.  SO that confirms that it was the paint that was the issue. To avoid this issue….

They recommend using:
Benjamin Moore  Aura – It’s more opaque and usually gives great coverage in just one coat

Again, the result is subtle, but dramatic.  Depending on where you stand and the amount of sun light filtering in throughout the day, the overall look changes.

Even though Cutting Edge Stencils sent me their product for review, I am giving my 100% honest opinion that they have a great product!  Stenciling is not just roosters and flowers anymore.  They have truly taken their designs to the next level to enhance the overall look and feel of a space. Here are a few others that I love:

Moroccan Dream Stencil

Nadya Damask SM scale

Vision Allover Stencil

AND it gets better…

Cutting Edge Stencil is offering a GIVEAWAY!  But, you’ll have to wait till next week to enter.  Head back to SAS Interiors next Thursday during my Summer Spaces Link Party for the Blogger Block Party and learn more about what Cutting Edge Stencil wants you to have!!

DIY: Faux Roman Shade

You might think I’ve gone drop cloth crazy (which I have), but this material is truly simple, affordable, and stylish!  Plus it’s also durable, chic, and a great neutral palette for any accent color.   Lately I’ve been transforming my interiors to look a little more casual. With updated fabrics on the pillows and windows, and some stylish new accessories and repurposed pieces, my interior is changing into my desired style (of the moment…next week it could change again)..haha).  My latest drop cloth project was to make faux roman shades for my dining room windows.

Before, the window treatments were dupioni silk drapery panels with detailed sheers to match.  I was over the heaviness-look and wanted something to lighten and brighten the space.

I was on a mission to repurpose, so I took the window panels that were in my living room and moved them into the dining room.  But it still wasn’t “just” right ~ It needed something.  With a little experimentation of fabrics, I thought the drop cloth material would be a perfect neutral accent to the simple burnt orange/red drapes (the roman shades also coordinate quite nice with my table runner).

Supplies needed to create your own faux roman shade

  • Fabric of choice
  • Double Fold Bias Tape
  • Sewing Machine
  • Sewing supplies (pins, scissors, measuring tape, etc)
  • Velcro

Before I begin the tutorial, I wanted to mention there was an existing honeycomb-style shade where I wanted to install this new faux roman.  I removed the fabric shade using a straight edge, but left the bar on in place.  This is what I later used to attach the faux roman shade with the Velcro.  **If you are starting from scratch, you could put the Velcro directly on the window OR get a tension rod and Velcro the shade to it.

Let’s jump right in

1. Decide how many ‘drops’ you want for your roman shade. I decided on 2 drops, and then I added a Header Flap on the top.  Each drop is 5-1/2” and the top flap is 3-1/2”.

2. Measure the width of your window and cut your material.  With regards to the length, I cut mine to be about 36” long.  It’s important to leave a lot of extra material on the length, so you have enough to create the drops. (Read on and it’ll help you determine your length).

3. Take your Double Fold Bias Tape and edge the length of the roman shade.

4 and 5. Pin and Sew the bias tape onto your fabric.  If your top edge is not finished, fold over and sew, so you have a finished edge.

6. Fold over your fabric to create a 3-1/2” Header Flap; Iron the edge and sew along the top with a ½â€ inseam.

7. It’s time to start your first drop: Measure 9” from the top (3-1/2” for the Header Flap + 5-1/2” for the drop) and then fold the fabric under to create the drop of the roman shade. Bring the fabric all the way to the top of the back.

8a and 8b. Flip over the Header Flap.  Pin the drop and sew the fabric underneath the flap (along the pinned line as shown in the picture).

9. Onto the second drop: Measure another 5-1/2” for the next drop (which is now 14.5 from the top).  Repeat step 8.

You can make as many drops as you’d like to create a longer roman shade. 2 drops worked perfectly for my size window.

10. When you are complete with your roman shade, flip it over and attach the Velcro to the top edge of the shade.

11. As I mentioned above, I used the existing bar that was already in place.  If you are starting new, you can either attach the Velcro right to the window or use a tension rod and attach the Velcro to it.

And here it is …

Here is the overall space: Lighter and Brighter!

Adding a non-functioning roman shade can really jazz up a window.  I’ll be honest, this tutorial was a bit difficult to write and I hope I didn’t lose you.  It’s actually quite easy to make once you get started.  If you have ANY questions, please reach out to me and ask!

* Just a reminder, don’t forget the BIG Blogger Block Party event ~ link up your Summer Space projects to my link party next Thursday, the 23rd! *

Summer Mantel with Frappe Accents

After many months, the warm weather FINALLY made it’s arrival and over the past few weeks, I’ve been sprucing up for summer.  One area of my home that I’ve been focusing on is making some updates to the fireplace mantel.

With a few simple switches and a couple DIY projects, it’s looking much lighter and summer-y!

Just to give you a peak at what it looked like before ~

The fireplace wall is quite the focal point in my home.  The wall is a burnt orange hue (the pictures distort the actual color a bit – – it’s not as bright in person), while the other walls in the room are cardboard brown.  The burnt orange color is continued throughout the space as an accent color, and can be seen in pillows, accessories, etc.  For the summer, I wanted to downplay the ‘orange’  and bring in a more neutral hue.  My new fav ~

frappe

I flipped the chalkboard platter so it’s now vertically positioned, and wrote the saying “Beautiful Blossoms” ~ I was just feelin’ cheery and thinking about the colorful flowers in the garden.  Then with a little frappe paint, I transformed an old green vase (that was sitting in the basement since we moved here) into a summer beauty!

What do you think of my new jars? I’m a lover of pasta and on occasion when I don’t have a chance to make sauce (or gravy as the true Italians call it), I buy jar sauce. I know, a sin, but out of convenience  it’s an easy substitute. Over the years, I’ve gone through quite alot of jars and have thrown all of them away (another sin), until now!

With my newly cleaned pasta jars, I painted the interiors with my frappe paint, filled them with flowers from the garden, and assembled them on the mantel. How pretty!

An inexpensive, but beautiful display.

On the other side of the mantel, I introduced one of my favorite TJ Maxx finds, the distressed $10 lantern ~ a must for summer.  Next to it, I lightened up the look with a framed “bloom” printable, along with two glass jars filled with a candle and potpourri.

And did you notice, I switched out the artwork for a mirror…another way to “lighten” things up! Here’s an overall view of the space ~

(FYI – my ottoman looks a lil’ sad, but it’s only because my 20 month old takes everything off and throws it on the floor.  I’m never one to leave an ottoman / coffee table bare)

I’m really loving the new fabrics on the pillows.  So refreshing!  Want to make your own Summer Pillows?  {check out this EASY-PEASY pillow tutorial}

I hope you enjoyed my little spruce up for summer!  Have you been doing any Spring / Summer updating?  I’d love to hear about it.

{Tutorial} Personalized Envelope Pillow

I hope you had a wonderful long weekend!  Mine was filled with BBQs, relaxation, spending time with family, and remembering those who have fought and are fighting for our country!  How did you spend this holiday weekend?

Now let me share with you, what I’ve been up to…..

Using my favorite new material – – drop cloth – – I created this stylish, yet simple envelope-style pillow, then stenciled the initial of our last name on the front.   To be honest with you, I’m usually not a monogram-type person, but I have to say, I truly enjoy seeing this cute pillow showcasing our family initial.

Let’s jump right in, so you can make one for yourself!

Supplies

Pillow
* Drop Cloth or a similar heavy weight fabric
* Scissors or rotary cutter
* Measuring Tape
* Cutting Board
* Sewing Machine
* Pillow Insert
* Iron
* Other misc. sewing supplies

1. Gather all of your supplies together and decide the size pillow you want to create.

The pillow that I created was a kidney size ~ 12” x 20”

2. For the front face, add 1” to the length and 1″ to the width – – so the pillow will be 13″ x 21″ (this extra inch will provide enough room to stuff your pillow).  Then with a rotary cutter or scissors, cut out the front face of the pillow.

You will need 2 back pieces, and for EACH add 1” overall for the height, which will give you 13”, and then add 3” to the width.  This additional 3” will give the overlap for the pillow envelope.

Here’s a little math for ya…

Divide the overall length in half and add 3

21 divided by 2= 10.5 + 3 = 13.5

Front Face = 13” x 21”

Back Pieces = (2) 13.5” (envelope edge) x 13″

3. Take one of the back pieces and fold over  1/4”  on the envelope side (this will create the opening for the pillow insert) and IRON the edge.

4. Sew the folded edge. 

Repeat Steps 3 and 4 for the other back piece (envelope side).

5. Lay your front face down (right sides together), then lay the back pieces on top (the sewn envelope sides together and should overlap).  Pin and sew all around the outer edge with a 1/2” seam.

6. Clip the corners.

7. Turn it to the right side and iron the edges flat to make a clean and crisp look.

8. Your envelope pillow has been created ~ add your pillow insert.

Complete…now you have a pretty little pillow

But wait…let’s personalize it!

Some of you lucky ladies out there have silhouette machines that can personalize just about everything.  Well, I don’t have one and I know many of you are in the same boat, so this part of the tutorial is for those that want to personalize the old fashion way.

Supplies

Stenciling
Computer (or stencil)
Fabric paint
Paint brush

1. To create your initial letter, open a Word document and find a font and size you like – – I used the century font at a size of about 150.

2. Print and Cut out the letter with an X-acto blade.

3 /4. Lay it on your pillow and trace the letter using a black Sharpie or pencil.  I used a sharpie because my paint color was black, but if you’re using another color, use a pencil.

5. Paint within the stencil.

Fill in the rest with the fabric paint – – like this one!

Now I have to admit, this project didn’t start off perfect.  Before stenciling on my finished pillow, I did a test run on a scrap.  I originally had skipped the tracing-with-a-marker step and attempted painting right on the stencil.  Nope…that did not work at all.  The paint bled underneath the stencil resulting in ugly, ugly!  Take a look at these pics ~But it’s done and…

Here’s the finished pillow

Along with this “B” personalized pillow, I also made the pretty pillows behind using the same steps.  I wanted to freshen things up for the Spring, so I’ve been making lots of changes – – stayed tuned for more pictures!

I hope you enjoyed this tutorial and found it helpful!  Have you ever made an envelope-style pillow? What about stenciling ~ have you ever stenciled before?

Stenciling: An Inexpensive and Stylish Alternative to Wallpaper

Wallpaper has gone in and out of style like bell bottoms…in the 60s/70s it was ‘in’ style, then by the 80s it was being ripped off the walls, and now over the past decade it’s totally back (any much more updated).  But sometimes you still don’t want the commitment of wallpaper or the hassle of installing it.

The happy compromise?

Stenciling

Stenciling is an inexpensive, yet stylish way to add interest and intrigue to a wall.  With many of the modern stencil designs available, stenciling is a great alternative to wallpaper.

I’ve been thinking of stenciling one of the walls in my foyer and was inspired by these tips from the pros!

Janell from Isabella and Max Rooms created this beautiful stenciled wall that was featured on HGTV.com.  Using a stipple affect, Janell dabbed the paint on the stencil openings to avoid the paint from seeping under the stencil – – great tip!  What an amazing and dramatic space.

Another gorgeous and modern stencil design – – looks like the wallpaper that I used in my Mom Cave. This beautiful space was created by Jesse of Good Girl Gone Glad.  By using a high-gloss paint, the stencil design is a glowing contrast to the flat paint backdrop.

Sometimes the ceiling needs a little love as well…Like Stacy of Not Just a Housewife put it, “Why should the walls have all the fun??”  Well in Stacy’s bedroom makeover, the ceiling definitely had a PAR-TAY.  Using a damask stencil design, Stacy went to town on creating this eye-popping and dramatic ceiling.

You will not believe how this stenciled wall was created (hint, hint: it’s a favorite takeout dinner in many households)….OKAY, I’ll just tell you.  It was made using a pizza box.  Awesome, right?!  Shoshanna of Love Your Room had this wonderful project featured on Houzz.  Because cardboard is quite strong and durable, it made a perfect template for this very creative project.

While searching the web, I found this awesome stencil company, Cutting Edge Stencils, that makes beautiful stencils that can be used over and over again for different projects.  They have many different styles and designs to choose from.  They also have a great Stenciling Tutorial that will answer all your ‘How-To’ questions.  Their stencils are great for furniture too.

Have you done any stenciling in your home?  If so, what type of design did you choose?  And where/what did you stencil?  I’ll keep you posted on what I do with my foyer…it’s been making quite the transformation – – details to come soon!


DIY: Drop Cloth Table Runner

Lately I’ve been a wee-bit obsessed with drop cloths…not the ugly blue kind, but the pretty and fabulous heavy beige version.  I’ve basically gone drop cloth MAD – – everything in my house is being transformed with drop cloths.  (I may need drop cloth therapy in a few weeks, but for now, I’m okay…ha!)

After making a few pillows (which I’ll share soon), I ventured into making a runner for my dining room table using, non-other than, a drop cloth and a fun chevron accent fabric (you know I love chevron).  I’ve never quite found a table runner that is the ‘perfect’ size, until now because – – I made it myself!

Here’s a sneak peak of how it looks ~

This is where it all began…

My $16 drop cloth purchase! For that, I got a 6′ x 9′ piece AND a 4′ x 10′ piece…WOW!

Project Supplies:

Drop Cloth
Accent Fabric
Thread – white of clear
Thread – contrasting color
Iron

And here are the steps to create the table runner:

Measure the length of your table to determine your desired width and length that you’d like to make the runner.

My overall table length is 76” long.  I wanted to see 2” of the table on each side, so I determined the finished dimension to be 72” long.   For the width, I wanted the finished dimension to be 14”.

Ok, now onto cutting the fabric…

1. From my above dimensions, I cut (2) 73” x 15” pieces of drop cloth.  This allows for a ½â€ seam all around.

*Again, the above dimensions will be modified to fit your table *

2. Using a rotary cutter or scissor, cut (2) 7” x 15” pieces from your accent fabric.

3. Taking your accent fabric, turn under and iron ½â€ on the two long sides.

4. Position the accent fabric on the “right” side of your drop cloth panel and pin 2-1/2” from the edge.

5. Using your contrasting thread, top stitch the panel onto the drop cloth.

6. Repeat steps  3-5 on the opposite end of the same drop cloth panel.

7. Taking both drop cloth panels, pin the two “right” sides together.  Sew all the way around, except leave an opening of 10-12” on ONE of the shorter ends.

8. Trim the corners.

9. Using the hole you left, pull the right side through. Then iron it flat.

10. Iron the opening as well, so it lays flat.

11. Using your contrasting thread and ½â€ seam, top stitch around the entire edge (this will close the opening). Iron again.

And it’s COMPLETE!

You now have a beautiful table runner that is the PERFECT shape and size!

Like the vases and flowers on the table?  Here are the details!

Drop Cloth is very durable and REALLY affordable, but any fabric can be used for this stylish table runner project.  If you choose a fabric that is lighter weight, you will want to add an inner lining for more support.

Have you ever made anything using drop cloth?  It really is my new favorite material!

You’ll find this  tutorial at Stories of A to Z-Tutorials & Tips Tuesday

DIY: Framed Chalkboard Medicine Cabinet

When recently working on my kids  bathroom makeover on a budget, I questioned what to do with the mirrored medicine cabinet ~

Leave it?  Or take it out?

The mirrored front medicine cabinet is positioned on the side wall, and since there is already a mirror over the sink, there really wasn’t a need for it.  BUT, I didn’t want to leave a huge hole in the wall AND I wasn’t interested in taking the time to patch it up either.  What to do?? WELL, I decided to create a new framed chalkboard medicine cabinet!

Medicine Cabinet turned framed chalkboard

SASinteriors-medicine-cabinet-2

This was actually quite an easy project to tackle, but before we start, here is how the bathroom looked before.

Supplies needed:
Chalkboard Paint
Wood Frame
Liquid Nails
Sandpaper

Start off by roughing up the existing mirror with sandpaper.  This will help the paint absorb better since the mirror surface is not porous.

Then it was time to add the chalkboard paint. I’ve used the same can of chalkboard paint for many of my projects {take a look ~ here & here} and it’s still half full…it definitely goes a long way!

I used a small roller brush to apply the chalkboard paint…

…and used the Valspar tray that came with my free paint sample.

Once the painting is complete, the medicine cabinet is ready to be framed.  The overall dimension of my medicine cabinet is 16″ x 22″, so I needed to find something to cover and overlap the mirror.  After much searching, I found a wood frame that was made for a 14″ x 18″ picture with an overall outside dimension of 18″ x 23″….it worked perfectly to cover the existing mirror.

Using liquid nails, I applied a good amount to the back of the frame and adhered it to the newly painted “mirror”.

Once the frame is in place, it’s very important to use a level to make sure it’s plumb!

I’m sure you’re wondering why I have a box of Lincoln Logs and 15+ books on the countertop…  I have a good explanation for that ~ Liquid Nails is great, but it doesn’t instantly dry…it takes about 30 minutes.  When I first adhered the frame, it actually started to sliiiiide down, SO with a little improv (ie: Lincoln Logs & books), it stayed right in place.

TIP: Chalkboard paint isn’t a must for this project.  In my master bath, I had another frameless medicine cabinet, that I simply added a similar wood frame to.  The medicine cabinet was instantly updated within minutes for less than $20.

My new framed chalkboard medicine cabinet is COMPLETE!  Now I have a stylish new medicine cabinet…

…to write my kids to-do’s for their morning/night routine

I’m so happy with how this turned out!  I just LOVE chalkboard paint!! Have you ever used chalkboard paint on a project?

Giving Birth to a Quilt + Sewing Lingo & Basics

My first quilt is officially done…  AND it really felt like giving birth.  Every step of the way, I wasn’t sure what I was doing and I was so afraid of making a mistake with possible repercussions down the line.

BUT….like giving birth, my quilt is a beautiful outcome!

I’m being a lil’ sarcastic…it’s not REALLY like giving birth.  Been there, Done that two times and birthing was MUCH MORE DIFFICULT.

On a real note ~ I truly can’t believe I sewed this.  Never would have believed it a few weeks ago.

It would be great if I could actually take you through the whole process, but since this is my FIRST quilt, it’d kind of be a joke if I wrote a tutorial.  Search the web and I know you’ll find some amazing bloggers who are pros at quilting. BUT, here are a few progress pictures.

The center is done after sewing each square together.

Figuring out the border and binding fabrics.

Will there be more quilts, you ask?…. I don’t know.  Since this took me half a century ~ (haha) well, maybe not that long ~ I think I’ll stick to quick, 1-day projects for now.  I’m an instant gratification girl, and this took a wee bit long for me.  BUT, I do have to say….I am quite impressed with myself and glad that I stuck it out!

Along the way, I learned some crazy sewing lingo that is probably part of the everyday language for someone who frequently sews, but for a beginner like me, it was quite interesting.

Here are just a few:

‘Walking’ Foot ~ Yes, I walk with my feet, but how does it pertain to sewing??   A ‘walking’ foot is a special sewing machine foot that moves the top and bottom layer of fabric together to avoid shifting or puckering.  It’s an essential for attaching bindings, straight line quilting, and curves ~ WHO KNEW?!  And I used this 80% of the time when making my quilt, so it’s a must-need tool when sewing! To learn more, take a look at this article: What is a Walking Foot?

Fat Quarter ~ WHAT?  A fat quarter..that’s a crazy name! A fat quarter is a quarter yard of fabric that typically measures 18″ x 22″.  It’s proportioned differently than if you cut a typical quarter yard of fabric cut from a bolt of fabric which would be only 9″ x 44″.  Fat quarters are GREAT for small projects.  The center part of my quilt was all made using fat quarters.  Here is a great article on What’s a Fat Quarter?

Stitch in the Ditch ~ Does that mean I’m supposed to bring my sewing machine outside and sew in a ditch??  NO, NOT AT ALL!  The term ‘stitch in the ditch’ means to sew long, straight lines between the seams (or “ditches”) on the quilt top using your walking foot. This is how the front and the back of the quilt stay together and in position. To read more, view this article, How do I “stitch in the ditch”?  Take a look at the picture below of how I ‘stitched in the ditch’ with white thread.

Those are just a few of the interesting (to say the least) terms that I learned throughout the process of creating my first quilt.

Even though sewing can often be thought of as challenging and intimidating, with the right materials and a few basic skills, it’s easy AND fun!

And to start with, it’s important to have a good sewing machine. For years, I had a basic machine that had limited options and had a needle that kept on breaking, UGH! Recently, I invested in a new machine, and it’s the reason why I’ve been loving to sew. Sewing machines can cost $1000s, but unless you are an expert, you really do not need to invest that much $$!

This machine is probably something you’ll want to pass on especially if you’re just starting out!

BUT, here are a few sewing machines that I recommend for a beginner that can grow with you and still be used at an intermediate and/or expert level.
Brother CP-7500 (this is the machine I got)
Singer 7258
Brother CS6000i

When looking at a machine, it’s best to find one that includes lots of extras, like these:

Now that I’m an expert sewer – NOT!  OK, OK ~ a beginner / allllllmost intermediate sewer (seamstress)…I can say that sewing is really not that difficult.

Here are a few more pictures of my FIRST QUILT —

And here’s my daughter enjoying her new beauty~

If you ever wanted to learn to sew, but thought it was too difficult, let me tell you….it’s NOT. I did take a class to get me started / motivated and it gave me the jump-start to begin something that I’ve been wanting to do for years!

Just Do It!! (I sound like a Nike ad, lol)

Linking up to:
Between Naps on the Porch-Met Monday, All Things Heart & Home-All Things Inspired,Savvy Southern Style-B&A Party, House of Hepworths , Shabby Chic Cottage-Transformation Thursdays, The Shabby Nest, Tatertots and Jello-Weekend Wrapup, Thrifty Decor Chick

Comic Art using Mod Podge

Who doesn’t love reading the ‘funnies’, a.k.a. the Sunday comics?  I remember being a kid and asking my parents to take out the comic section from the Sunday newspaper.   I enjoyed reading them, but did I actually ‘get’ the jokes?  Well, I’m not so sure…

Once it was time to add the final touches to my Kids Bathroom makeover, I want to do a project with Mod Podge.  My first thought was to use fun fabrics or patterned papers, but then my husband had the suggestion of using comics….I had a complete {Ah Hah} moment.  Kids and Comics…how perfect?!

Here’s how it came out ~And here’s the process…

Continue reading