
Tag: Saratoga Springs New York

Publication Feature: SAS Interiors Featured in FIRST for Women Magazine

I was thrilled to announce last week that I had a 3-page article published in a local magazine, and I’m just as thrilled to announce that this month I have been published again in a national magazine, FIRST for Women.

My feature in FIRST is new news to you, but not to me.  It was been in the works for quite a while…

It proves to me and hopefully for you, that any article you read or any TV remodel home show you watch, hasn’t been put together over night or even in just one week.  I’m sure all of those amazing makeover shows that we watch where the house has been transformed in 30 minutes, has actually taken months – probably 6+ months – to put together.

Sorry, I digressed…

Anyway, I was contacted by the Decor Director of FIRST back in early November 2012.  I was shocked one afternoon to receive this email:

FIRST for Women Magazine feature

They think “my ideas are just genius” and they wanted to feature my styled bookcases.  Yes, the laminate bookcases that I styled with books, accessories, pictures, and more after I painted them last Summer.

After an ‘Absolutely, thank you so much’ email back, the story was approved for the March issue.  I was elated to say the least.  I just couldn’t believe, my work was that much of interest to actually be featured.  Honestly, I have all of YOU to thank for your continued following and support of my blog.  Without the love of pinning and sharing my work, this never would be possible.

FIRST for Women Magazine feature

After a few rounds of phone interviews and confirmation of my blog and name in mid-December, it was complete and the waiting game began.

All that waiting brings us to this weekend.  The coveted March issue that I’d been waiting to get my hands on was finally on the newsstands.

FIRST for Women Magazine feature

I can be such a dork at times and took a few snapshots (that I shared on instagram and facebook) of when I first saw the magazine at Barnes & Noble.

I was totally pinching myself…

FIRST for Women Magazine feature

And here’s the feature on my styled bookshelves

FIRST for Women Magazine feature

What’s funny is that this bookcase and it’s matching partner (which were separate in this picture), are now side by side in my newly created home office / family room.  I just featured the space last week.

Home Office / Family Room Space

Home Office / Family Room Space

But I will say, the bookcases are still styled the same as they appear in the article.

I know, feel, and believe that this is just the beginning of many more amazing opportunities to come.  Again, thank you so much for your continued support – I can not tell you how much it’s appreciated!

DIY: How-To Hem (no sew) and Add Stripes to Curtains Using Paint

I hope you had a great weekend!  I know it’s Tuesday, but since my husband and kids had off yesterday for President’s Day, it feels like the first day of the week for me.  In spite of having a no-plan weekend, the 3 days flew by and we were majorly busy (new projects, photographing others, food shopping, car buying, etc.).  How does 36 hours fly by that fast?  Anyway, since showing you my newly created home office / family room last week,  I’ve got a slew of DIY projects to share.  First up…

A ‘how-to’ on how I hemmed and created the thin-striped curtain panels (I know a few of you have excitedly been awaiting this tutorial).  I was surprised how easy they were to create and they look like they cost alot of $$$ (but they totally didn’t).

DIY: Tutorial on how to hem a window curtain panel and how-to add stripes using wall paint; Designer look for less by @Jenna_Burger, sasinteriors.net

When the royal blue walls were complete last Summer, I knew white curtains would be a great, striking complement. Thankfully, I had an extra pair of panels from my son’s room that were purchased from Ikea 5+ years ago.

DIY: Tutorial on how to hem a window curtain panel and how-to add stripes using wall paint; Designer look for less by @Jenna_Burger, sasinteriors.net

I wanted to jazz up the white panels a bit though, and at first thought of a leading edge similar to what I created for my daughter’s room.  As more ideas developed, I had seen this living room and pinned it a while back. The thin-striped lines stuck in my head and I knew they would be just the touch to add interest to the stark white panels, yet not overwhelm the room.  I’ve seen many striped fabrics in window panels lately, but I wanted something softer and thought thick horizontal lines would be too heavy for the space since the dark blue walls are dramatic enough.

Inspiration for thin-striped curtain panels

The area for where the new curtain panels were to go, started out like this…

DIY: Tutorial on how to hem a window curtain panel and how-to add stripes using wall paint; Designer look for less by @Jenna_Burger, sasinteriors.net

To begin, I hung the white panels on the dark wood rods that were already in place.

DIY: Tutorial on how to hem a window curtain panel and how-to add stripes using wall paint; Designer look for less by @Jenna_Burger, sasinteriors.net

Nope they didn’t work.

The dark rod blended in too much with the wall, and the panels looked so low and squat.  It totally went against my rule of thumb on how best to hang a curtain.

Onto the idea #2.

Because of the window height, I couldn’t put a decorative rod above (there wasn’t enough room), so instead I bought a $3 basic metal pocket curtain rod.

I created the “pocket” at the top of the curtain (fold over top edge, sew or use fusible tape to create a pocket of about 2″ for the rod to slip through).  Then the panels had to be hemmed at the bottom because they were too long.

Here’s my quick tutorial on How-To Hem a Curtain ~

1. With your curtain hung on the rod, loosely pull the bottom of the panel and add 2-3 pins at the spot where the panel hits the floor plane.

Hint: Don’t pull the panel tawt because if you pin and sew at that point, your panels will result too short.  You want to leave the panel(s) loose, so it just grazes the floor (this is how I feel a curtain panel looks professional.  It’s not a must, but it’s my opinion).

DIY: Tutorial on how to hem a window curtain panel and how-to add stripes using wall paint; Designer look for less by @Jenna_Burger, sasinteriors.net

2. With the 2-3 pins indicating the line for which to hem the panel, I used a measuring tape to keep the same length and added more pins all the way across the width of the panel.DIY: Tutorial on how to hem a window curtain panel and how-to add stripes using wall paint; Designer look for less by @Jenna_Burger, sasinteriors.net

O, and did I tell you the good part about this project – I didn’t use a sewing machine.  I was totally feeling lazy that day! You can of course, but it’s not a must.  That’s a major plus for my non-sewing friends!

3. Using fusible tape, I folded the bottom edge underneath and hemmed at the line of the pins.

DIY: Tutorial on how to hem a window curtain panel and how-to add stripes using wall paint; Designer look for less by @Jenna_Burger, sasinteriors.net

Here’s the result…

Yes, much better!

DIY: Tutorial on how to hem a window curtain panel by @Jenna_Burger, sasinteriors.net

A perfectly tailored window curtain panel that just grazes the floor.  Super easy!

Ok, so now on to the 2nd part of this tutorial…

How-To Add Stripes Using Paint ~

FYI – you could totally skip step one if you have already have the perfect length curtain and you can skip this step if you have no interest in adding stripes.  Just thought I’d share that tid-bit 😉

For this part of the project, I used the following materials:

  • Painters Tape
  • Wall Paint that is the same color as the wall
  • Paint Brush
  • Measuring Tape

DIY: Tutorial on how to hem a window curtain panel and how-to add stripes using wall paint; Designer look for less by @Jenna_Burger, sasinteriors.net

1. To start off, I determined how many stripes I wanted and the width of the stripes.

4 stripes and 1″ wide.

I layed my curtain panel on the floor and using a little math (big UGH), I determined my stripe placement.  Using painters tape (because it’s easy to remove), I marked the 4 stripe locations.

DIY: Tutorial on how to hem a window curtain panel and how-to add stripes using wall paint; Designer look for less by @Jenna_Burger, sasinteriors.net

2. Then I added the painters tape and my measuring tape to create the 1″ wide stripe.

DIY: Tutorial on how to hem a window curtain panel and how-to add stripes using wall paint; Designer look for less by @Jenna_Burger, sasinteriors.net

3. * Important part!

Once the tape is in position, it’s important to press hard on it like you’re burnishing it into the fabric.  You want to make sure the tape is sealed so the paint doesn’t seep underneath. I ‘burnished’ the edge with my nail.

DIY: Tutorial on how to hem a window curtain panel and how-to add stripes using wall paint; Designer look for less by @Jenna_Burger, sasinteriors.net

4. Then using the wall paint that I used in the room (Benjamin Moore Van Deusen Blue), I painted on the stripes using a craft brush.  I did not add anything to the paint to make the medium different.  It’s straight paint on fabric!

DIY: Tutorial on how to hem a window curtain panel and how-to add stripes using wall paint; Designer look for less by @Jenna_Burger, sasinteriors.net

DIY: Tutorial on how to hem a window curtain panel and how-to add stripes using wall paint; Designer look for less by @Jenna_Burger, sasinteriors.net

Once all four stripes were done, I took off the tape.  Some of the areas weren’t completely dry, and that’s okay.

DIY: Tutorial on how to hem a window curtain panel and how-to add stripes using wall paint; Designer look for less by @Jenna_Burger, sasinteriors.net

5. When setting up the stripes for the second panel, I layed both curtains side by side so they were perfectly aligned.  Then, by eye, I created the stripes on panel #2.

DIY: Tutorial on how to hem a window curtain panel and how-to add stripes using wall paint; Designer look for less by @Jenna_Burger, sasinteriors.net

Once they were completely dry, they were ready to hang, and admire! #happygal

DIY: Tutorial on how to hem a window curtain panel and how-to add stripes using wall paint; Designer look for less by @Jenna_Burger, www.JENNABURGER.COM

The bamboo shades (which I got from Payless Decor) are a fantastic compliment to the stark white window panels and white moulding trim.  You may have seen the bamboo shades in other parts of my home (check this post out) and I adore them!  They are of great quality (and an awesome price).  The darker hue and texture (which is kind of difficult to tell in the picture because of the natural light coming through) are just gorgeous.  On my windows you’ll find the tibet color.

DIY: Tutorial on how to hem a window curtain panel and how-to add stripes using wall paint; Designer look for less by @Jenna_Burger, www.JENNABURGER.COM

DIY: Tutorial on how to hem a window curtain panel and how-to add stripes using wall paint; Designer look for less by @Jenna_Burger, www.JENNABURGER.COM

O, and if you like it, would you pin it or share it? Thanks a bunch!

DIY: Tutorial on how-to add stripes using wall paint; Designer look for less by @Jenna_Burger, sasinteriors.net

Have questions?  Don’t be afraid to ask – I’d be happy to help!

Want to see more drapery projects?

Then you might want to check out this post on Adding Decorative Leading Edge Trim to Curtains ~

DIY Tutorial on How-To Add a Leading Edge to a Curtain Panel by @Jenna_Burger, sasinteriors.net

Or this project on How-To Make Curtains from Scratch and Line them with Drop Cloth~

DIY-Window Panels101

Of course you’ll want to know How-To Best Hang Window Drapery Panels, right?

The Right (and Wrong) Way to Hang Curtains

Thanks for checking out my 2-in-1 tutorial!  What a great Tuesday!

 Have you ever tried painting on fabric?  What about embellishing window treatments?  Or even making your own curtains?  Share your creations with me – would love to see them!

I link my projects to some of these parties: Skip to My Lou, Dittle Dattle, Between Naps on the Porch, Today’s Creative Blog, Stories of A to Z, All Things Heart & Home, House of Hepworths, Finding Fabulous, The Shabby Nest, Serenity Now, Tatertots and Jello, Thrifty Decor Chick, Tip Junkie

Easily Change a Recessed Light to a Decorative Hanging Fixture

In my quest to make a few easy upgrades in the kitchen (I shared my new bamboo shades earlier in the week), I was really hoping for some sort of decorative fixture.  It was near impossible aesthetically because of the close proximity to the hanging fixtures in the adjacent rooms, plus there are 6 recessed lights (hi-hats) in the space and the layout just wouldn’t allow – I wasn’t wanting to change the space that much for an electrician to come in and rip out the entire ceiling to simply add a pretty new light.

But thenwww.JENNABURGER/wp-content/uploads/2013/02/RecessedLightToFixture2.jpg”>Easily and Inexpensively Convert a Recessed Light to a Hanging Decorative Fixtures by @Jenna_Burger via sasinteriors.net

To easily make the upgrade, I used a Recessed Light Adapter Kit (a.k.a. Recessed Fixture Converter) which quickly and inexpensively allows a recessed light to be converted to any style hanging fixture or pendant.  Think about the possibilities for all those blah hi-hats that can now be WOW – hallways, bathrooms, kitchens…

Easily and Inexpensively Convert a Recessed Light to a Hanging Decorative Fixtures by @Jenna_Burger via sasinteriors.net

To start off, the Mister and I removed the light bulb and the plastic can, so only the sheetrock and wires inside were exposed.  Then we took the new white plate from the conversion kit and installed it as specified in the directions (the electrical wires were still exposed and dangling).

Easily and Inexpensively Convert a Recessed Light to a Hanging Decorative Fixtures by @Jenna_Burger via sasinteriors.net

Then it was time to hang and electrify the fixture.  If you plan on changing out your recessed light, follow the directions that come with the kit!  I am not an electrician and I’m sharing the pictures and steps that I took, but every condition is slightly different.

Easily and Inexpensively Convert a Recessed Light to a Hanging Decorative Fixtures by @Jenna_Burger via sasinteriors.net

The hanging fixture we chose was from Lowe’s and it’s a great accent to the fixtures in the nearby spaces. Cute, right? It was less than $50 so it was a winner in my book. I’ve seen similar for a lot more $$$, so I was a #happygal.

Easily and Inexpensively Convert a Recessed Light to a Hanging Decorative Fixtures by @Jenna_Burger via sasinteriors.net

Within about 20 minutes, the fixture was hung and we stood back to admire.

Easily and Inexpensively Convert a Recessed Light to a Hanging Decorative Fixtures by @Jenna_Burger via sasinteriors.net

Check out how the kitchen has transformed over the years.

All DIY baby!!

Evolution of Kitchen Makeover revamped entirely with DIY projects (no professionals) by @Jenna_Burger via sasinteriors.net

It’s hard to believe how it looked less than 2 years ago.  I’m super happy with the recent revamp of the bamboo shades and the decorative light fixture.  (Who knows what will be next…)

If you want to read more about the DIY Kitchen Makeover, click {here} or feel free to ask me.

Have you ever changed a recessed light to a decorative fixture?  If not, where in your home would you like to?

A Simple Kitchen Window Upgrade

Do you ever feel with a little upgrade, a space in your home that you haven’t quite loved, will finally look exactly how you always hoped?  That little revamp which won’t take long, but the room doesn’t feel “right” without ?

Well, I’ve had that feeling in my kitchen for a while.  The part that needed a redo wasn’t horrible, but I was kind of tired of it.

It’s not the cabinets because I still love them 2 years later.

It’s not the hardware because I still love that too.

But instead it was actually the valance over the windows that I felt blah about.

So the kitchen window got a revamp!

Kitchen Window Revamp - A simple upgrade for a large kitchen window via @Jenna_Burger, sasinteriors.net

I created the previous valance 2 years ago and I never felt it was just right (don’t tell the Mister.  He didn’t see anything wrong with it).  To others, the valance was fine, but for me, it just wasn’t exactly what I envisioned.  Here’s how it looked before (with the old oak cabinets too – crazy to look at)…

Kitchen Valance

Anyway, since I’ve been adding bamboo shades (which I got from favorite resource, Payless Decor) to many of the first floor windows after I painted the mouldings white, it seemed like the most appropriate choice to continue the look + I love the wood texture of the shades against the light yellow wall color and crisp, white mouldings!

Aren’t they gorgeous?!

Kitchen Window Revamp - A simple upgrade for a large kitchen window via @Jenna_Burger, sasinteriors.net

This past weekend while the kids went out for breakfast with their grandparents, I found a few hours of free time to finally hang my new roman shades.  When does that ever happen – free time – huh??  I blasted the music – Katy Perry was my fav choice for this project 🙂 – and got to work.

You might have seen me post this pic on Instagram Saturday afternoon…Kitchen Window Revamp - A simple upgrade for a large kitchen window via @Jenna_Burger, sasinteriors.net

I removed the old valance + there was still a cellular shade from the old owners behind it.  Then in about an hour, I hung the new roman shades.  Usually I always choose inside mount shades because decorative treatments (long drapes) are on the outside, but because the moulding of the kitchen window hits the ceiling and I wanted to allow as much light in as possible, so I decided on an outside mount.  Now the new bamboo shades touch the ceiling.

What do you think?

Kitchen Window Revamp - A simple upgrade for a large kitchen window via @Jenna_Burger, sasinteriors.net

Such a difference and the new shades go so well with the open cabinet.

Kitchen Window Revamp - A simple upgrade for a large kitchen window via @Jenna_Burger, sasinteriors.net

O, and did you notice the new light?  That was an easy switch-aroo that we did a few weekends ago as well.  We changed the hi-hat to a hanging fixture.  I’ll share more on that later this week, so stay tuned…

Kitchen Window Revamp - A simple upgrade for a large kitchen window via @Jenna_Burger, sasinteriors.net

It’s amazing how small things which only take a few hours (or a morning filled with good music), change the entire look of a room.  I am thrilled with the new look of this room.

If you love the look of these gorgeous bamboo shades, they’re from Payless Decor and the color is Tibet.

Kitchen Window Revamp - A simple upgrade for a large kitchen window via @Jenna_Burger, sasinteriors.net

Ahhh… Much Better – #happygirl

What small adjustments have you made in a room of your home to completely change the look? If nothing yet, what changes do you want / hope to make?


How To Upcycle: Successful Tips for Changing Old Items into Creative Home Decor

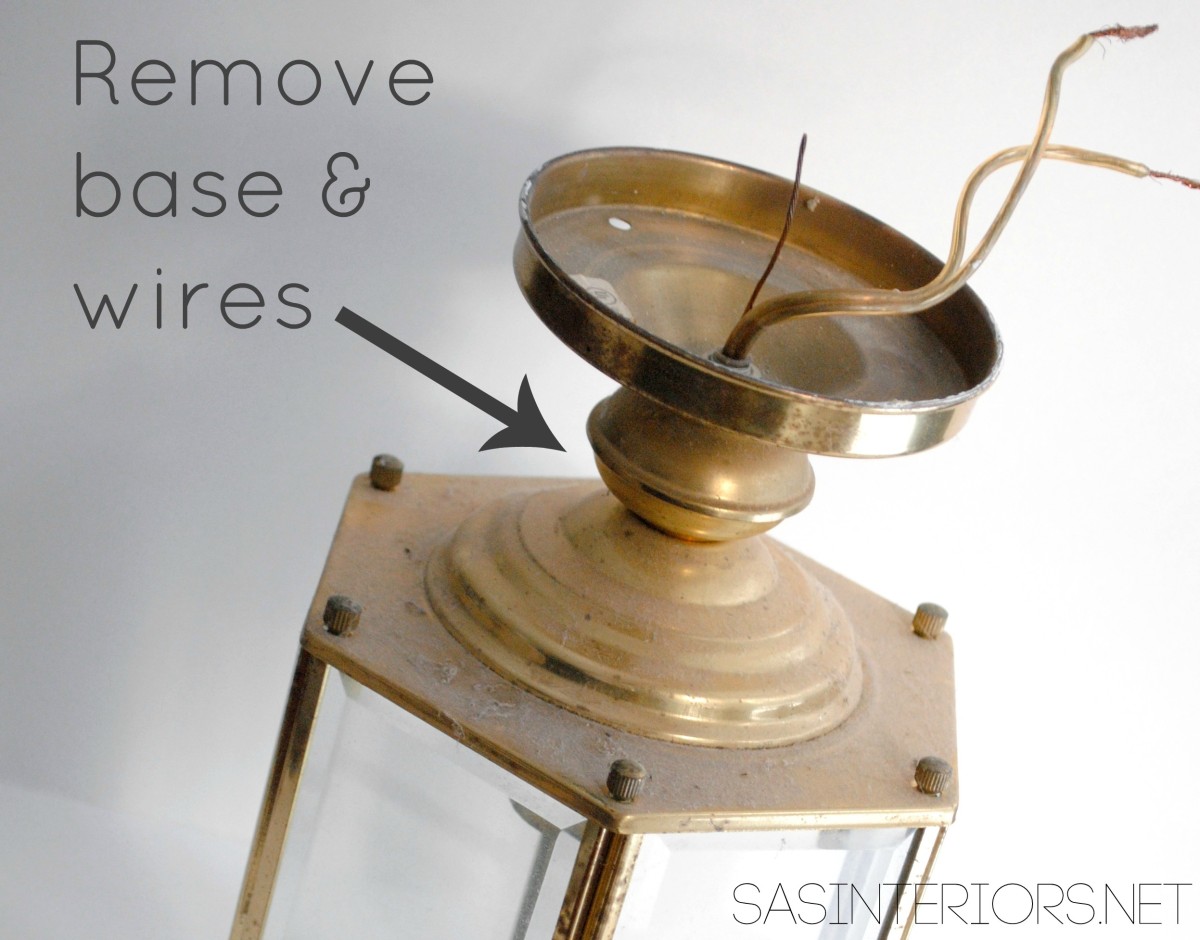
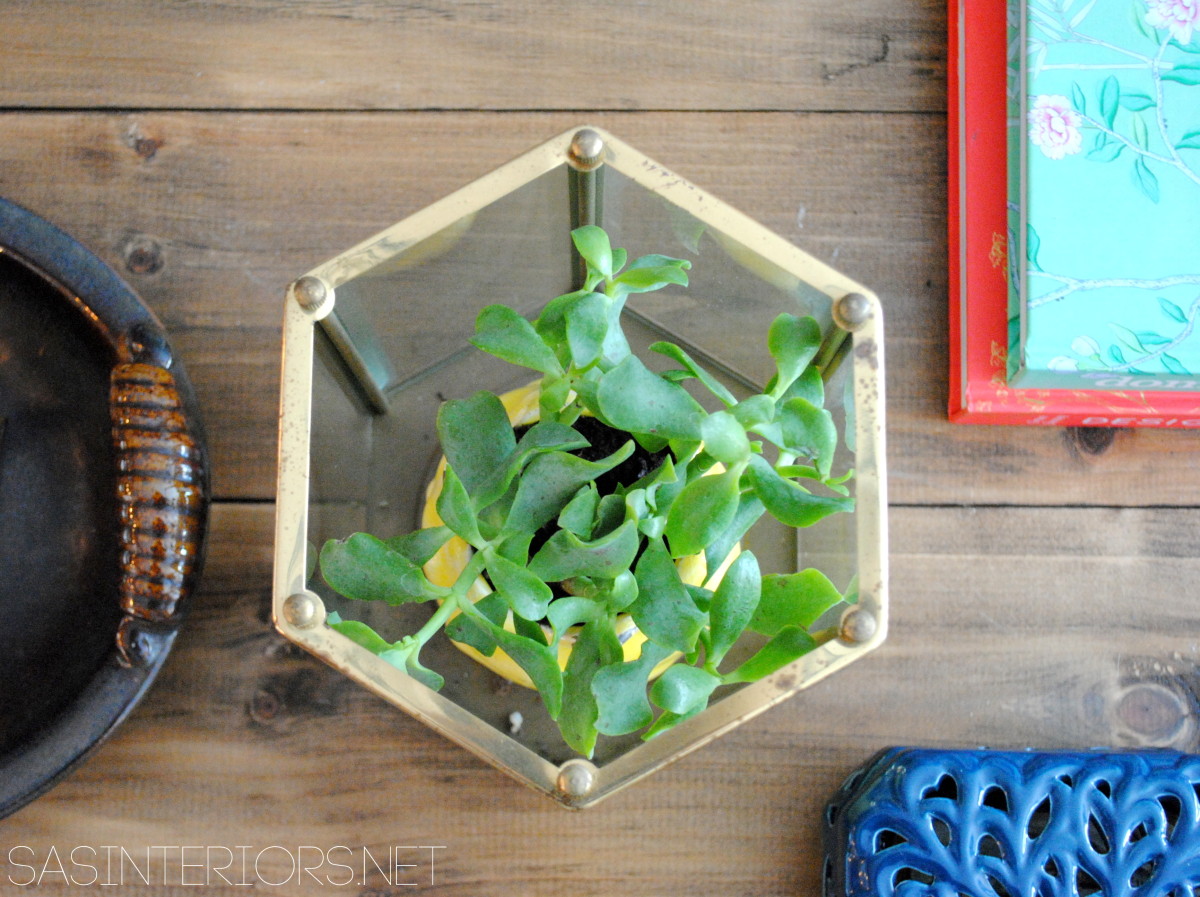
One of my all-time favorite ways to save money and bring elements into my home that have purpose and meaning is with upcycling, a.k.a. reusing / repurposing an item into another use or function. I’ve upcycled a lot of things around my home and shared the process and result on the blog, like my recent light to vase switch-aroo!

Not only can you save $$$ in your pocket, but upcycling allows you to create something that is original and one-of-a-kind.  Yes, you may have to think outside the box a bit, but in the end I’m sure you’ll be happy with the result.

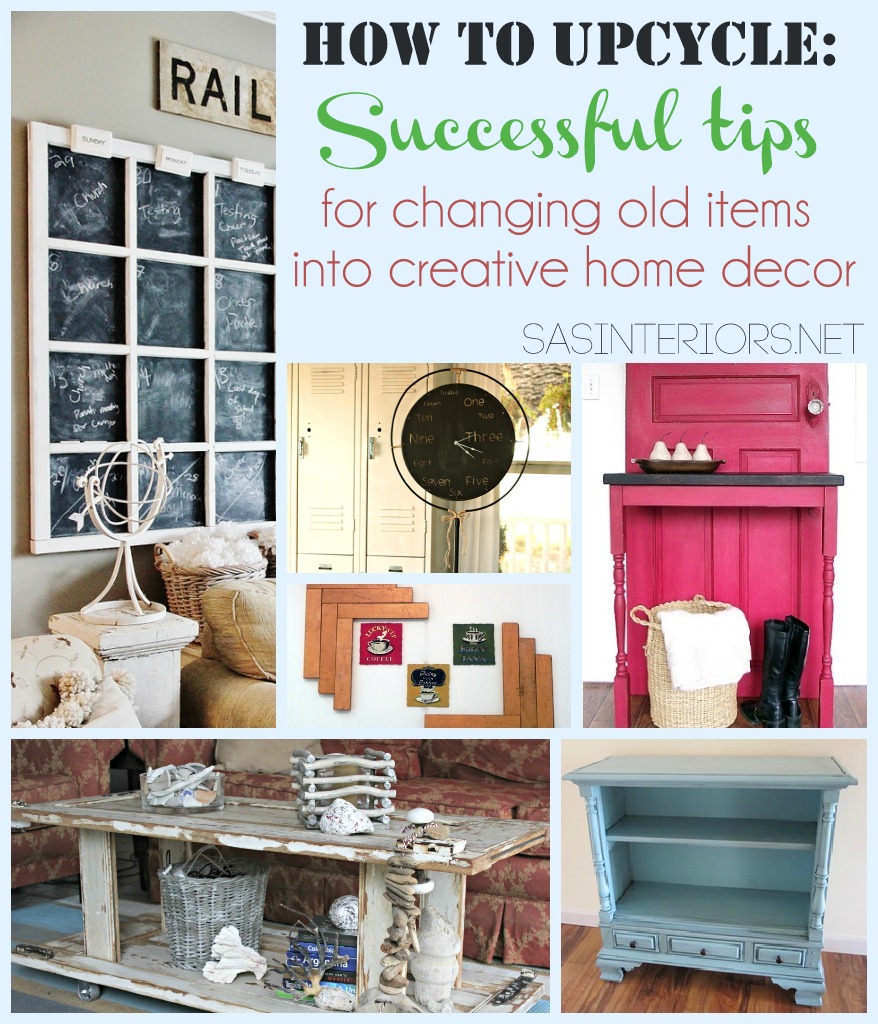
Since upcycling so many items around my digs, I thought I would share some tips and ideas on how to successfully change old items into trendy, fun, and creative new home decor.

How to Upcycle: Successful Tips for Changing Old Items into Home Decor via @Jenna_Burger, sasinteriors.net


1. Shop Your Home

One of my favorite ways to shop is with a $0 budget. What?  How is that possible (you ask)?

Well by shopping your home. Take a tour around your house and look for items that you’re bored or tired of.  Then with a little creativity, give them a fresh new look.  It can be as simple as a coat of spray paint (in a fun, vibrant color) or taking the item and completely changing it’s function {like my garage sale clock-turned-mirror}.  It can be a super simple reuse of an item, but I guarantee by changing it’s look, the item will be new again!

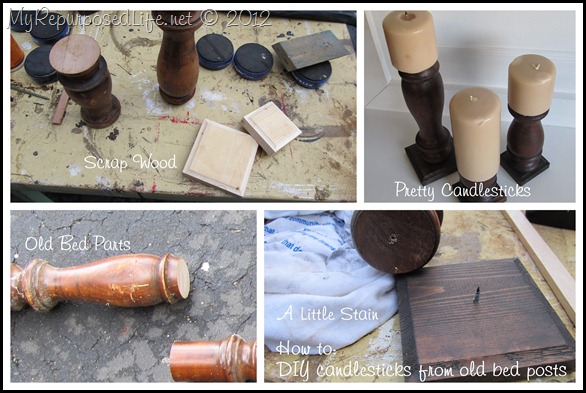
Sometimes the unimaginary can be made into something else.  Gail of My Repurposed Life did just that when she shopped her home and instead of ditching an old bed, she used the posts and upcycled them into candletsicks. How cool?!

How to Upcycle: Successful Tips for Changing Old Items into Home Decor via @Jenna_Burger, sasinteriors.net

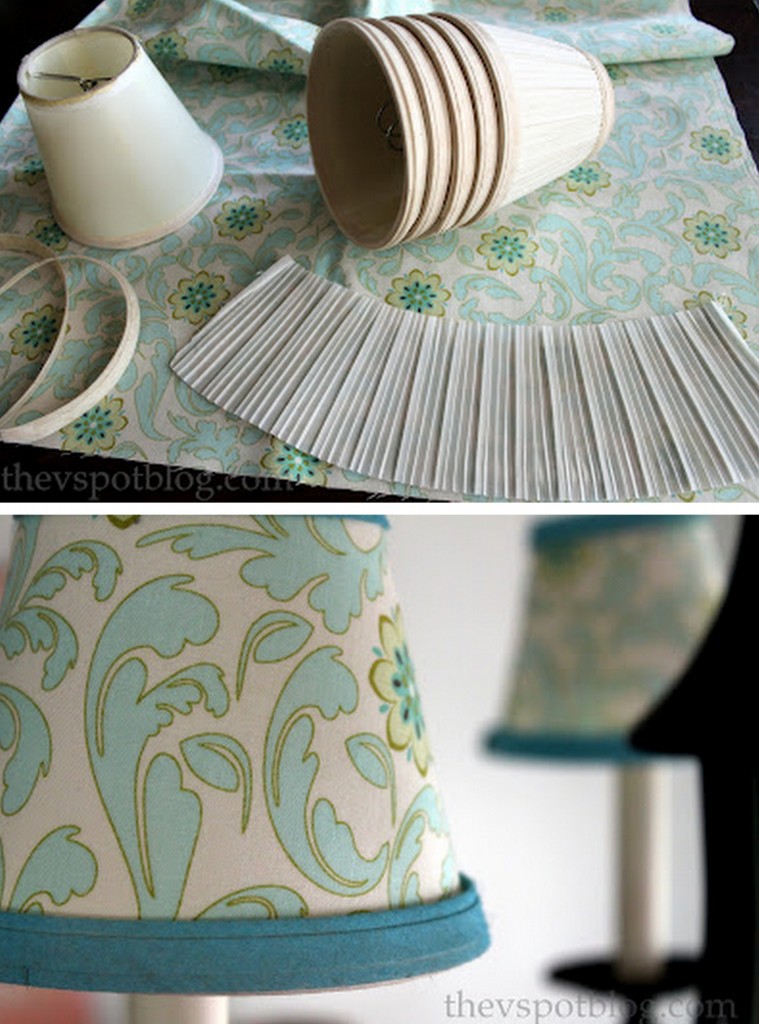
Or how about these old lampshades which Viv of The V Spot revamped with new fabric and ribbon?  They were almost trashed, but now they look like something that you’d buy at a high-end boutique.

How to Upcycle: Successful Tips for Changing Old Items into Home Decor via @Jenna_Burger, sasinteriors.net


2. Good Bones

When thinking about keeping or tossing, it’s important to look beyond the surface to see if the “trash” is worth the work to upcycle.  Who wants to spend time on repurposing something and have it fall apart the next day?  Especially with furniture or larger-scaled items, look at the joints (dovetail joints are best, but not a must) and the structure of the piece.  Think about what you want to do with it – keep as is or change it’s function – before starting the transformation.  Like our bodies, good bones are important for a longer life.

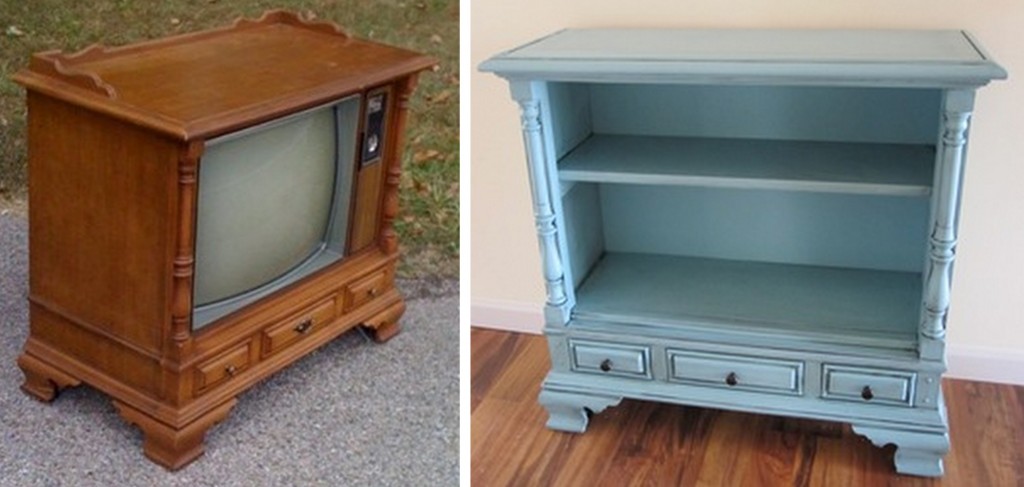
A project that I saw, what feels like a gazillion years ago but never forgot, is Beckie’s vintage television turned console table.  How incredible is this furniture upcycle?! You gotta go check it out on Infarrantly Creative.

How to Upcycle: Successful Tips for Changing Old Items into Home Decor via @Jenna_Burger, sasinteriors.net


3. Thrift Store Finds

Thrift stores, estate sales, garage sales, and ReStore shops are all ideal spots to find items to upcycle into trendy and creative home decor.  Things that I am always on the lookout for are picture frames, small bowls, glassware, maps, candlesticks, old books, and chairs (that can easily be reupholstered).  These items are perfect for almost any spot of the home and usually cost very little ($1-$5).

  • Picture frames can always be revamped with a can of spray paint or chalk paint. Try sunshine yellow, raspberry, or tangerine.  Bold is better!
  • Small bowls are perfect to hold jewelry or simply rest on top of a cluster of books.
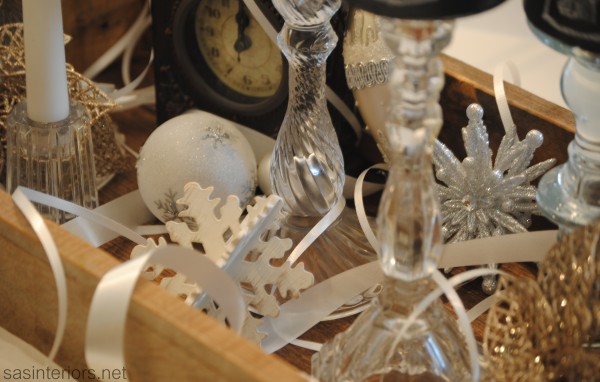
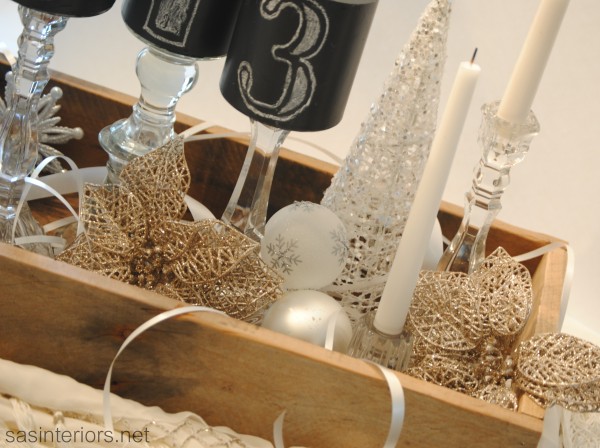
  • Glassware can be grouped together or displayed on their own.  I love glassware for mantel displays and table vignettes.
  • Maps can be used for SO many upcycling projects.  Decoupage them onto drawer fronts like Dinah did in her craft room.
  • An upholstering chairs is one of my favs! Check out my 1st upcycled chair {here}

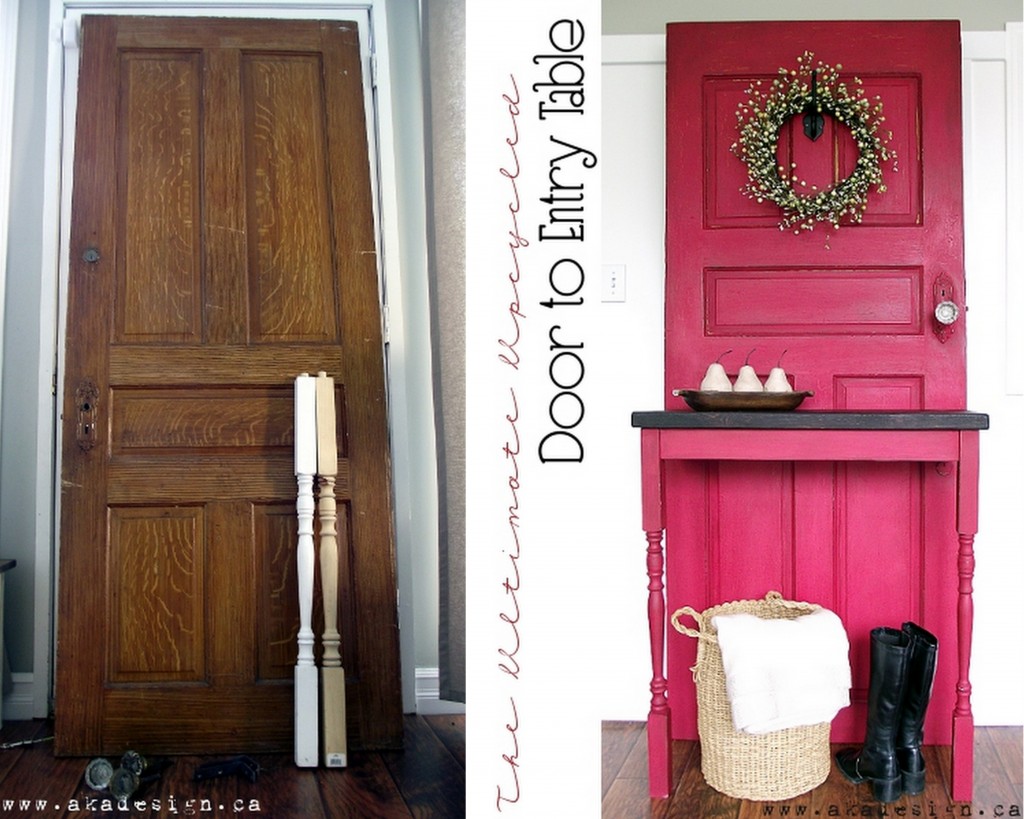
Shannon and Dean of AKA Design rocked this upcycled project outta the park.   They turned an old wooden door, that they found at a ReStore shop, into the ultimate entry table – how amazing!

How to Upcycle: Successful Tips for Changing Old Items into Home Decor via @Jenna_Burger, sasinteriors.net

Here’s another one for you…

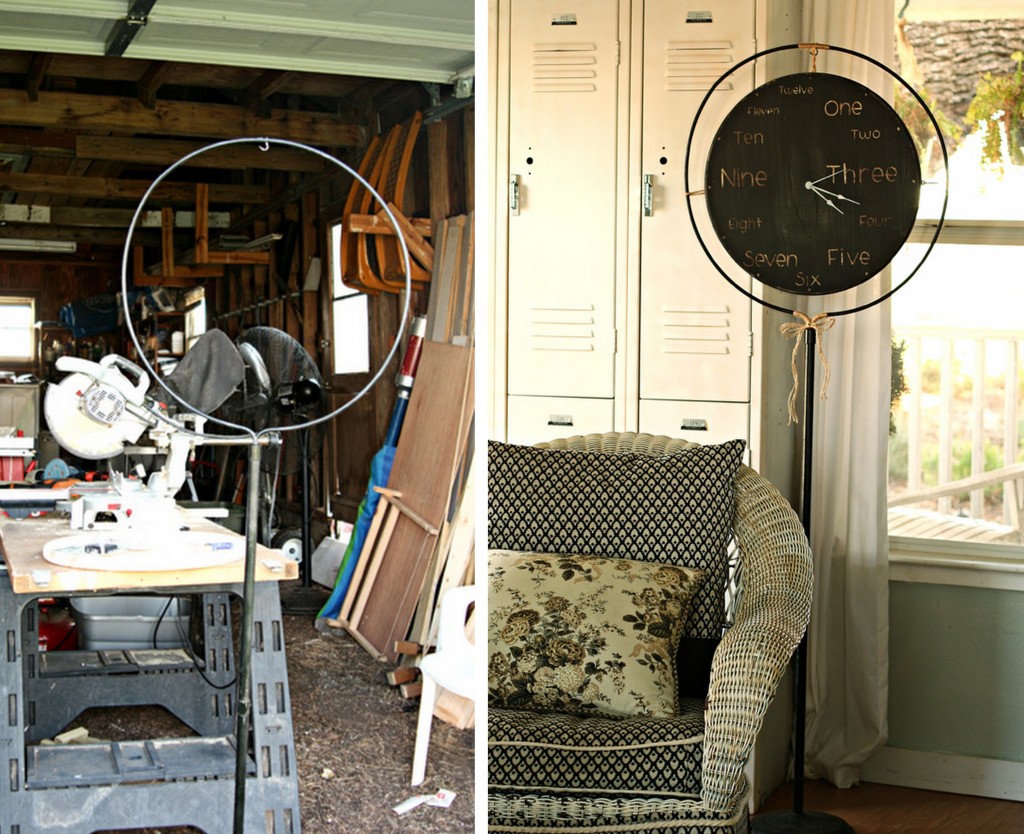
Lisa of The Pennington Point found this frame “thingy” (as she put it so perfectly) at a flee market.  She had lots of ideas for it, then came up with the perfect upcycled creation… a new wooden clock.  So creative!

How to Upcycle: Successful Tips for Changing Old Items into Home Decor via @Jenna_Burger, sasinteriors.net


4. Don’t Toss It – Save It

I’m not a hoarder (even though you may think differently if you peaked into my garage), but I often have a difficult time parting with things (specifically decor items) because I always believe that someday, somehow I will use it for something.   You never know when an item can be of use.  One day it’s trash and another day it’s treasure.  The best items can be created with something you almost threw out.  If you’re questioning whether an item is worth tossing or keeping, look at it outside of it’s traditional element.  Use your creative eye to see how it can be upcycled into something else.

Now, let me state, I am not condoning keeping everything that crosses your path, but items around the house that could potentially be reused, revamped, or recycled should stick around – you never know what they can be used for in the future.

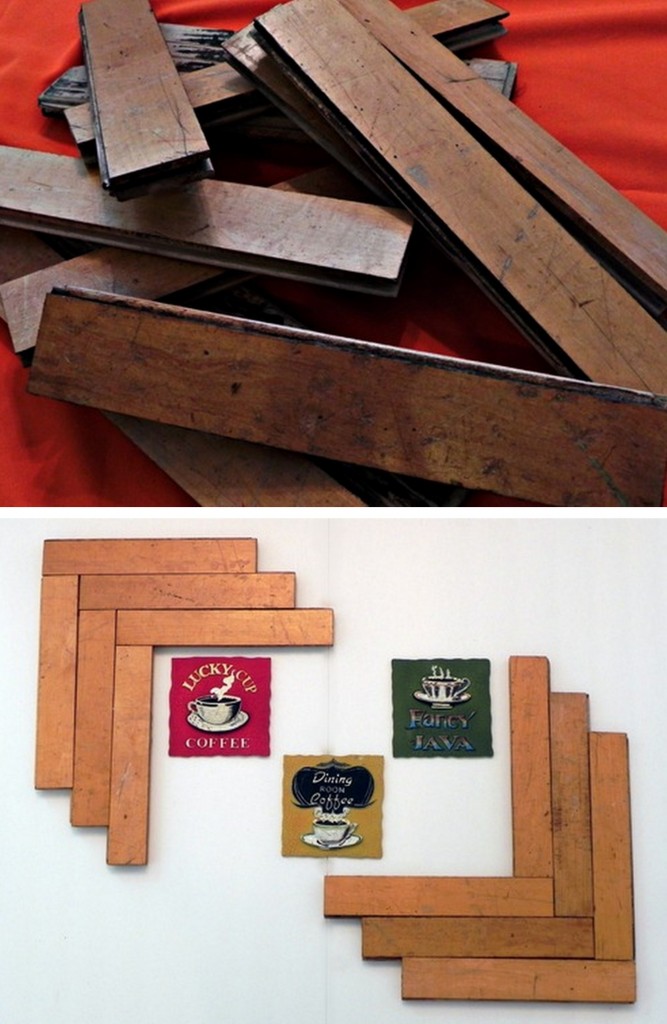
Whether it be in your home or at an old school, treasure can be found all around you.  Jessica of Mad in Crafts got a hold of these awesome floor boards from the stage of her old high school.  Thanks to her mom who salvaged some of the boards, she upcycled them into some fun wall art…

How to Upcycle: Successful Tips for Changing Old Items into Home Decor via @Jenna_Burger, sasinteriors.net


5. Roadside Pickup

Never doubt a roadside pickup.  “Trash” on the side of the road can literally be some of the best finds ever… like my favorite turquoise chair (remember when I had the back of my truck filled with groceries and piled the chair right on top)

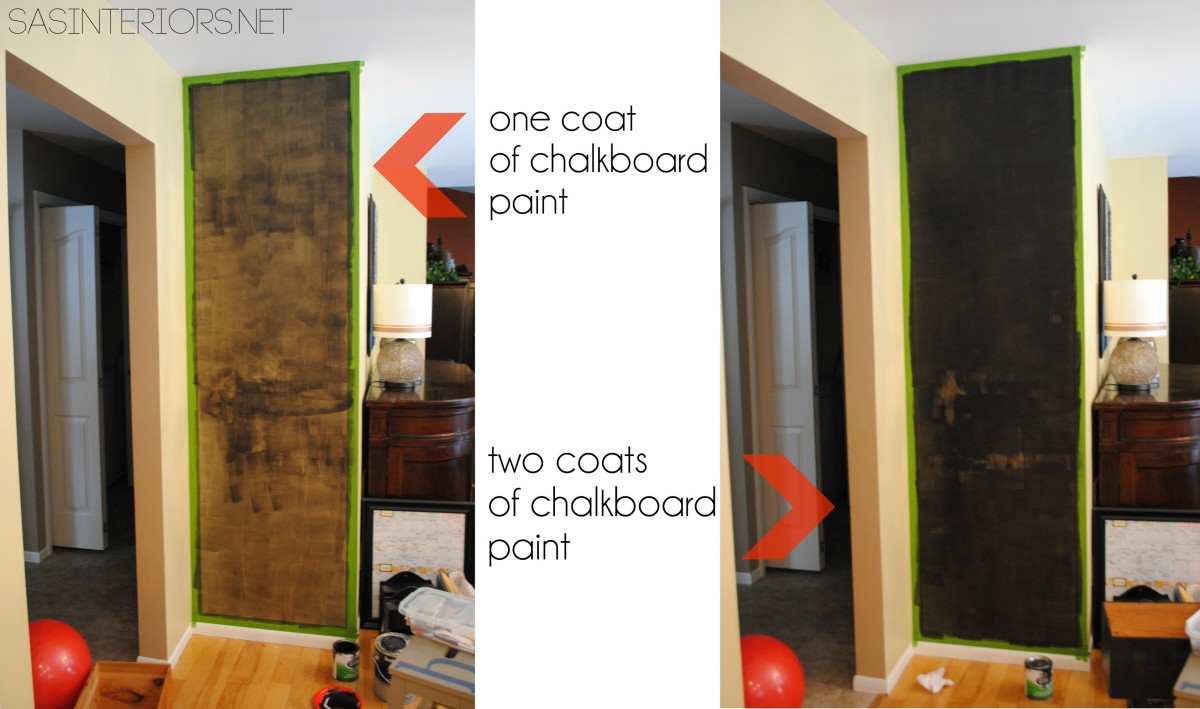
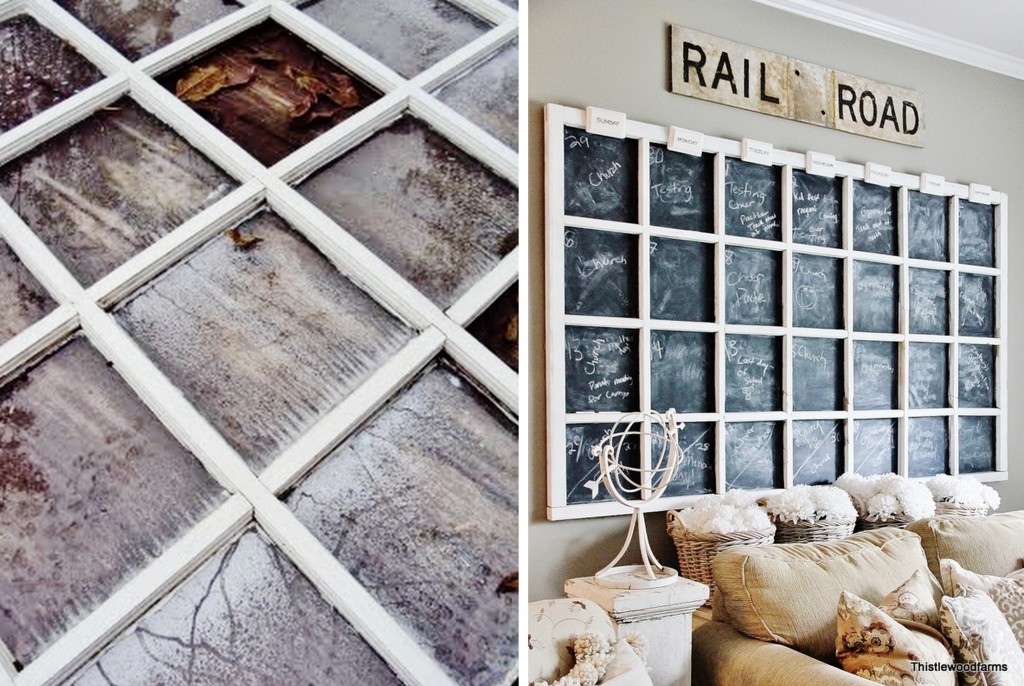
My friend KariAnne over at Thistlewood Farm calls her roadside pickups her “little slice of junk heaven”.  But clearly her house doesn’t portray “junk” one bit.  Check out the transformation of this curbside find, where she upcycled a 40 pane glass window into a huge chalkboard calendar.  Pure Gorgeousness…

How to Upcycle: Successful Tips for Changing Old Items into Home Decor via @Jenna_Burger, sasinteriors.net


6. Look for Inspiration to Knock-Off

Don’t be ashamed by copying or being inspired by something you see in a magazine or read on a blog.  Some of the best creations can evolve from what you see day in and day out.  Knock-offs can save Big Bucks and you can be proud of your thrifty, unique, one-of-a-kind creation.

Sara of The Clever Pink Pirate created the ultimate knock-off when she was inspired by $89 Pottery Barn mirrors, but saved big when she created her own version using wood bowls found at a local thrift store.  So neat!

How to Upcycle: Successful Tips for Changing Old Items into Home Decor via @Jenna_Burger, sasinteriors.net


7. Dumpster Divin’

Well there’s not much of an explanation needed here.  But honestly, who knows what you’ll find in a dumpster.  Since others may not be smart enough or have the know-how to successfully upcycle, then you can truly find some awesome treasures.  Be prepared to be up against some crazy, gross stuff, but who knows what you’ll discover.

*disclaimer: this is not (yet) something that I’ve tried.

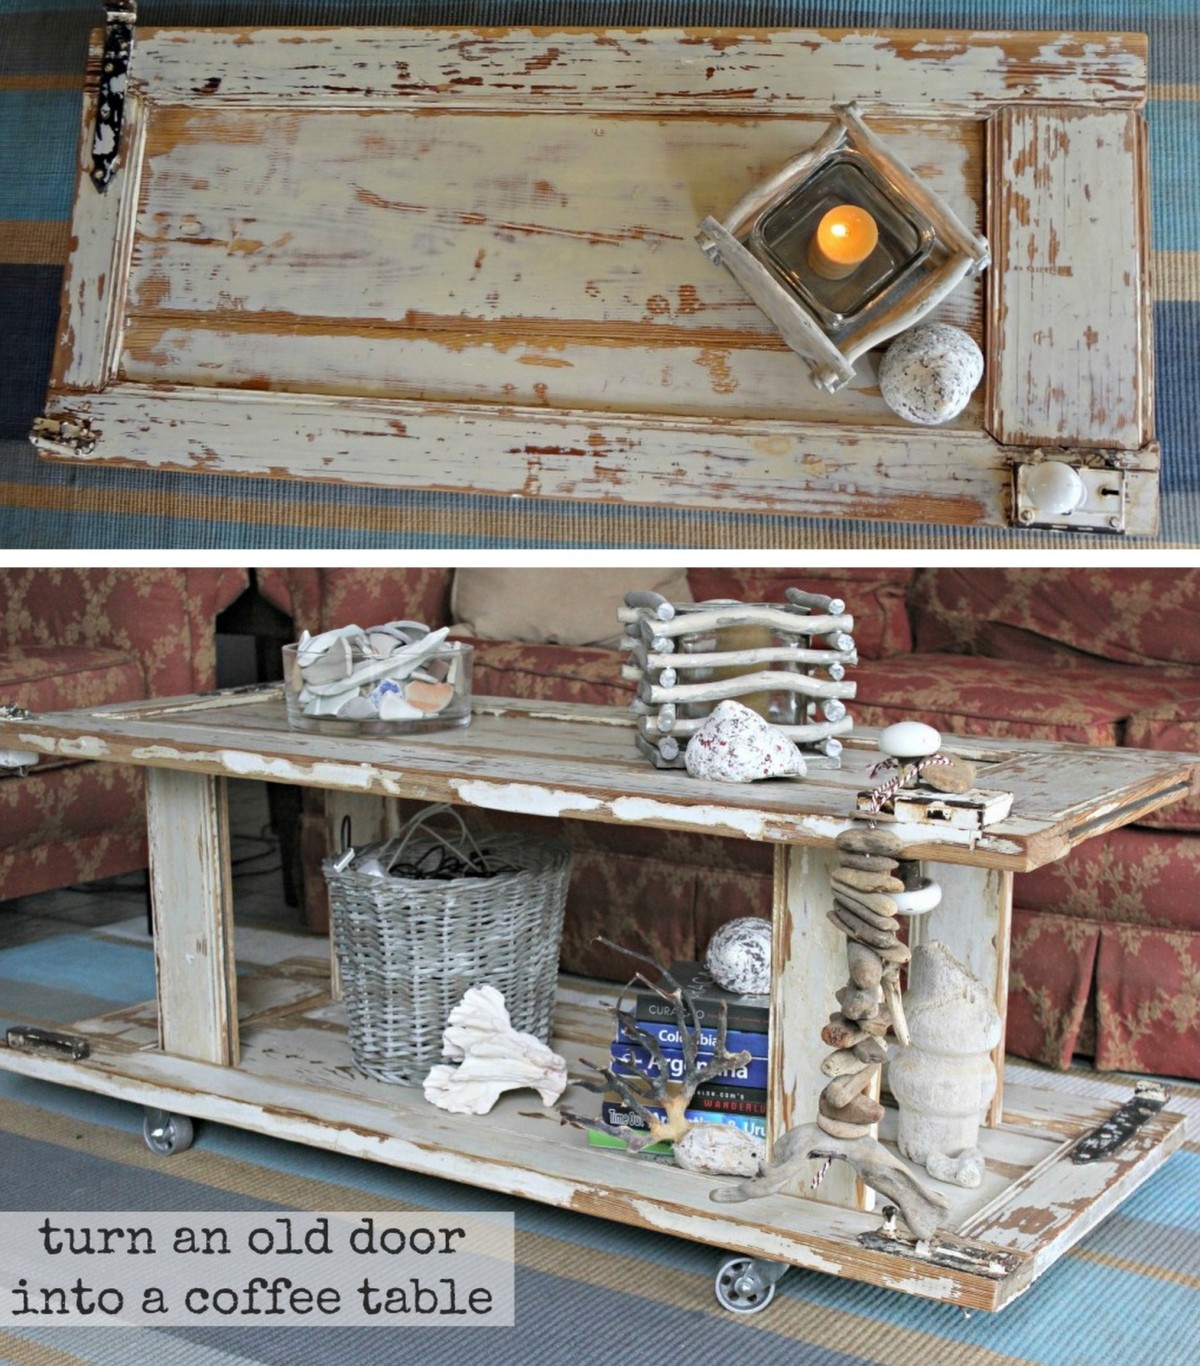
This DIY dumpster divin’ creation makes it all worth it.  Can we give Karah of The Space Between a big, WOW! What an awesome upcycled project.  From door to coffee table…

How to Upcycle: Successful Tips for Changing Old Items into Home Decor via @Jenna_Burger, sasinteriors.net


8. Find a New Location

Sometimes the best upcycles involve nothing but moving the item from one spot to another.  Or buying it and just using it ‘as-is’.  For many who are reluctant to DIY or use tools to change something, this is the best way to upcycle because little time is involved.  ‘Shopping your home’ and moving items around is my M.O.!  A new spot gives new life to what was once boring.  Give it a try.  Gather a few items and move them to someplace else.  I bet your home will look like new in no time (while spending nothing).

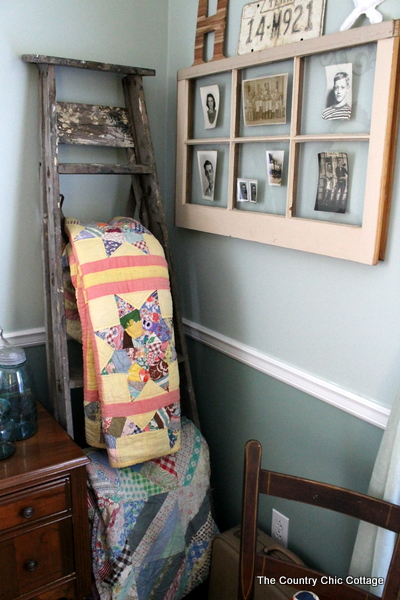
I love how Angie of Country Chic Cottage displays this old, vintage, distressed ladder to hang beautiful quilts.  What a great way to reuse something old…

How to Upcycle: Successful Tips for Changing Old Items into Home Decor via @Jenna_Burger, sasinteriors.net

Want to see more creative upcycled projects?  Have a look…

Old lamp turned plant stand by Plucking Daisies

Luggage Rack to Tray Table by Mod Podge Rocks

Barn Door Desk by Cleverly Inspired

Memo Board by Eclectically Vintage

Window pane turned cork board by Mom 4 Real

Drawer pull turned succulent holder by The Scrap Shoppe

Clock turned mirror by Free Stylin

Valentine Sweater Wreath by Crafts n Coffee

Porch Entry Table by Domestic Imperfection

Upcycled Chair to Side Table by The Happy Homemaker

Wine Crate Show Storage by White House Black Shutters

Old Chair to Spring Planter by My Sister’s Suitcase

Reupholstered Chair by Streetwise Decor

Have you ever thought of or tried upcycling? If so, what have you upcycled in your home?  What treasures do you search for at thrift stores and garage sales?

Trash To Treasure: Upcycled Light To Vase

Sometimes the most unlikely objects can turn from trash to treasure.

Trash to Treasure: Upcycled Light to Vase created by @Jenna_Burger, sasinteriors.net

As we’ve been changing the light fixtures throughout our home over the last 3 years (I’m pretty sure every. single. one. has now been updated), most went straight to the curb.  A few weekends ago when the last old, brassy light came down in the upstairs hallway, it was half way to the trash, until I had a thought…

Could I upcycle it into something else?  But what?? A cloak?  Another light?  A vase?  Should I spray paint it or leave it brass?  Lots of thoughts were brewing.

Of course, I forgot to take a pick of the light in it’s old home, but here’s what it looked like right after taken down from the ceiling.

Dust and all…

Trash to Treasure: Upcycled Light to Vase created by @Jenna_Burger, sasinteriors.net

After giving it a good scrubbing, I decided to leave the brassy finish (I liked the warm hue) and use it as an accessory to hold a vase.  A vase within a vase.  Yes!  Perfect!

I removed the base (which I was going to you as a candle stick, but it all fell apart), as well as the wires.

Trash to Treasure: Upcycled Light to Vase created by @Jenna_Burger, sasinteriors.net

And then within minutes it went from ugly to this treasure…

Trash to Treasure: Upcycled Light to Vase created by @Jenna_Burger, sasinteriors.net

O, you know how I love to spend $0 and shop my home!

Trash to Treasure: Upcycled Light to Vase created by @Jenna_Burger, sasinteriors.net

Trash to Treasure: Upcycled Light to Vase created by @Jenna_Burger, sasinteriors.net

Trash to Treasure: Upcycled Light to Vase created by @Jenna_Burger, sasinteriors.net

I’m in love! Such a silly thing made into something spectacular.  For now it sits on the coffee table, but I’ve got other ideas for my new found treasure.  We’ll see where my thoughts and ideas take me…

What items have you upcycled in your home?  How have you made treasure out of trash?

I link my projects to some of these parties: Skip to My Lou, Dittle Dattle, Between Naps on the Porch, Today’s Creative Blog, Stories of A to Z, All Things Heart & Home, House of Hepworths, Finding Fabulous, The Shabby Nest, Serenity Now, Tatertots and Jello, Thrifty Decor Chick, Tip Junkie


How-To Make a Chalkboard Wall

Chalkboard walls are not just for kids.  They are super fun & functional for everyone, at any age.  While the kids are busy creating new drawings, us moms are making lists so nothing’s forgotten at the store.  The need for a chalkboard wall in a home can also change and evolve as your family changes and grows.

Another plus about chalkboard walls is that with the use of chalkboard paint, they are super easy to create.  For less than $10 and a few spare hours, a new wall can be created anywhere in your home (or office)!

Inexpensive & Easy-To-Create "Framed" Chalkboard Wall using @frogtape by @Jenna_Burger, SASinteriors.net

Earlier this week, I shared my revamped CCC {Central Command Center}.  This 30″ wide spot in our home has had about 6 (or maybe more) makeovers, but it’s an intracle spot that keeps our family on track day-to-day.

For this new CCC, I decided to add a chalkboard backdrop.  To create this fun, yet important part of the wall, I used chalkboard paint.

chalkboard paint

This lil’ old can has been around for almost 2 years and has been used on a ton of projects.  The largest before this project was the chalkboard wall we created in the basement for the kids a couple of years back.  Anyway, this can has lasted a long time!

Before starting the chalkboard wall, I decided I wanted to create a “frame” surround.  There really is no “frame” on the wall, but by leaving 3″ of the yellow wall color, a “frame” surround was created.

Inexpensive & Easy-To-Create "Framed" Chalkboard Wall using @frogtape by @Jenna_Burger, SASinteriors.net

To create the frame, I applied two layers (two rows of tape side-by-side) of FrogTape.  This was my first time using FrogTape and I’m in love!  It was great.  Y’all know what a pain of a time I had when I painted the mouldings white, well this stuff would have come in handy.  Basically this tape has a sealer that when applied to the wall it doesn’t let paint seep underneath.  I had a few spots that the paint went under, but for the most part, it was great!

Inexpensive & Easy-To-Create "Framed" Chalkboard Wall using @frogtape by @Jenna_Burger, SASinteriors.netI wasn’t provided product from FrogTape.  I bought it myself because I’ve been wanting to try it out for a long time.  It gets my seal of approval!

Inexpensive & Easy-To-Create "Framed" Chalkboard Wall using @frogtape by @Jenna_Burger, SASinteriors.net

Once I applied the FrogTape and “burnished” it (pressed down really hard at the edges), I was able to start painting.

Inexpensive & Easy-To-Create "Framed" Chalkboard Wall using @frogtape by @Jenna_Burger, SASinteriors.net

I applied 3-4 coats of the chalkboard paint so the surface was fully covered and no wall color from underneath came through.

Once I knew no more coats were needed, I removed the paint.  If the paint is still wet, that’s okay.  As you peel away the tape, you’ll see your crisp, clean line! What a beauty.

Inexpensive & Easy-To-Create "Framed" Chalkboard Wall using @frogtape by @Jenna_Burger, SASinteriors.net

And then you’re ready to stand back and admire!

Inexpensive & Easy-To-Create "Framed" Chalkboard Wall using @frogtape by @Jenna_Burger, SASinteriors.net

Once your chalkboard wall is complete, the fun of either drawing or layering can begin! Since this is more of a functional spot than a fun spot, I created a Family Central Command Center.  This is how it resulted…  And you can learn more about it {here}.

Central Command Center_11a

Have you ever used chalkboard paint before? If so, what have you created?

Want to see more of my chalkboard projects (using this one can of paint)?
New Years Sparkly Tablescape with Chalkboard Candles
Kids Play Kitchen
Framed Chalkboard Medicine Cabinet
Chalkboard Platter

New Years Sparkly Tablescape + Lowes Giveaway #LowesCreator

Lowes CreatorI hope you had a wonderful and joyous Christmas!  Ours was filled with plenty of smiles, laughs, and hugs.  The kids were thrilled with their gifts from Santa and they have been quite occupied (which makes mama happy treasuring the quiet moments).  We’re off to see more family this coming weekend, but in the meantime, I have something fun to share…

In the midst of all the Holiday Hoopla, Lowe’s sent me on another challenge this month to scour their aisles and create SOMETHING SPARKLY for New Years. This one surely threw me for a loop (especially since I don’t usually decorate for New Years), but I arose to the challenge and feel that I hit this one out of the ballpark!

Thus the creation of my New Years 2013 Sparkly Tablescape

New Years Sparkly Tablescape Centerpiece by @Jenna_Burger, sasinteriors.net #LowesCreator #LowesCreativeIdeas #NewYears #Decorating #Tablescape

An idea struck when I was in the plumbing aisle looking at PVC pipe.  Isn’t that where all your ideas start too??

Scouring the aisles of Lowes

In knowing that I had a bunch of crystal candlesticks (which are missing mates and are all random sizes and heights) in the china cabinet, I thought that would be a good place to start to bring in the glitz, glitter, and sparkly!  And then I would add PVC pipe into the mix.

Ok, but seriously…  I had the thought to cut the PVC pipe, paint them with chalkboard paint, and add the numbers 2-0-1-3. So I was off and shopping for my materials.

I ended up buying:

  • (1) 2′ long PVC pipe
  • (4) PVC caps (which I think were around 25 cents each)
  • chalkboard paint
  • nuts (for napkin rings – keep on reading)

Once home, I started off by cutting the PVC pipe with a miter box so I had 4 pieces that were 4″ high each.

15New Years Sparkly Tablescape Centerpiece by @Jenna_Burger, sasinteriors.net #LowesCreator #LowesCreativeIdeas #NewYears #Decorating #Tablescape

New Years Sparkly Tablescape Centerpiece by @Jenna_Burger, sasinteriors.net #LowesCreator #LowesCreativeIdeas #NewYears #Decorating #Tablescape

It was bitter in the garage, so the Mister and I cut them indoors. I’ll tell you, it was a mess – beware! After cutting the PVC to the needed size, I handsanded the edges to get rid of the plastic shavings and to make them somewhat smooth.

New Years Sparkly Tablescape Centerpiece by @Jenna_Burger, sasinteriors.net #LowesCreator #LowesCreativeIdeas #NewYears #Decorating #Tablescape

I added the PVC cap on one end which would be the part that sits on top of the candlestick.

New Years Sparkly Tablescape Centerpiece by @Jenna_Burger, sasinteriors.net #LowesCreator #LowesCreativeIdeas #NewYears #Decorating #Tablescape

Then using Rustoleum chalkboard paint, I painted the exterior, interior, and the edges.

Then using Rustoleum chalkboard paint, painted the exterior, interior, and the edges.

Lastly, with white chalk, I freehanded the number 2-0-1-3 on each PVC cylinder.

New Years Sparkly Tablescape Centerpiece by @Jenna_Burger, sasinteriors.net #LowesCreator #LowesCreativeIdeas #NewYears #Decorating #Tablescape

Believe me, up close it isn’t perfect, but it’s unique and cute!

Once the Chalkboard PVC holders were done, I was ready to decorate my tablescape. To start, I shopped my home. I gathered anything silver and sparkly.  I grabbed ornaments from the Christmas tree, the new sparkly Christmas cones from the mantel, a clock (so apropos for New Years), along with white ribbon in different sizes and many of my crystal candles.

After that it was ready to start playing.  After a few moves and some edits, the centerpiece was complete.

New Years Sparkly Tablescape Centerpiece by @Jenna_Burger, sasinteriors.net #LowesCreator #LowesCreativeIdeas #NewYears #Decorating #Tablescape

New Years Sparkly Tablescape Centerpiece by @Jenna_Burger, sasinteriors.net #LowesCreator #LowesCreativeIdeas #NewYears #Decorating #Tablescape

As the moveable base for the centerpiece, I used the pallet wooden box that I recently created for my Christmas setting.  It’s nice because it holds everything in place and can easily move so the table can actually be used for meals. Beauty + Function!

New Years Sparkly Tablescape Centerpiece by @Jenna_Burger, sasinteriors.net #LowesCreator #LowesCreativeIdeas #NewYears #Decorating #Tablescape

Under the wood box is a pretty white scarf that I’ve had for years (and don’t ever wear).  When I was hunting around my home, I thought it would be the perfect addition to bring in some sparkle.

New Years Sparkly Tablescape Centerpiece by @Jenna_Burger, sasinteriors.net #LowesCreator #LowesCreativeIdeas #NewYears #Decorating #Tablescape

New Years Sparkly Tablescape Centerpiece by @Jenna_Burger, sasinteriors.net #LowesCreator #LowesCreativeIdeas #NewYears #Decorating #Tablescape

And of course we couldn’t have a New Years table without some bubbly…

New Years Sparkly Tablescape Centerpiece by @Jenna_Burger, sasinteriors.net #LowesCreator #LowesCreativeIdeas #NewYears #Decorating #Tablescape

For each seat setting, I added a silver charger with our china plates on top (a simple white plate with silver edging). For the napkin, I added a linen cloth and tied it with a piece of jute and added a few nuts for fun. I was going to create an entire napkin ring with nuts, but didn’t have time, but it could be an idea for a future project.

New Years Sparkly Tablescape Centerpiece by @Jenna_Burger, sasinteriors.net #LowesCreator #LowesCreativeIdeas #NewYears #Decorating #Tablescape

New Years Sparkly Tablescape Centerpiece by @Jenna_Burger, sasinteriors.net #LowesCreator #LowesCreativeIdeas #NewYears #Decorating #Tablescape

And one last look at my fun, whimsical, and sparkly New Years Tablescape.

New Years Sparkly Tablescape Centerpiece by @Jenna_Burger, sasinteriors.net #LowesCreator #LowesCreativeIdeas #NewYears #Decorating #TablescapeIs it pin-worthy?

After wracking my brain for a bit on the ideal project for New Years, I’m thrilled with the outcome of my sparkly creation.  It wasn’t easy, but I feel when I’m put to the challenge, something great always results!

Cheers to a happy, healthy, joyous, prosperous, and amazing 2013!

Onto the giveaway, which is HUGE!

Now’s your chance to tackle a new project in your home in 2013.  Lowe’s is generously giving one winner a $75 Gift Card to their store – how cool?!

a Rafflecopter giveaway

Disclosure: I am part of the Lowe’s Creative Team and was provided with a Lowe’s gift card to purchase items for my project.  I was also compensated for my time to use the products.  No one told me what to create, what to buy, how to use the product, or what to write.  All opinions are 100% mine!

I link my projects to some of these parties: Skip to My Lou, Dittle Dattle, Between Naps on the Porch, Today’s Creative Blog, Stories of A to Z, All Things Heart & Home, House of Hepworths, Finding Fabulous, The Shabby Nest, Serenity Now, Tatertots and Jello, Thrifty Decor Chick, Tip Junkie

5 Creative Ways to Wrap with Craft Paper

Wrapping gifts makes me happy!

With a yummy glass of wine in hand, I wrapped quite a few last evening. It brings me joy to give to others.

Until this year, I used the typical fun and festive paper that you see in the holiday aisles at most big-box stores.  Papers come in a variety of colors, lengths, and themes,  but there is something impersonal about it.  Just like a front door to a home, the packaging on a present sets the tone for what’s the come.  Wrapping doesn’t have to be expensive, but creative is key.  Earlier this week, I shared 15 unique ways to wrap holiday gifts and today I’m sharing how the gifts I will be giving this year will be wrapped.

5 Creative ways to wrap holiday gifts using craft paper by @Jenna_Burger via sasinteriors.net

From the graphic and title of this post you can pretty much figure out what I used for wrapping gifts this year, but if not, it’s… Craft Paper.

I love it!  Why? It’s inexpensive, you’ll never run out, it can be used and customized for any occasion, it’s multi-functional, and is super thick/heavy (like high-end pricey papers at $6/$8 a roll).

And let me say it again… you’ll never run out (well eventually you will but not for at least 5 or 10 years)! I purchased a 500′ roll of brown craft paper for $8 at Lowes.  Pretty awesome, right?!

Let’s dig right in to see how my presents will be wrapped for Christmas 2012…

After wrapping my presents in the brown craft paper, I got started with the embellishments a.k.a. the fun part!

Craft Paper Idea #1

Materials

  • Yarn
  • Paint Chip samples or other gift tags

As a DIYer and crafter, paint chip samples seemed unique and so appropriate to add to a gift that came from me. I picked a few up that seemed Christmas-like in a range of red and green hues.

5 Creative ways to wrap holiday gifts using craft paper by @Jenna_Burger via sasinteriors.net

You really can do so much with paint chip samples!  After I wrapped my present in brown craft paper, I then wrapped two layers of red yarn around and finished it off with a long green paint chip sample.  I added the words DAD on it with individual letter stamps that I got at AC Moore for $1.  Super cheap and so pretty!

5 Creative ways to wrap holiday gifts using craft paper by @Jenna_Burger via sasinteriors.net

And the result…

5 Creative ways to wrap holiday gifts using craft paper by @Jenna_Burger via sasinteriors.net

Craft Paper Idea #2

Materials

  • Jute
  • Leftover (non-used) small ornaments
  • Paint Chip samples
  • Letter Stamps

5 Creative ways to wrap holiday gifts using craft paper by @Jenna_Burger via sasinteriors.net

Again super easy to make and some of the supplies are a repeat from the last gift idea.  Instead of using the yarn this time, I decided on jute, which again is very inexpensive. I got this roll at Walmart for $3 and have used it for many things around the house.

After wrapping and adding the embellishments, here’s the result…

5 Creative ways to wrap holiday gifts using craft paper by @Jenna_Burger via sasinteriors.net

It was so simple to make!  I wrapped  a loooong strand of jute towards the end of the box (not centered) with an ornament and paint chip sample, and it was complete.  With the individual letter stamps, you can say anything and add as many words as you’d like.  The options are endless.  For this present I wrote Merry Christmas.

Craft Paper Idea #3

Materials

  • Jute
  • A simple tag
  • Any ornament

5 Creative ways to wrap holiday gifts using craft paper by @Jenna_Burger via sasinteriors.net

Using any ornament – I loved how these chocolate snowflakes sparkled – add it to a present for a creative embellishment.  I wrapped one layer of jute around the box, added a tag, and the simple snowflake ornament, and my present was complete.

This special one is for my mom…

5 Creative ways to wrap holiday gifts using craft paper by @Jenna_Burger via sasinteriors.net

Craft Paper Idea #4

Materials

  • Yarn – I chose red
  • Small Ornaments

5 Creative ways to wrap holiday gifts using craft paper by @Jenna_Burger via sasinteriors.net

A minute later, the result…

5 Creative ways to wrap holiday gifts using craft paper by @Jenna_Burger via sasinteriors.net

For this present in particular, I simply wrapped a looong strand of red yarn around the box and finished it with two small ornaments.  So easy.

Craft Paper Idea #5

Materials

  • All of the above!

To create this last idea, I used it all…  Jute, yarn, an ornament, and a paint chip sample.

5 Creative ways to wrap holiday gifts using craft paper by @Jenna_Burger via sasinteriors.net

As you see, each present has similar materials, but is put together differently each time to truly make a one-of-a-kind gift.  How special?  And what recipient wouldn’t appreciate the time you took to think outside of the box?!

5 Creative ways to wrap holiday gifts using craft paper by @Jenna_Burger via sasinteriors.net

5 Creative ways to wrap holiday gifts using craft paper by @Jenna_Burger via sasinteriors.net

Pretty, simple, and O so fun and unique to create!

If you’re looking for even more ideas on how to wrap, then you’ll have to check out my Wrapping Round-Up of 15 Unique Ideas to Wrap Holiday Gifts.Creative ways to wrap holiday gifts using craft paper by @Jenna_Burger via sasinteriors.net

How do you usually wrap your Holiday gifts?

JOYful Christmas Mantel

The hustle and bustle of the Holidays are in full swing, but I was able to step back from the craziness of it all this past weekend to revamp my mantel and deck it out for Christmas.

As a Blogger, I feel so lucky to have a platform to share my new creations.  When the time comes to create a new mantel composition, I push myself to always try something new and different, and raise the bar from the previous year.  Thus the result of my new JOYful Christmas Mantel…

Like with every mantel, I cleared off all the decor from my Fall mantel so I could see the space free and clear!  This always helps start the ball-rolling for my latest montage.  I’ll tell you, I don’t usually go into decorating my mantels (or many areas of my home) with a plan.  Once I see a blank slate, somehow it all starts coming together.

I will say though, I’ve had the idea to create this JOY sign for a while.  I thought it would look beautiful leaning against the new ebony stained wood board backdrop. Thankfully all came together and I’m so pleased with the result – I’ll be sharing a quick and easy tutorial on how I created the sign very soon.

Going for an asymmetrical look,  I added a gorgeous boxwood wreath next to the JOYful sign.  I scored this totally faux, but looks totally real, wreath at Lowe’s – I’m in love, I’m in love, I’m in love.  I love decorating with boxwood and cedar branches, and when I saw this, I grabbed it.  Well actually I thought about making it at first, but after figuring out the cost, this was a better deal.

In creating the mantel, I mixed in a few Christmas elements with a few non-Holiday pieces.  I couldn’t dare put away my fabulous white ginger jar that I enjoy looking at everyday, so of course there it is… (along with my easy-peasy presto-chango-with-spray-paint candle stick).  And I think they look great amongst everything else.

Some of the fun, festive decor that I added around it are the:  three sparkly mod Christmas trees, two brushed nickel Christmas stocking holders (which I got forever ago from Target), and one piece of birch log.

My burnt orange wall is a show-stopper in itself, but I always like to add a burst of color in another way.  With this mantel, I brought in a pop of yellow with a few sprigs of forsythia (totally wrong flower for the season, but I love the yellow with the red in the JOY sign).  In the same vase, I added some faux red berries.  Yellow + Red = Perfect Compliment!

The mantel is simple, elegant, and festive.  O, I truly wish you could see it in person!

The drop cloth and felt stockings are still a favorite of mine.  I made them last year and added metallic gold ornaments to give a little accent.

And here’s the overall space…

O, how I love thee!

Thanks for taking a tour of my Christmas Mantel 2012.  Similar to my recent tablescape creation, I mixed in items from around my home with dollar store deals and DIY projects.

Have you decorated your mantel for Christmas yet?  If so, please share the link below so I can visit. 

Looking for tips on how to decorate a mantel? {click here}

I link my projects to some of these parties: Skip to My Lou, Dittle Dattle, Between Naps on the Porch, Today’s Creative Blog, Stories of A to Z, All Things Heart & Home, House of Hepworths, Finding Fabulous, The Shabby Nest, Serenity Now, Tatertots and Jello, Thrifty Decor Chick, Tip Junkie