
Tag: Saratoga Springs New York

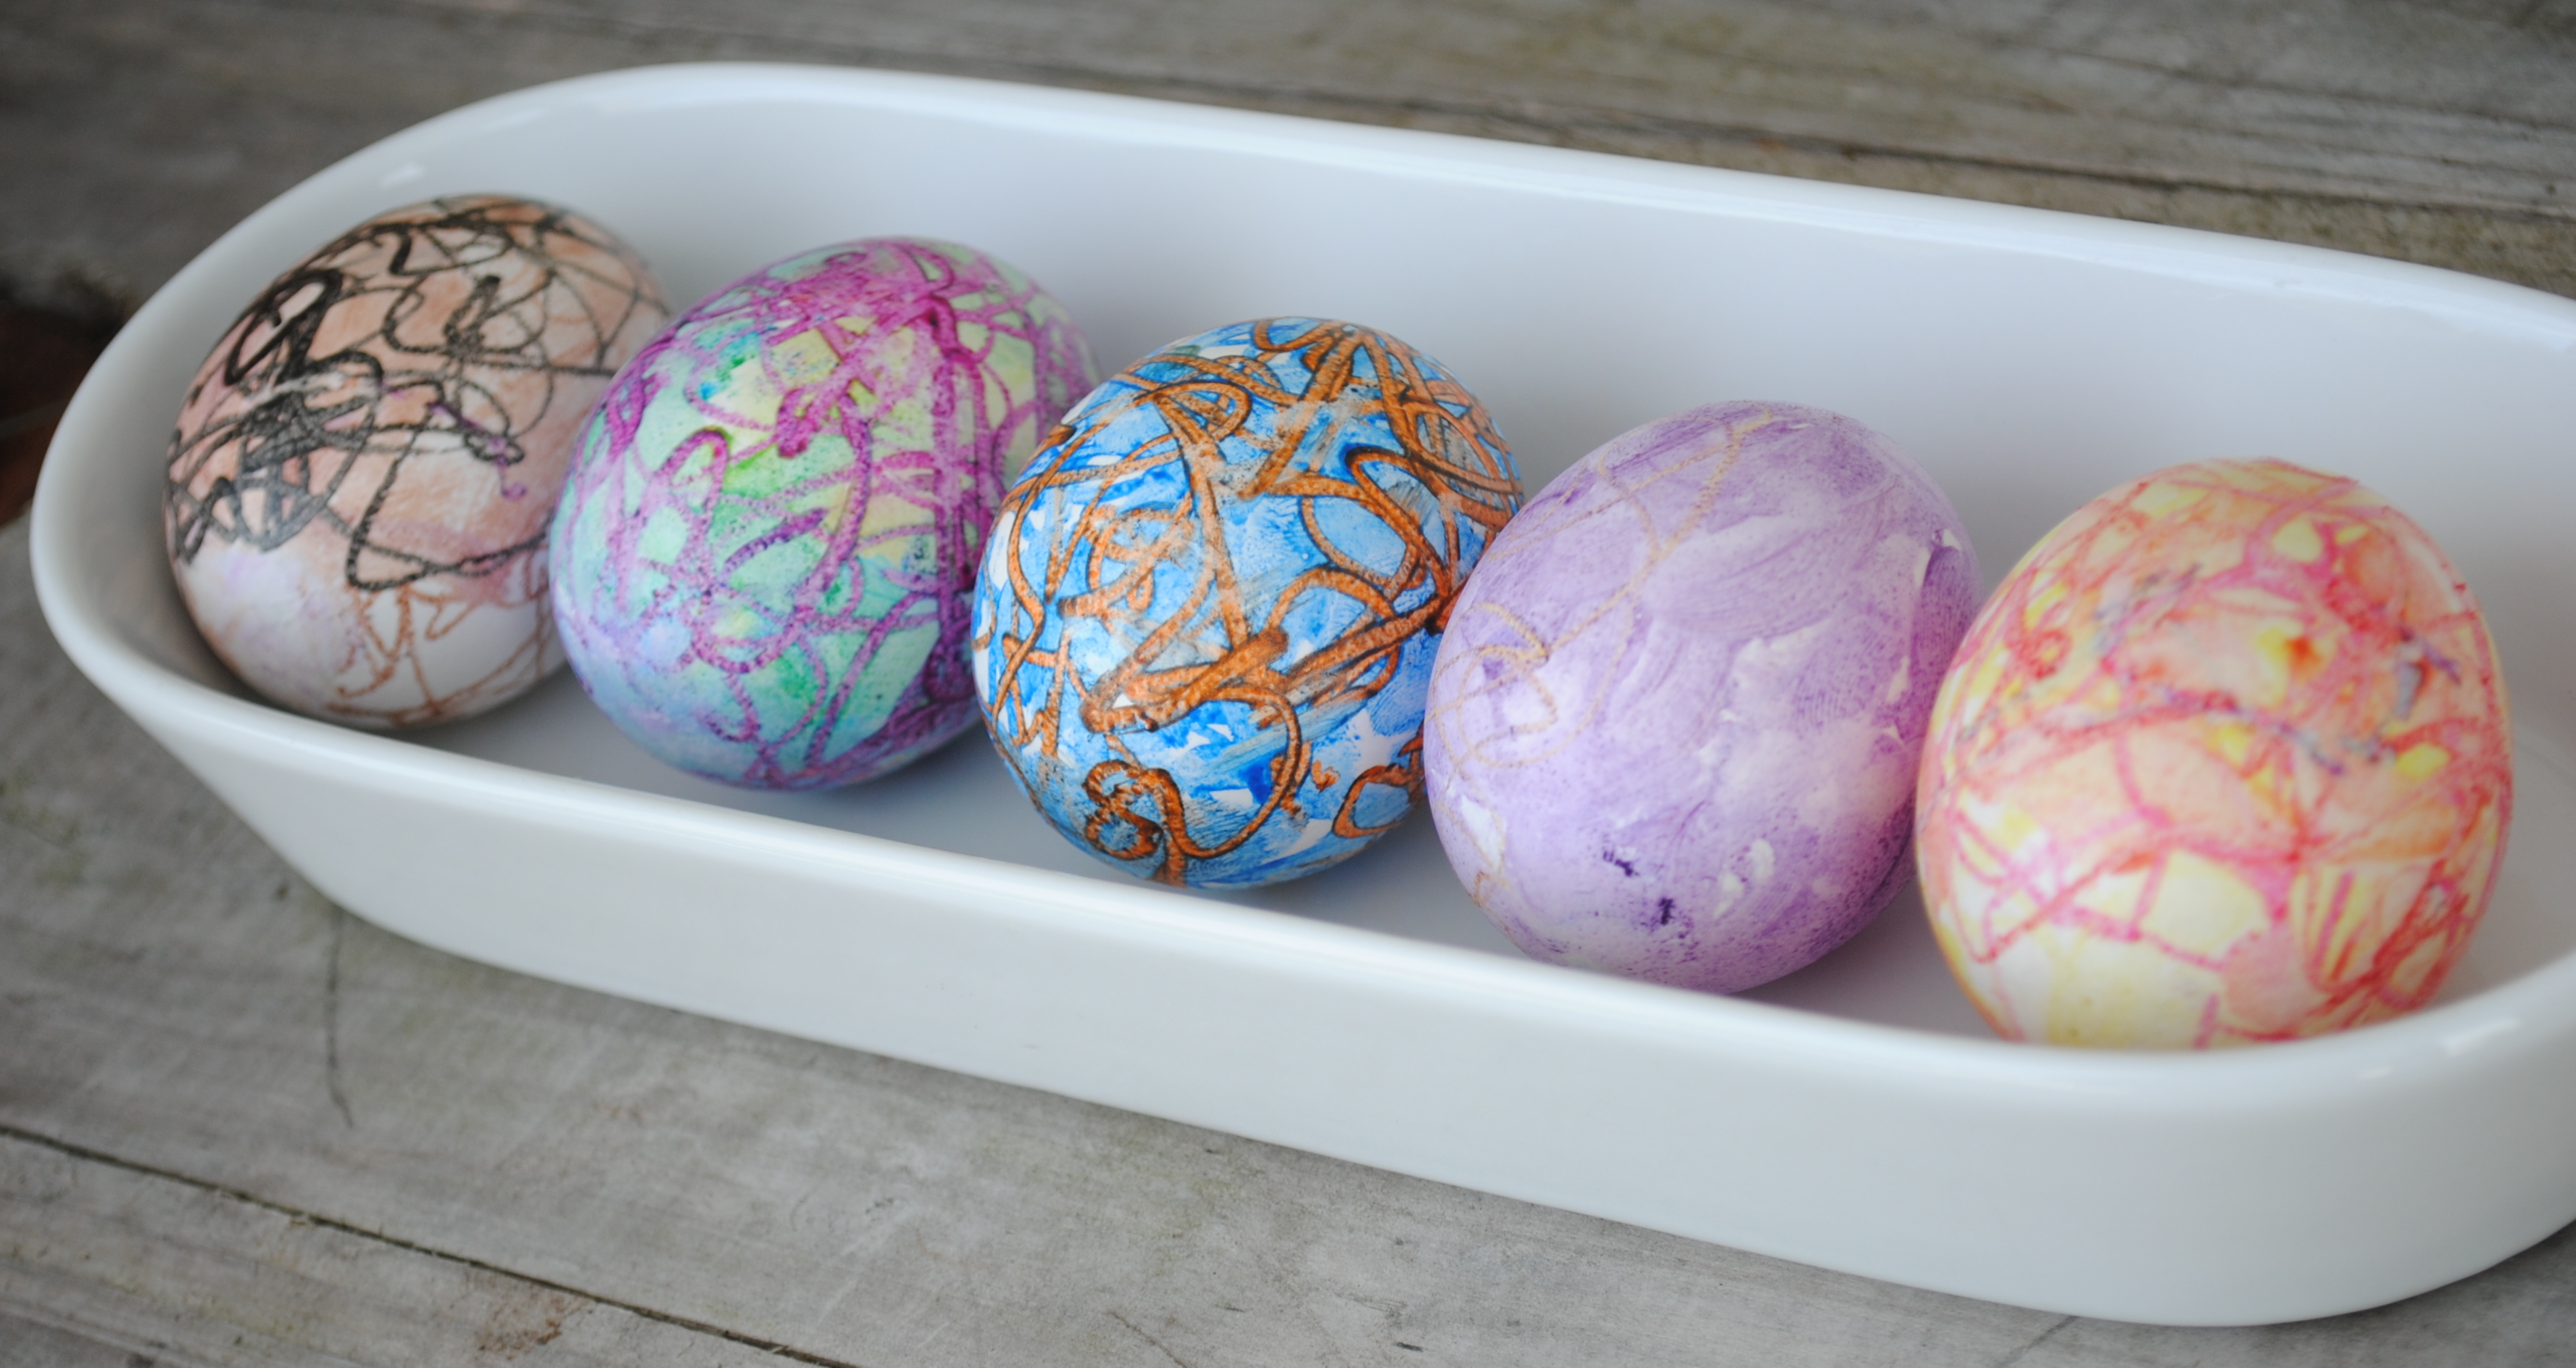
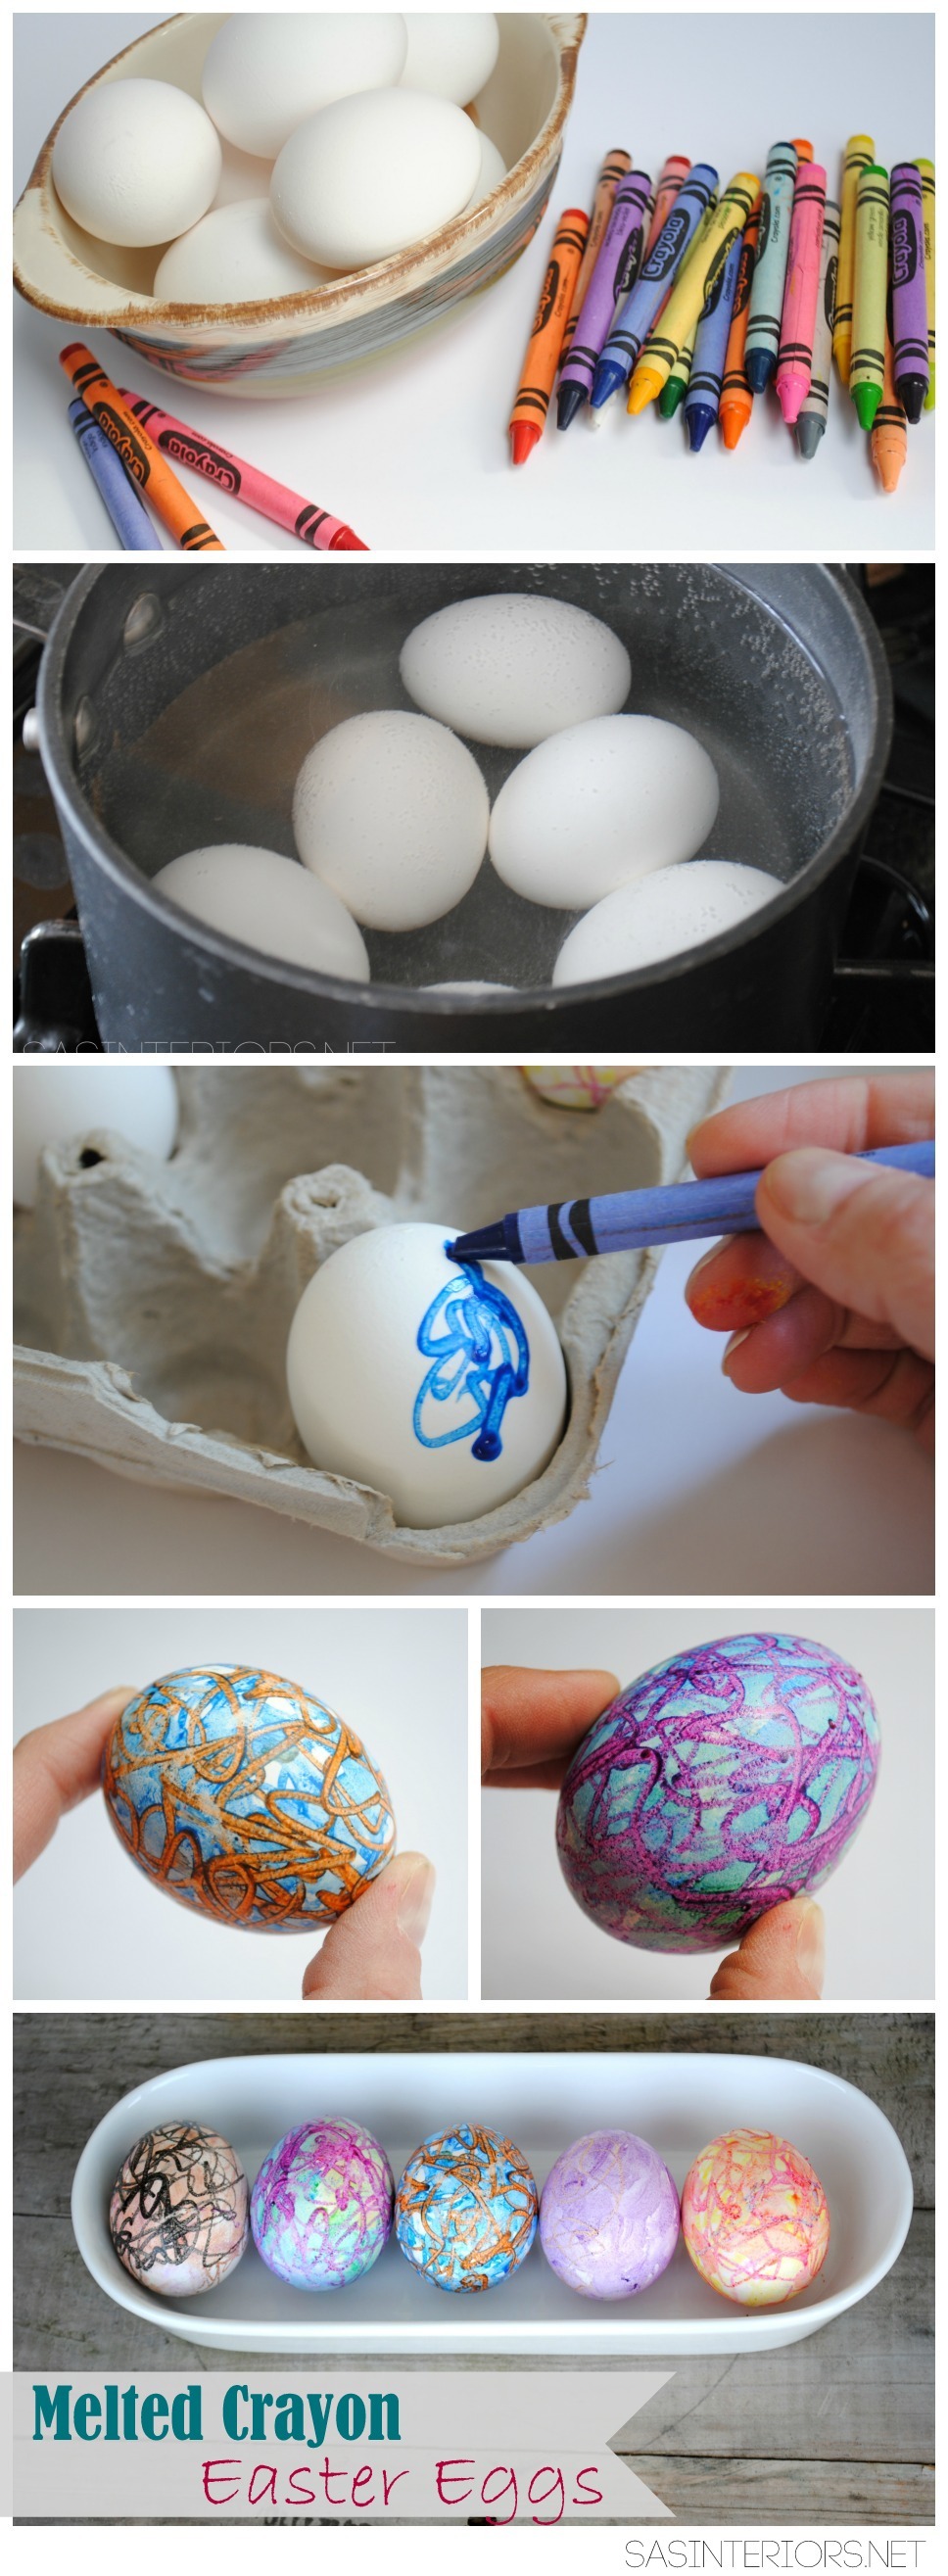
Groutable Luxury Vinyl Tile Floor {an Update}

In the 400+ posts I’ve shared over the years there are a select few that I receive questions about on a daily basis.  Which, by the way, I love!  Reader inquiries + questions make me so happy 🙂

One post, in particular, that many readers are interested in is my experience with groutable luxury vinyl tile flooring.

Post Update: Groutable Luxury Vinyl Tile, an amazing alternative to cermamic tile. How has it held up in 2 years? Reader Questions, ANSWERED! You will not believe how this flooring will change your life.

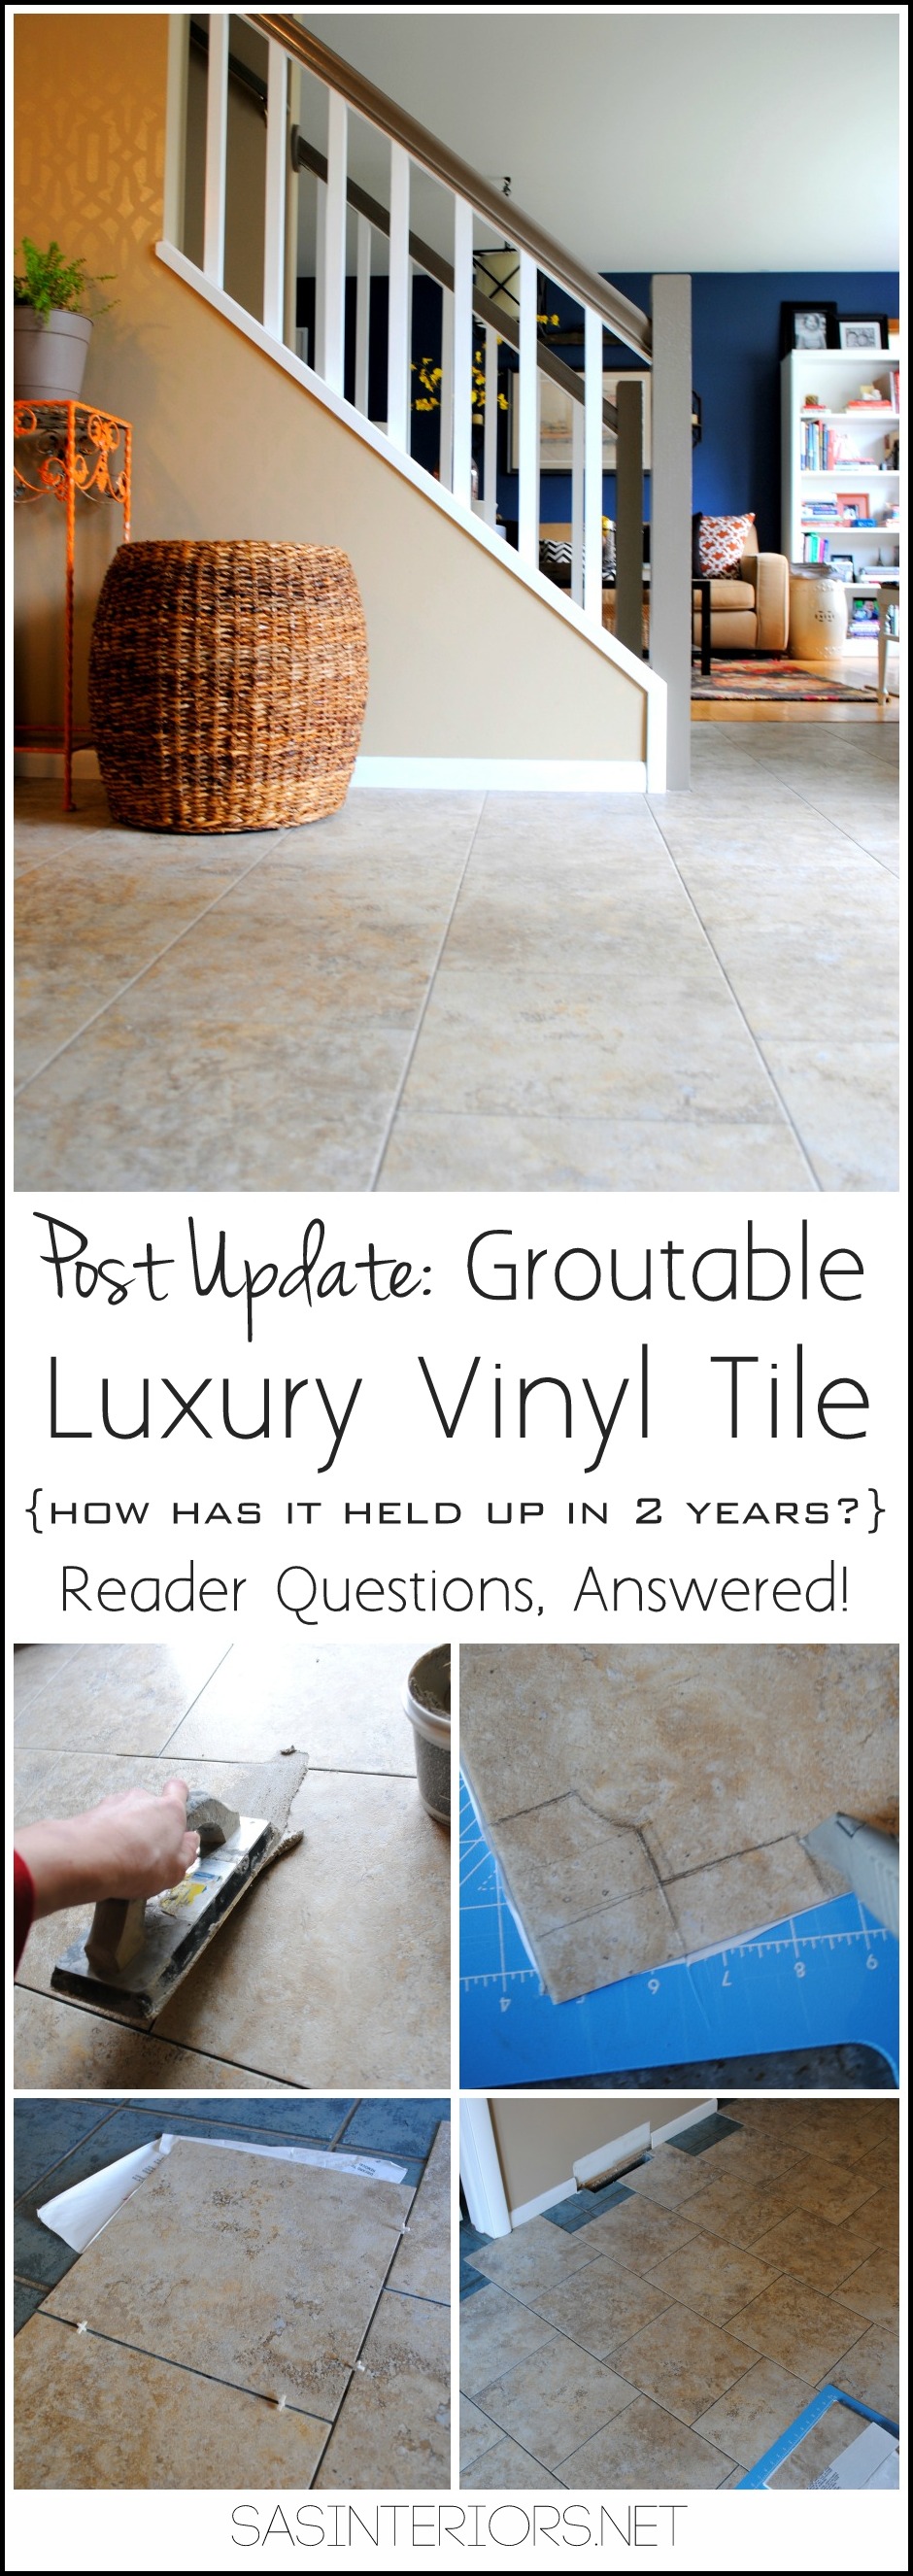
I’ve installed groutable LVT  in my parents floor + my foyer + my master bath + in the kids bath, so I can officially say I’ve had some experience with the product.

So the basic question I continually get asked is:  Has your vinyl tile held up + How is it today?

Here are just a few of the reader questions I’ve received:

From Rachele
> Hi!  I just came across you on pinterest about the groutable vinyl floor tiles I was curious how they hold up over time? I never knew you could do this so of course I’m thinking tomorrow we will go buy flooring and get busy! LOL but I wanted to ask over time how it held up? Thank you so much.

From Shirley
> I’m in the process of installing vinyl groutable tile in a kitchen and dining area. The area already have vinyl square tiles on the floor. My question is, do I need to install a sub-floor/wood boards before installing the vinyl tile ?

From Kamie
> Hello,  I came across your post about the installation of peel and stick vinyl tiles in January of 2012.  I found this same product today on my hunt for new flooring for my kitchen.  My question to you is, how has it held up so far?  Is it durable?  Are you still satisfied with the product?  You response and insight are greatly appreciated.

From Cathy
> I saw these vinyl tiles at Lowe ‘s and read the box, but it didn’t have a lot of details.  For example, we want to put these in our kitchen which has vinyl sheeting glued on concrete. Should we remove the old vinyl first or put these tiles directly ver the old vinyl.  I’m sure it will be extremely difficult to get the old stuff up.  Then there will be old glue to also get up. Another question I have is should you put  down additional glue besides the glue on the back of the tile?  If so, what kind?  These do appear to be easier than wood, cork, or porcelain tile.  We’ve used the old peel and stick before in other homes.  Thanks for your info.

From Carrie
> I am researching groutable tile and came across your blog. Now that it has been down for a year how is the grout holding up? We are thinking about putting this in our kitchen and keep going back and forth on whether or not we want to grout it. It seems like the people who put it over pre-existing ceramic tile or cement have the best results. Ours is just a lauan subfloor and we live in an old house (1870’s) so it is hard to have  perfectly level floor. Just wondering your thoughts of the durability. Right now in our renovation we are at the end of our budget so we wanted something we can do by ourselves but also looked good in the end. I am just terrified of having the grout crack and pull away. The tiles we are looking at are beveled so we could do it without grout, but that makes me worried that dirt and liquid could cause a problem.

From Joseph
> I came across your web page while looking for groutable vinyl tile and I was just curious how is it holding up 2 years later? Would you do it again.  Are there any cons to it that you have come across? Thanks

> Hello Jenna – I was so glad I found your great DIY on groutable vinyl floor tiles – this is exactly what I want to do for my kitchen floor. I will also be covering
smaller square ceramic tiles with larger vinyl tiles. My question is, did you have to put extra adhesive down in the lower grout lines of the ceramic floor to eliminate any “sunken” or dip lines in the finished vinyl tile floor?

From Janet
> Thank you for you thoughts. What you did for your parents foyer looks great and you have me very psyched to do this!!

And there are many more, but these are the general questions readers have asked & this post is dedicated to answering them all (or as much as I can…)

Post Update: Groutable Luxury Vinyl Tile, an amazing alternative to cermamic tile. How has it held up in 2 years? Reader Questions, ANSWERED! You will not believe how this flooring will change your life.

My Overall Thoughts on Groutable Luxury Vinyl Tile

I am very satisfied! Overall, all of the LVT floors I have installed have held up amazingly.  There has not been one issue with the flooring cracking, settling, sinking, etc.  With all the floors I have installed, I DID NOT remove the existing floor, but all the floors ‘before’ were ceramic and in good condition with no cracking.  In none of the spaces did I fill in the existing joints and none of the luxury vinyl floor tiles have “sunk” in those crevices.  LVT floor is thick and really not bendable as in typical vinyl tiles.  You can definitely tell the difference between the two and the cost reflects that.  LVT is more expensive than a typical vinyl tile, but it is absolutely worth the additional cost.  I still feel that using groutable luxury vinyl tile is a wonderful long-term solution for a floor.  The look is very similar to ceramic tile & the turn-around time and ease of installation is incredible.  A floor that can be done in one day (install + grout) with no prior experience is pretty great, don’t you think?!

Post Update: Groutable Luxury Vinyl Tile, an amazing alternative to cermamic tile. How has it held up in 2 years? Reader Questions, ANSWERED! You will not believe how this flooring will change your life.
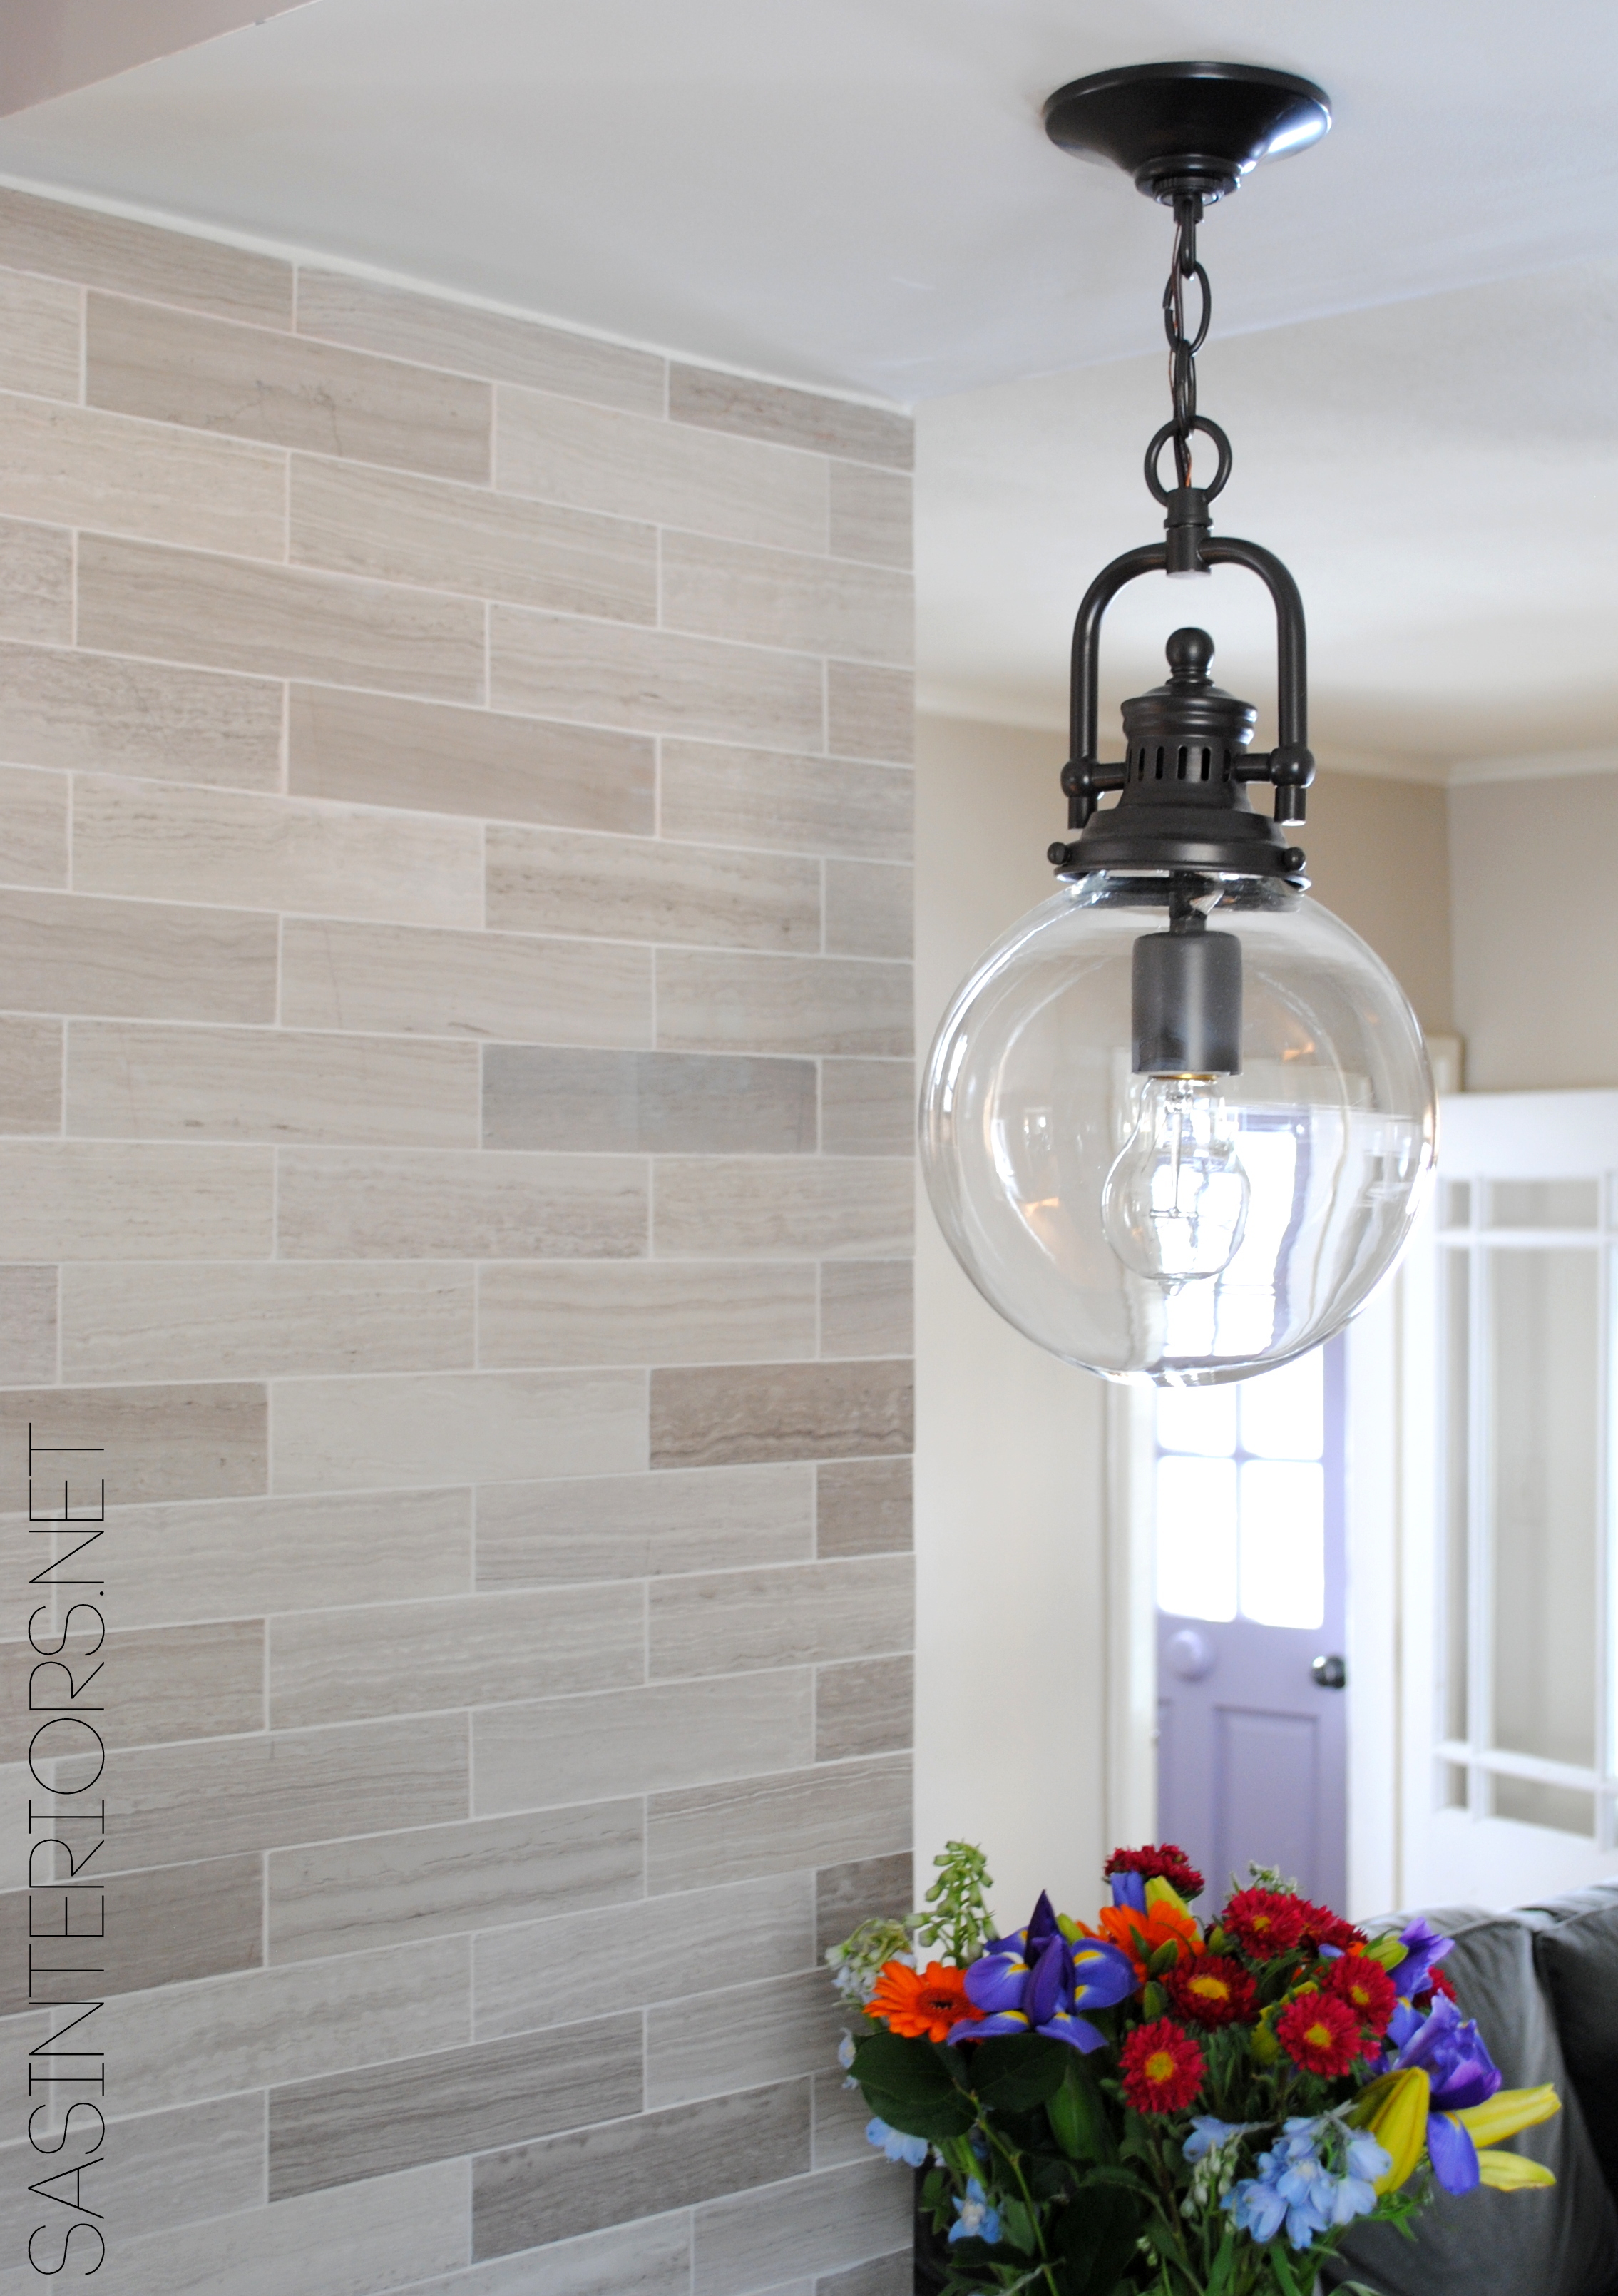
Luxury Vinyl Tile in the Master Bathroom

Now that I’ve shared my overall thoughts on LVT, here are answers to the Top TEN Questions that have been asked:

1. How has the tile held up over time?

Fabulous.  As I said in my overall thoughts, there has not been one issue in any of the spaces that I have installed the LVT.  With the use of grout, the tiles are very sturdy and there have been no issues with loosening of the glue or the tile shifting over time.  Once the grout hardens, the tile is fully adhered to the floor below.  When I remodeled the powder room and replaced the toilet, a few of the tiles had to be fixed because I had originally cut the tile around the base of the bowl.  The LVT and grout were installed so well to the floor below that it was actually difficult to lift the tiles. They eventually came up, but it took some muscle.

2. Do I need to install a sub-floor/wood boards before installing the vinyl tile?

This is a difficult question to answer because every floor, in every home is different and I’m sharing my experience and the installation process I took.  BUT, here is my thought… If the floor you are working with is in good condition – no cracks, lifting, etc – you should be okay to install the LVT directly on top.  So basically you are purely changing the floor because of how it looks versus because it is damaged.  If the floor you are covering has issues and/or is damaged, then it would be best to remove the floor, install / patch the existing subfloor, and then install the luxury vinyl tile.

3. Is it durable?

I think the product is very durable, especially with the use of grout.  All of the spaces (foyers + bathrooms) I have installed the LVT are high-traffic areas and the tile has been exposed to water, mud, wet shoes, and more. No where have I seen issues with lifting or general wear.

4. Why do you love LVT?

4 reasons…

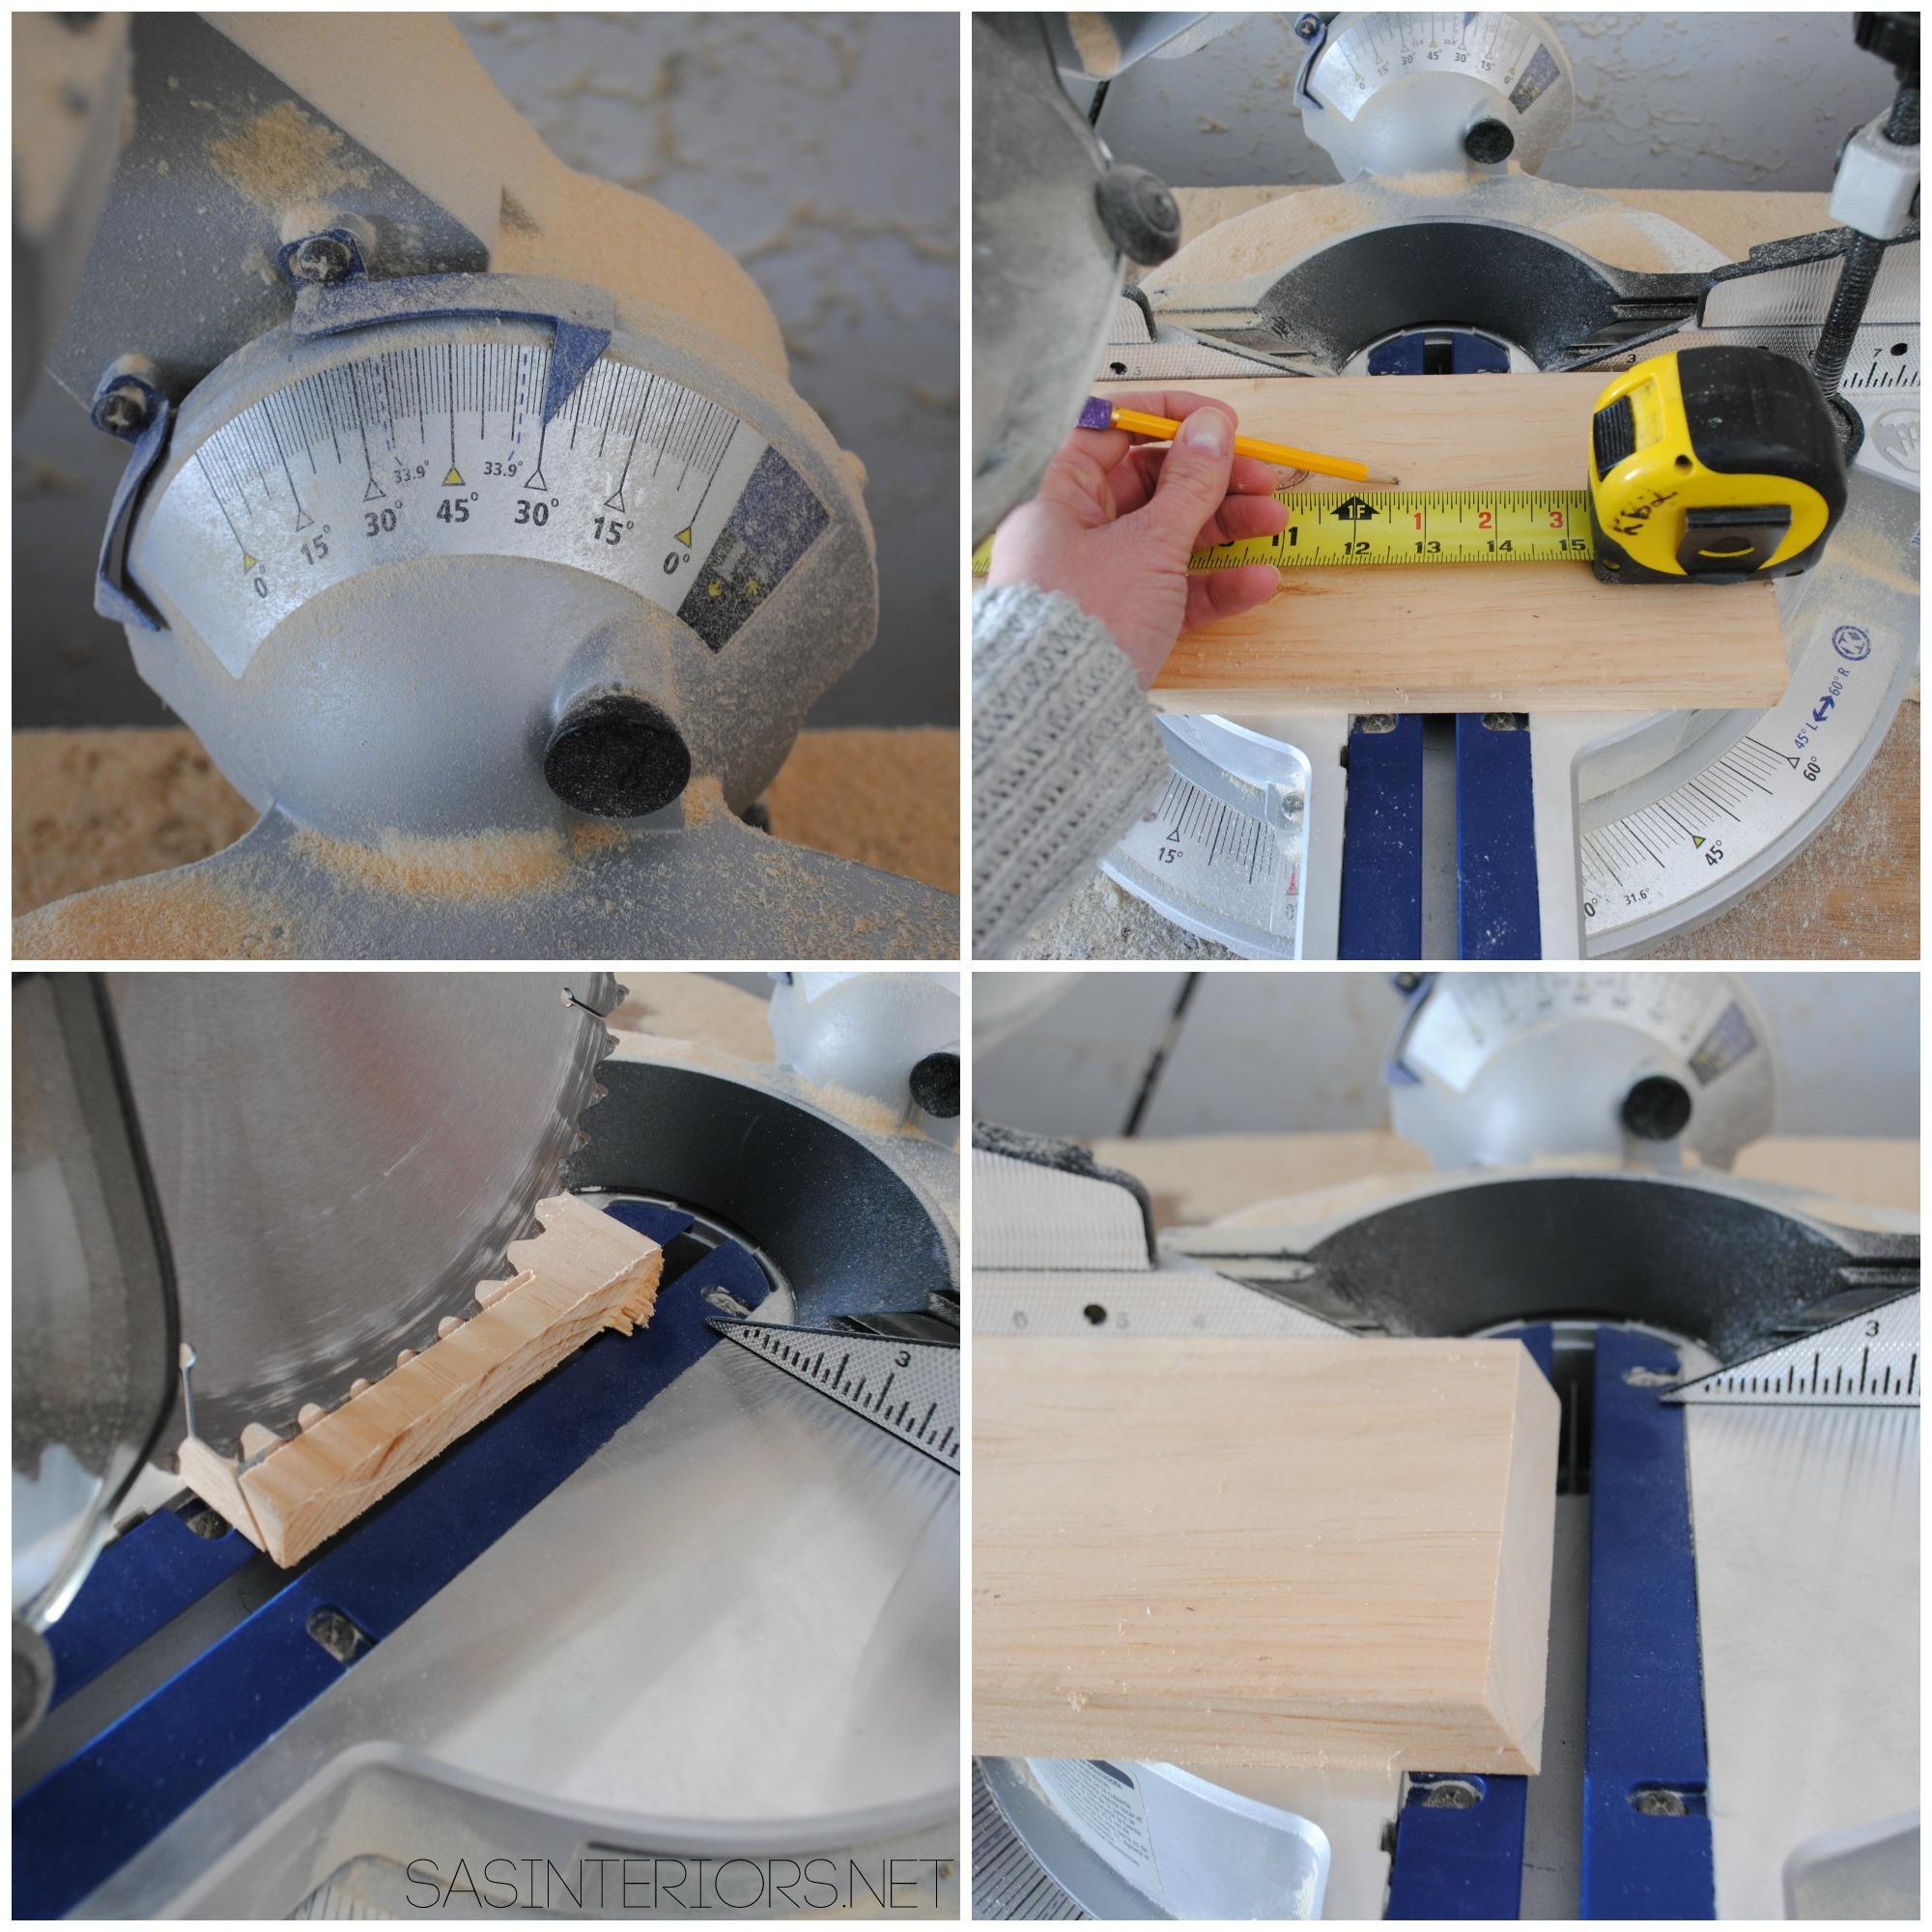
> The ease of install – it’s a one day job (depending on the size of the space of course). Yes, I have tiled before, but I do not feel that installing LVT was difficult at all.  I think a person with little experience can complete this project with ease.  Measuring and cutting is really the most difficult part of the project, so take your time and measure correctly!  Installing ceramic tile is not difficult, but it is tricky and experience is helpful.  Cutting ceramic tile can often be difficult and time consuming.  For prior ceramic tile projects, I’ve used tile snips, a tile cutter, and a wet saw.  A wet saw is the best for cutting ceramic tile, but it’s not easy – I’ve made alot of mistakes.  In my estimation, ceramic tile would take about double the time for installation compared to installing groutable vinyl tile.

> No prior experience installing a floor is needed.

> The cost is more than half of ceramic tile. A standard 40-50 sq. ft. space is fairly inexpensive.  The typical luxury vinyl tiles that I purchased from Lowe’s were $1.08 and the premixed grout cost $7.  The total cost of an entire project for this square footage would cost about $65.  Ceramic tile is available in a range of prices, but usually starts at $2 per sq. ft., so the savings right there is 50%.

> Luxury vinyl tile is flexible + forgiving.  I’ve installed ceramic tile before and within a few months it started cracking in some areas because the subfloor wasn’t level.  I’m not a professional and don’t have the budget to pay a professional, yet I wanted change.  LVT is a great solution because it provides the flexibility for a slightly uneven floor below.  YET, by adding the grout, the result is a sturdy, durable finished product.

5. Should you put  down additional glue besides the glue on the back of the tile?

I never used additional glue.  I felt the glue that was on the back of the tile was enough for it to adhere to the floor below.  The glue on the back of the tile is very sticky and once the paper backing was removed, I immediately laid it into place.  IF the tile isn’t used right away and over time the back is exposed to air, additional glue might be needed.  I can not recommend a glue to use since I have never used one.

6. The tiles we are looking at are beveled so we could do it without grout?  What are your thoughts?

I don’t prefer the look of a beveled LVT because to me it defeats the purpose of them looking like ceramic tile and that is the reason I like LVT.  If you use a beveled tile and don’t use grout, I do not think you will get the same result as I did.  The finished look won’t be the same and durability could be compromised because the addition of the grout really keeps the tiles in place.  I would suggest if you are spending the money and taking the time to install a vinyl floor, the luxury vinyl tile + the grout is your best option for a long-lasting result.

7. Did you have to put extra adhesive down in the lower grout lines of the ceramic floor to eliminate any “sunken” or dip lines in the finished vinyl tile floor?

I did not.  In my foyer I was going to add a skim coat before installing the LVT but decided against it.  The grout lines were very large and deep which is what I was worried about, but I decided to move forward with the LVT.  After 1.5 years, there have been no issues and no “sinking” / dip lines.  Again, this is my experience with the LVT and I feel that because it’s thicker than typical vinyl tile, it holds up extremely well.

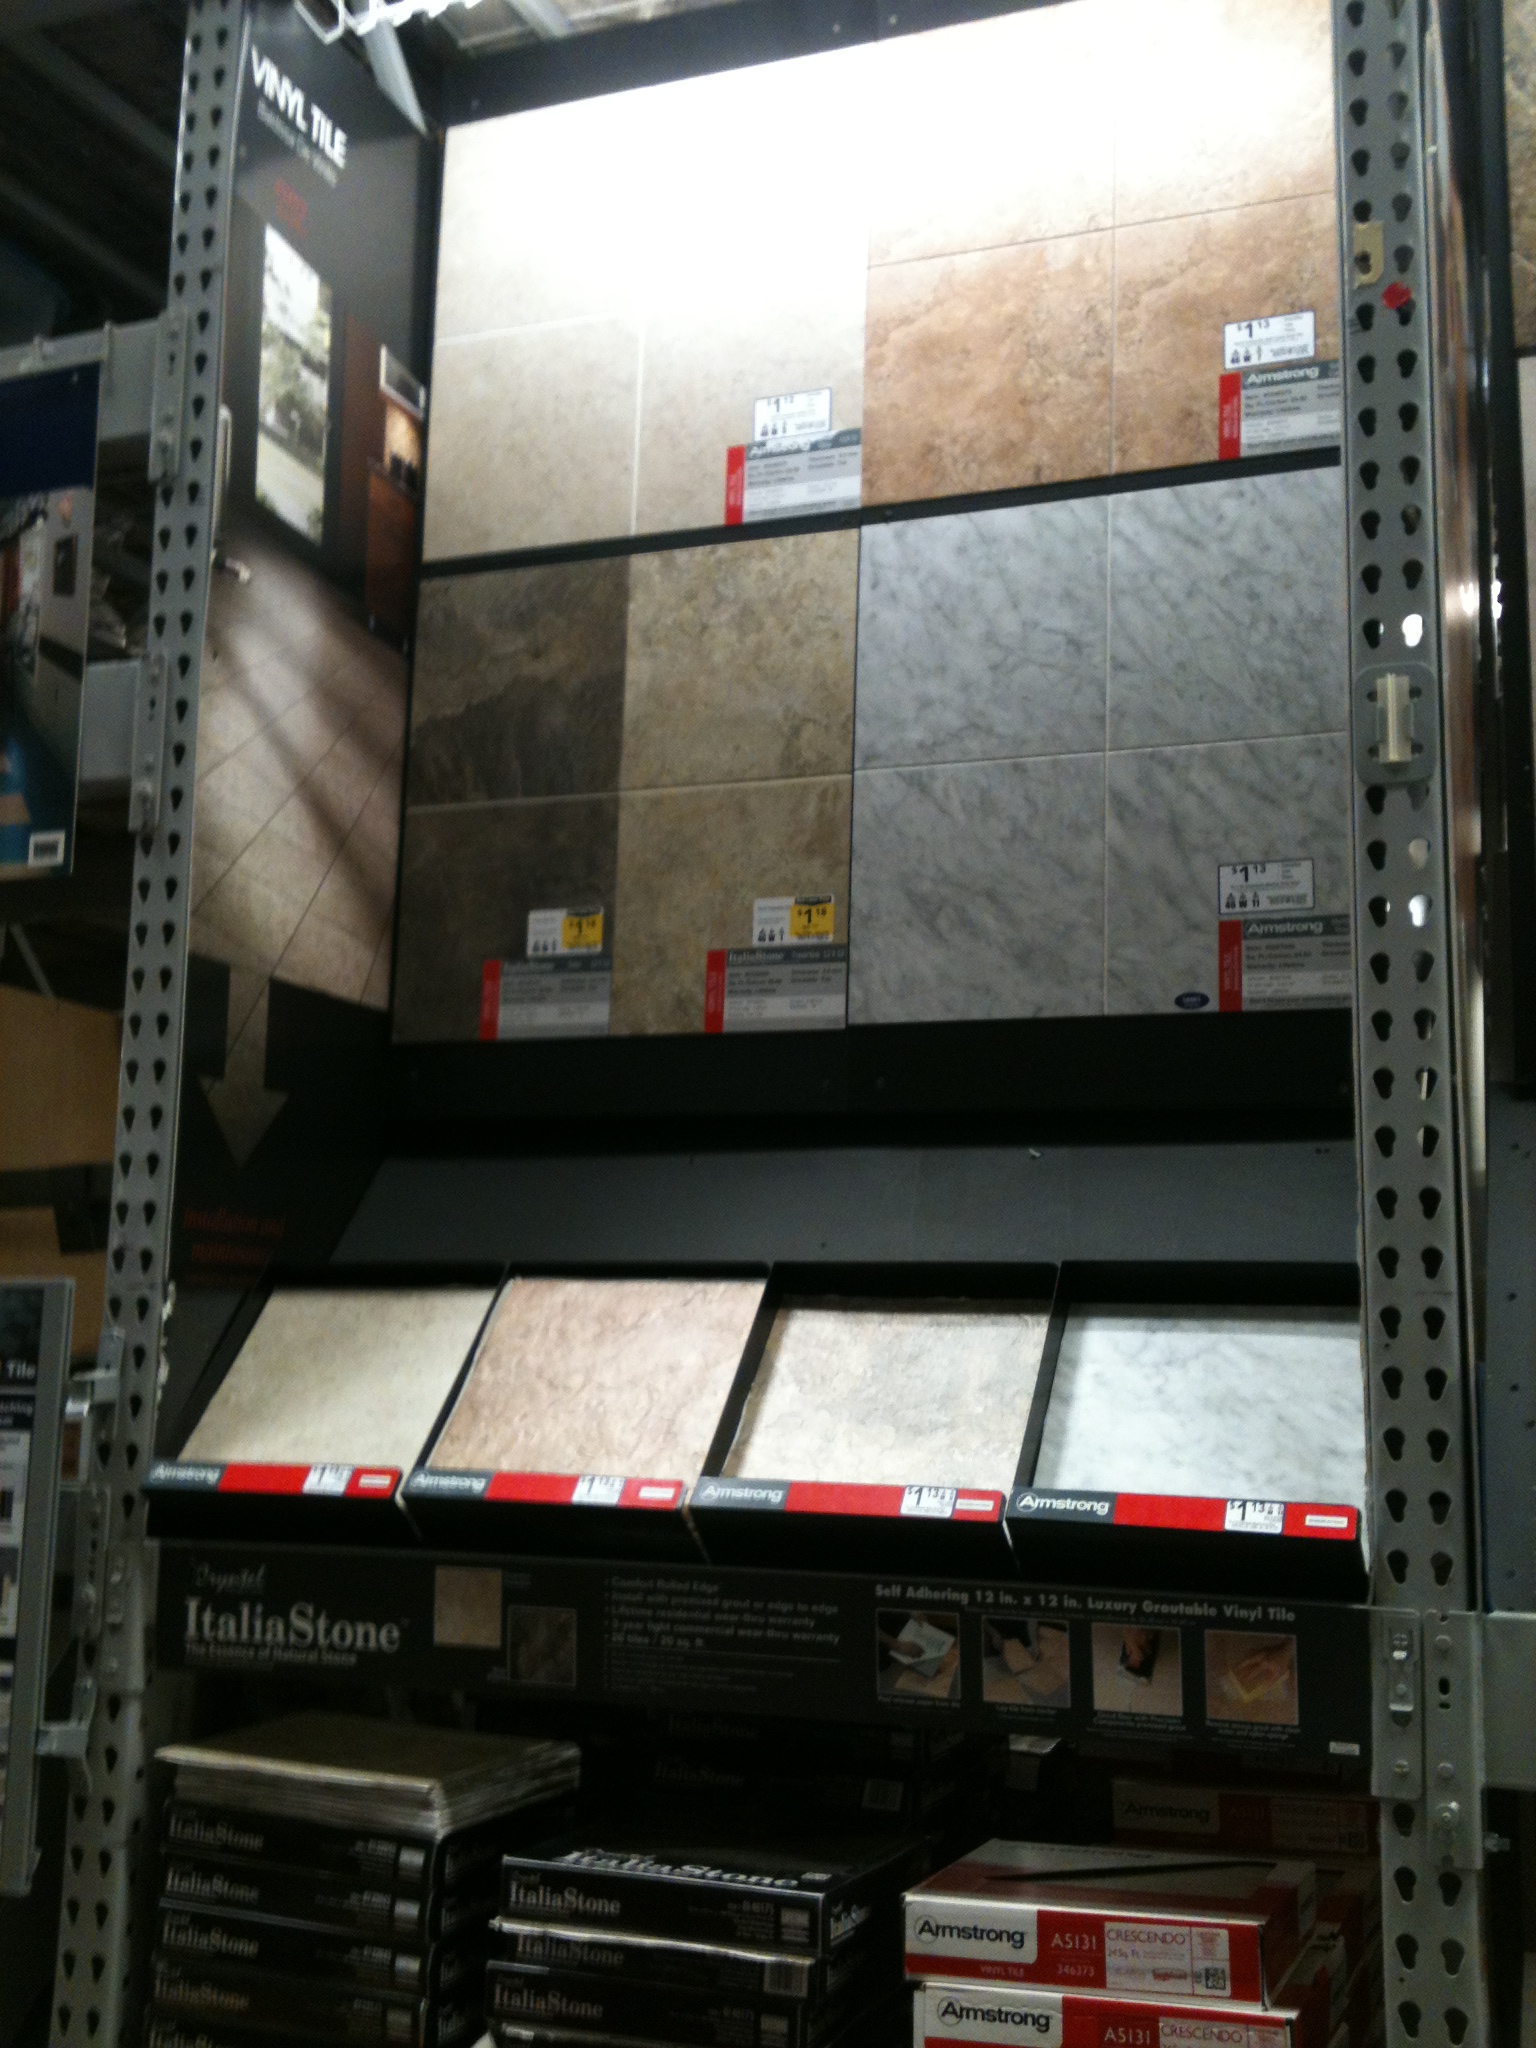
8. Where do I buy Luxury Vinyl Tile?

I purchased the luxury vinyl tile for my projects at Lowe’s.  There are a few companies that sell LVT and there is a special section with these specific tiles.  LVT is the general name, but don’t get them confused with other names like high-end or something else.  You will definitely know the different between LVT and regular vinyl tile – they feel much more durable.

Post Update: Groutable Luxury Vinyl Tile, an amazing alternative to cermamic tile. How has it held up in 2 years? Reader Questions, ANSWERED! You will not believe how this flooring will change your life.

9. How long do I have to wait to grout after the tile is installed?

0 minutes.  There is no “set time” with LVT as is with ceramic tile. As soon as your tiles are installed, you can immediately get to grouting!  How fab is that?!

10. Name 1 Con!

That’s a tough one…  I guess I would say, the one con is the color selection.  I have purchased groutable luxury vinyl tile at Lowe’s, but other home improvement stores also offer similar products.  The selection is not as vast as ceramic tile (which is a con), but I was surprised by the wide range of colors and textures.  When I was at the store making my purchase, I was told by a sales rep that any peel-and-stick vinyl tile is groutable, except for the styles that have the faux grout look around the edge.  I don’t know if this is true or not, but it’s what I was told.

Have more questions? Please Ask!

I’ve tried to cover it all.  How did I do??

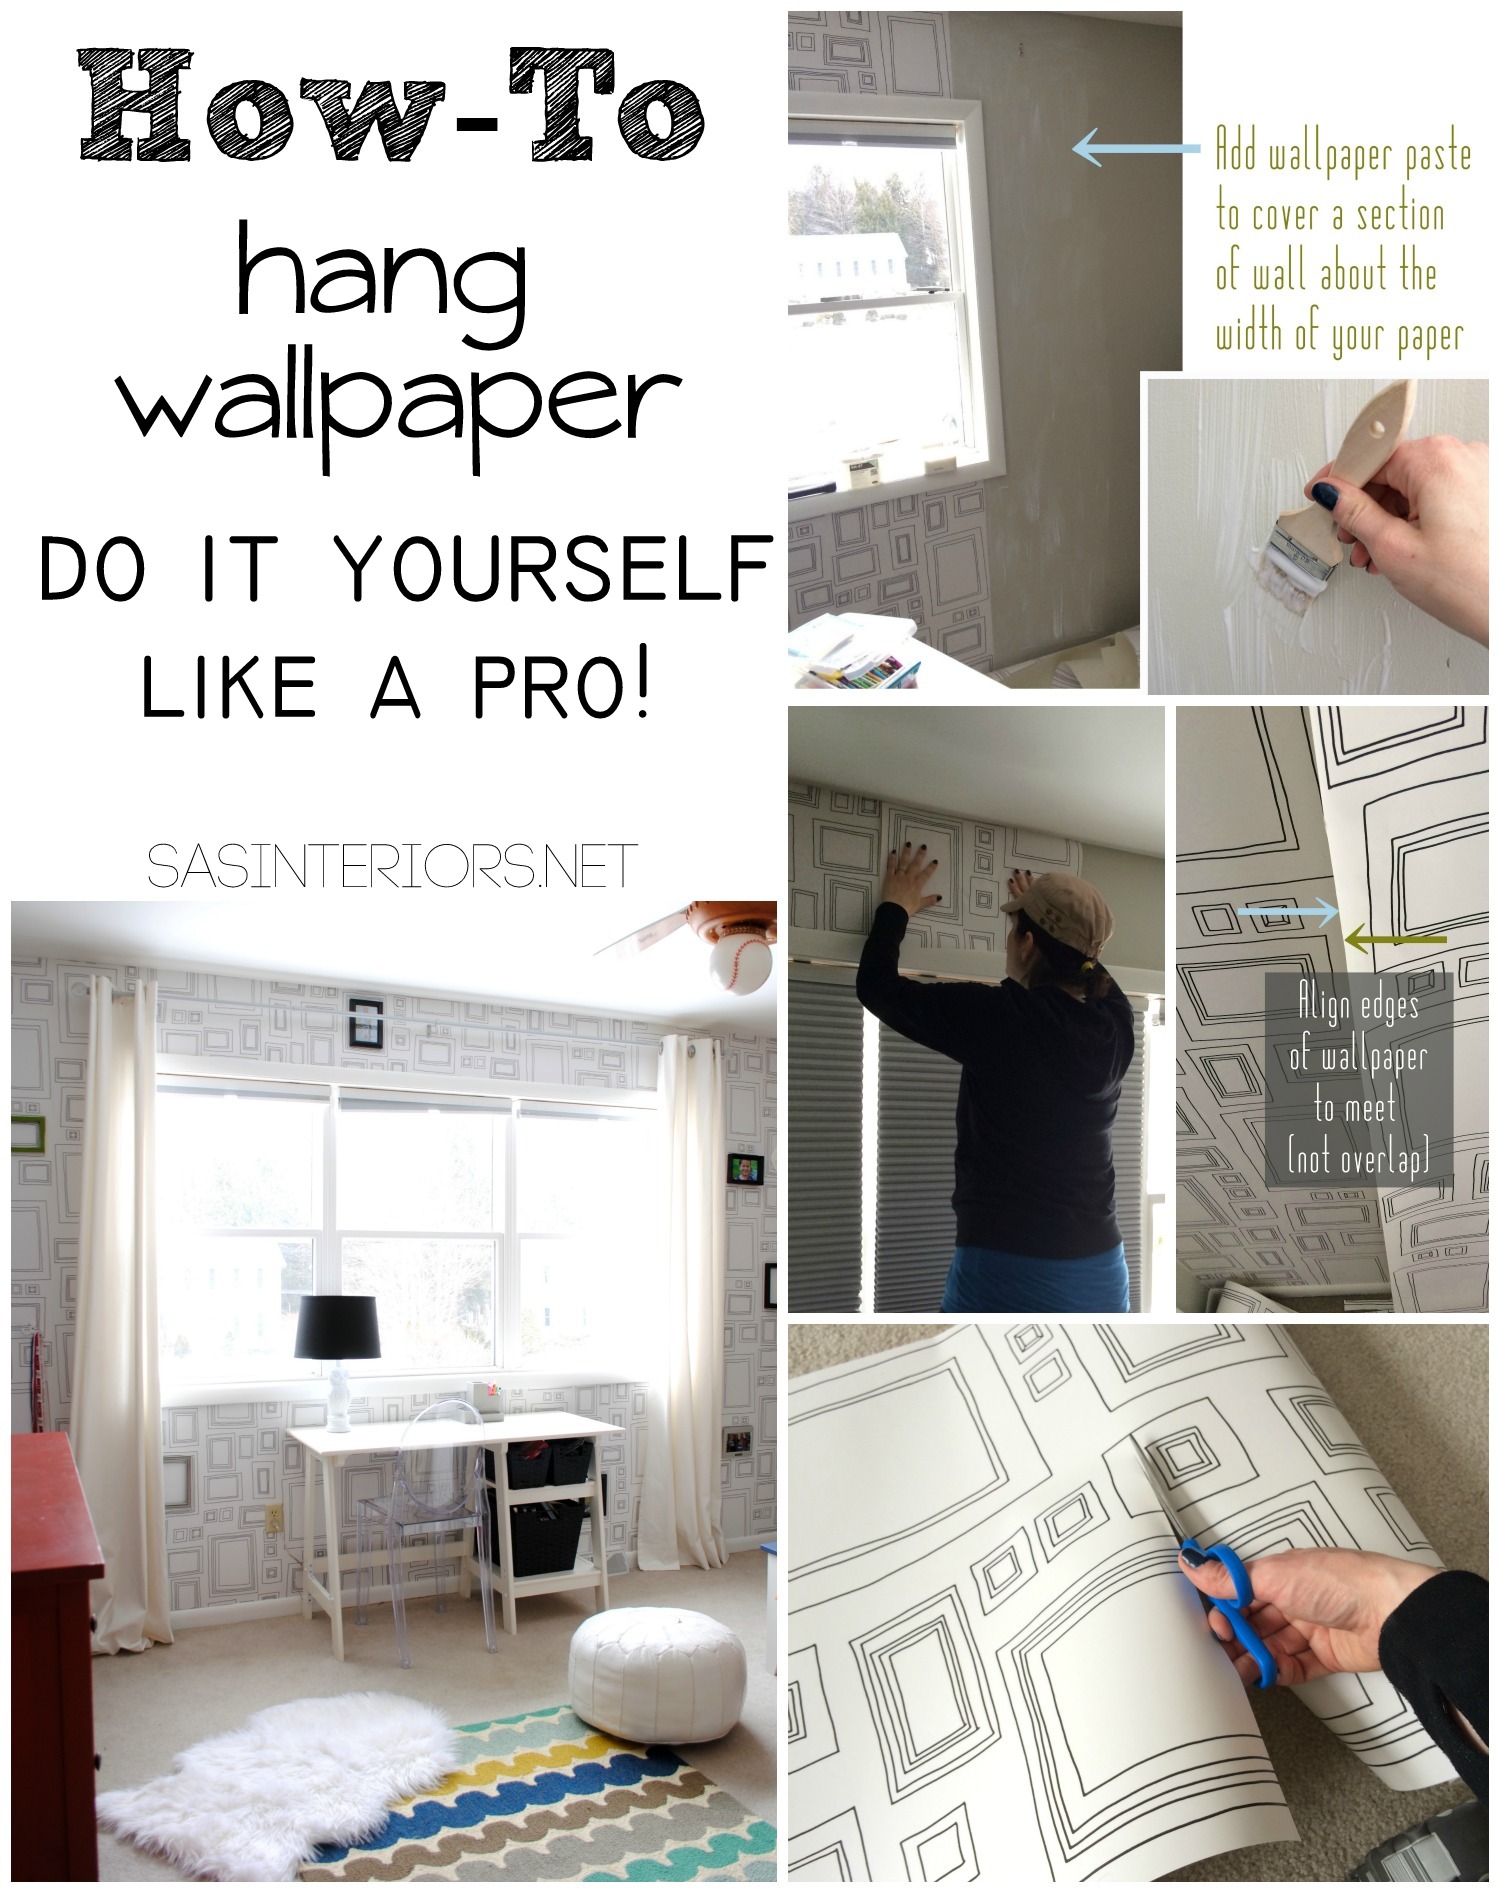
Check out these posts on how-to install groutable luxury vinyl tile floor:
DIY: Installing Groutable Luxury Vinyl Tile {my foyer}
How-To Install Groutable Luxury Vinyl Tile {my parents foyer}

Since groutable vinyl tile takes no experience, is half the cost, and takes half the time, what will use for your next tile project?

DIY: Wood Honeycomb Shelves

Even though we veered away from the original design for the revamped shared kids space, my son had his heart set on honeycomb shelves after I showed him the Land of Nod style.  And since this mama can’t let her boy down, I had to pull through.

But instead of buying, what did I do?  DIYed them, of course.  After a little research & this post by A Beautiful Mess, I was confident to move forward.

Not only are these honeycomb / hexagon shelves functional, the whole ensemble is like a piece of art.  And instead of painting the shelves a color or staining them a traditional wood finish, I chose an interesting blue hue which is in-trend and spot on with the other tones that I’ve introduced into the room.

Take a look…

{DIY Tutorial} How-To Make Wood Honeycomb Shelves. Why spend hundreds, when you can make them yourself! These shelves complete the look of the room. So many great projects in this kids room makeover.

The entire shelf composition runs the length of the twin bed, which is about 80″ long, and makes the entire wall truly come alive.  This “installation” also parallels with my Lowe’s Creative challenge project for this month which focuses on introducing the submerged color trend of watery, cool blue hues into a project.  With the size + interesting finish, this project is by far one of my favorites!

———————————–

Before we move forward, it has to be said that this project was a big challenge, but the bigger the venture, the better the result.  I don’t often do large-scale woodworking projects and at times I thought it was going to be a big F-A-I-L, but in the end the honeycomb shelves MAKE THE ROOM.  Take Away? Don’t be afraid to challenge yourself.  Push through because in the end, it’ll be worth it!

———————————–

Like usual, before starting a larger scale project, I sketched out my idea and figured out the supplies I needed.  This was the first sketch…

Design 1 for honeycomb shelves

And then the shelves ended up evolving into this layout instead so not all of the shelves are actually attached…

Design 2 for honeycomb shelves

Supplies I used:

  • (7) 1″ x 6″ x 6′ long pieces of wood – each shelf took approximately (1) board
  • 1-1/2″ wood screws
  • 1-1/2″ corner brackets
  • Plastic toggle anchors
  • Stain or Paint – depending on how you want to finish the shelf surface
  • Other supplies: miter saw, tape measure, drill, sander, level, pencil

To save on time, I often have my wood cut while at shopping at Lowe’s, but for this project, I cut it at home because of the quantity needed + the angles.

Here are the steps I took:

1. I set the miter saw to 30 degrees and never touched the saw again for the entire project.  This angle is crucial so each of the 6 pieces will make the perfect hexagon shape.  I approximated that I wanted each finished shelf to be an overall dimension of about 14″ x 14″, and chose the length of 7″ for the long side of each piece.

After marking the wood with my tape measure + pencil, I made the first cut using the miter saw. Then I flipped the piece of wood over to make the second angled cut.

{DIY Tutorial} How-To Make Wood Honeycomb Shelves. Why spend hundreds, when you can make them yourself! These shelves complete the look of the room. So many great projects in this kids room makeover.

This is what the first piece looked like when cut.

Then I cut about 42 more…

Size of cut for honeycomb shelf

2. Before taking the next steps of attaching each piece to make the shelves, I layed all the pieces out to see how they’d actually go together.

{DIY Tutorial} How-To Make Wood Honeycomb Shelves. Why spend hundreds, when you can make them yourself! These shelves complete the look of the room. So many great projects in this kids room makeover.

3. Then we were ready to chug forward and attach these bad boys…

The first hexagon box was created using 6 pieces and all the angles faced each other.  It’s best to stand them up on their sides, so the floor acts like the wall. The Mister (who was a huge part of this project as well) and I actually moved from the carpet to a flat, hard surface so the pieces would lay flat.  The carpet was too cushy.

TIP: You must use wood screws for this project.  We started out with screws, but it wasn’t working right (because we didn’t pre-drill), then changed over to using nails.  BIG MISTAKE.

Once you have the angled wood pieces in position, first pre-drill the holes, then drill in the wood screws.  If you don’t pre-drill the holes, the wood will probably split, which is what happened to us atfirst.  Using a nail won’t work because they’ll pull out and the overall shelf won’t be stable / sturdy.  Believe me, these are all lessons we learned along the way!

{DIY Tutorial} How-To Make Wood Honeycomb Shelves. Why spend hundreds, when you can make them yourself! These shelves complete the look of the room. So many great projects in this kids room makeover.

4. When the first box is complete, you can either be done or add on to it to create a multi-honeycomb shelf like ours.  If you continue adding on to the first hexagon, you’ll use one side of the original hexagon to create the second hexagon. This time though, the cut angles won’t touch each other, but instead overlap.  I’ll be honest, it does get tricky at this point and the shelves become a big jigsaw puzzle.  We ended up with (1) 3 box shelf, (1) 2 box shelf, and (1) stand alone shelf.

{DIY Tutorial} How-To Make Wood Honeycomb Shelves. Why spend hundreds, when you can make them yourself! These shelves complete the look of the room. So many great projects in this kids room makeover.

Once all the shelves were screwed together, we were ready for the next steps…  finish the surface + install.

It took me some time to determine how I wanted to finish the shelves.  At first I was going to paint them, but then steered away because I wanted to see the wood grain shine through.  That meant stain.  But, what stain?  In the end, I chose a gray / blue water-based stain by Minwax.  The submerged color seemed perfect with the other hues in the room and was ideal with what’s on-trend right now.

5. First, I gave the edges and all the surfaces a good sanding with my orbital sander.   Then using a rag, I applied the wood stain and almost instantly wiped it away so very little actually soaked into the wood.  Because of this, the drying time was very quick.

{DIY Tutorial} How-To Make Wood Honeycomb Shelves. Why spend hundreds, when you can make them yourself! These shelves complete the look of the room. So many great projects in this kids room makeover.

6. About a day later, the shelves were ready to install.  I first attached the metal angle brackets to the shelves. Then I determined the height + positioning of where the shelves would be hung.

Next, the Mister + I marked the holes through the brackets and pre-drilled the holes into the wall.  As with hanging anything, I always love using plastic toggle drywall anchors (I shared a pic recently on Instagram).

Once the anchors were in each hole, we repositioned the shelves in place and screwed them in using a drill + screw.  It’s key to use a level as well so the shelf doesn’t get installed crooked!

{DIY Tutorial} How-To Make Wood Honeycomb Shelves. Why spend hundreds, when you can make them yourself! These shelves complete the look of the room. So many great projects in this kids room makeover.

At this point, the shelves were almost done…

I loved the look of the blue shelves against the lighter gray walls, but I still wanted to make them pop.  To do so, I chose to paint the front edge of the shelves a white color which matches the moulding throughout the room.  Two coats later with a small, flat brush did the trick.

{DIY Tutorial} How-To Make Wood Honeycomb Shelves. Why spend hundreds, when you can make them yourself! These shelves complete the look of the room. So many great projects in this kids room makeover.

Lastly, so the metal brackets didn’t stand out so much, I painted those as well using the wall paint color.

{DIY Tutorial} How-To Make Wood Honeycomb Shelves. Why spend hundreds, when you can make them yourself! These shelves complete the look of the room. So many great projects in this kids room makeover.

And then they were finally complete!

{DIY Tutorial} How-To Make Wood Honeycomb Shelves. Why spend hundreds, when you can make them yourself! These shelves complete the look of the room. So many great projects in this kids room makeover.

{DIY Tutorial} How-To Make Wood Honeycomb Shelves. Why spend hundreds, when you can make them yourself! These shelves complete the look of the room. So many great projects in this kids room makeover.

Love the under-the-bed wood rolling carts?  I shared the tutorial on how to make them earlier this week.

{DIY Tutorial} How-To Make Wood Honeycomb Shelves. Why spend hundreds, when you can make them yourself! These shelves complete the look of the room. So many great projects in this kids room makeover.

These shelves are perfect to fill with books, toys in containers, and any fun thing(s) to display.

{DIY Tutorial} How-To Make Wood Honeycomb Shelves. Why spend hundreds, when you can make them yourself! These shelves complete the look of the room. So many great projects in this kids room makeover.

{DIY Tutorial} How-To Make Wood Honeycomb Shelves. Why spend hundreds, when you can make them yourself! These shelves complete the look of the room. So many great projects in this kids room makeover.

{DIY Tutorial} How-To Make Wood Honeycomb Shelves. Why spend hundreds, when you can make them yourself! These shelves complete the look of the room. So many great projects in this kids room makeover.

And here is a pretty pinnable picture if you want to remember this project for a later date…

{DIY Tutorial} How-To Make Wood Honeycomb Shelves. Why spend hundreds, when you can make them yourself! These shelves complete the look of the room. So many great projects in this kids room makeover.

So what do you think?

Do you like the honeycomb / hexagon look?  Have you incorporated this new trend into your home? What has been your most difficult DIY project endeavour?

Lowes Creative Team Member Badge - Spring 2014

To gather even more unique, fun, and creative ideas for your indoor and outdoor Spring spaces, I would definitely suggest downloading the Lowe’s Creative Ideas app on your iphone and/or ipad.  I’m always checking out the FREE app for great seasonal + do-it-yourself inspiration.

 Also consider following Lowe’s on Facebook, Pinterest, and Instagram as well.

Disclosure: I am part of the Lowe’s Creative Team and was provided with a Lowe’s gift card to purchase items for my project.  I was also compensated for my time to use the products.  No one told me what to create, what to buy, how to use the product, or what to write.  All opinions are 100% mine!

DIY: Rolling Underbed Wood Storage Cart

I’ve been busy-busy on finishing up the details for my boys room makeover.  This room has taken quite the turn from it originally being a boy/girl, sister/brother shared bedroom, to a full-on boy hangout haven!  Even though my little guy is only 7 (just shy of 8), I feel it’s a space he can grow with (until I get my hands on it for another makeover, hehe).

So my latest and greatest DIY project in the room is something that holds stuff that I often refer to as the ‘bane of my existence’… TOYS.  Specifically, the little, itty bitty toys like Legos and Kinex that somehow always end up under my feet giving me a great big ‘OW’.

Often under my kids’ bed is the ‘stuffing place’ where things are put that don’t have a home.  When I do a big cleaning, I never know what I will find…  Do you have that problem?  Please tell me yes and reassure me that I’m not the only one.  My solution to a neat under-bed space? Make something to take up the space so there is no room to stuff!

Thus the creation of these rolling underbed wood storage carts.

DIY Tutorial for a Rolling Underbed Wood Storage Cart! The perfect solution for holding toys + stuff. Less than $10 to make compared to $40+ to buy!

Pretty + Functional!  I’m in heaven.

Want to know how to make them? Let’s Go!

They are really easy & super inexpensive.  Actually after making them, I did a quick search online (not thinking I’d find anything similar) and saw similar styles for a minimum of $40…  Crazy that mine cost about $10/each to make.

Supplies You’ll Need:

for a 24″ x 24″ box (buy more or less if you want to change the size)

  • (2) 1″ x 6″ x 24″ long piece of wood
  • (2) 1″ x 6″ x 22.5″ long piece of wood
  • (4) 1.5″ rolling wheels
  • (1) 24″ x 24″ piece of 1/4″ plywood
  • 1.5″ long wood nails
  • 3/4″ long wood nails
  • optional: paint, chalkpaint, 1/2″ thick rope

DIY Tutorial for a Rolling Underbed Wood Storage Cart! The perfect solution for holding toys + stuff. Less than $10 to make compared to $40+ to buy!

Before buying the supplies, I determined that the size of rolling wood carts would be 24″ x 24″ and (2) under the twin bed would fit perfectly leaving some additional space for other awkward toys (like my little guys plastic skateboard ramp).  Here is a sketch I did before heading to the store…

Note:  a 1″ x 6″ is actually 3/4″ x 5-1/2″.  To make a perfect 24″ x 24″ square box, (2) sides were cut to 22.5″ long.

Here are the steps I took:

1. Using the 1.5″ long wood nails, I attached the 24″ piece to the 22.5″ long piece.  I first added a dab of wood glue, then followed it with (3) nails.

DIY Tutorial for a Rolling Underbed Wood Storage Cart! The perfect solution for holding toys + stuff. Less than $10 to make compared to $40+ to buy!

2. I continued attaching the other wood pieces so the box was created…

DIY Tutorial for a Rolling Underbed Wood Storage Cart! The perfect solution for holding toys + stuff. Less than $10 to make compared to $40+ to buy!I’m not sure why my little girl in the background is holding a coffee cup, but rest assured she wasn’t drinking it. At least I hope she wasn’t…

3. Once the 4 sides were put together, I attached the 24″ x 24″ plywood using 3/4″ long wood nails. About 4 nails per side should be enough to make it sturdy.

DIY Tutorial for a Rolling Underbed Wood Storage Cart! The perfect solution for holding toys + stuff. Less than $10 to make compared to $40+ to buy!

4. The (4) wheels were next…  Using 3/4″ screws, I attached a wheel to each corner.

DIY Tutorial for a Rolling Underbed Wood Storage Cart! The perfect solution for holding toys + stuff. Less than $10 to make compared to $40+ to buy!

The result of the rolling cart thus far…

The beauty of this wood cart is that it doesn’t have to be only for under the bed.  Change the size – make it taller or less wide – and use them in the living room for toys, blankets, or DVDs.  How about in the garage for tools?  Or in the craft room for supplies?  There are so many ways, so many uses!

DIY Tutorial for a Rolling Underbed Wood Storage Cart! The perfect solution for holding toys + stuff. Less than $10 to make compared to $40+ to buy!

To jazz up the rolling cart, I thought it would be neat + easy to add a fun + functional rope pull.

But first, I gave the overall cart a good sanding. Kids + Splinters aren’t pretty…

Yes I sometimes DIY with a leopard scarf…

And rest assured after posing for this pic, I put my eye protection on.  Promise!

Now onto the rope.

5. In the center of one side, towards the top, I drilled a hole slightly larger than 1/2″.

DIY Tutorial for a Rolling Underbed Wood Storage Cart! The perfect solution for holding toys + stuff. Less than $10 to make compared to $40+ to buy!

6. I then cut a piece of rope about 12″ long (I think, I actually eyed it and didn’t really measure) and threaded it through the hole and tied it on both sides.

DIY Tutorial for a Rolling Underbed Wood Storage Cart! The perfect solution for holding toys + stuff. Less than $10 to make compared to $40+ to buy!

The rope was a bit expensive – I think this roll was about $8 – but I plan on using it for another project, so it made sense.  You don’t really need rope if you don’t have it on hand.  Instead try a piece of cabinet hardware or something you already have in the home.

7. Once the rope was in, I gave the overall wood surface a quick dry-brush paint application. One quick, imperfect coat and it was almost complete.

DIY Tutorial for a Rolling Underbed Wood Storage Cart! The perfect solution for holding toys + stuff. Less than $10 to make compared to $40+ to buy!

8. To jazz the cart up one more step, I added a chalkboard front using chalkboard paint.  Using my eye, no measuring tape, I created a box with painters tape and painted 3 coats of the chalkboard paint.

DIY Tutorial for a Rolling Underbed Wood Storage Cart! The perfect solution for holding toys + stuff. Less than $10 to make compared to $40+ to buy!

DIY Tutorial for a Rolling Underbed Wood Storage Cart! The perfect solution for holding toys + stuff. Less than $10 to make compared to $40+ to buy!

9. Right after the last coat was brushed on, I had a little helper take off the painters tape while the paint was still wet.

Look at that beautiful straight line…

DIY Tutorial for a Rolling Underbed Wood Storage Cart! The perfect solution for holding toys + stuff. Less than $10 to make compared to $40+ to buy!

And the rolling wood carts were complete!

DIY Tutorial for a Rolling Underbed Wood Storage Cart! The perfect solution for holding toys + stuff. Less than $10 to make compared to $40+ to buy!

DIY Tutorial for a Rolling Underbed Wood Storage Cart! The perfect solution for holding toys + stuff. Less than $10 to make compared to $40+ to buy!


DIY Tutorial for a Rolling Underbed Wood Storage Cart! The perfect solution for holding toys + stuff. Less than $10 to make compared to $40+ to buy!

Check out the honeycomb shelves…  My longest, most difficult project yet, but I’m in love.  More to come on those later this week!

BTW, you can see more of that fabulous wallpaper on the wall to the left in a recent post I shared.

DIY Tutorial for a Rolling Underbed Wood Storage Cart! The perfect solution for holding toys + stuff. Less than $10 to make compared to $40+ to buy!

So what do you think?  Could these wood carts be something you could use in your home?  Each were about $10 to make and both took about a total of an hour (maybe a little more) to make.  Not too bad!

What are your favorite toy storage solutions? What are your favorite under-the-bed storage solutions?

Decorating with Leaning + Ladder Shelves

Within the past two months, I’ve purchased 4 leaning shelves (a.k.a. ladder shelves).

Obsessed? No.

Great for storage? Affordable? Open + Airy?  Yes.

For the same reason, I’ve been loving leaning shelves as of late, I’ve got my clients hooked too and I’d like to share with you why leaning shelves work so well for any room in the home.

Decorating with Leaning + Ladder Shelves - Leaning Shelves are affordable, open + airy, and bring great height to a space. So much inspiration + ideas in THIS POST!

Any style shelf gives height to the room. Most pieces of furniture (tables, sofa, chair, bed, etc) aren’t higher than 30/36″ off the floor, which often leaves pictures / artwork to be the only source of height in a room.  As much as it’s important to have “things” on the wall, it’s also important to break up the monotony and a bookcase / shelves can be that element.  Don’t get me wrong, I love the look of a closed bookcase, but I also really prefer the style of a leaning shelf.

Why?

> Height: Art + pictures are a must on the walls, but without anything else to grab the eye and break up the plane, a space can become boring and lack depth.  By adding shelving, specifically leaning shelves, a wall can have the needed to break and 3-dimensional look needed to add visual interest.  With the addition of books, accessories, baskets, and more, the shelves can become the star of a room.

> Storage: The aesthetic part of shelves is that it brings height + interest to a room, but the storage element of shelving brings in the functional aspect.  Who doesn’t desire more storage in their house?  I certainly do {raising hand in the air}…  Adding in a tall element, like a shelf, allows you to use the vertical plane of the wall instead of the horizontal, floor area, of a room.  Save on floor area, use height instead!

> Affordability: Leaning Shelves are very affordable, probably because there really isn’t much too them.  The most recent style I chose, I purchased at Target for a few dollars over $100. I’ve also been wanting to make my own version – I think it would be fairly easy – but I’m still gathering the guts + time to do it.  Anyway, there are versions that are less than $100, like this one and styles that are a lot more (but are pretty fabulous) like this one at $1600.  Add height to a room for around $100? Perfect!

> Open + Airy: I specifically like the look of leaning shelves because they provide the height and the storage needed in a room, but they aren’t closed in as a typical bookshelf with a back + sides are.  The leaning shelf is minimal allowing for any size space (even small spaces like bathrooms & laundry rooms/nooks) to handle the horizontal attention-grabber.  Plus I’ve seen leaning shelves in a variety of widths, as well.

I must be on the right design track with my recent purchases because I opened two design magazines this month and they both featured spaces with leaning bookshelves.

After reading the first feature in the March issue of HGTV magazine, it ‘s what inspired me to write this post. I know you all would love and feel confident to use leaning shelves after seeing these inspirational spaces!

1.  A leaning shelf in the kitchen

Perfect for holding dishes, cookbooks, bowls, coffee supplies, and so much more.

Decorating with Leaning + Ladder Shelves - Leaning Shelves are affordable, open + airy, and bring great height to a space. So much inspiration + ideas in THIS POST!

2. A leaning shelf in the living room

Ideal for books, pictures, accessories, and I adore the idea of a adding a reading light.  No more need for a side table.

Decorating with Leaning + Ladder Shelves - Leaning Shelves are affordable, open + airy, and bring great height to a space. So much inspiration + ideas in THIS POST!

See how this ladder shelf gives so much height to the space, yet there is no real break of wall color or ‘closed-in’ feeling.

3. A leaning shelf in the entry

Essential for all the winter-wares, shoes, and bags!  The shelves allow space for the must-haves, along with some surface to display some pretty like a plant and cool fan.

Decorating with Leaning + Ladder Shelves - Leaning Shelves are affordable, open + airy, and bring great height to a space. So much inspiration + ideas in THIS POST!

4. A leaning shelf in the entry

Big or small, most bathrooms could use more storage.  Am I right?? And if you have a pedestal-style sink, you really are in need of more surface space.  A ladder shelf is the perfect solution for all your products + towels.

Decorating with Leaning + Ladder Shelves - Leaning Shelves are affordable, open + airy, and bring great height to a space. So much inspiration + ideas in THIS POST!

5. A leaning shelf in the laundry

Another spot that most everyone can use more space.  Depending on the layout of the laundry room or nook, a leaning shelf can provide the extra storage needed to keep the space tidy + organized.

Decorating with Leaning + Ladder Shelves - Leaning Shelves are affordable, open + airy, and bring great height to a space. So much inspiration + ideas in THIS POST!The above images of 5 ways to use a leaning shelf is from HGTV magazine

The other publication that I was flipping through and came across an interesting display of leaning shelves was Better Homes and Gardens April issue.

Decorating with Leaning + Ladder Shelves - Leaning Shelves are affordable, open + airy, and bring great height to a space. So much inspiration + ideas in THIS POST!

Decorating with Leaning + Ladder Shelves - Leaning Shelves are affordable, open + airy, and bring great height to a space. So much inspiration + ideas in THIS POST!

For these shelves, I am pretty sure they painted them the popping turquoise hue, but what a great space, right?!  I love the color palette of the vivacious yellow, gray, and turquoise.  If you can, get your hands on this issue – they’re are lots of great + affordable ideas for bathroom upgrades.

After seeing all these ideas, I am sure you want to get your hands on some new shelving.  Am I right?  I put together a collection of a few favorites with resource links.

Decorating with Leaning + Ladder Shelves - Leaning Shelves are affordable, open + airy, and bring great height to a space. So much inspiration + ideas in THIS POST!

Resources:
1. Cherry-finish Leaning Shelf
2. White Leaning Shelf
3. Iron frame / Wood Shelves Leaning Shelf
4: Black Leaning Shelf
5: Lucite (clear) Leaning Shelf
6: Gray Leaning Shelf with Bins
7: Leaning Shelves with Desk

Here’s a peak at the recent leaning shelves I purchased…

Decorating with Leaning + Ladder Shelves - Leaning Shelves are affordable, open + airy, and bring great height to a space. So much inspiration + ideas in THIS POST!

Recognize the room?  It’s my boys room that I am currently giving an overhaul.  work is still in progress…

I’m sharing this because it’s amazing how much these shelves have brought to the room!  The amount of storage / surface space is incredible.  From books, to ‘special things’ to ALL THE LEGOS, these shelves hold it all + have there is room for more.

My daughter’s room also got a leaning shelf.

We moved the pictures that were there into the master and added the shelf in it’s place to hold books, and of course ALL THE LEGOS!

Decorating with Leaning + Ladder Shelves - Leaning Shelves are affordable, open + airy, and bring great height to a space. So much inspiration + ideas in THIS POST!

Seen enough?  No?  Okay, I’ve got more inspiration for you…

Decorating with Leaning + Ladder Shelves - Leaning Shelves are affordable, open + airy, and bring great height to a space. So much inspiration + ideas in THIS POST!Awesome coastal living room with a leaning white shelf/desk. via: Sabrina Alfin Interiors

Decorating with Leaning + Ladder Shelves - Leaning Shelves are affordable, open + airy, and bring great height to a space. So much inspiration + ideas in THIS POST!Seriously, how great is this space with the leaning shelves used for wine storage?  Doesn’t get much better than this! via: Cynthia Lynn Photography

Decorating with Leaning + Ladder Shelves - Leaning Shelves are affordable, open + airy, and bring great height to a space. So much inspiration + ideas in THIS POST!Work space with white leaning shelves. Shelves by The Container Store

Decorating with Leaning + Ladder Shelves - Leaning Shelves are affordable, open + airy, and bring great height to a space. So much inspiration + ideas in THIS POST!How amazing is this lucite leaning shelf?  It’s incredibly expensive, but is a show-stopper!  Leaning Shelf by Wisteria.

Decorating with Leaning + Ladder Shelves - Leaning Shelves are affordable, open + airy, and bring great height to a space. So much inspiration + ideas in THIS POST!Such a bright + vibrant space.  Ideal for a playroom or girly room.  Leaning Shelves by The Container Store

Decorating with Leaning + Ladder Shelves - Leaning Shelves are affordable, open + airy, and bring great height to a space. So much inspiration + ideas in THIS POST!

Decorating with Leaning + Ladder Shelves - Leaning Shelves are affordable, open + airy, and bring great height to a space. So much inspiration + ideas in THIS POST!Metal + Wood combo shelves by Pottery Barn

Decorating with Leaning + Ladder Shelves - Leaning Shelves are affordable, open + airy, and bring great height to a space. So much inspiration + ideas in THIS POST!Such a bright, airy space with the perfect element to bring in some height…  a leaning shelf!  Unknown Source

Decorating with Leaning + Ladder Shelves - Leaning Shelves are affordable, open + airy, and bring great height to a space. So much inspiration + ideas in THIS POST!What a great office space with a non-traditional leaning shelf and I adore the pops of turquoise + the amazing wallpaper. via: Matilda Rose Interiors

Decorating with Leaning + Ladder Shelves - Leaning Shelves are affordable, open + airy, and bring great height to a space. So much inspiration + ideas in THIS POST!How fun is this?  I love chalkboard walls and layering it with a leaning bookcase still allows for the wall to be seen through it.  Same style as shown above in my favorite finds, this leaning shelf is by Land of Nod.

Decorating with Leaning + Ladder Shelves - Leaning Shelves are affordable, open + airy, and bring great height to a space. So much inspiration + ideas in THIS POST!Leaning shelves with a desk make a great combination for storage + work. via: CM Glover

Decorating with Leaning + Ladder Shelves - Leaning Shelves are affordable, open + airy, and bring great height to a space. So much inspiration + ideas in THIS POST!Leaning shelves come in all sizes.  This narrow style in a colorful deep red hue is adorable in this nursery. Unknown Source

Decorating with Leaning + Ladder Shelves - Leaning Shelves are affordable, open + airy, and bring great height to a space. So much inspiration + ideas in THIS POST!Leaning shelves are great for an office space! via: Asbury Remodeling & Construction

Decorating with Leaning + Ladder Shelves - Leaning Shelves are affordable, open + airy, and bring great height to a space. So much inspiration + ideas in THIS POST!Shelf / Desk combo by The Container Store

Decorating with Leaning + Ladder Shelves - Leaning Shelves are affordable, open + airy, and bring great height to a space. So much inspiration + ideas in THIS POST!A more modern style shelf/desk combo at Crate and Barrel

Decorating with Leaning + Ladder Shelves - Leaning Shelves are affordable, open + airy, and bring great height to a space. So much inspiration + ideas in THIS POST!The shelves on this white ladder shelf are thicker which gives it more weight and style.  How great for a kitchen or casual dining space.

Leaning shelves for everyone.  Are you now ready to purchase one (or 2, or maybe 3) for your home?!

Creating Colorful Easter Eggs with Melted Crayons

Create colorful EASTER EGGS using Melted Crayons. It's easy to do + KIDS will LOVE it. Read the tutorial now or Pin for Later!

In just about a month, another Easter will be upon us.  Along with focusing on the importance of Easter, creating colorful eggs is often a tradition that many kids enjoy as the holiday approaches, mine included!  A basket filled with eggs of varying hues can make a gorgeous centerpiece and is the ideal reminder that Spring is on it’s way – I hope.

A new and unique alternative idea that you may want to try this year is to use crayons instead of the traditional food coloring or store-bought dye kits.  I have to tell you, the result will be unexpectedly awesome!  Have you ever felt that the traditional food coloring or dyes don’t create an intense enough color?  Yes, you can leave the eggs in the dye filled cup for hours, but what child wants to wait that long? Mine certainly don’t…  With the technique of using melted crayons, the color can be as bright (or subtle) as you’d like and the result is instant…

Here are the steps I took with my kids to create Colorful Easter Eggs Using Melted Crayons…

Supplies Needed:

  • Eggs (steps to hard boil the eggs are below)
  • A colorful collection of crayons

Create colorful EASTER EGGS using Melted Crayons. It's easy to do + KIDS will LOVE it. Read the tutorial now or Pin for Later!To start off…

1.Put the eggs in a pot and fill the pot with cold water so it covers the eggs about 1-2″.

2.Once the eggs come to a full boil, remove the pot from the stove and cover for 12 minutes (so they create a hard-boiled egg).

3.Carefully remove the eggs from the pot and let them stand for about 1-2 minutes (the eggs will be very hot, so be sure to use tongs when removing them from the pot).

Create colorful EASTER EGGS using Melted Crayons. It's easy to do + KIDS will LOVE it. Read the tutorial now or Pin for Later!

Here comes the fun part…

4. Using crayons, start drawing on your egg.  Be creative. Get the kids involved.  It’s a lot of fun to try different patterns and to mix the colors. For our eggs, I used one color as the base, then added another color on top.  I smudged in the background hue which gave a fun, swirly look.

Create colorful EASTER EGGS using Melted Crayons. It's easy to do + KIDS will LOVE it. Read the tutorial now or Pin for Later!

Because of the hot exterior of the egg, the crayon will melt on the egg’s surface.  Once your masterpiece is finished, gently place the egg into the original egg holder and place it into the refrigerator.  After a few minutes they will be cool and the decorated eggs can be handled and displayed as you’d like.

Create colorful EASTER EGGS using Melted Crayons. It's easy to do + KIDS will LOVE it. Read the tutorial now or Pin for Later!

They’ll make a beautiful addition to any centerpiece – paired with other Easter decorations or simply on their own.

Create colorful EASTER EGGS using Melted Crayons. It's easy to do + KIDS will LOVE it. Read the tutorial now or Pin for Later!

Create colorful EASTER EGGS using Melted Crayons. It's easy to do + KIDS will LOVE it. Read the tutorial now or Pin for Later!

Want to save it and/or pin it for later use?  Here’s a quick graphic to remember the steps…

Create colorful EASTER EGGS using Melted Crayons. It's easy to do + KIDS will LOVE it. Read the tutorial now or Pin for Later!

Enjoy and Happy Easter Egg Decorating!

How-To Hang Wallpaper Like a Pro!

If you follow me on Instagrammy favorite place on the web to share snippets throughout my day – then you know I had a busy weekend wallpapering. The kids room took a design turn after we found out a few weeks ago that baby #3 is going to be a girl.  In the end, as a family, we decided the kids will stay in the rooms they are currently in and the girls will eventually share a room once the baby is ready to move in.  So what does that mean??  Design changes!  The room that was going to be a shared boy / girl room was no longer needed.  Since we had already started on the transformation for my little guy, it meant we had to continue chugging along.  And let me tell ya, he’s a happy camper!

After choosing a new paint color (Benjamin Moore Hazy Skies) that I was very unsure of, because it was way lighter of a color than I’m used to, I am now thrilled with the decision.  Why?  Because I’ve been adding in colors in other ways.  Layers, my friends!  Layers are huge and in a kids room, books and toys add an amazing pop!  BUT, I was in need of more.  Yes more!  And that more resulted in a fun + unique wallpaper for the focal window wall that instantly turned the entire 12′ width into a photo gallery wall

Turn any wall into a Photo Gallery Wall with wallpaper! It adds dimension and endless possibilities for any space.

How fun is that?!  And before we go any further, I want to give you a peak at the before and after…

Turn any wall into a Photo Gallery Wall with wallpaper! It adds dimension and endless possibilities for any space.

I want to show you more of the room because it’s turning out pretty fantastic, but I can’t.  That’s to come – pinky swear!

Turn any wall into a Photo Gallery Wall with wallpaper! It adds dimension and endless possibilities for any space.

This incredible wallpaper is made by Taylor & Wood through Graham & Brown and it truly brings a wall to life.  I knew I wanted to do something fun on this focal wall.  Originally I was thinking a stencil, but this is way better.  So let’s jump right into how I installed it…

Tutorial + Tips + Tricks for hanging wallpaper. Do It Yourself but get the results of a PRO! Splurge on the paper / Save money on the install.

How-To Hang Wallpaper…  LIKE A PRO!

Similar to the last time I hung wallpaper in the powder room, this paper was also NOT pre-pasted (wallpaper that has paste and is activated with only water).  After wallpapering a few areas in my home, I have found that higher-quality wallpapers typically are not pre-pasted, so instead a paste has to be added.  I actually think the paste is easier to use than putting the paper through water.  I wrote a tutorial a long time ago on How-To Hang Prepasted Wallpaper, if you want to check that out.

Supplies:

  • Wallpaper
  • Wallpaper Paste
  • Smoothing Took
  • Sharp Razor or blade
  • Other handy tools for wallpapering are: a tape measure, a laser level, a pencil

Supplies for wallpapering like a PRO!

The Steps:

1. To start off, I found it best to measure the wall and cut a piece of wallpaper the length of the wall + an additional 6-8″ for extra at the top (ceiling) and bottom (floor).

a little helper is always fun + keeps you entertained!Tutorial + Tips + Tricks for hanging wallpaper. Do It Yourself but get the results of a PRO! Splurge on the paper / Save money on the install.

Tutorial + Tips + Tricks for hanging wallpaper. Do It Yourself but get the results of a PRO! Splurge on the paper / Save money on the install.

2. I wasn’t worried about centering the paper on the wall for this project (in the powder room I did) and started at the left most edge of the wall. When hanging wallpaper, I find it best to add the best directly to the wall, THEN add the paper.  I used a cheap $1 brush to add enough paste to cover the width of the wallpaper (not the entire wall).

Tutorial + Tips + Tricks for hanging wallpaper. Do It Yourself but get the results of a PRO! Splurge on the paper / Save money on the install.

3. Once the paste is in place, then I started at the ceiling (adding about 2-3″ extra paper to trim), I hung the paper making sure to match the seam of the adjacent paper.  NEVER overlap the paper.

Tutorial + Tips + Tricks for hanging wallpaper. Do It Yourself but get the results of a PRO! Splurge on the paper / Save money on the install.

4. When the paper initially adheres to the wall, there are always bumps and wrinkles.  No worries.  Simply smooth them out with the plastic smoothing tool.  It’s best to start at the top and move down the wall, as well as from the center of the paper and smooth out towards the edges.  You want to press firmly, but not too hard so all the glue seeps out.  Alittle glue seepage is okay and expected.

Tutorial + Tips + Tricks for hanging wallpaper. Do It Yourself but get the results of a PRO! Splurge on the paper / Save money on the install.

5. Cutting around windows, doors, and outlets.  Thought to be tricky, but really not.  For the large window, I added the paste to the wall.  Then I hung the paper temporarily (very lightly) and trimmed the paper around the window using a scissor, leaving about 2 extra inches for trimming.  Once I cut the paper, THEN I went back and adhered the wallpaper to the wall properly.

Tutorial + Tips + Tricks for hanging wallpaper. Do It Yourself but get the results of a PRO! Splurge on the paper / Save money on the install.

Here is a picture of me trimming the wallpaper around an outlet.  I used a sharp razor, cutting a small hole at the outlet and trimmed so the entire outlet was exposed.  The paper was wrinkled, but I smoothed it out after the hole was cut.

Tutorial + Tips + Tricks for hanging wallpaper. Do It Yourself but get the results of a PRO! Splurge on the paper / Save money on the install.

CONFESSION: totally my opinion... Wallpaper is kind of like giving birth (that’s all I thought about throughout the process).  Going into it, your excited and ready to do “the work”.  You’re in the midst of it cheering yourself on.  Then there are some snags along the way and you start to get frustrated and defeated.  The end is almost near. You’re exhausted and your patience is done.  AND it’s over.  All is beautiful and you can sit back and relax.  After a few days, the memories start to fade and within no time, you think back that it wasn’t so bad after all.  Until the next time…

Anyway, let’s move on.  Obviously you  know where this prego girls head is.

Here are some pictures mid-project (the moments when exhaustion started to set in).

Tutorial + Tips + Tricks for hanging wallpaper. Do It Yourself but get the results of a PRO! Splurge on the paper / Save money on the install.

Tutorial + Tips + Tricks for hanging wallpaper. Do It Yourself but get the results of a PRO! Splurge on the paper / Save money on the install.

And the result once finished.  The part of enjoyment…

Tutorial + Tips + Tricks for hanging wallpaper. Do It Yourself but get the results of a PRO! Splurge on the paper / Save money on the install.

Tutorial + Tips + Tricks for hanging wallpaper. Do It Yourself but get the results of a PRO! Splurge on the paper / Save money on the install.

I started to jazz up the wall by hanging a few real picture frames over the “frames”.  It started to bring in some color and dimension!  I used a few pieces of command strips to keep the frames in place instead of nailing them to the wall.

Tutorial + Tips + Tricks for hanging wallpaper. Do It Yourself but get the results of a PRO! Splurge on the paper / Save money on the install.

We (meaning my son + I) have a lot more ideas for making this wall even better.  In the meantime though (after hours of joyous wallpaper hanging) a few pictures and frames did the trick for fun.

Tutorial + Tips + Tricks for hanging wallpaper. Do It Yourself but get the results of a PRO! Splurge on the paper / Save money on the install.

I even added some hooks for hanging a few hats and metals.

Tutorial + Tips + Tricks for hanging wallpaper. Do It Yourself but get the results of a PRO! Splurge on the paper / Save money on the install.

Tutorial + Tips + Tricks for hanging wallpaper. Do It Yourself but get the results of a PRO! Splurge on the paper / Save money on the install.

So there you have it.  A 2 in 1.  A tutorial on how-to hang wallpaper + a fun & unique way to create an instant photo gallery wall.  A LOT more is happening in this room to make it suit the style of my little guy.  More to come soon…

Kitchen Revamp: Before + After

Oh My, where are the days going?  I swear, I wake up and 5 minutes later it is night time.  I can not keep ahead, but thankfully all is good – NO complaints, except for the bitter cold temps.  Some fun news to share…  I was in NYC for a quick trip late last week and met up with some blogger pals – Diane, Kelly, and Denise – for a Better Homes and Gardens event.  BHG, along with BrandSpark, invited some local bloggers to the Best New Product Awards, where we got to mingle with representatives of some big brands.  It was so fun to “get out” and meet others who are just as passionate as I.  I’ll have more to come soon on the products and a chance for you to win some cool stuff.

While I should have my feet up resting (at 5 months prego, my body is definitely feeling aches + pains), I’ve been busy busy with a few client kitchens – all at different phases of construction.  One I just started and have a design meeting for later today, another is mid-install, and another I just finished.  I shared a peak of it the recently completed kitchen the other day, but now it’s time to show more + it’s evolution…

Kitchen Remodel: Integrating / Reusing existing Ikea cabinets with new custom cabinets to match. Transformation is INCREDIBLE!

This kitchen was really wonderful to work on, but a definite challenge. For privacy sake, I can’t show the floor plan, but there was a large area of the “kitchen area”, which I would say technically was the eating area, that was unused.  Then the space for the “kitchen” with the cabinets was very small + tight.  When the client brought me in, she really expressed the want + desire to reuse much of the existing cabinetry.  The challenge?  They were faux wood/stained cabinets from Ikea and to match them exactly isn’t the easiest objective!  My carpenter/cabinet fabricator was up for a challenge…  Could he do it??

Here are a few before pictures…

before pictures of a Kitchen Remodel: Integrating / Reusing existing Ikea cabinets with new custom cabinets to match. Transformation is INCREDIBLE!

Once we discussed the scope of work + the clients needs + style, this was the Creative Vision Board that I created…

Creative Vision Board for Kitchen Remodel

The “known” of the space was the cabinetry.  The client wanted to match the new with the existing.  I spiced it up with the layers + details

>Lighting

>Fabric

>Tile

>Open shelving

These 4 elements brought the kitchen to the next level!

Lighting: The lighting before was very contemporary and did not fit the style of the house, which is old-world eclectic.  Yes, it has modern features, but certainly is not contemporary.  I wanted to bring in a sense of the handcrafted look and chose new fixtures for the space.

New Lighting for the Kitchen Remodel

Fabric: It’s often a challenge in a kitchen to bring in color, but fabric on a window can be the needed element to soften and liven a space.  The client and I looked at several options for window fabric and chose a modern pattern with colors of teal, mustard, and taupe.

Unfortunately, the window treatment is the only area of the space that is still incomplete.  We are awaiting the roman shade for the window.  Here are a few options we looked at before choosing #1…

Fabric Options for the Kitchen Remodel

Tile: Along with the cabinets, the countertop which is soapstone, was also staying.  To balance the darker hues of the cabinets and counter, I knew a lighter natural stone would be the perfect compliment.  The client and I visited a local tile shop and found this beautiful natural tile with light gray veining – the size: 2″ x 8″ – which was ideal.

 Natural TileTile for the Kitchen Remodel

Open Shelving: To break up the monotony of the stained cabinets, I wanted to bring in an opportunity of open shelving to give the space more openness.  We chose for the shelves to be minimal and painted them to match the crown moulding that was added around the room.  The backsplash tile was also continued behind the open shelves to give a cohesive look.

Open Shelving for the Kitchen Remodel

With a few more tweaks + tricks throughout the space, it came together amazingly.  My carpenter is incredible and not only did he match the new with the old, he also used a few of the existing doors and reworked them to fit in new spots.  For example, using one of the old doors, he used part of it to create a pull-out spice rack which now sits next to the new dishwasher.

New spice rack for the kicthen remodel

I love when clients want to work with what they have!  The outcome of this kitchen made me so happy.  Here are some more after pictures…

Kitchen Remodel: Integrating / Reusing existing Ikea cabinets with new custom cabinets to match. Transformation is INCREDIBLE!

Kitchen Remodel: Integrating / Reusing existing Ikea cabinets with new custom cabinets to match. Transformation is INCREDIBLE!

Kitchen Remodel: Integrating / Reusing existing Ikea cabinets with new custom cabinets to match. Transformation is INCREDIBLE!

Kitchen Remodel: Integrating / Reusing existing Ikea cabinets with new custom cabinets to match. Transformation is INCREDIBLE!

Lastly some Before + Afters – sorry for them not being at the same angle…

Before & After of a Kitchen Remodel: Integrating / Reusing existing Ikea cabinets with new custom cabinets to match. Transformation is INCREDIBLE!

Before & After of a Kitchen Remodel: Integrating / Reusing existing Ikea cabinets with new custom cabinets to match. Transformation is INCREDIBLE!

There you have it.  A few more details and the kitchen will be complete!  In the meantime, want some more ideas for upgrading a kitchen?  Check out this post of mine on 5 Upgrades for a Killer Kitchen

5 Upgrades for a Killer Kitchen

more client kitchens coming soon…

Master Bedroom Refresh: REVEAL

The master bedroom refresh is finally complete. I’ve been sharing most, if not all, of the steps along the way and it’s been an exciting journey.  I’m thrilled with the result and today I’m ready to share all the nooks + crannies of the room.  Ready? Let’s go…

Master Bedroom Refresh {REVEAL} : Room transformation with inexpensive solutions + DIY projects! You will surely be INSPIRED!

Where it all began…

The Creative Vision Board.  The idea + direction for the master bedroom refresh…

Creative Vision Board for Master Bedroom Refresh. Love the ideas seen here? See the actual space by clicking through...

The bedroom took on a new life with an inexpensive upgrade to the bed wall.  Before, all of the walls with the exception of the bed wall, were painted Berkshire Beige when we moved into the house.  The bed wall was painted Texas Leather which is slightly darker, but with all the light that filters in from the large windows, the contrast wasn’t enough.

To really add some depth and contrast to the bed wall, I started out the refresh by going to the dark side and painting the wall a deep chocolate hue called Brownstone by Benjamin Moore.

Master Bedroom Refresh {REVEAL} : Room transformation with inexpensive solutions + DIY projects! You will surely be INSPIRED!

I had to start out the reveal with my favorite picture because it has my pretty kitty, Jessie.  She made her debut on the blog over a year ago when we finished the foyer floor. Hasn’t she grown so much?!  She’s the sweetest.

This is the area of the room that is to the left of the bed.  It had pictures before, but I rearranged them a bit to create a new and refreshened montage.  It’s amazing how a space can look so different using things you already own.

To put the collection together, I played around a little with the arrangement before adding nails to the wall…

Creating a photo montage - steps to putting it together.

I love the balance of pictures and meaningful (to us) quotes.

In this picture below, you can also see the contrast of the two paint colors.  The dark wall surely makes a statement!

Master Bedroom Refresh {REVEAL} : Room transformation with inexpensive solutions + DIY projects! You will surely be INSPIRED!

Master Bedroom Refresh {REVEAL} : Room transformation with inexpensive solutions + DIY projects! You will surely be INSPIRED!

The statement.  The focal point of the room.  THE BED!  With the surrounding new/updated elements, the bed takes on a completely new look and feels brand new, even though it’s 10 years old.  I love the look of fully upholstered beds instead of just a headboard.  It eliminates the need for a bedskirt and gives a higher-end look to the space.  Yes, upholstered beds (with fabric side rails) are slightly more expensive than just a headboard, but they’re totally worth the splurge.  That’s a place to spend the money!!!

Master Bedroom Refresh {REVEAL} : Room transformation with inexpensive solutions + DIY projects! You will surely be INSPIRED!

I feel like I sleep in luxury every night (and a few weekend afternoons) with my new bedding from Crane and Canopy.  We worked together on choosing the right look and feel for the room.  With the other vibrant colors (plum + citrine), the simpler Linden Gray Border bedding was the perfect compliment. Sleeping under this luxurious 400 thread count duvet is like heavenly bliss.  To be honest, it was difficult to choose a bedding style.  They’re entire collection is beautiful!

Master Bedroom Refresh {REVEAL} : Room transformation with inexpensive solutions + DIY projects! You will surely be INSPIRED!

The square canvas images above the bed are actually one collection purchased from Ikea years ago.  sorry, but I doubt they’re still available.  As with most rooms I design, I typically start with one element; one statement piece.  The art is ‘The Element’ that the rest of the room evolved around.  The plum pillow on the bed and the striped pillow on the chaise were purchased from Crate and Barrel years ago as well and they compliment the artwork perfectly.  The only new pillows are the citrine shams that I randomly found at Homegoods.  Of course I wasn’t looking for them at the time, but I am so thankful to have went with my gut because they make the room.  In the store, I really didn’t think the color was right, but once home, they were spot on with the hues of the artwork! #score

Master Bedroom Refresh {REVEAL} : Room transformation with inexpensive solutions + DIY projects! You will surely be INSPIRED!

Breaking up the matching furniture was key to making this room refresh a success.  The space before looked heavy with 4 large pieces of furniture all in a dark hue.  Something had to give.  Eliminating one of the nightstands so the 2 weren’t matchy-matchy, was a great solution.  I relocated the one nightstand to my office and brought in a new smaller, round table in a light gray color.  It makes such a  difference.

Master Bedroom Refresh : Room transformation with inexpensive solutions + DIY projects! You will surely be INSPIRED!

With the main wall going darker, other elements had to go lighter, which meant lots of white layers.  The new white velvet window treatments were the perfect compliment, but needed to be jazzed up.  My simple, inexpensive solution?  Add a decorative leading edge!  The update is incredible and the contrasting plum fabric frames the windows beautifully.

Master Bedroom Refresh {REVEAL} : Room transformation with inexpensive solutions + DIY projects! You will surely be INSPIRED!

Also in this area of the room are the new hanging pendant-turned-light and the revamped desk that was headed curbside. Both were fun projects and made this corner of the room so interesting…  so much more than before.

The desk is surely my most favorite furniture makeover to-date.  I love what the bright hue does for the space + I’m happy to have tried something new – Make Your Own Chalk Finish Paint!

Master Bedroom Refresh {REVEAL} : Room transformation with inexpensive solutions + DIY projects! You will surely be INSPIRED!

The pictures and artwork seen above the revamped desk are a new gallery montage I created and they continue across almost the entire wall, which is opposite of the bed wall.

This is what I wake up to and see every morning!

Master Bedroom Refresh {REVEAL} : Room transformation with inexpensive solutions + DIY projects! You will surely be INSPIRED!

Master Bedroom Refresh {REVEAL} : Room transformation with inexpensive solutions + DIY projects! You will surely be INSPIRED!

I love the new dress form that holds some of my pretty, colorful necklaces.  It brings such an elegant, feminine quality to the bedroom.

Master Bedroom Refresh {REVEAL} : Room transformation with inexpensive solutions + DIY projects! You will surely be INSPIRED!

Master Bedroom Refresh {REVEAL} : Room transformation with inexpensive solutions + DIY projects! You will surely be INSPIRED!

So do you want to know more details on what I purchased where?  Here are some resources:

Resources

Resources:
1. Wall Paint – Benjamin Moore Brownstone in flat
2. Artwork – Ikea, Collection of 3
3. Lamps – JCPenney
4. Wedding Song pillow (DIY project) + striped pillow from Crate and Barrel
5. Nightstand – part of a 4 piece collection purchased at a local store
6. Chaise – Crate and Barrel; item no longer available
7. Rug – Safavieh purchased on Joss and Main
8. Duvet – Linden Gray Border bedding from Crane and Canopy
9. Upholstered bed – Queen Colette Bed from Crate and Barrel
10. Citrine Shams – Homegoods
11. Bamboo Shades – Payless Decor
12. Deep plum pillow – Crate and Barrel
13. Drapes – white velvet panels from Lowes with custom edge detail (DIY project)

All the RESOURCES for the Master Bedroom Refresh {REVEAL} : Room transformation with inexpensive solutions + DIY projects! You will surely be INSPIRED!

14. Wall Paint – Benjamin Moore Berkshire Beige in flat
15. Lantern from World Market turned Light Fixture (DIY project)
16. Chair – Thrift store chair given new life with spray paint (DIY project)
17. Throw – Homegoods
18. Desk – Desk Makeover using Make-Your-Own chalk finish paint (DIY project)
19. Gallery Wall – Everything was repurposed from throughout my home; nothing new on the wall
20. Dresser – part of a 4 piece collection purchased at a local store
21. Lamp – Crate and Barrel; item no longer available
22. Silver Leaf Tray – Target
23. Dress form – Homegoods

And there you have it.  The master bedroom refresh {reveal} in it’s entirety.  Most of the space was revamped with new DIY creations and items from other rooms in my home.  A few new items that I didn’t have were seamlessly added to create a cohesive look.  I know it took a few weeks from start to finish, but thank you for following along on the ‘real’ timeline of my room refresh!

Master Bedroom: Picture Gallery Wall

One topic on the blog that I’ve shared inspiration on the most times, have received the most pins, and gets the most questions + comments, is creating a gallery wall.

Gallery walls are one of my most favorite design elements in a home because it tells so much.  Whether putting together a collection of a few large black and white family photos or creating a wall from wall edge to wall edge filled with colorful instagram images + momentos from your travels, a gallery wall is an expression of who you and your family are; truly the most important part of creating a meaningful home.

As the plans for my master bedroom were originally coming together, I knew I wanted to relocate the TV and create a gallery wall opposite of the bed.  The room just called for it.  It asked to have more photos.  I love being surrounded by photos, artwork, and elements that are most special to me.  In the bedroom, it makes the most sense.

Creating a gallery wall behind a TV + tips on how to implement your own gallery wall. So many ideas & inspiration on this blog!

The opposite of the bed used to have a large mirror (which was part of a bedroom matching set that I broke up) and the TV mounted to the side with a table underneath.  Very plain jane.  The space certainly didn’t reflect ‘us’.

Master Bedroom that didn't reflect 'us'

We removed the wall-mounted TV and the mirror, and placed the TV on top of the dresser.  The dresser, which is about 5′ long has a lot of surface space, so in addition to the TV, I added in one of my all-time favorite lamps that I hadn’t found the right home for since we moved here.   It’s a purchase from Crate and Barrel years ago and used to be in our previous home’s guest room.  I’m so happy to have found such a prominent place for it! #happygal

Gallery wall in progress

These two elements – the TV and the lamp – were the perfect size, and balance each other well.  The TV isn’t the focal point anymore and with the pictures that are about to be mounted on the wall, the TV will “disappear” and/or appear as just another frame on the wall.

As for the art / pictures on the wall, nothing was purchased.  ALL came from other areas around my home or my storage closet with all my extra goodies.  I wasn’t worried about the color of the frames or the images themselves, I just wanted only things that were important to us.  This is the wall we wake up to and see every morning…  It’s a great way to start the day (most days).

I don’t have too many in-progress pictures because I was so in-the-moment, but I started the gallery wall with the square mirror.  Part of it is actually behind the TV, so the TV overlaps it, which creates a shadow = depth.  Then I continued with the surrounding pictures – the square pictures above (Norman Rockwell prints) and the black and white Fallingwater image.

Gallery Wall Progress

As the wall continued, it started to take form, but it wasn’t smooth as butter.  Creating a gallery wall takes time, planning, and most likely a few mishaps before it’s just right!  Believe me, I didn’t snap my fingers and say Presto, to have it all complete in 5 minutes.  It definitely took a few days and a few moves.  As I’m working on a big project, especially something like a gallery wall, I like to do it and then take a step back to reflect.

Creating a successful gallery wall

After hanging most of the images and reflecting on it, I realized something was off.  Many of the frames were too in line and not overlapping enough.  To create a successfully balanced gallery wall, I feel it’s important to have a mix of larger and smaller pieces, along with them being staggered / overlapping.

I took a picture of why I didn’t feel this 1st attempt wasn’t right…

Creating a Gallery Wall around a TV

And take a look at the change after a few adjustments / moves…

Creating a gallery wall behind a TV by @Jenna_Burger, WWW.JENNABURGER.COM

Creating a gallery wall behind a TV by @Jenna_Burger, WWW.JENNABURGER.COM

Many of the pieces of art were given to me and a few are store-bought finds.

> The sepia image of the flower was in our previous powder room and purchased at Homegoods.  It’s actually part of a pair, but I broke them up.

> The black and white image above is a charcoal drawing of a house that the Mister drew.  He’s so talented!

> The pretty sunset image in the larger white frame to the right used to be in my daughter’s room, but I stole it 🙂

> Continuing to the right, the 2 square images are Norman Rockwell prints – Day in the Life of a Little Boy + Day in the Life of a Little Girl.  They remind us so much of our little kids.

Norman Rockwell Prints - Day in the Life of a Little Girl / Day in the Life of a Little Boy

More of the wall…

> To the right of the Norman Rockwell images is a black and white picture of Frank Lloyd Wright’s Fallingwater that was gifted to my husband for his graduation.  We were both Architecture majors in college, so it means a lot to us.

> The gold framed image at the top is an oil painting of Paris gifted to me after my Mom and I took a trip there 10 years ago.

> The other gold framed oil painting is a random picture that was given to me from my parents (or maybe I just took it from their house – can’t remember)

> In the black frame below are my little boys handprints – my first mother’s day gift.

The rest of the wall…

Creating a gallery wall behind a TV by @Jenna_Burger, WWW.JENNABURGER.COM

> The white framed ballerina piece of art was recently given to me by the talented Donna Talley, stylist and producer for BHG.  She’s been a very special person in my life as of late!  She has provided me with some amazing opportunities.

> The other white framed image above is another charcoal work by my husband of Falling Water.

The wall in it’s entirety…

Creating a gallery wall behind a TV by @Jenna_Burger, WWW.JENNABURGER.COM

Now that I’ve shared the result of the entire wall, I thought it would be helpful to show you where I started (with the mirror #1) and how it took shape.

Laying out a Gallery Wall

Some tips for creating a gallery wall:

  • Start with one framed picture and continue laying out the wall off of it.  Laying out the gallery wall on the floor first can also be helpful.  I did that on this previous wall I created…

  • Stagger the framed pictures instead of laying them out in one line.
  • Overlap framed pictures to give depth.
  • Create balance with a variety of larger and small pictures

For more ideas + inspiration, visit this previous posts:

Creating a Photo Wall Display
Useful Ideas and Layouts to Create a Photo Gallery Wall
Ideas + Solutions for the Wall Behind the TV

If you want to check out my EASY tip on hanging a picture or artwork, check out this post:
The Best Tip to Hang a Picture

Let me show you the rest of the wall.

Creating a gallery wall behind a TV by @Jenna_Burger, WWW.JENNABURGER.COM

Creating a gallery wall behind a TV by @Jenna_Burger, WWW.JENNABURGER.COM

The view as we enter our bedroom with lots of beautiful light filtering in…

Creating a gallery wall behind a TV by @Jenna_Burger, WWW.JENNABURGER.COM

Creating a gallery wall behind a TV by @Jenna_Burger, WWW.JENNABURGER.COM

Creating a gallery wall behind a TV by @Jenna_Burger, www.sasinteriors.net

The before, in-progress, and after is pretty different.  I’m so happy with the transformation because it’s a space I created that truly reflects us!

Before, In-Progress, & After Gallery Wall

The gallery wall… the final project before the big reveal.

Even though you’ve pretty much seen the entire room throughout all the DIY projects that I’ve shared over the past few weeks, the final reveal is coming later this week!

Let There Be Light: How to Make a Pendant Fixture

You may have noticed a pretty little pendant in some of the pictures I’ve been sharing of projects throughout the progress of my master bedroom revamp.  Guess what, I made it. Well kind of.

Let there be light: How-To turn a pendant into a light fixture; Tutorial by @Jenna_Burger, WWW.JENNABURGER.COM

So I didn’t actually make the fabulous fixture, but I did electrify it so it could work as a light. Let there be light: How-To turn a pendant into a light fixture; Tutorial by @Jenna_Burger, WWW.JENNABURGER.COM The fixture I am referring to is the capiz hanging pendant from World Market, one of my favorite resources for interior decor.  I had originally intended on using the pendant on our ceiling fan.  I’m not crazy that we have a fan in our room instead of an amazing chandelier.  But since it gets super hot during the summer months and the Mister vetoed the removal of the fan, it simply IS.  So making the best of it, I had planned on adding the pretty pendant during the winter when the fan isn’t in use.  WELL, the size and the mounting didn’t work once I had it in hand, so instead I thought it would make for an interesting light at my newly revamped desk. So to make this pendant glow and actually function as a light, I purchased a light kit from Home Depot (I’m a Lowe’s gal through and through, but they didn’t have the parts that I needed). Let there be light: How-To turn a pendant into a light fixture; Tutorial by @Jenna_Burger, WWW.JENNABURGER.COM For this project, these are the supplies I used:

  • Decorative Pendant (try a mason jar or an unconventional fixture to use as a light)
  • Light Kit
  • 8′ length of extra wire
  • Decorative Chain
  • Wire Cutter
  • Screw Driver

Here are the steps I took to make this pretty pendant into an actual light… In all the light kits I found, the wire cord length was only 8′, but I needed it to be 16′ long.  Solution: I purchased the light kit + extra wire that Home Depot cut for me, which cost an additional $3 for the extra 8′ of length. 1. At home, I first connected the (2) 8′ lengths of wire.  First, using a wire cutter I cut about 1/2″ of casing off one end to expose the wires inside. 2. Then I cut the ends off the other 8′ length wire.  So I was left with 4 exposed wire ends. 3. I connected (2) ends together and (2) ends together, and then sealed them with electrical tape.  It doesn’t matter what end goes with what end. These steps are very easy and take minutes to do. Let there be light: How-To turn a pendant into a light fixture; Tutorial by @Jenna_Burger, WWW.JENNABURGER.COM Depending on how long of a pendant you want, you might be able to skip right over the steps above and start with the following steps of connecting the wires to the socket. 1. Start off by removing the cardboard and the socket shell.  Then create an Underwriter’s Knot with the end of your wires.  This type of knot will prevent the wire from loosening inside the socket. To make this type of knot, first separate the wires, form a large loop with each wire, and thread the end of each wire through the other loop. Complete the knot by pulling the ends of the wires so the knot will tighten. 2. With your fingers, twist the wire strands together to form a partial loop.  Then wrap each wire clockwise around the socket terminals (the inside of the screw). Then tighten the terminal with a screwdriver. 3. Once the wires are secured and tightened into the terminals, slip on the cardboard sleeve (YES, LEAVE THE CARDBOARD ON), and put the socket shell back into position. 4. Let there be light! Let there be light: How-To turn a pendant into a light fixture; Tutorial by @Jenna_Burger, WWW.JENNABURGER.COM For the bulb, I used an old fashion style that I found at Lowe’s (like this one).  They give such a great look since the bulb is slightly exposed.  FYI, these style light bulbs won’t be available much longer because the US in no longer producing or importing filament bulbs.  So grab em’ while you can! Once the wiring was complete, I added the decorative chain… Let there be light: How-To turn a pendant into a light fixture; Tutorial by @Jenna_Burger, www.sasinteriors.net Here’s a close up.  Isn’t it pretty?! Let there be light: How-To turn a pendant into a light fixture; Tutorial by @Jenna_Burger, WWW.JENNABURGER.COM And here’s how the new pendant looks in the room… (psst…  I still have to cover the black electrical tape where I connected the 2 wires) Let there be light: How-To turn a pendant into a light fixture; Tutorial by @Jenna_Burger, WWW.JENNABURGER.COM Let there be light: How-To turn a pendant into a light fixture; Tutorial by @Jenna_Burger, WWW.JENNABURGER.COM Let there be light: How-To turn a pendant into a light fixture; Tutorial by @Jenna_Burger, WWW.JENNABURGER.COM Let there be light: How-To turn a pendant into a light fixture; Tutorial by @Jenna_Burger, WWW.JENNABURGER.COM I’m in love.  And surrounded by my newly painted desk + my newly custom-made (for little $$$) window panels, I’m a happy girl! The bulb is only 40 watts, so it gives a beautiful glow when lit.  Definitely nice for the evening while watching TV.  And I’ll tell you, I’ve been spending alot more R + R time in my room lately!  I’m just loving the space.  Next area of the space to show you…  The Galley Wall!  And then the final reveal. If you want to see another lamp project of mine, you can check it out here when I guest posted at my friend Lindsay’s blog, Makely Home.

Are you a fan of shell style light fixtures? Have you ever made something/anything into a light? If not, what do you wish you could electrify?