Author: Jenna

DIY: How-To Hem (no sew) and Add Stripes to Curtains Using Paint

I hope you had a great weekend!  I know it’s Tuesday, but since my husband and kids had off yesterday for President’s Day, it feels like the first day of the week for me.  In spite of having a no-plan weekend, the 3 days flew by and we were majorly busy (new projects, photographing others, food shopping, car buying, etc.).  How does 36 hours fly by that fast?  Anyway, since showing you my newly created home office / family room last week,  I’ve got a slew of DIY projects to share.  First up…

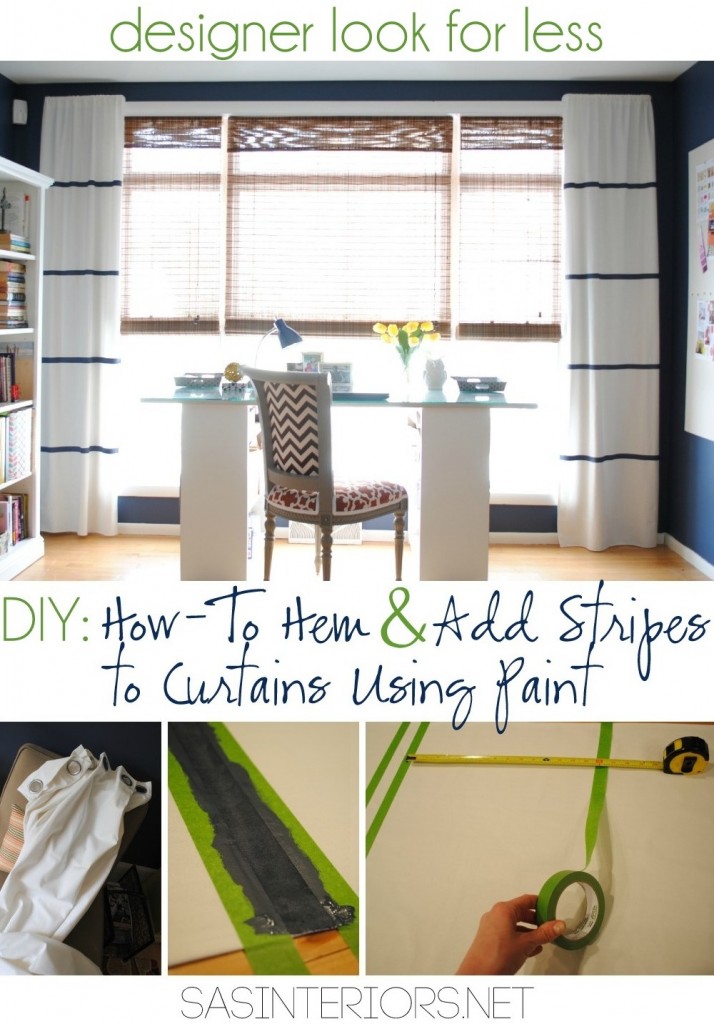
A ‘how-to’ on how I hemmed and created the thin-striped curtain panels (I know a few of you have excitedly been awaiting this tutorial).  I was surprised how easy they were to create and they look like they cost alot of $$$ (but they totally didn’t).

DIY: Tutorial on how to hem a window curtain panel and how-to add stripes using wall paint; Designer look for less by @Jenna_Burger, sasinteriors.net

When the royal blue walls were complete last Summer, I knew white curtains would be a great, striking complement. Thankfully, I had an extra pair of panels from my son’s room that were purchased from Ikea 5+ years ago.

DIY: Tutorial on how to hem a window curtain panel and how-to add stripes using wall paint; Designer look for less by @Jenna_Burger, sasinteriors.net

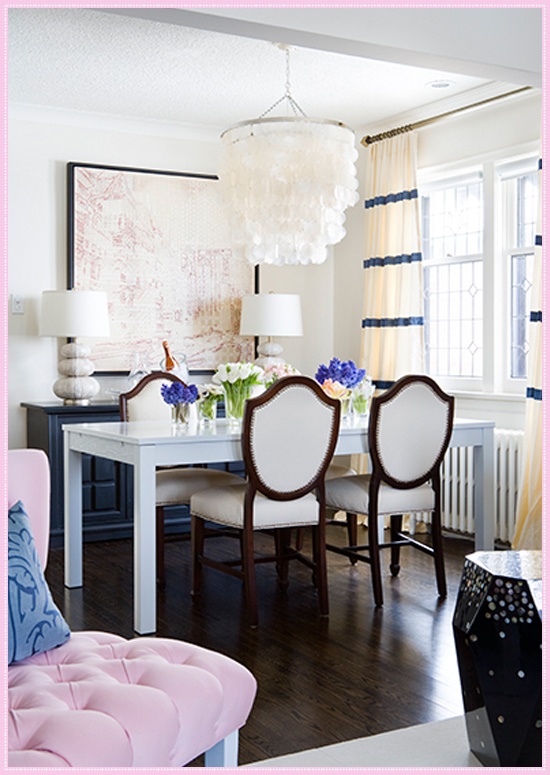
I wanted to jazz up the white panels a bit though, and at first thought of a leading edge similar to what I created for my daughter’s room.  As more ideas developed, I had seen this living room and pinned it a while back. The thin-striped lines stuck in my head and I knew they would be just the touch to add interest to the stark white panels, yet not overwhelm the room.  I’ve seen many striped fabrics in window panels lately, but I wanted something softer and thought thick horizontal lines would be too heavy for the space since the dark blue walls are dramatic enough.

Inspiration for thin-striped curtain panels

The area for where the new curtain panels were to go, started out like this…

DIY: Tutorial on how to hem a window curtain panel and how-to add stripes using wall paint; Designer look for less by @Jenna_Burger, sasinteriors.net

To begin, I hung the white panels on the dark wood rods that were already in place.

DIY: Tutorial on how to hem a window curtain panel and how-to add stripes using wall paint; Designer look for less by @Jenna_Burger, sasinteriors.net

Nope they didn’t work.

The dark rod blended in too much with the wall, and the panels looked so low and squat.  It totally went against my rule of thumb on how best to hang a curtain.

Onto the idea #2.

Because of the window height, I couldn’t put a decorative rod above (there wasn’t enough room), so instead I bought a $3 basic metal pocket curtain rod.

I created the “pocket” at the top of the curtain (fold over top edge, sew or use fusible tape to create a pocket of about 2″ for the rod to slip through).  Then the panels had to be hemmed at the bottom because they were too long.

Here’s my quick tutorial on How-To Hem a Curtain ~

1. With your curtain hung on the rod, loosely pull the bottom of the panel and add 2-3 pins at the spot where the panel hits the floor plane.

Hint: Don’t pull the panel tawt because if you pin and sew at that point, your panels will result too short.  You want to leave the panel(s) loose, so it just grazes the floor (this is how I feel a curtain panel looks professional.  It’s not a must, but it’s my opinion).

DIY: Tutorial on how to hem a window curtain panel and how-to add stripes using wall paint; Designer look for less by @Jenna_Burger, sasinteriors.net

2. With the 2-3 pins indicating the line for which to hem the panel, I used a measuring tape to keep the same length and added more pins all the way across the width of the panel.DIY: Tutorial on how to hem a window curtain panel and how-to add stripes using wall paint; Designer look for less by @Jenna_Burger, sasinteriors.net

O, and did I tell you the good part about this project – I didn’t use a sewing machine.  I was totally feeling lazy that day! You can of course, but it’s not a must.  That’s a major plus for my non-sewing friends!

3. Using fusible tape, I folded the bottom edge underneath and hemmed at the line of the pins.

DIY: Tutorial on how to hem a window curtain panel and how-to add stripes using wall paint; Designer look for less by @Jenna_Burger, sasinteriors.net

Here’s the result…

Yes, much better!

DIY: Tutorial on how to hem a window curtain panel by @Jenna_Burger, sasinteriors.net

A perfectly tailored window curtain panel that just grazes the floor.  Super easy!

Ok, so now on to the 2nd part of this tutorial…

How-To Add Stripes Using Paint ~

FYI – you could totally skip step one if you have already have the perfect length curtain and you can skip this step if you have no interest in adding stripes.  Just thought I’d share that tid-bit 😉

For this part of the project, I used the following materials:

  • Painters Tape
  • Wall Paint that is the same color as the wall
  • Paint Brush
  • Measuring Tape

DIY: Tutorial on how to hem a window curtain panel and how-to add stripes using wall paint; Designer look for less by @Jenna_Burger, sasinteriors.net

1. To start off, I determined how many stripes I wanted and the width of the stripes.

4 stripes and 1″ wide.

I layed my curtain panel on the floor and using a little math (big UGH), I determined my stripe placement.  Using painters tape (because it’s easy to remove), I marked the 4 stripe locations.

DIY: Tutorial on how to hem a window curtain panel and how-to add stripes using wall paint; Designer look for less by @Jenna_Burger, sasinteriors.net

2. Then I added the painters tape and my measuring tape to create the 1″ wide stripe.

DIY: Tutorial on how to hem a window curtain panel and how-to add stripes using wall paint; Designer look for less by @Jenna_Burger, sasinteriors.net

3. * Important part!

Once the tape is in position, it’s important to press hard on it like you’re burnishing it into the fabric.  You want to make sure the tape is sealed so the paint doesn’t seep underneath. I ‘burnished’ the edge with my nail.

DIY: Tutorial on how to hem a window curtain panel and how-to add stripes using wall paint; Designer look for less by @Jenna_Burger, sasinteriors.net

4. Then using the wall paint that I used in the room (Benjamin Moore Van Deusen Blue), I painted on the stripes using a craft brush.  I did not add anything to the paint to make the medium different.  It’s straight paint on fabric!

DIY: Tutorial on how to hem a window curtain panel and how-to add stripes using wall paint; Designer look for less by @Jenna_Burger, sasinteriors.net

DIY: Tutorial on how to hem a window curtain panel and how-to add stripes using wall paint; Designer look for less by @Jenna_Burger, sasinteriors.net

Once all four stripes were done, I took off the tape.  Some of the areas weren’t completely dry, and that’s okay.

DIY: Tutorial on how to hem a window curtain panel and how-to add stripes using wall paint; Designer look for less by @Jenna_Burger, sasinteriors.net

5. When setting up the stripes for the second panel, I layed both curtains side by side so they were perfectly aligned.  Then, by eye, I created the stripes on panel #2.

DIY: Tutorial on how to hem a window curtain panel and how-to add stripes using wall paint; Designer look for less by @Jenna_Burger, sasinteriors.net

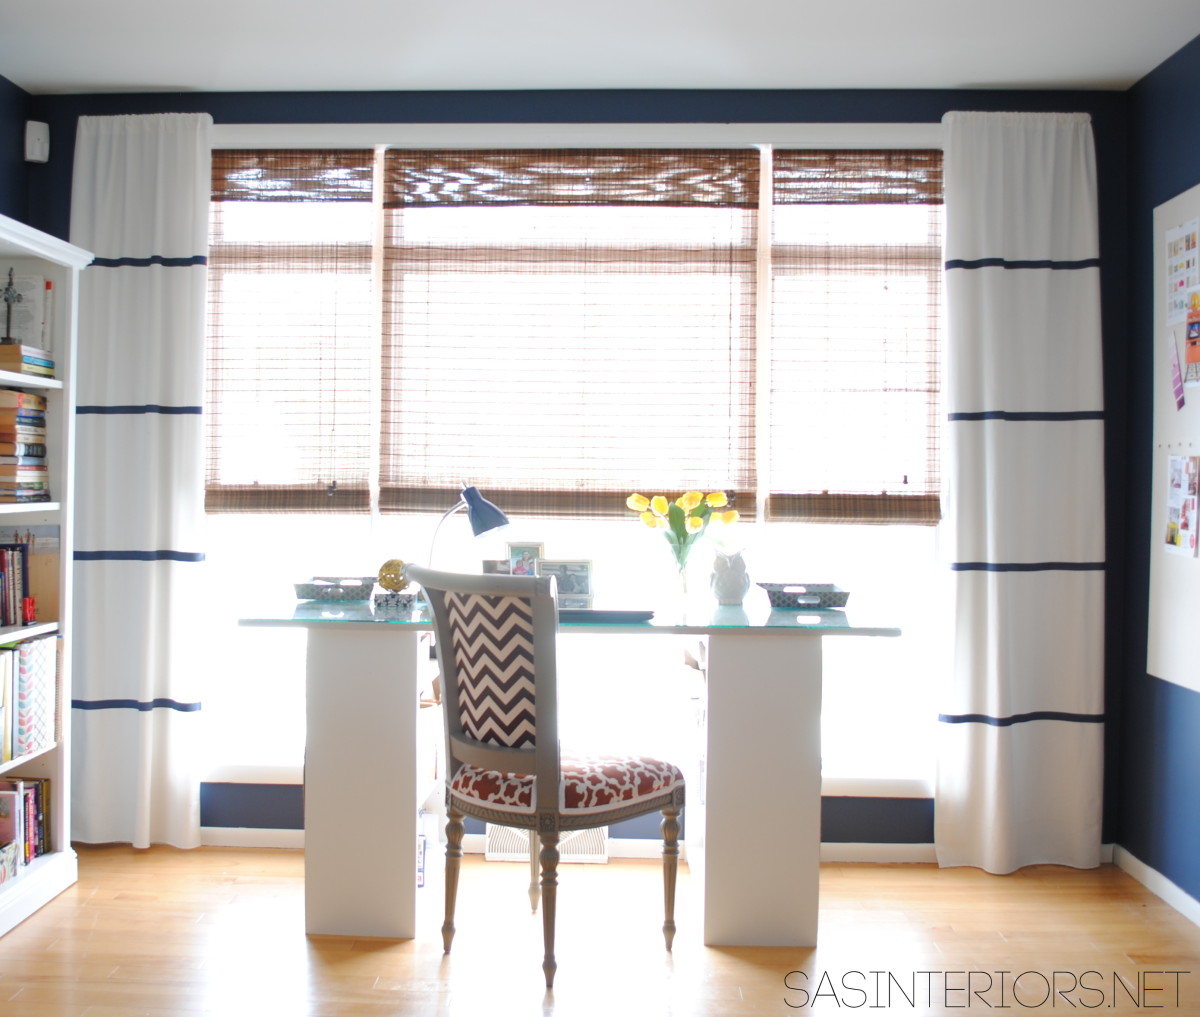
Once they were completely dry, they were ready to hang, and admire! #happygal

DIY: Tutorial on how to hem a window curtain panel and how-to add stripes using wall paint; Designer look for less by @Jenna_Burger, www.JENNABURGER.COM

The bamboo shades (which I got from Payless Decor) are a fantastic compliment to the stark white window panels and white moulding trim.  You may have seen the bamboo shades in other parts of my home (check this post out) and I adore them!  They are of great quality (and an awesome price).  The darker hue and texture (which is kind of difficult to tell in the picture because of the natural light coming through) are just gorgeous.  On my windows you’ll find the tibet color.

DIY: Tutorial on how to hem a window curtain panel and how-to add stripes using wall paint; Designer look for less by @Jenna_Burger, www.JENNABURGER.COM

DIY: Tutorial on how to hem a window curtain panel and how-to add stripes using wall paint; Designer look for less by @Jenna_Burger, www.JENNABURGER.COM

O, and if you like it, would you pin it or share it? Thanks a bunch!

DIY: Tutorial on how-to add stripes using wall paint; Designer look for less by @Jenna_Burger, sasinteriors.net

Have questions?  Don’t be afraid to ask – I’d be happy to help!

Want to see more drapery projects?

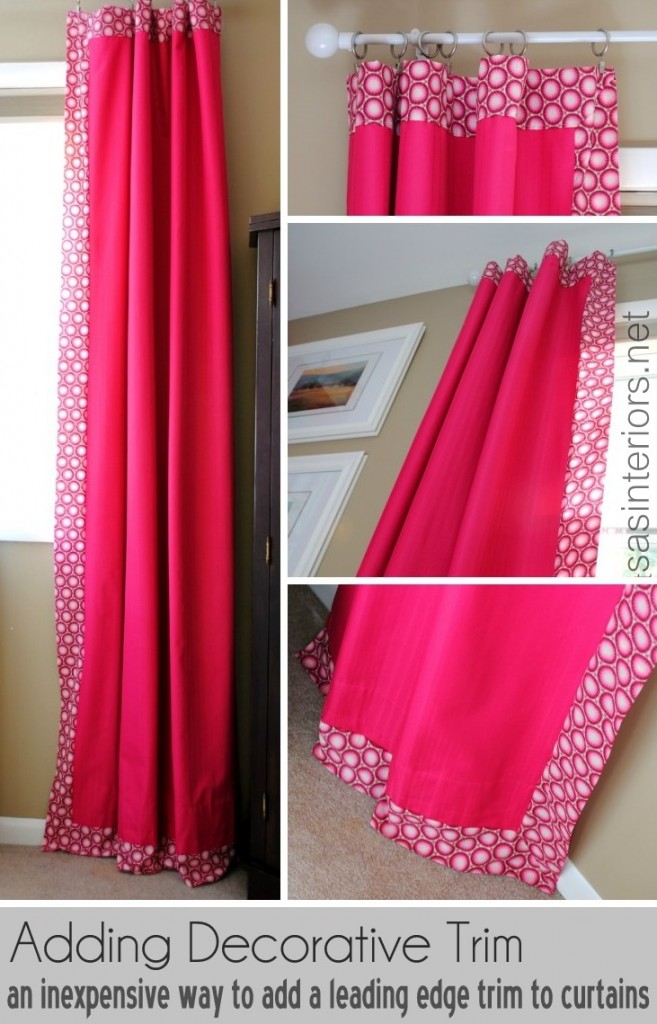
Then you might want to check out this post on Adding Decorative Leading Edge Trim to Curtains ~

DIY Tutorial on How-To Add a Leading Edge to a Curtain Panel by @Jenna_Burger, sasinteriors.net

Or this project on How-To Make Curtains from Scratch and Line them with Drop Cloth~

DIY-Window Panels101

Of course you’ll want to know How-To Best Hang Window Drapery Panels, right?

The Right (and Wrong) Way to Hang Curtains

Thanks for checking out my 2-in-1 tutorial!  What a great Tuesday!

 Have you ever tried painting on fabric?  What about embellishing window treatments?  Or even making your own curtains?  Share your creations with me – would love to see them!

I link my projects to some of these parties: Skip to My Lou, Dittle Dattle, Between Naps on the Porch, Today’s Creative Blog, Stories of A to Z, All Things Heart & Home, House of Hepworths, Finding Fabulous, The Shabby Nest, Serenity Now, Tatertots and Jello, Thrifty Decor Chick, Tip Junkie

Publication Feature: SaratogaMama Magazine

It’s an exciting day for me.

My name, my picture, and my home have been published.

The feature is in the premier issue of a local family-related publication called SaratogaMama Magazine run by Colleen Pierre of SaratogaMama.com.

If your local to the Albany / Saratoga  Springs area of Upstate NY, you might have heard of it – SaratogaMama is so helpful to learn about important places, helpful resources, and “what’s happening” in our community.  The article I wrote is about Ideas for Infusing Color into Your Home for Spring.   So no matter where you live you might gather some helpful and creative ideas.  Plus, you can get a little sneak peak at the featured photos of my pad taken by Mark Bolles, a local photographer.

Here’s the feature, which you can read in it’s entirety by clicking {here}.

(left click on image to view larger – these directions are for you mom, lol )Feature Article in SaratogaMama Magazine

Feature Article in SaratogaMama Magazine

Feature Article in SaratogaMama Magazine

Have an enjoyable and creative weekend!  Any exciting plans?

Easily Change a Recessed Light to a Decorative Hanging Fixture

In my quest to make a few easy upgrades in the kitchen (I shared my new bamboo shades earlier in the week), I was really hoping for some sort of decorative fixture.  It was near impossible aesthetically because of the close proximity to the hanging fixtures in the adjacent rooms, plus there are 6 recessed lights (hi-hats) in the space and the layout just wouldn’t allow – I wasn’t wanting to change the space that much for an electrician to come in and rip out the entire ceiling to simply add a pretty new light.

But thenwww.JENNABURGER/wp-content/uploads/2013/02/RecessedLightToFixture2.jpg”>Easily and Inexpensively Convert a Recessed Light to a Hanging Decorative Fixtures by @Jenna_Burger via sasinteriors.net

To easily make the upgrade, I used a Recessed Light Adapter Kit (a.k.a. Recessed Fixture Converter) which quickly and inexpensively allows a recessed light to be converted to any style hanging fixture or pendant.  Think about the possibilities for all those blah hi-hats that can now be WOW – hallways, bathrooms, kitchens…

Easily and Inexpensively Convert a Recessed Light to a Hanging Decorative Fixtures by @Jenna_Burger via sasinteriors.net

To start off, the Mister and I removed the light bulb and the plastic can, so only the sheetrock and wires inside were exposed.  Then we took the new white plate from the conversion kit and installed it as specified in the directions (the electrical wires were still exposed and dangling).

Easily and Inexpensively Convert a Recessed Light to a Hanging Decorative Fixtures by @Jenna_Burger via sasinteriors.net

Then it was time to hang and electrify the fixture.  If you plan on changing out your recessed light, follow the directions that come with the kit!  I am not an electrician and I’m sharing the pictures and steps that I took, but every condition is slightly different.

Easily and Inexpensively Convert a Recessed Light to a Hanging Decorative Fixtures by @Jenna_Burger via sasinteriors.net

The hanging fixture we chose was from Lowe’s and it’s a great accent to the fixtures in the nearby spaces. Cute, right? It was less than $50 so it was a winner in my book. I’ve seen similar for a lot more $$$, so I was a #happygal.

Easily and Inexpensively Convert a Recessed Light to a Hanging Decorative Fixtures by @Jenna_Burger via sasinteriors.net

Within about 20 minutes, the fixture was hung and we stood back to admire.

Easily and Inexpensively Convert a Recessed Light to a Hanging Decorative Fixtures by @Jenna_Burger via sasinteriors.net

Check out how the kitchen has transformed over the years.

All DIY baby!!

Evolution of Kitchen Makeover revamped entirely with DIY projects (no professionals) by @Jenna_Burger via sasinteriors.net

It’s hard to believe how it looked less than 2 years ago.  I’m super happy with the recent revamp of the bamboo shades and the decorative light fixture.  (Who knows what will be next…)

If you want to read more about the DIY Kitchen Makeover, click {here} or feel free to ask me.

Have you ever changed a recessed light to a decorative fixture?  If not, where in your home would you like to?

A Simple Kitchen Window Upgrade

Do you ever feel with a little upgrade, a space in your home that you haven’t quite loved, will finally look exactly how you always hoped?  That little revamp which won’t take long, but the room doesn’t feel “right” without ?

Well, I’ve had that feeling in my kitchen for a while.  The part that needed a redo wasn’t horrible, but I was kind of tired of it.

It’s not the cabinets because I still love them 2 years later.

It’s not the hardware because I still love that too.

But instead it was actually the valance over the windows that I felt blah about.

So the kitchen window got a revamp!

Kitchen Window Revamp - A simple upgrade for a large kitchen window via @Jenna_Burger, sasinteriors.net

I created the previous valance 2 years ago and I never felt it was just right (don’t tell the Mister.  He didn’t see anything wrong with it).  To others, the valance was fine, but for me, it just wasn’t exactly what I envisioned.  Here’s how it looked before (with the old oak cabinets too – crazy to look at)…

Kitchen Valance

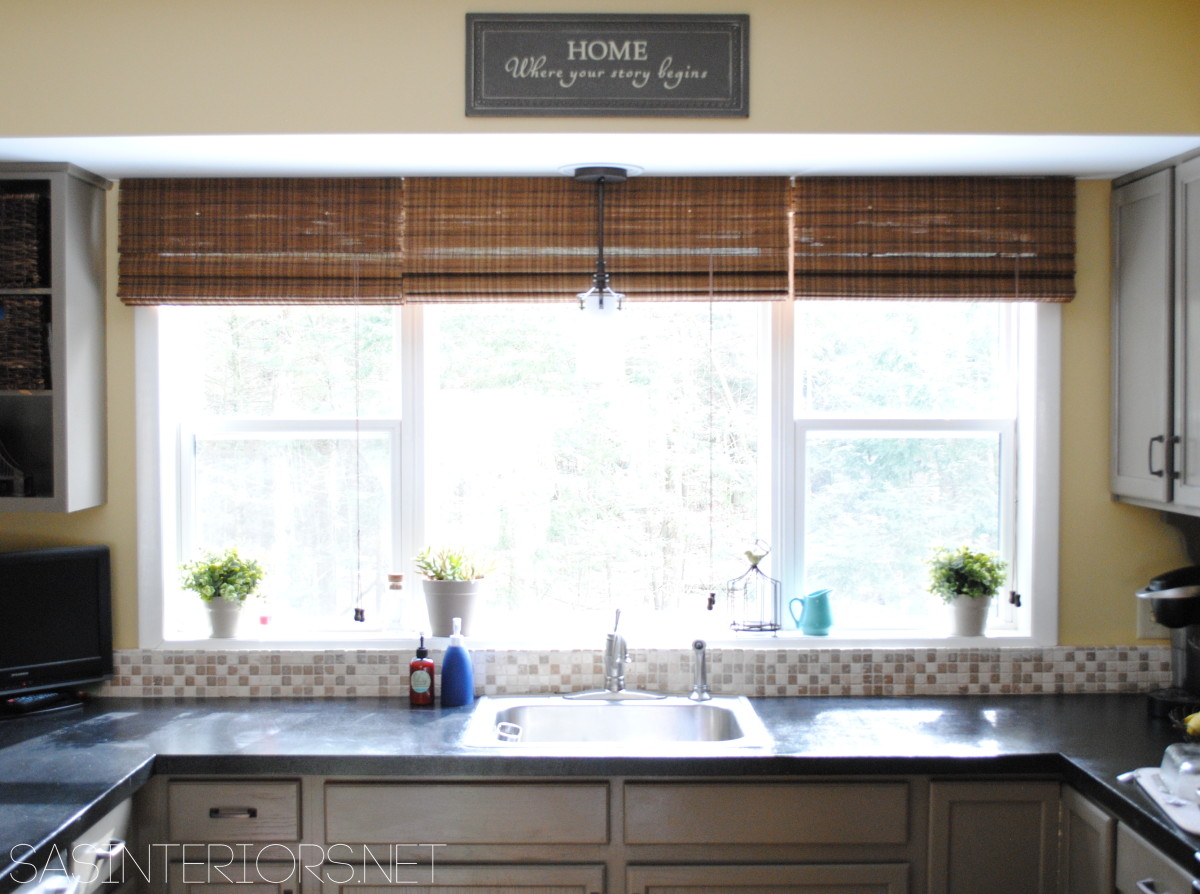
Anyway, since I’ve been adding bamboo shades (which I got from favorite resource, Payless Decor) to many of the first floor windows after I painted the mouldings white, it seemed like the most appropriate choice to continue the look + I love the wood texture of the shades against the light yellow wall color and crisp, white mouldings!

Aren’t they gorgeous?!

Kitchen Window Revamp - A simple upgrade for a large kitchen window via @Jenna_Burger, sasinteriors.net

This past weekend while the kids went out for breakfast with their grandparents, I found a few hours of free time to finally hang my new roman shades.  When does that ever happen – free time – huh??  I blasted the music – Katy Perry was my fav choice for this project 🙂 – and got to work.

You might have seen me post this pic on Instagram Saturday afternoon…Kitchen Window Revamp - A simple upgrade for a large kitchen window via @Jenna_Burger, sasinteriors.net

I removed the old valance + there was still a cellular shade from the old owners behind it.  Then in about an hour, I hung the new roman shades.  Usually I always choose inside mount shades because decorative treatments (long drapes) are on the outside, but because the moulding of the kitchen window hits the ceiling and I wanted to allow as much light in as possible, so I decided on an outside mount.  Now the new bamboo shades touch the ceiling.

What do you think?

Kitchen Window Revamp - A simple upgrade for a large kitchen window via @Jenna_Burger, sasinteriors.net

Such a difference and the new shades go so well with the open cabinet.

Kitchen Window Revamp - A simple upgrade for a large kitchen window via @Jenna_Burger, sasinteriors.net

O, and did you notice the new light?  That was an easy switch-aroo that we did a few weekends ago as well.  We changed the hi-hat to a hanging fixture.  I’ll share more on that later this week, so stay tuned…

Kitchen Window Revamp - A simple upgrade for a large kitchen window via @Jenna_Burger, sasinteriors.net

It’s amazing how small things which only take a few hours (or a morning filled with good music), change the entire look of a room.  I am thrilled with the new look of this room.

If you love the look of these gorgeous bamboo shades, they’re from Payless Decor and the color is Tibet.

Kitchen Window Revamp - A simple upgrade for a large kitchen window via @Jenna_Burger, sasinteriors.net

Ahhh… Much Better – #happygirl

What small adjustments have you made in a room of your home to completely change the look? If nothing yet, what changes do you want / hope to make?


How To Upcycle: Successful Tips for Changing Old Items into Creative Home Decor

One of my all-time favorite ways to save money and bring elements into my home that have purpose and meaning is with upcycling, a.k.a. reusing / repurposing an item into another use or function. I’ve upcycled a lot of things around my home and shared the process and result on the blog, like my recent light to vase switch-aroo!

Not only can you save $$$ in your pocket, but upcycling allows you to create something that is original and one-of-a-kind.  Yes, you may have to think outside the box a bit, but in the end I’m sure you’ll be happy with the result.

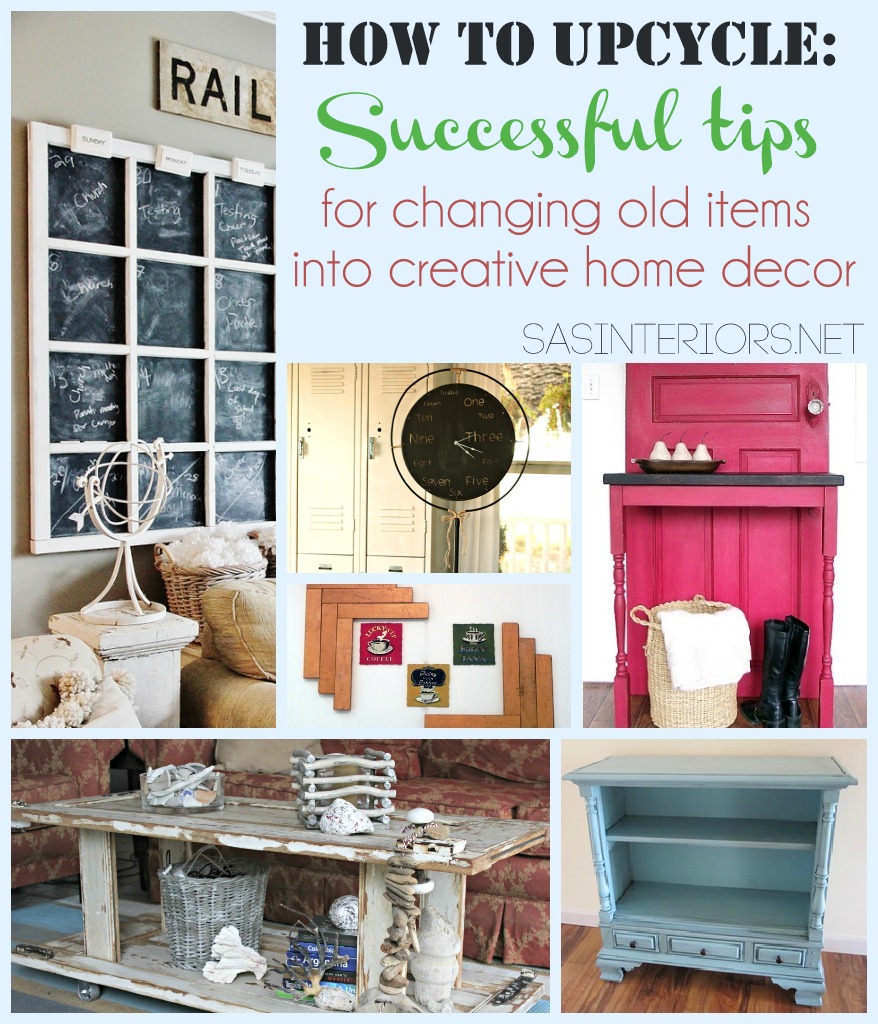
Since upcycling so many items around my digs, I thought I would share some tips and ideas on how to successfully change old items into trendy, fun, and creative new home decor.

How to Upcycle: Successful Tips for Changing Old Items into Home Decor via @Jenna_Burger, sasinteriors.net


1. Shop Your Home

One of my favorite ways to shop is with a $0 budget. What?  How is that possible (you ask)?

Well by shopping your home. Take a tour around your house and look for items that you’re bored or tired of.  Then with a little creativity, give them a fresh new look.  It can be as simple as a coat of spray paint (in a fun, vibrant color) or taking the item and completely changing it’s function {like my garage sale clock-turned-mirror}.  It can be a super simple reuse of an item, but I guarantee by changing it’s look, the item will be new again!

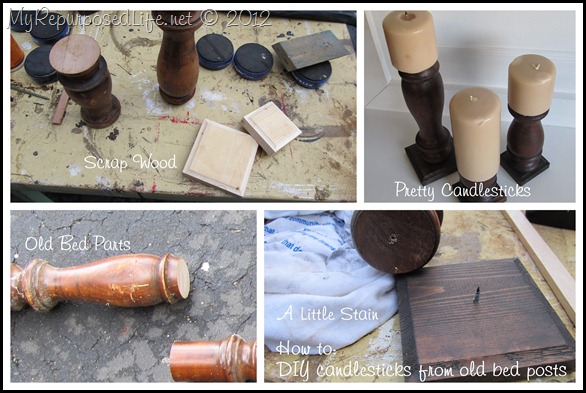
Sometimes the unimaginary can be made into something else.  Gail of My Repurposed Life did just that when she shopped her home and instead of ditching an old bed, she used the posts and upcycled them into candletsicks. How cool?!

How to Upcycle: Successful Tips for Changing Old Items into Home Decor via @Jenna_Burger, sasinteriors.net

Or how about these old lampshades which Viv of The V Spot revamped with new fabric and ribbon?  They were almost trashed, but now they look like something that you’d buy at a high-end boutique.

How to Upcycle: Successful Tips for Changing Old Items into Home Decor via @Jenna_Burger, sasinteriors.net


2. Good Bones

When thinking about keeping or tossing, it’s important to look beyond the surface to see if the “trash” is worth the work to upcycle.  Who wants to spend time on repurposing something and have it fall apart the next day?  Especially with furniture or larger-scaled items, look at the joints (dovetail joints are best, but not a must) and the structure of the piece.  Think about what you want to do with it – keep as is or change it’s function – before starting the transformation.  Like our bodies, good bones are important for a longer life.

A project that I saw, what feels like a gazillion years ago but never forgot, is Beckie’s vintage television turned console table.  How incredible is this furniture upcycle?! You gotta go check it out on Infarrantly Creative.

How to Upcycle: Successful Tips for Changing Old Items into Home Decor via @Jenna_Burger, sasinteriors.net


3. Thrift Store Finds

Thrift stores, estate sales, garage sales, and ReStore shops are all ideal spots to find items to upcycle into trendy and creative home decor.  Things that I am always on the lookout for are picture frames, small bowls, glassware, maps, candlesticks, old books, and chairs (that can easily be reupholstered).  These items are perfect for almost any spot of the home and usually cost very little ($1-$5).

  • Picture frames can always be revamped with a can of spray paint or chalk paint. Try sunshine yellow, raspberry, or tangerine.  Bold is better!
  • Small bowls are perfect to hold jewelry or simply rest on top of a cluster of books.
  • Glassware can be grouped together or displayed on their own.  I love glassware for mantel displays and table vignettes.
  • Maps can be used for SO many upcycling projects.  Decoupage them onto drawer fronts like Dinah did in her craft room.
  • An upholstering chairs is one of my favs! Check out my 1st upcycled chair {here}

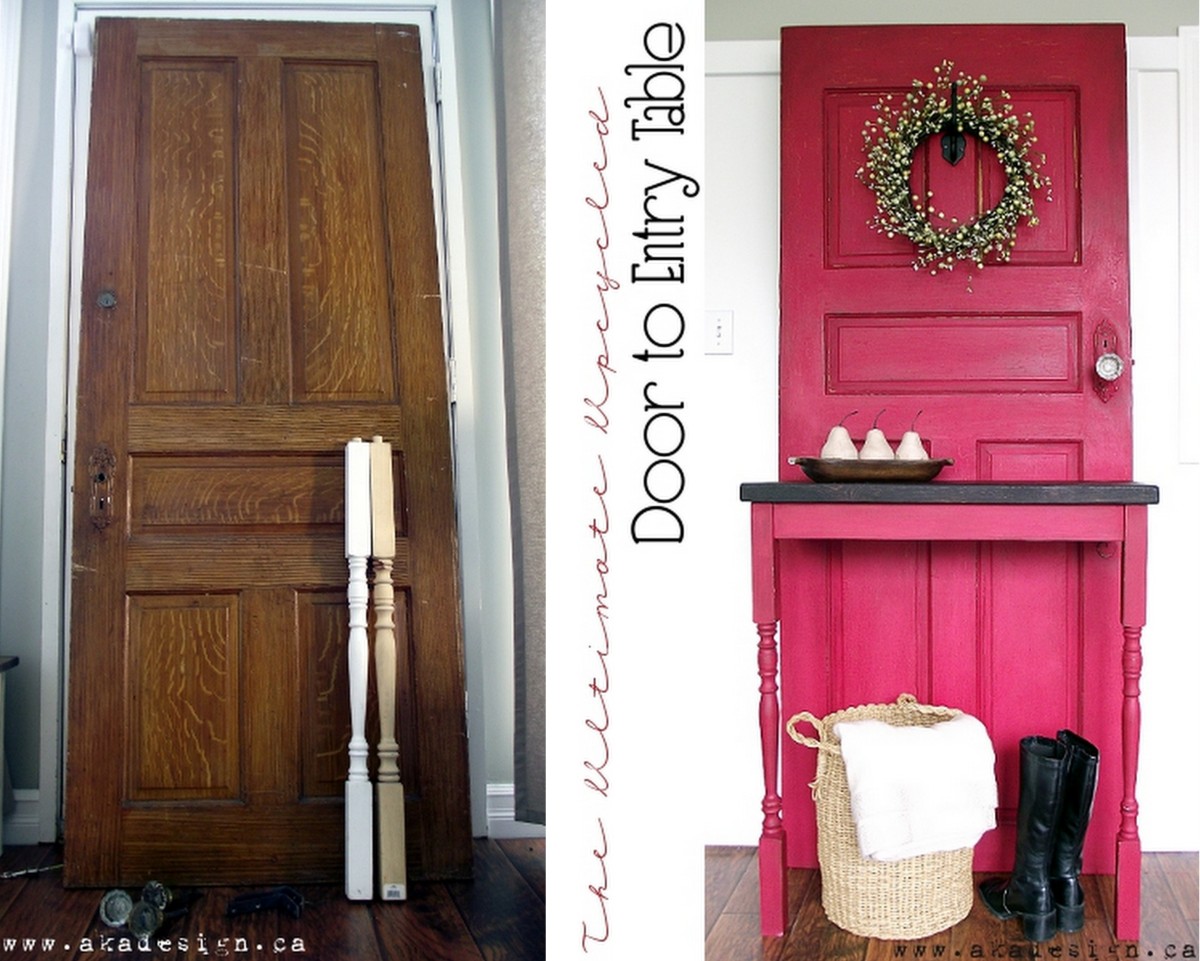
Shannon and Dean of AKA Design rocked this upcycled project outta the park.   They turned an old wooden door, that they found at a ReStore shop, into the ultimate entry table – how amazing!

How to Upcycle: Successful Tips for Changing Old Items into Home Decor via @Jenna_Burger, sasinteriors.net

Here’s another one for you…

Lisa of The Pennington Point found this frame “thingy” (as she put it so perfectly) at a flee market.  She had lots of ideas for it, then came up with the perfect upcycled creation… a new wooden clock.  So creative!

How to Upcycle: Successful Tips for Changing Old Items into Home Decor via @Jenna_Burger, sasinteriors.net


4. Don’t Toss It – Save It

I’m not a hoarder (even though you may think differently if you peaked into my garage), but I often have a difficult time parting with things (specifically decor items) because I always believe that someday, somehow I will use it for something.   You never know when an item can be of use.  One day it’s trash and another day it’s treasure.  The best items can be created with something you almost threw out.  If you’re questioning whether an item is worth tossing or keeping, look at it outside of it’s traditional element.  Use your creative eye to see how it can be upcycled into something else.

Now, let me state, I am not condoning keeping everything that crosses your path, but items around the house that could potentially be reused, revamped, or recycled should stick around – you never know what they can be used for in the future.

Whether it be in your home or at an old school, treasure can be found all around you.  Jessica of Mad in Crafts got a hold of these awesome floor boards from the stage of her old high school.  Thanks to her mom who salvaged some of the boards, she upcycled them into some fun wall art…

How to Upcycle: Successful Tips for Changing Old Items into Home Decor via @Jenna_Burger, sasinteriors.net


5. Roadside Pickup

Never doubt a roadside pickup.  “Trash” on the side of the road can literally be some of the best finds ever… like my favorite turquoise chair (remember when I had the back of my truck filled with groceries and piled the chair right on top)

My friend KariAnne over at Thistlewood Farm calls her roadside pickups her “little slice of junk heaven”.  But clearly her house doesn’t portray “junk” one bit.  Check out the transformation of this curbside find, where she upcycled a 40 pane glass window into a huge chalkboard calendar.  Pure Gorgeousness…

How to Upcycle: Successful Tips for Changing Old Items into Home Decor via @Jenna_Burger, sasinteriors.net


6. Look for Inspiration to Knock-Off

Don’t be ashamed by copying or being inspired by something you see in a magazine or read on a blog.  Some of the best creations can evolve from what you see day in and day out.  Knock-offs can save Big Bucks and you can be proud of your thrifty, unique, one-of-a-kind creation.

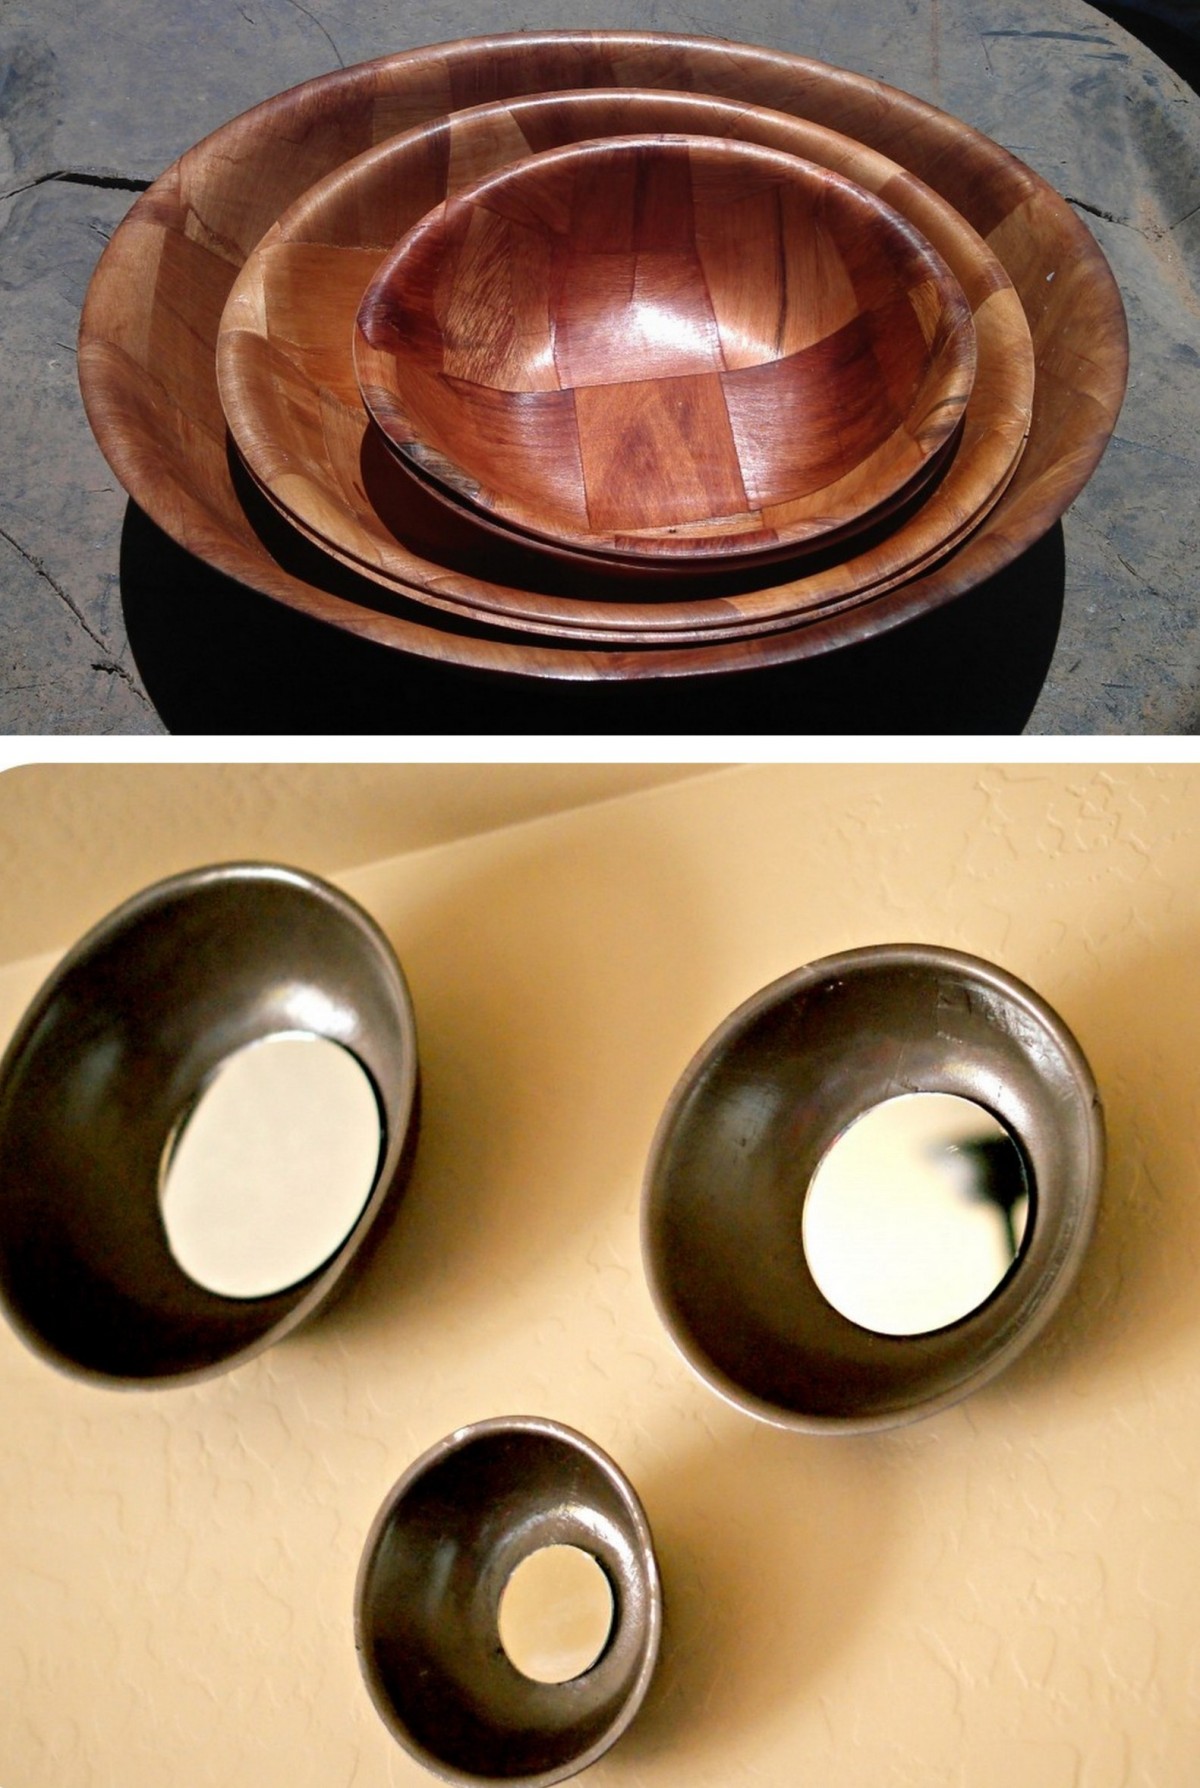
Sara of The Clever Pink Pirate created the ultimate knock-off when she was inspired by $89 Pottery Barn mirrors, but saved big when she created her own version using wood bowls found at a local thrift store.  So neat!

How to Upcycle: Successful Tips for Changing Old Items into Home Decor via @Jenna_Burger, sasinteriors.net


7. Dumpster Divin’

Well there’s not much of an explanation needed here.  But honestly, who knows what you’ll find in a dumpster.  Since others may not be smart enough or have the know-how to successfully upcycle, then you can truly find some awesome treasures.  Be prepared to be up against some crazy, gross stuff, but who knows what you’ll discover.

*disclaimer: this is not (yet) something that I’ve tried.

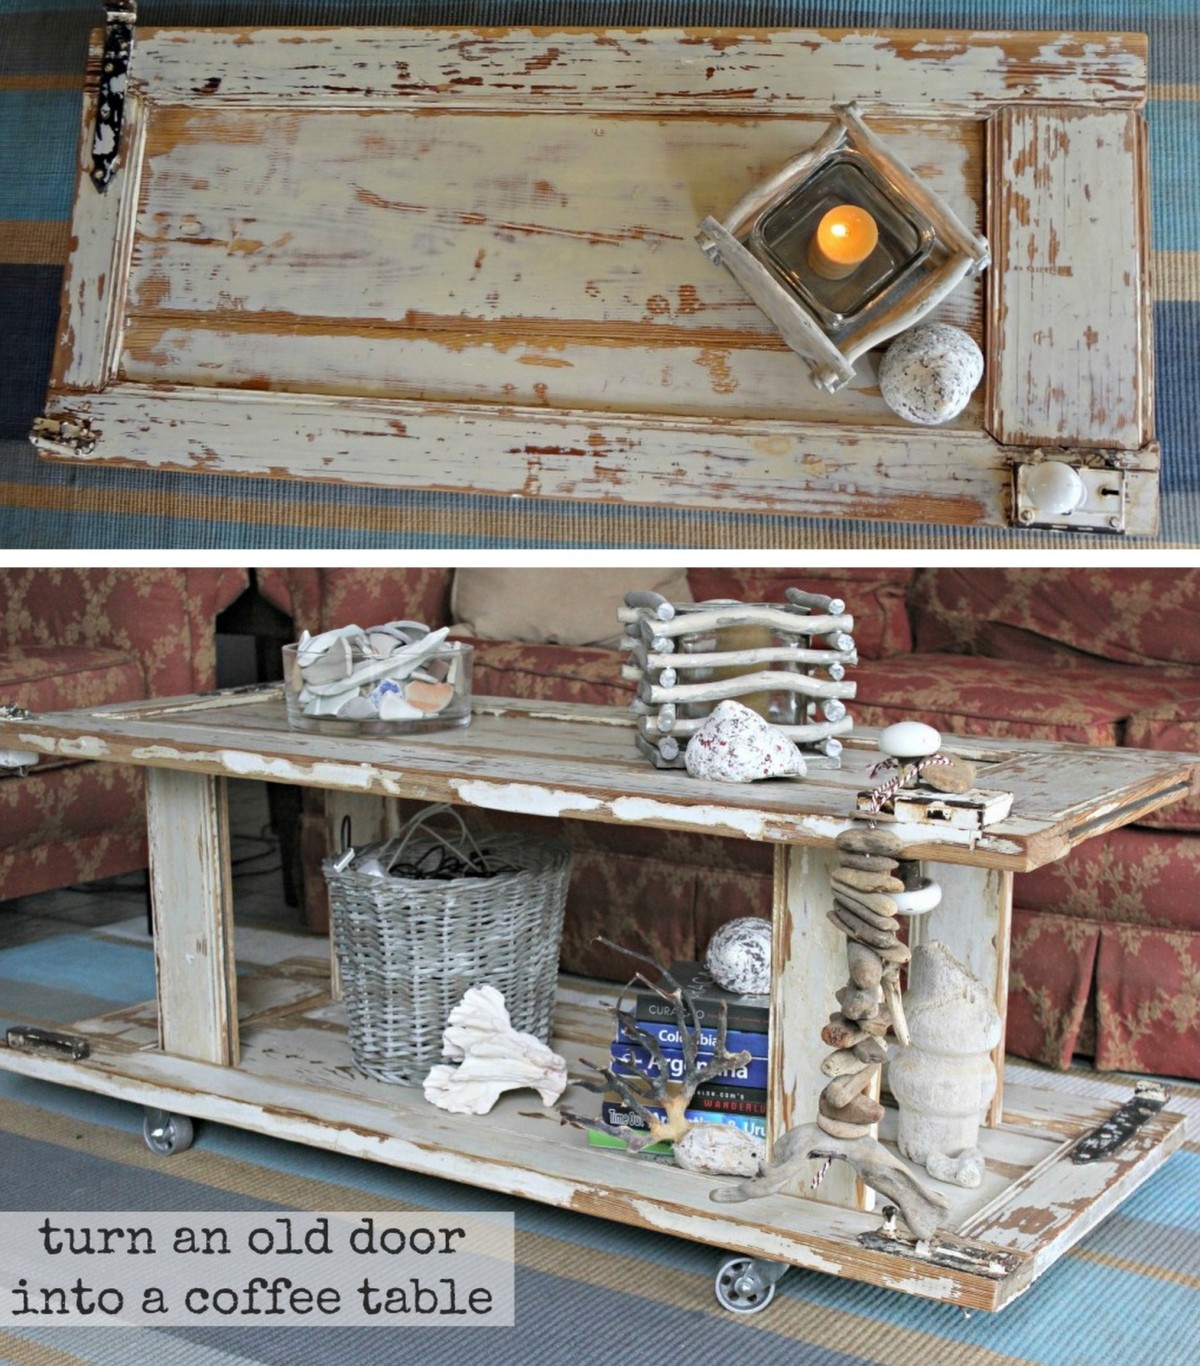
This DIY dumpster divin’ creation makes it all worth it.  Can we give Karah of The Space Between a big, WOW! What an awesome upcycled project.  From door to coffee table…

How to Upcycle: Successful Tips for Changing Old Items into Home Decor via @Jenna_Burger, sasinteriors.net


8. Find a New Location

Sometimes the best upcycles involve nothing but moving the item from one spot to another.  Or buying it and just using it ‘as-is’.  For many who are reluctant to DIY or use tools to change something, this is the best way to upcycle because little time is involved.  ‘Shopping your home’ and moving items around is my M.O.!  A new spot gives new life to what was once boring.  Give it a try.  Gather a few items and move them to someplace else.  I bet your home will look like new in no time (while spending nothing).

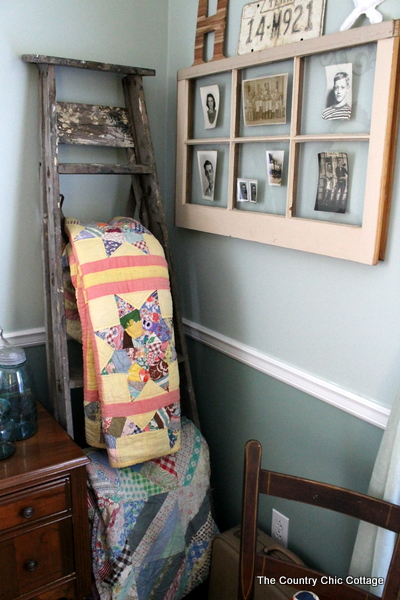
I love how Angie of Country Chic Cottage displays this old, vintage, distressed ladder to hang beautiful quilts.  What a great way to reuse something old…

How to Upcycle: Successful Tips for Changing Old Items into Home Decor via @Jenna_Burger, sasinteriors.net

Want to see more creative upcycled projects?  Have a look…

Old lamp turned plant stand by Plucking Daisies

Luggage Rack to Tray Table by Mod Podge Rocks

Barn Door Desk by Cleverly Inspired

Memo Board by Eclectically Vintage

Window pane turned cork board by Mom 4 Real

Drawer pull turned succulent holder by The Scrap Shoppe

Clock turned mirror by Free Stylin

Valentine Sweater Wreath by Crafts n Coffee

Porch Entry Table by Domestic Imperfection

Upcycled Chair to Side Table by The Happy Homemaker

Wine Crate Show Storage by White House Black Shutters

Old Chair to Spring Planter by My Sister’s Suitcase

Reupholstered Chair by Streetwise Decor

Have you ever thought of or tried upcycling? If so, what have you upcycled in your home?  What treasures do you search for at thrift stores and garage sales?

Trash To Treasure: Upcycled Light To Vase

Sometimes the most unlikely objects can turn from trash to treasure.

Trash to Treasure: Upcycled Light to Vase created by @Jenna_Burger, sasinteriors.net

As we’ve been changing the light fixtures throughout our home over the last 3 years (I’m pretty sure every. single. one. has now been updated), most went straight to the curb.  A few weekends ago when the last old, brassy light came down in the upstairs hallway, it was half way to the trash, until I had a thought…

Could I upcycle it into something else?  But what?? A cloak?  Another light?  A vase?  Should I spray paint it or leave it brass?  Lots of thoughts were brewing.

Of course, I forgot to take a pick of the light in it’s old home, but here’s what it looked like right after taken down from the ceiling.

Dust and all…

Trash to Treasure: Upcycled Light to Vase created by @Jenna_Burger, sasinteriors.net

After giving it a good scrubbing, I decided to leave the brassy finish (I liked the warm hue) and use it as an accessory to hold a vase.  A vase within a vase.  Yes!  Perfect!

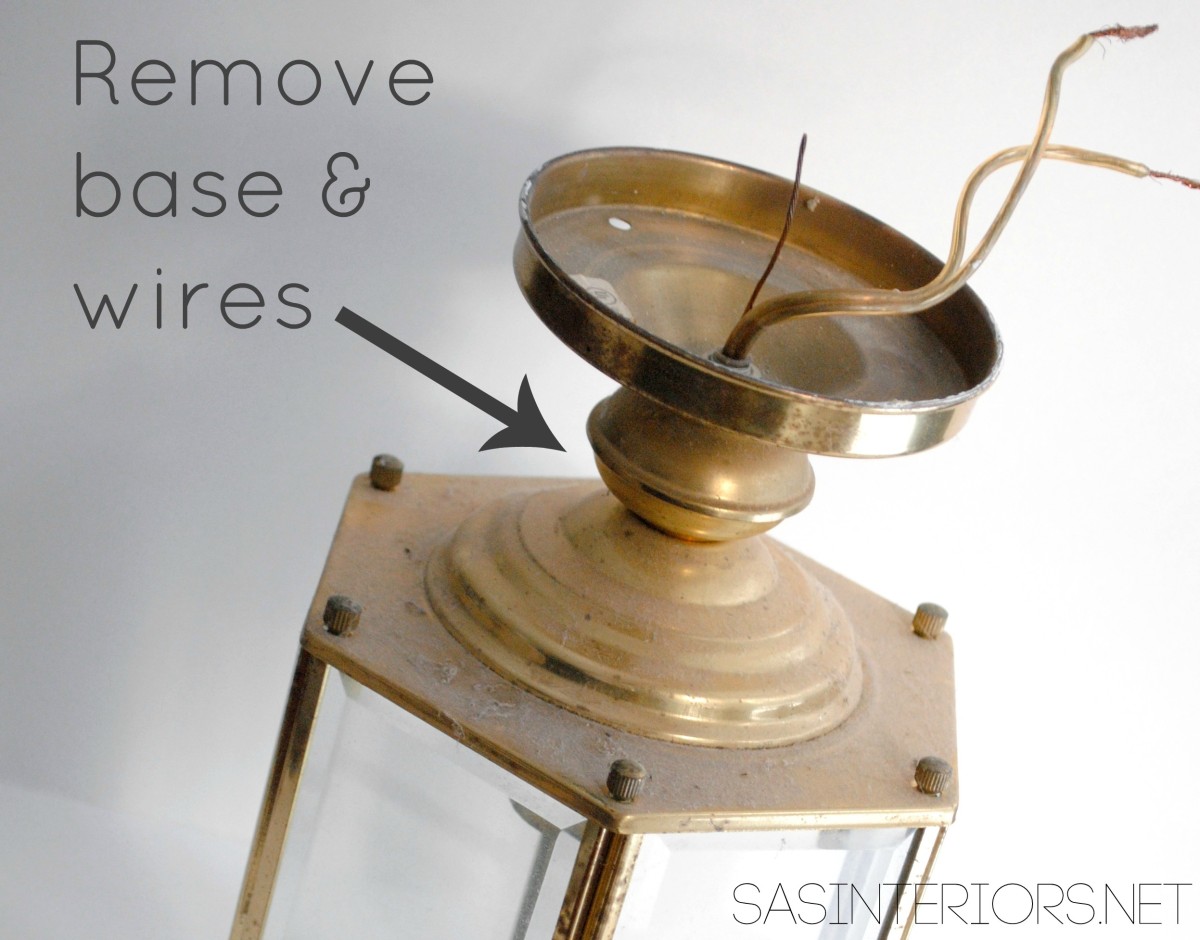
I removed the base (which I was going to you as a candle stick, but it all fell apart), as well as the wires.

Trash to Treasure: Upcycled Light to Vase created by @Jenna_Burger, sasinteriors.net

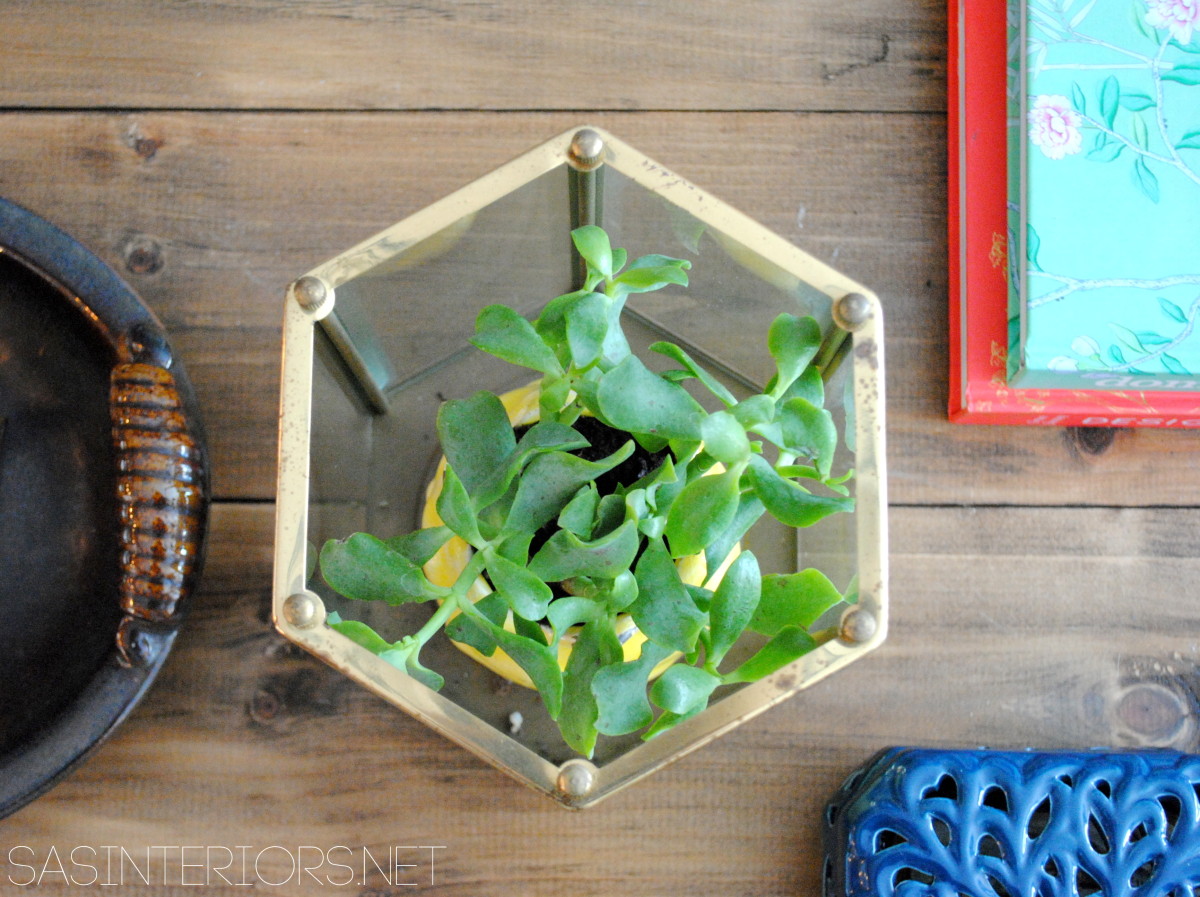
And then within minutes it went from ugly to this treasure…

Trash to Treasure: Upcycled Light to Vase created by @Jenna_Burger, sasinteriors.net

O, you know how I love to spend $0 and shop my home!

Trash to Treasure: Upcycled Light to Vase created by @Jenna_Burger, sasinteriors.net

Trash to Treasure: Upcycled Light to Vase created by @Jenna_Burger, sasinteriors.net

Trash to Treasure: Upcycled Light to Vase created by @Jenna_Burger, sasinteriors.net

I’m in love! Such a silly thing made into something spectacular.  For now it sits on the coffee table, but I’ve got other ideas for my new found treasure.  We’ll see where my thoughts and ideas take me…

What items have you upcycled in your home?  How have you made treasure out of trash?

I link my projects to some of these parties: Skip to My Lou, Dittle Dattle, Between Naps on the Porch, Today’s Creative Blog, Stories of A to Z, All Things Heart & Home, House of Hepworths, Finding Fabulous, The Shabby Nest, Serenity Now, Tatertots and Jello, Thrifty Decor Chick, Tip Junkie


Basic Tips, Ideas, and Thoughts on Starting Your Own Blog

I hope you’re having a nice weekend!   I usually take a break from work on the weekends, but I was eager to share this post with you about blogging.

Over the past few months, several friends and readers have reached out to me for advice on starting a blog. After sharing my story, along with a helpful list of ideas and tips to get going, I thought I could help more than just those few… thus the creation of this post

Basic tips, ideas & my thoughts on starting your own blog.  10 helpful tips I wish someone told me when I started blogging 2+ years ago…

After blogging for 2+ years, Blogger @Jenna_Burger is sharing basic tips, ideas, and thoughts on starting your own blog  - as a hobby or a business!

Even though I sometimes still look at myself like a newbie and think I have a ton to still learn about blogging, I realized that I also have a lot to share through my personal experiences – good and bad. The beginning days of when I started blogging were exciting and exhilarating, but also (at times) difficult and frustrating.  I spent many endless hours and late nights, trying to find my way through coding, HTML, design, and much much more.  Now I can look back and appreciate all the lessons that I learned.  It feel it’s important to overcome struggles to get to the other side. The feeling will be that more gratifying in the end.  It’s how we learn and can reflect on the path taken.  That being said, I didn’t have a blog mentor when my blogging days began.  It would have been great to have someone to point me in the right direction.  So basically the rest of this post shares the ideas, tips, and thoughts I wish I had when first starting out.  I hope as a somewhat seasoned Blogger, this helps you out on your possible blogging journey.

To start out, here are a few questions to ask yourself:

  • Have you ever thought of starting your own blog but didn’t know where to start?
  • Have you ever wondered how a blog can actually be a business?
  • Do you have something special and unique to share with others?
  • Do you wish you could have a job that doesn’t feel like work and that you truly love to do?

If you’ve ever had these thoughts, keep on reading…

I’m super thankful to have taken the leap to start a blog to influence and inspire so many people.  When I decided to start my Interior Design business 2+ years ago, I thought a blog would be beneficial as an “add-on” to reach a larger audience.  At the time, I had no expectations for it and thought the blog would simply be a means to share information about design.  Boy, has that changed.   And I have to be honest, at the time, I really didn’t know much about blogging, how influential they were/are, or how much of a resource blogs can be.

That being said, 2 years later, I love blogging.  I love reaching a huge amount of people and inspiring them to think outside the box and to create a home that they may not have thought could be possible.  I’m thankful that I have found a job, but feel like I never work.  I love that I’m here for my kids each and every day, but at the same time am doing something for myself and providing for my family. It’s a win-win.  With hard work, Blogging has become a source of income for my family and I take this job very seriously.  At times its difficult to juggle it all, and my life is rarely balanced, but I’m okay with that (honestly, who’s life is??).  I wouldn’t change it for anything and I hope you find the same path, whether it be blogging or another passion.

I think when you have something special or unique to offer, it’s important to share that with others, and blogging is a great avenue to do so!

So let my sharing of tips begin…

1. To start off the first and most important question to ask yourself is whether you envision your idea, a.k.a. a new blog, to be a hobby or a business.  Many blogs start out as a hobby, but then eventually turn into a business that actually provides an income.

To help determine this, ask yourself these questions…

  • How much time do you have to devote to your new blog?
  • Would you want to write a few times a week or just on occasion?
  • Would you want to share your blog with others?  Meaning more than just your family and friends?
  • Would you want to (over time) make money?

Looking within yourself at these questions, you’ll hopefully be able to determine how devoted you are.  Let me say, hobby blogs are awesome and just fine too.  It’s what you want to make it and how much time you devote.

My blog has definitely evolved, but for the last year and a half as I’ve transitioned to making blogging my job, I spend about 30+ hours a week focusing on DIYing, projects, photographing, writing, social media, PR, etc.  Additionally, I spend about 10-20 hours on my Interior Design business, but that fluctuates depending on the amount of projects I have going on.  I blog about 3-4 times a week and have an idea of what I’m going to post about.  I don’t like it to be too ‘set in stone’, because I think it feels more real (for me) when I share projects and ideas as I go along.  If you want to create a biz out of blogging, finding the right balance of posts per week will be important.  Actual blogging only takes about 25% of my time, while the other remaining 75% is all the other stuff (ie: projects, social media, PR, emails, etc).

2. If you’re thinking of starting a blog, do it because you want to, not to make money.  You can absolutely start out with the desire to make money (eventually), but it will take a while.  You really need to write about what you love.  You have to stand behind your ideas/thoughts and passions.  Readers will be drawn to that and that is how your following will begin.  Like with any new business, it takes a good two years to see any sort of return.  For some it’s faster, but often it takes time.

After blogging for 2+ years, Blogger @Jenna_Burger is sharing basic tips, ideas, and thoughts on starting your own blog  - as a hobby or a business!via

I would say at around my two year mark was when I saw a turn.  My following / pageviews started to really increase, companies started reaching out to me, and offers started to come my way.  Again, that was after two years of really pounding the pavement.  But again because I love what I do, I really don’t feel like I work, even though I probably spend more time “working” than a typical 40-hour a week job.

3. Once you’ve established your thoughts on how you envision your blog to be – whether a hobby or a business – it will help determine what blogging platform you use.  Blogger.com and WordPress.com are great starter and FREE blogging services.  If you’re starting out, these blogs are easy to use and you can be up and running in an afternoon.  That being said, with these free blogging sites, you do not OWN your blog, the service you are using owns it. Since you don’t own it, that company (especially with Google) can take it down for no reason (it’s been done to many). Also with Blogger.com, there are limitations, but if it’s for a hobby, then it’s fine and this is a great platform.

After blogging for 2+ years, Blogger @Jenna_Burger is sharing basic tips, ideas, and thoughts on starting your own blog  - as a hobby or a business!

Want to learn more, {here} is a great article that shares more pros and cons!

I use WordPress.org and have my site hosted on a server. I own my blog and run everything, but also pay money to do so. I’ve worked with a few designers to design the site to look professional. If you have big visions for a prolonged business and blogging venture, I would suggest starting on WordPress.org from the beginning.  It will save you alot of time and alot of money to make the transition at a later date.

*FYI: this is all my opinion.  There are many huge, successful blogs that use blogger.com and there are very small hobby blogs that use WordPress.org.  There is no right and no wrong.

4. Decide on a name and be sure the URL is available.  There are a zillion websites and blogs across the internet and I bet you, the name you love, will be taken.  Maybe you’ll be in luck and it’ll be available. Once you’ve established the niche and type of blog you want to start, next up is deciding what to call it.  If starting a blog on any platform, I would suggest buying the actual .com or .net name. You can do so through Go Daddy or Mad Dog Domains (there are many others as well).

5. Just like your home or the clothes you wear, the design of your blog will set the tone for what you’re writing about.  A blog can simply be a white background with generic typography in the header space or it can be elaborate with different color, graphics, and text.  When starting to put your blog together, look for inspiration through other blogs and websites.  Whether you are designing it or working with a professional, gather ideas from others.  Don’t copy, but be inspired and alter that to fit who you are.

6. If you want to grow your blog, I feel it’s important to have a social media presence.  Without, how will people find you?  My advice to start out is to set up a Facebook and Pinterest page.  These 2 social media networks are the biggest traffic sources and will drive more followers (there are quite a few more, but these are what I feel are the current top 2).  It’s the way to reach more people and to share your great posts with others.

After blogging for 2+ years, Blogger @Jenna_Burger is sharing basic tips, ideas, and thoughts on starting your own blog  - as a hobby or a business!SAS Interiors on Facebook

After blogging for 2+ years, Blogger @Jenna_Burger is sharing basic tips, ideas, and thoughts on starting your own blog  - as a hobby or a business!SAS Interiors on Pinterest

7. Once your blog is up and running, reach out to other Bloggers in your same niche.  Establish or request to become apart of a support group.  Visit and comment on blogs.  See what others are writing about and how they are driving traffic to their site.  Email other Bloggers to start a virtual conversation.  If you want to take Blogging up a notch, find a “pack” of like Bloggers and start to build connections and friendships.

One more tip would be to attend a Blogging Conference.  Not only will you be able to learn so much about Blogging, but I am sure you will make some lifelong friends!

8. Google Adsense.  Day one, no one is going to advertise you.  You have no traffic, so there really isn’t a value for them (YET).  That being said, I would absolutely set up a Gmail Account (start a business account separate from your personal account) and sign up for Google Adsense.  Even if you make 10 cents the first month, it’s something.  The longer you have ads through Google on your site, the better the ads will eventually be.  Believe me, DO THIS!

After blogging for 2+ years, Blogger @Jenna_Burger is sharing basic tips, ideas, and thoughts on starting your own blog  - as a hobby or a business!

9. If you want to start a blog, pictures are important.  Obviously for me, pictures are everything, but even for the text-rich niches, at least one picture is important.  People are visual, so make them clear, turn off the flash on your camera (only use manual mode), and make them large on your blog posts (no small pictures!).  Also add text to your picture(s).  This will be important for Pinterest – head over and you’ll see what I mean.  Almost 80% (that’s my guess, not a fact) of the pictures on Pinterest have text on them – it’s a driver to the original source. Using FREE programs like Picasa and Picmonkey make it easy for your to edit pictures and add text (these are the 2 programs I use 95% of the time).

10.  This is the last but most important advice! Ready??  BE YOU! BE REAL!  WRITE LIKE YOU SPEAK!  My biggest obstacle when starting out was I wrote like a robot giving information, but not writing from the heart.  Readers want to feel a connection with the writer.  That’s why they return time and time again.  I know some readers who only read certain blogs because they like the person.  They may have never met the person, but they feel they know them through their words.  And lastly, remember quality over quantity.  Don’t force a post to simply get it out there.  It’s not worth it.  I post about 3 times a week, but write my posts that have value and truly share something that I know others will benefit or be inspired from.

Be You

via

 As I mentioned earlier in the post, I have helped answer blogging questions for several friends recently, but one in particular is my good friend, Kathy, who just started a primal nutritional blog called Primal Bliss Nutrition.  Like me, she has decided to start a nutritional consulting business along with her daily resource blog.  Thankfully she took much of my advice – mostly what I shared above – and launched her site last week. As a fresh and new Blogger, here is what she has to say so far about the leap into the World of Blogging…

After blogging for 2+ years, Blogger @Jenna_Burger is sharing basic tips, ideas, and thoughts on starting your own blog  - as a hobby or a business!

Learning to blog on WordPress.org is like learning a new language. I am amazed at how much there is to learn. I thoughtit would be much simpler, but it is actually very complex. There is a great deal to learn along the way. I had to learn (and I am still learning) many new functions that I was not familiar with before. However, I am enjoying learning these new skills.  That being said, Jenna suggested I go full out with hosting my own site through WordPress.org versus using Blogger.com. There are several reasons for this, the most important to me being the choices for layouts and themes, and the flexibility and control I have over my work. Also transferring to WordPress.org at a later time can be a consuming and expensive process. I am happy I took her advice!  As Jenna did for her blog, I worked with DreamUp Studios to design my blog. They were very affordable and very helpful, and I’m happy I worked with a professional designer instead of using a typical template.

Jenna has been a godsend. She taught me that WordPress.org is all coding. The pictures, words, fonts, everything is done based on a code or command entered. Although it is difficult to learn how to apply different codes, it gives you much more flexibility in how your blog appears. You have much more control over everything, and can really personalize your blog.  I still have a great deal to learn but I feel like I am way ahead of where I would have been with the advice I was given!

I know there is alot more, but at least that’s a start. I wish you the best of luck in your blogging adventure!  Blogging is very rewarding.  At times it’s difficult, but I’m so happy to have a platform where I can share my passions and inspire.


DIY: Glass Jar Pen Holder using a Pipe Clamp

Are you ready for a super easy project (from start to finish it took 5 minutes) that can be used all throughout the house and cost pennies to create?

I knew you would be!

My revamped central command center has put our family on the right path to an organized year (I’m crossing my fingers it’ll stay that way).  You’ve all loved it which I’m completely psyched about and today I’m back sharing the easy step-by-steo on how I created the new glass jar holders hanging on the wall.  It’s super simple, so let’s get started!

Simple DIY Glass Jar Pen Holder using a one dollar pipe clamp! Super easy to create & can be used anywhere around the house!

The one big annoyance with the old CCC was the lack of pen and pencil storage.  When in need of something to write with, we would always be hunting around the house and then the task or thought that needed to be remembered and written down was totally forgotten.

NOT ANYMORE!

To start out, I grabbed a few glass jars from the refrig that were either empty or almost near empty.  I chose a jelly jar and a salsa jar, but really any glass jar will do!  (Unfortunately the diameter of the salsa jar was too big, so I substituted it with another glass jar).

Simple DIY Glass Jar Pen Holder using a one dollar pipe clamp! Super easy to create & can be used anywhere around the house!

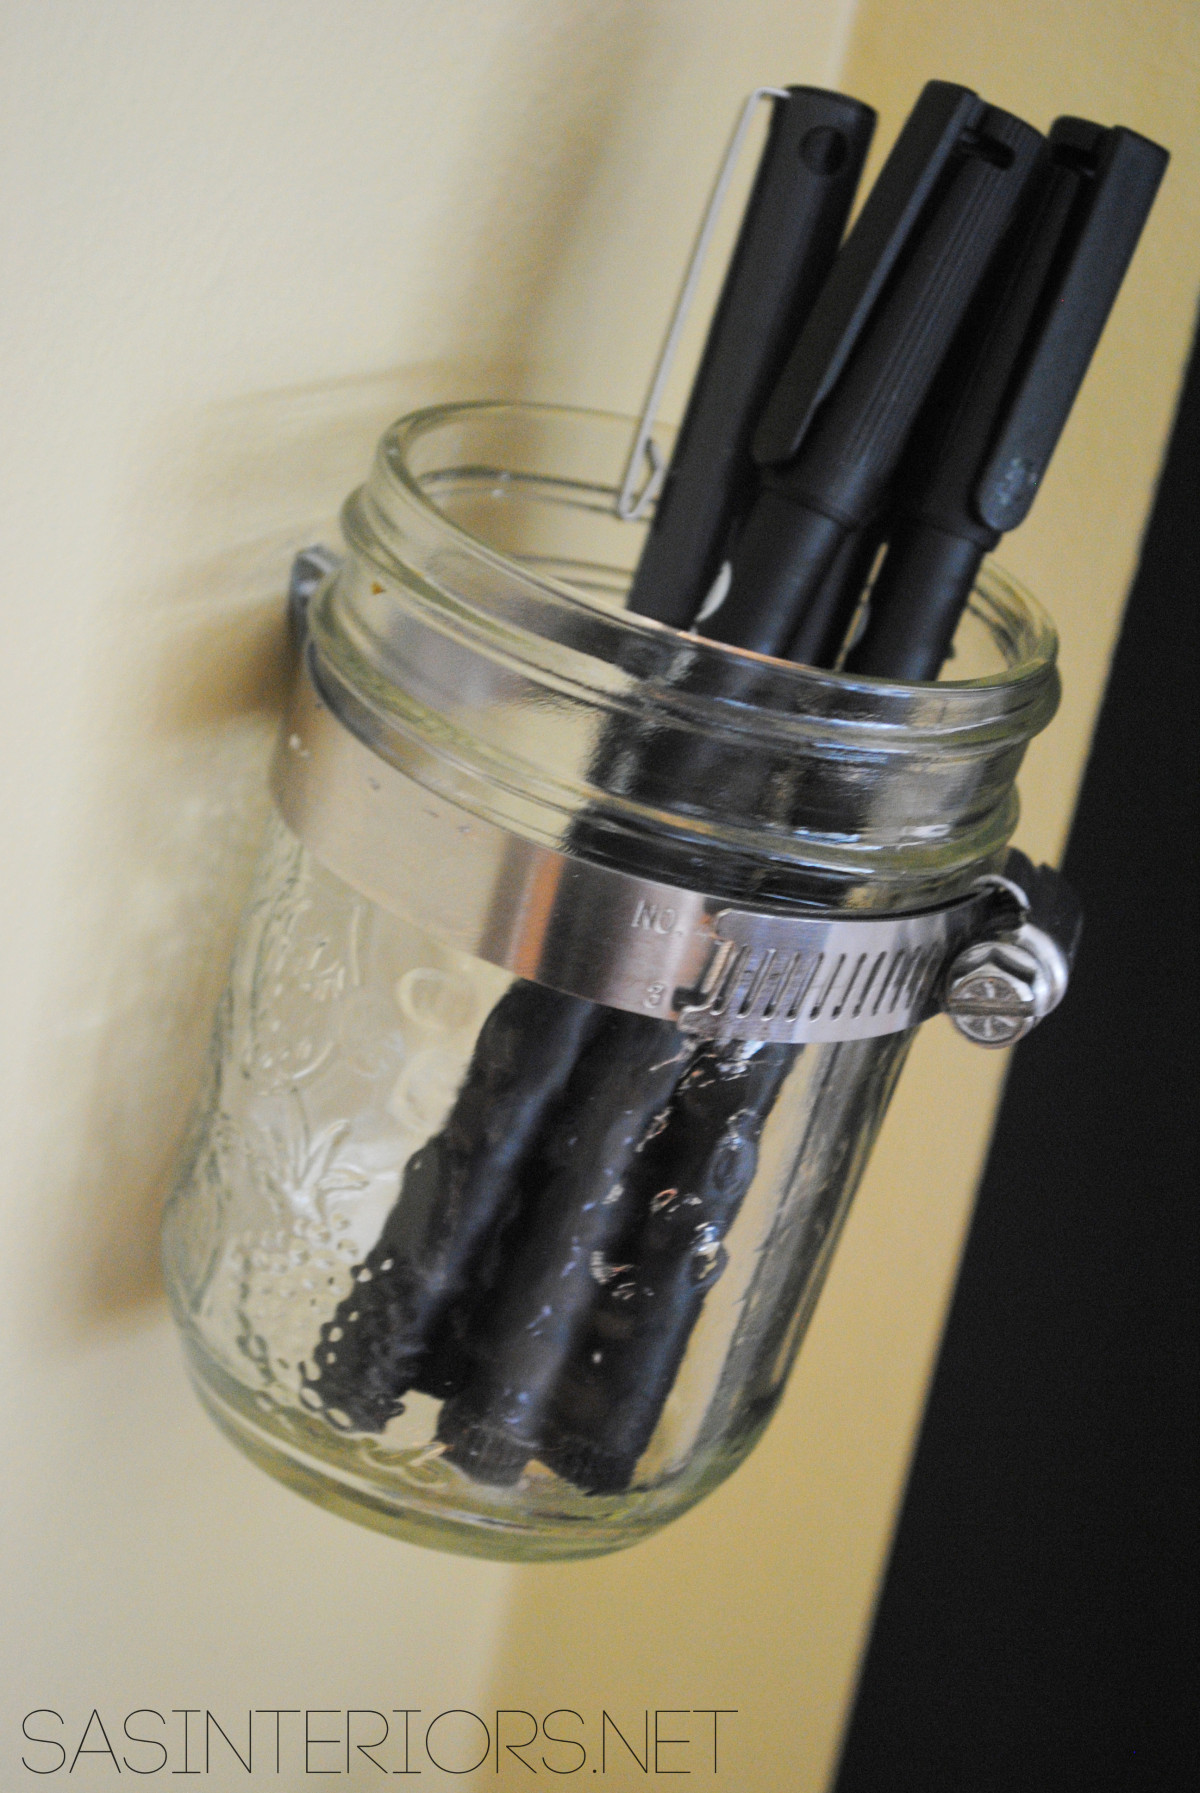
The trick to these babies hanging from the wall is a $1 (I actually think it cost even less $$$) hose pipe clamp (usually found in the plumbing section). I chose a 3″ diameter, but there are larger and smaller styles.  The salsa jar could have worked if I chose a 4″+ size.

Once I had the jars cleaned out, they were ready to hang.  After some thought (and a few fails), I thought the easiest way to hang the hose pipe clamps from the wall was with a picture hanger.  This would allow for there to be only one hole in the wall (easy patch up job at a later date) and I could easily choose the right spot for install.

I wrapped the picture hook around the hose clamp and tightened it a bit so it was secure – super easy.  No tools needed other than a hammer.

Simple DIY Glass Jar Pen Holder using a one dollar pipe clamp! Super easy to create & can be used anywhere around the house!

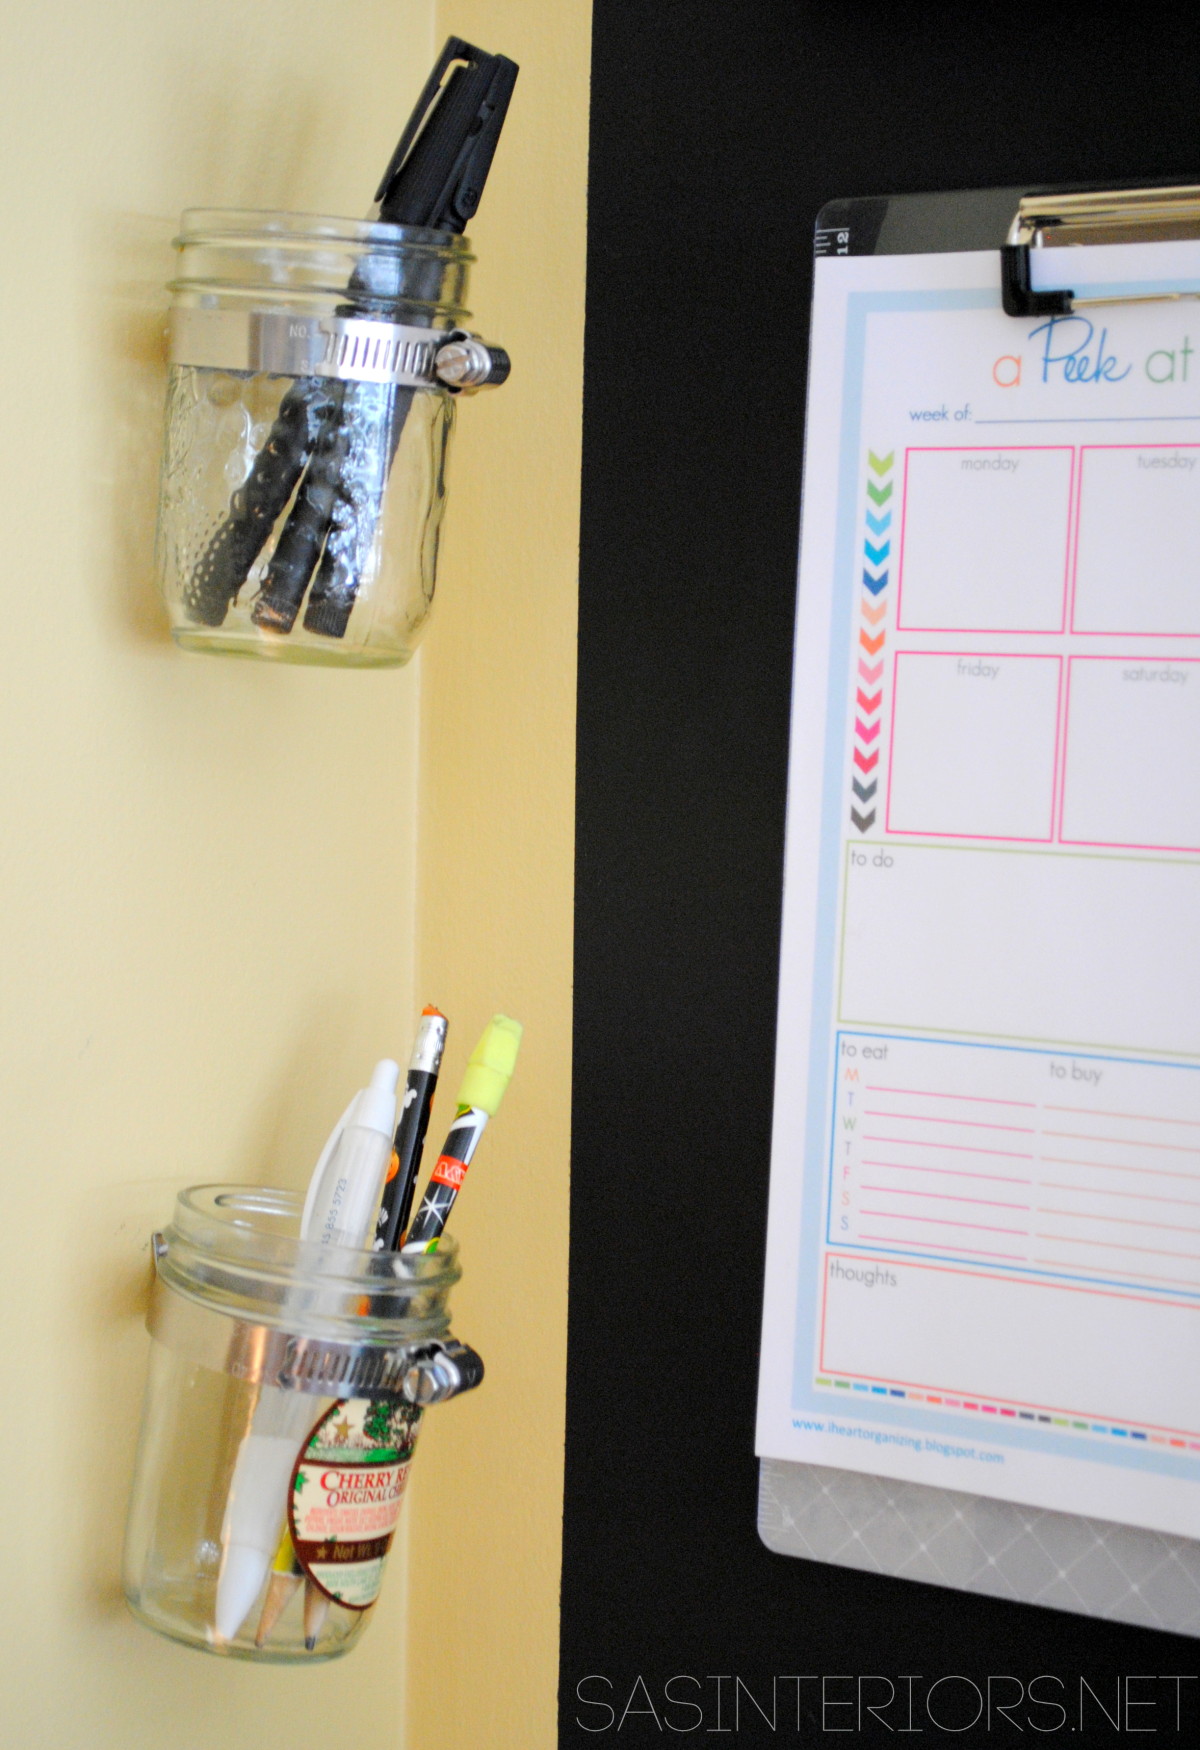
The result once hung…

Simple DIY Glass Jar Pen Holder using a one dollar pipe clamp! Super easy to create & can be used anywhere around the house!

And the result with actual pens…

Simple DIY Glass Jar Pen Holder using a one dollar pipe clamp! Super easy to create & can be used anywhere around the house!

Super easy and unbelievably functional!  YES – huge score.

Simple DIY Glass Jar Pen Holder using a one dollar pipe clamp! Super easy to create & can be used anywhere around the house!

To keep the glass jars even more secure, I added a tacky dot at the spot where the jar meets the wall.  Now it stays perfectly in place.


Simple DIY Glass Jar Pen Holder using a one dollar pipe clamp! Super easy to create & can be used anywhere around the house!

If you want to see more of my Family Central Command Center, click {here}

Chalkboard Family Central Command Center for the heart of the home including a monthly calendar, kids charts, inspirational quotes, and more.  Created by @Jenna_Burger via sasinteriors.net

It’s amazing what can be created with very little money and at the same time be super useful!  Now I’m on the hunt for other places around the house where I can stick a glass jar (or two) on the wall.

Do you collect or display mason jars?  Ever use this technique of using a hose pipe clamp?

How-To Make a Chalkboard Wall

Chalkboard walls are not just for kids.  They are super fun & functional for everyone, at any age.  While the kids are busy creating new drawings, us moms are making lists so nothing’s forgotten at the store.  The need for a chalkboard wall in a home can also change and evolve as your family changes and grows.

Another plus about chalkboard walls is that with the use of chalkboard paint, they are super easy to create.  For less than $10 and a few spare hours, a new wall can be created anywhere in your home (or office)!

Inexpensive & Easy-To-Create "Framed" Chalkboard Wall using @frogtape by @Jenna_Burger, SASinteriors.net

Earlier this week, I shared my revamped CCC {Central Command Center}.  This 30″ wide spot in our home has had about 6 (or maybe more) makeovers, but it’s an intracle spot that keeps our family on track day-to-day.

For this new CCC, I decided to add a chalkboard backdrop.  To create this fun, yet important part of the wall, I used chalkboard paint.

chalkboard paint

This lil’ old can has been around for almost 2 years and has been used on a ton of projects.  The largest before this project was the chalkboard wall we created in the basement for the kids a couple of years back.  Anyway, this can has lasted a long time!

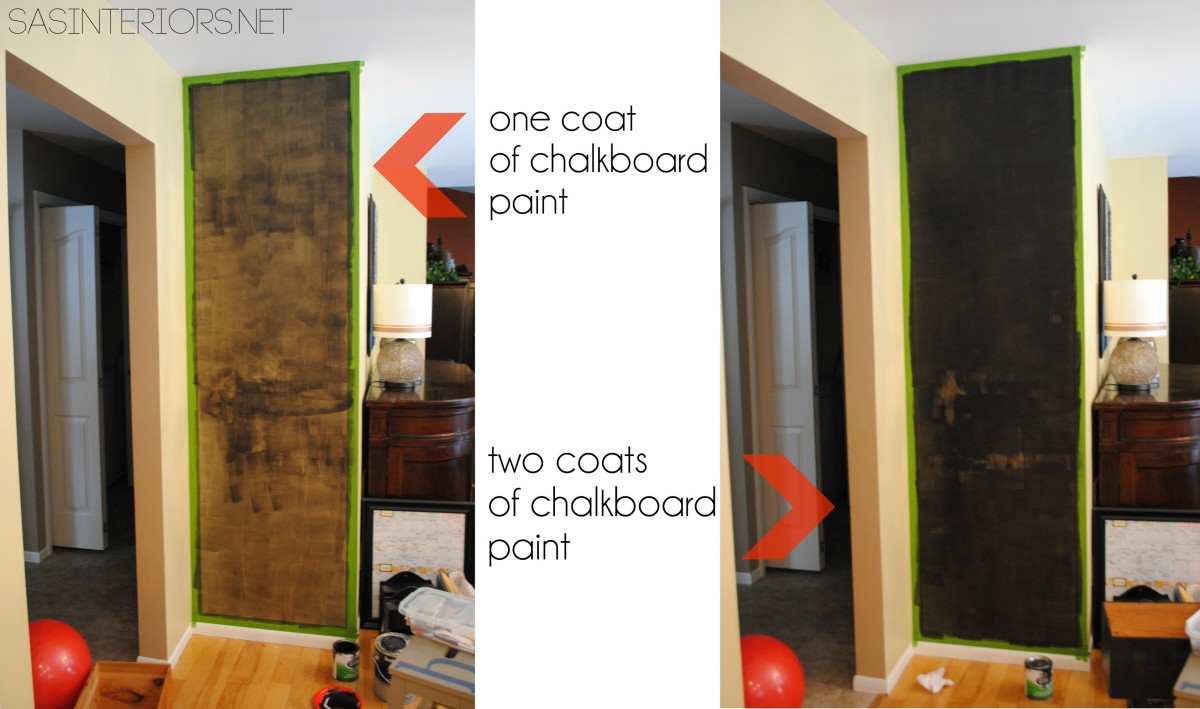
Before starting the chalkboard wall, I decided I wanted to create a “frame” surround.  There really is no “frame” on the wall, but by leaving 3″ of the yellow wall color, a “frame” surround was created.

Inexpensive & Easy-To-Create "Framed" Chalkboard Wall using @frogtape by @Jenna_Burger, SASinteriors.net

To create the frame, I applied two layers (two rows of tape side-by-side) of FrogTape.  This was my first time using FrogTape and I’m in love!  It was great.  Y’all know what a pain of a time I had when I painted the mouldings white, well this stuff would have come in handy.  Basically this tape has a sealer that when applied to the wall it doesn’t let paint seep underneath.  I had a few spots that the paint went under, but for the most part, it was great!

Inexpensive & Easy-To-Create "Framed" Chalkboard Wall using @frogtape by @Jenna_Burger, SASinteriors.netI wasn’t provided product from FrogTape.  I bought it myself because I’ve been wanting to try it out for a long time.  It gets my seal of approval!

Inexpensive & Easy-To-Create "Framed" Chalkboard Wall using @frogtape by @Jenna_Burger, SASinteriors.net

Once I applied the FrogTape and “burnished” it (pressed down really hard at the edges), I was able to start painting.

Inexpensive & Easy-To-Create "Framed" Chalkboard Wall using @frogtape by @Jenna_Burger, SASinteriors.net

I applied 3-4 coats of the chalkboard paint so the surface was fully covered and no wall color from underneath came through.

Once I knew no more coats were needed, I removed the paint.  If the paint is still wet, that’s okay.  As you peel away the tape, you’ll see your crisp, clean line! What a beauty.

Inexpensive & Easy-To-Create "Framed" Chalkboard Wall using @frogtape by @Jenna_Burger, SASinteriors.net

And then you’re ready to stand back and admire!

Inexpensive & Easy-To-Create "Framed" Chalkboard Wall using @frogtape by @Jenna_Burger, SASinteriors.net

Once your chalkboard wall is complete, the fun of either drawing or layering can begin! Since this is more of a functional spot than a fun spot, I created a Family Central Command Center.  This is how it resulted…  And you can learn more about it {here}.

Central Command Center_11a

Have you ever used chalkboard paint before? If so, what have you created?

Want to see more of my chalkboard projects (using this one can of paint)?
New Years Sparkly Tablescape with Chalkboard Candles
Kids Play Kitchen
Framed Chalkboard Medicine Cabinet
Chalkboard Platter

Revamped Family Chalkboard Central Command Center

Chalkboard Family Central Command Center for the heart of the home including a monthly calendar, kids charts, inspirational quotes, and more.  Created by @Jenna_Burger via sasinteriors.net

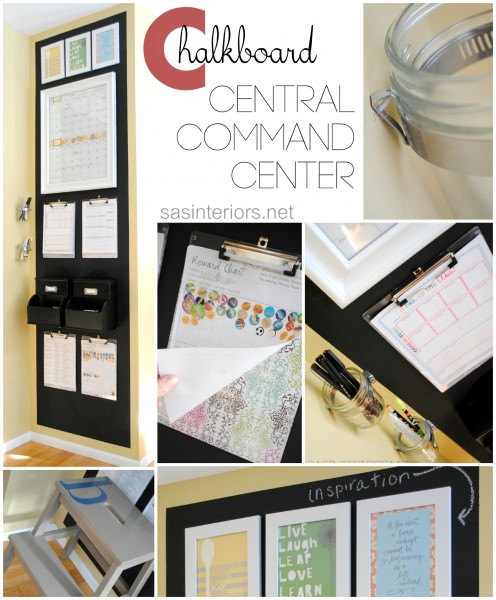
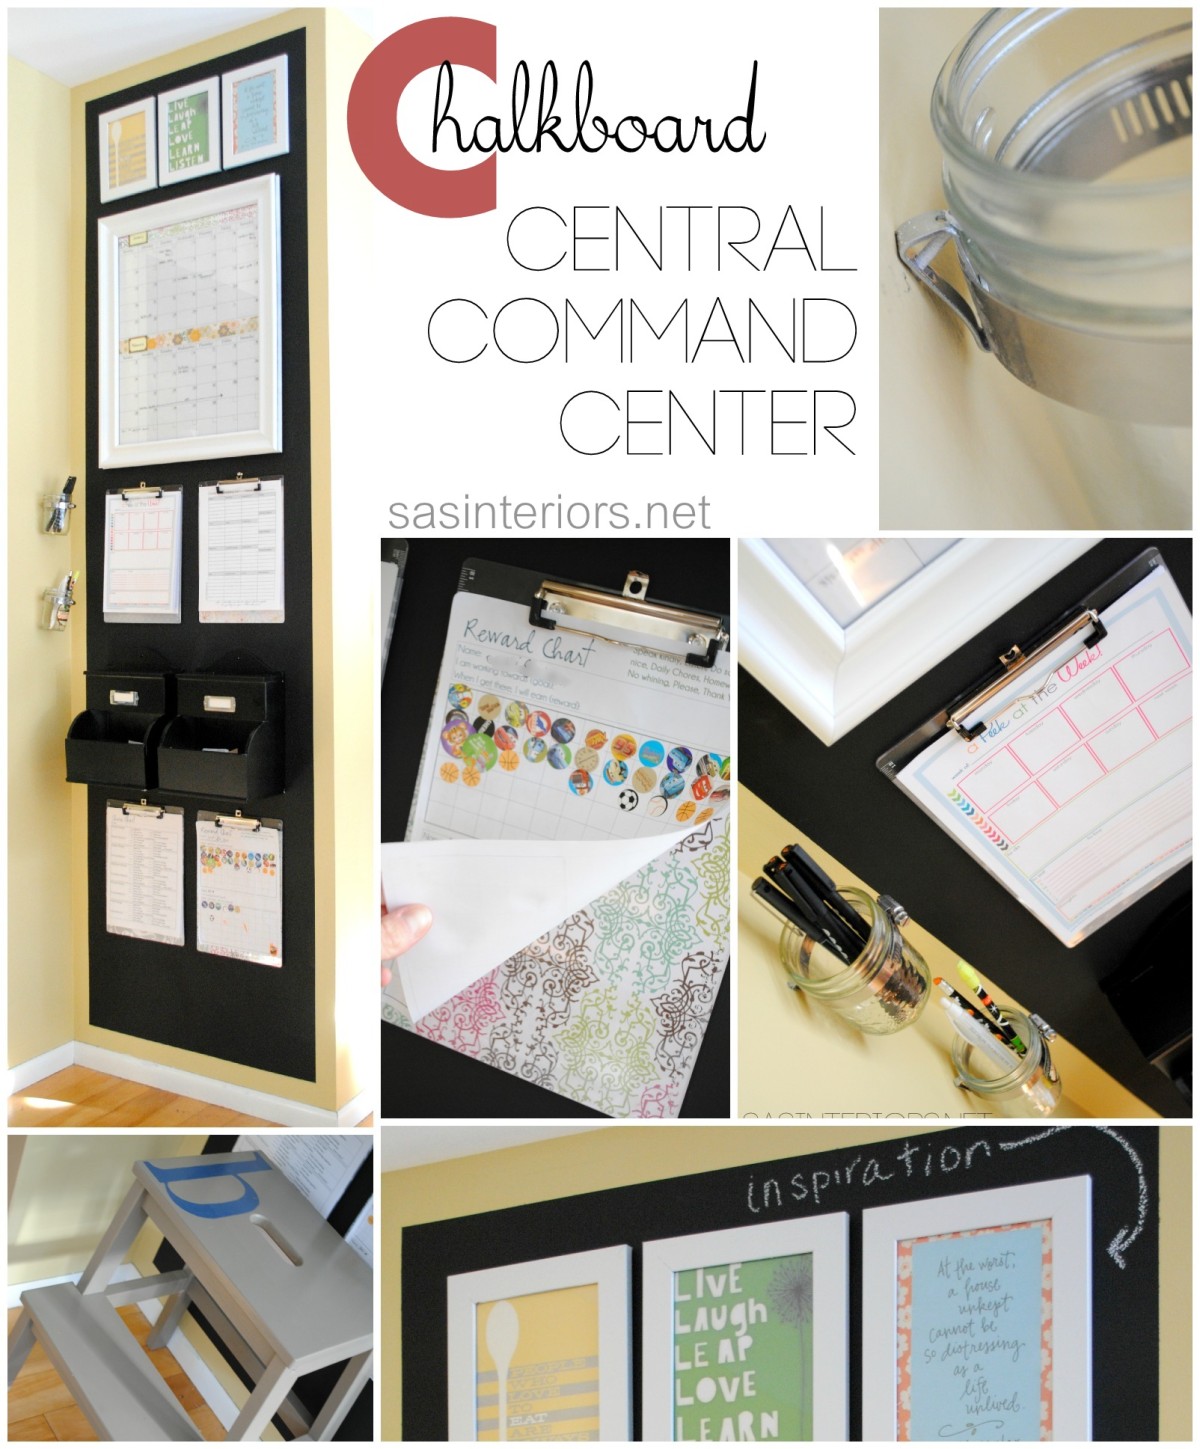
This 30″ wide wall has had more makeovers than any other spot in my home.  In the almost 3 years that we’ve lived here, I think it’s had at least 6 lives – thank goodness it’s not an entire room.  But I have to say, this 30″ wall is the key to how we function – it’s our Central Command Center… a.k.a. CCC

I couldn’t let the year begin without making a few updates to this small, but important part of our home (the previous CCC can be found here).  I actually had made a few changes about a month ago, but it just wasn’t right.  After living with it for a while, I knew what it needed…  A chalkboard.  An entire wall of chalkboard.

The revamp started with removing everything from the CCC, patching up the old holes, and touching it up with some fresh paint.  Once the wall was ready, I was off applying the chalkboard paint.

I’ll share more on the specifics of how I created the chalkboard backdrop in a separate blog post, but in the meantime, let’s take a tour of my NEW Family Central Command Center…

Chalkboard Family Central Command Center for the heart of the home including a monthly calendar, kids charts, inspirational quotes, and more.  Created by @Jenna_Burger via sasinteriors.net

One of the major changes to the CCC is the calendar.  The calendar that I had previously created was for only one month.  SO many of you asked me, “I love the one month, but what do you do with plans you need to write down for the next month?”.  I actually had the same dilemma and now it’s resolved.  There are two calendars for two months.  Problem solved. When the month we’re in is on the bottom, I put the next month’s dates on the top.  It’s a little backwards having the month after above, but it works!

Chalkboard Family Central Command Center for the heart of the home including a monthly calendar, kids charts, inspirational quotes, and more.  Created by @Jenna_Burger via sasinteriors.net

On the picture frame turned calendar, I still use a sharpie, dry-erase pen, or these handy-dandy pens by NameBubbles that are available with their write-on labels.

Did you notice the frames on the calendar & pictures above are now white instead of black?  Once the chalkboard was painted on the wall, the black frames disappeared, so I spray painted the old ones.  Using a white primer spray paint + a white glossy top coat, the frames are as good as new.

I still love my inspirational quotes and those are the same (in their new white frames).

Chalkboard Family Central Command Center for the heart of the home including a monthly calendar, kids charts, inspirational quotes, and more.  Created by @Jenna_Burger via sasinteriors.net

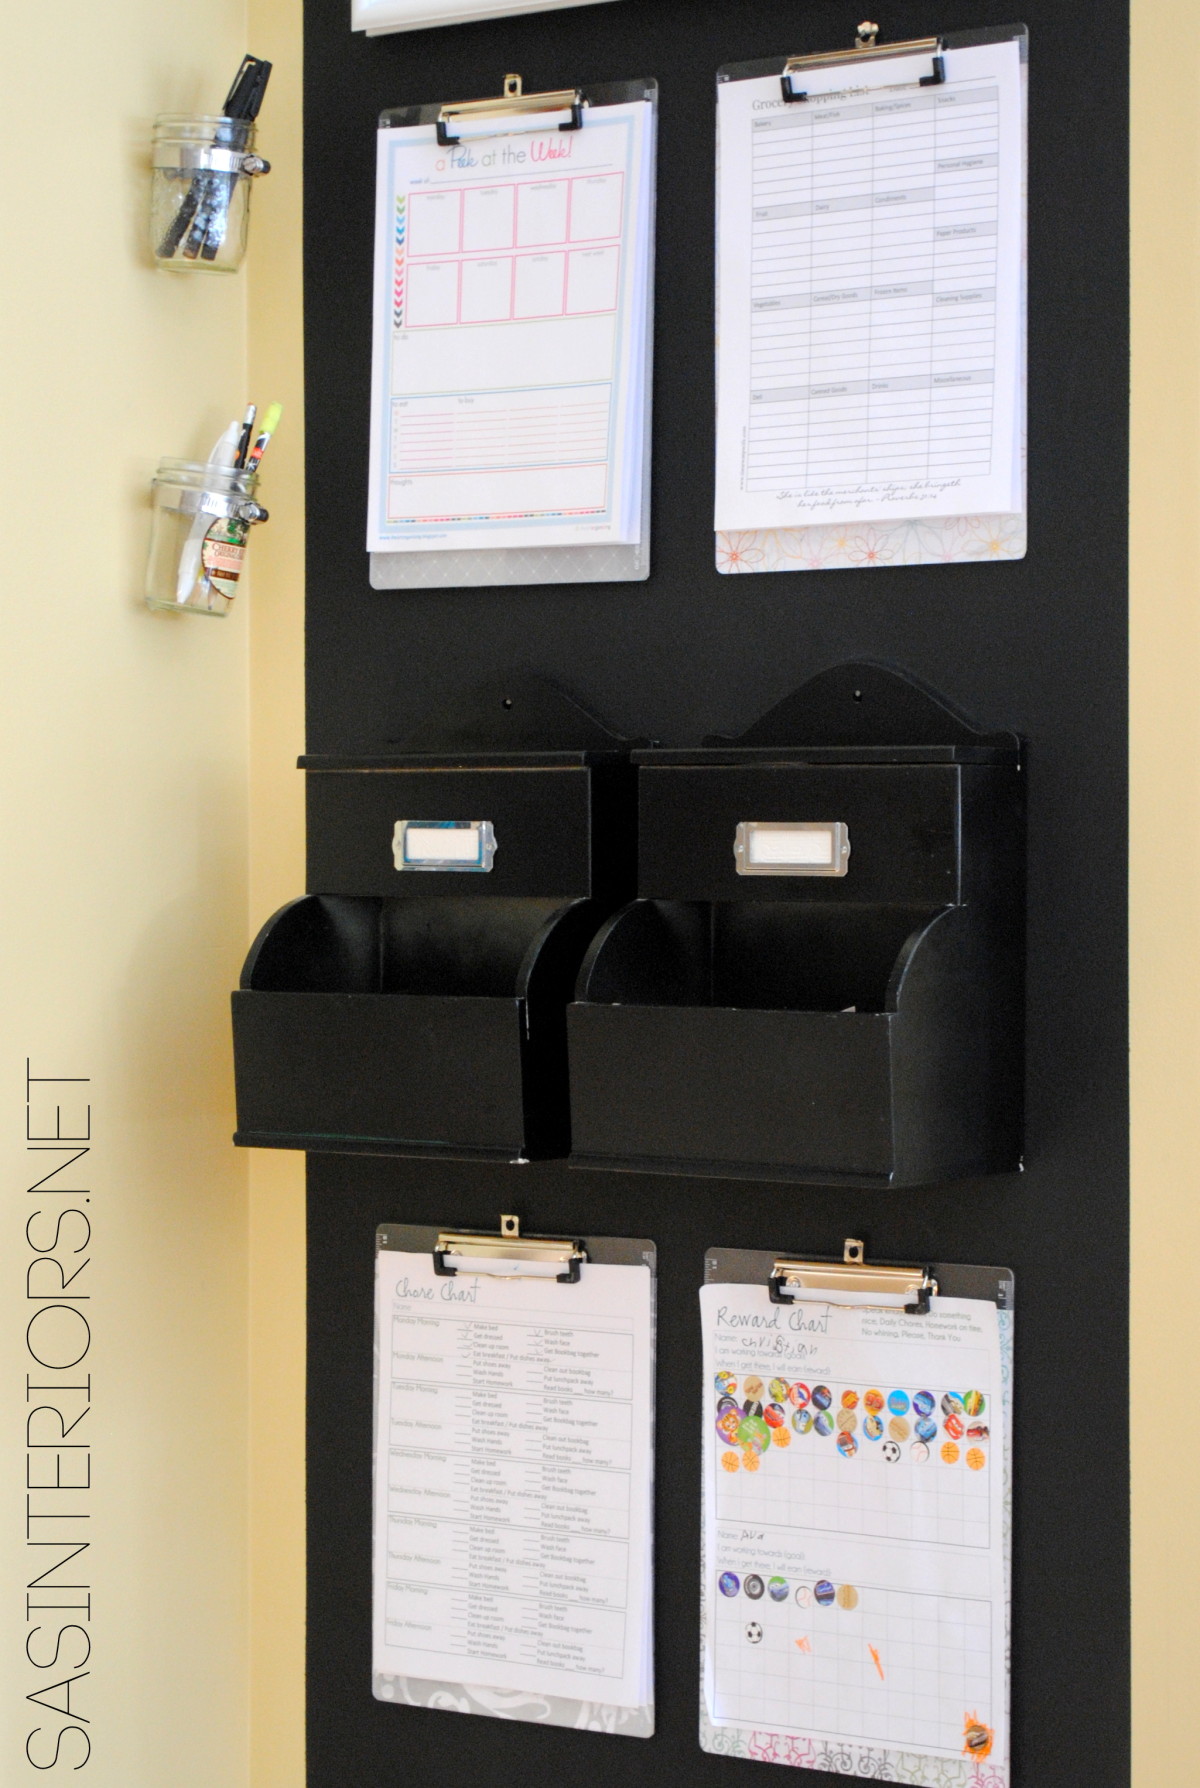
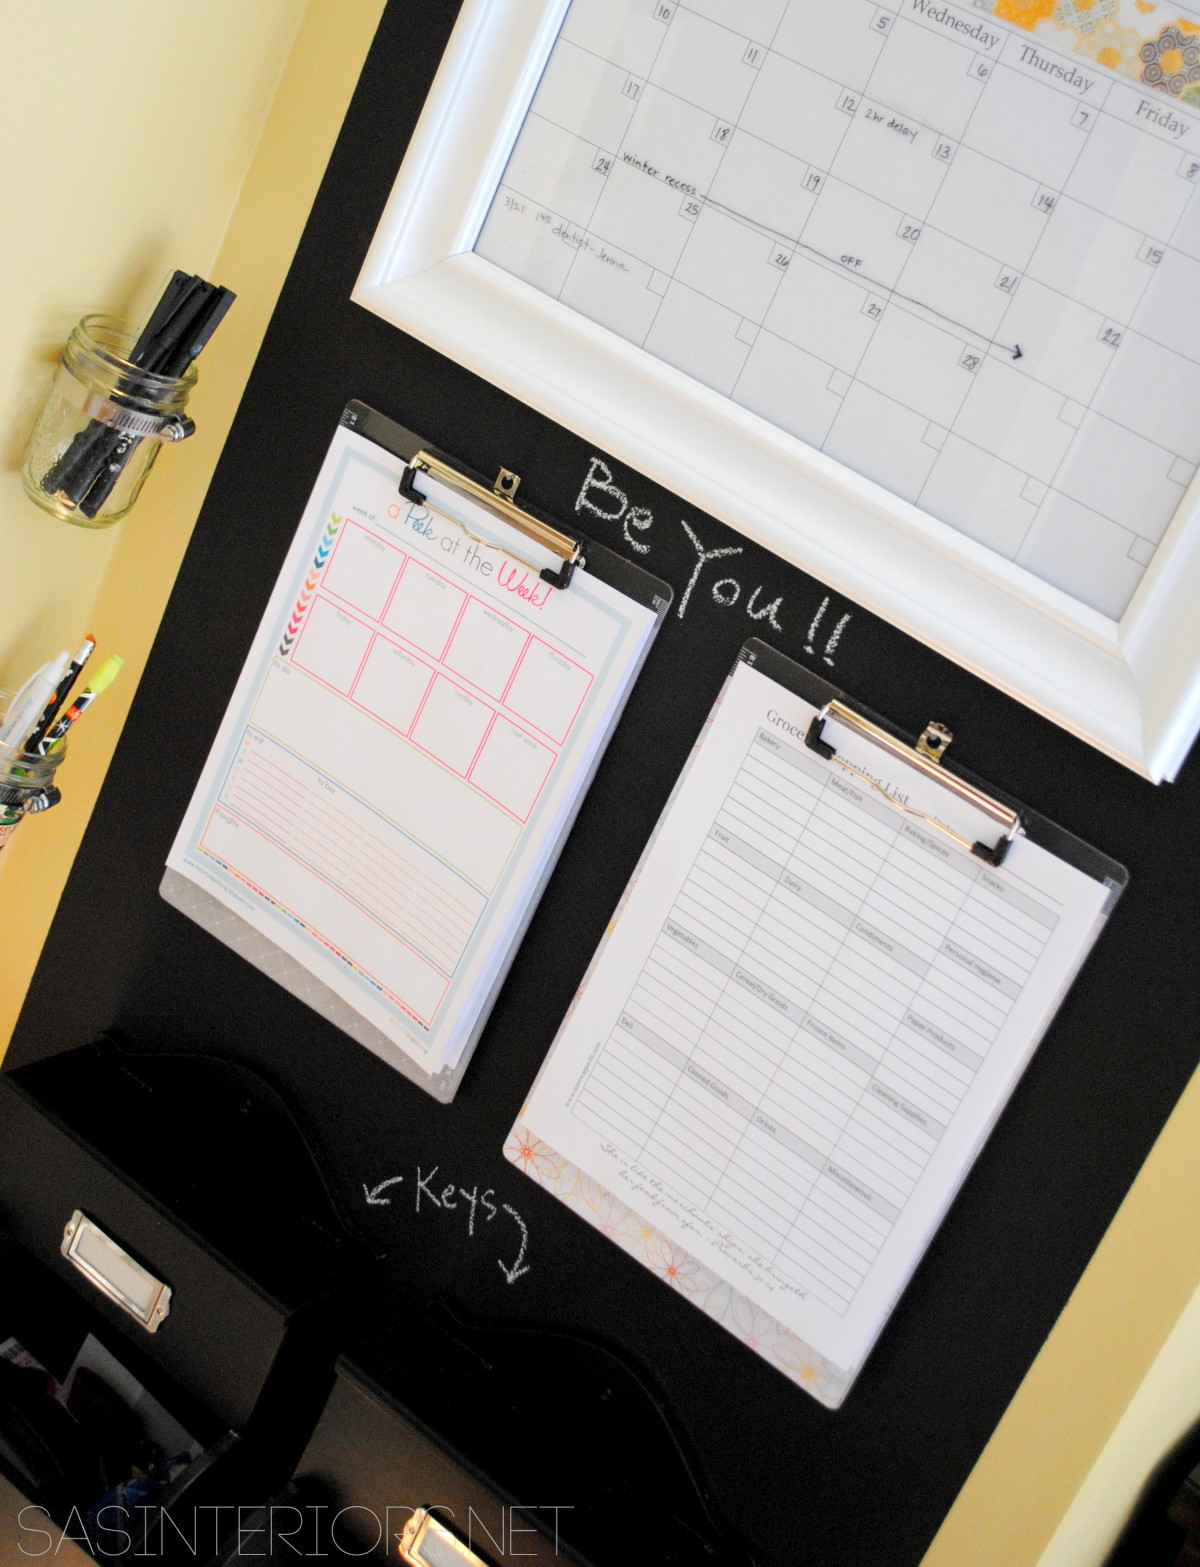
Below the calendar are the new additions to the CCC.  A month ago when the wall got an update, I made these 4 fun clipboards with scrapbook paper.  In between them are our key (and misc stuff) boxes that I had purchased at TJs and spray painted them black.

Chalkboard Family Central Command Center for the heart of the home including a monthly calendar, kids charts, inspirational quotes, and more.  Created by @Jenna_Burger via sasinteriors.net

Chalkboard Family Central Command Center for the heart of the home including a monthly calendar, kids charts, inspirational quotes, and more.  Created by @Jenna_Burger via sasinteriors.net

The top clipboards hold our grocery list & our Peak at the Week schedule.  Now I have no excuses to forget anything at the store – haha (wishful thinking)…

Chalkboard Family Central Command Center for the heart of the home including a monthly calendar, kids charts, inspirational quotes, and more.  Created by @Jenna_Burger via sasinteriors.netLooking to print these out – click {here} for the Peak at the Week chart created by iheartorganizing.com; Click {here} for the Grocery List created by The Time-Warp Wife (thanks to the awesome reader who found the link!)

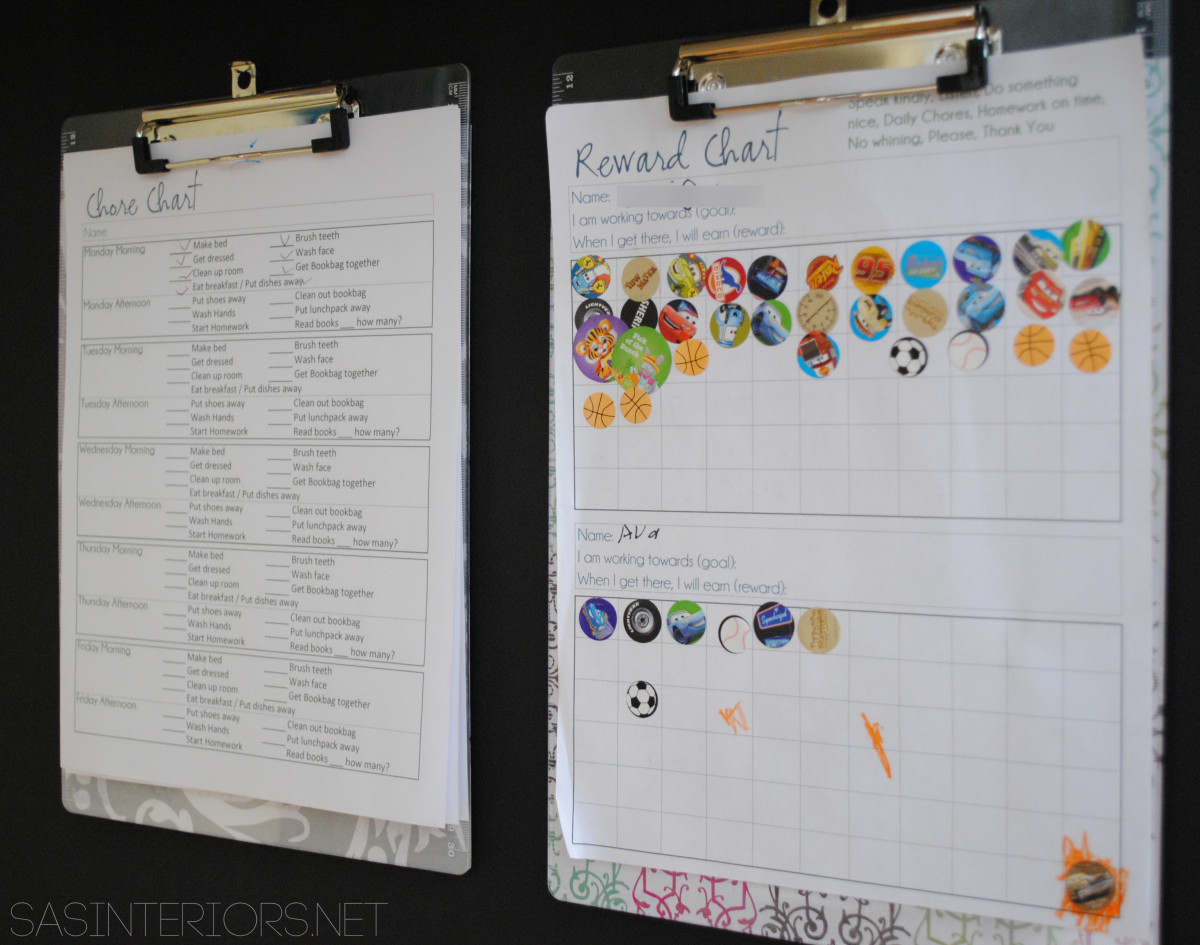
And below are the kids charts – a chore / responsibility chart for my son and a reward chart where both kids get to add stickers when they’ve made good choices / decisions.

Perfectly at their level!

Chalkboard Family Central Command Center for the heart of the home including a monthly calendar, kids charts, inspirational quotes, and more.  Created by @Jenna_Burger via sasinteriors.netLooking to print these out – click {here} for the chore chart and click {here} for the reward chart

I chose this spot of the home because it’s in the ideal location, kinda close to the foyer and kinda close to the kitchen.  It’s a small spot (a large wall or space isn’t really needed), yet is efficiently and thoughtfully put together for all our family needs.

Chalkboard Family Central Command Center for the heart of the home including a monthly calendar, kids charts, inspirational quotes, and more.  Created by @Jenna_Burger via sasinteriors.net

One of the major needs that was missing in our previous CCCs was something to write with.  Somehow we can NEVER find a pen or a pencil in our home (our kids must eat them – hehe).  Being inspired by others who used mason jars for storage, I grabbed some hose clamps from Lowe’s and installed two pencil / pen holders next to the charts.  I put them high enough, so little fingers hopefully won’t touch them. {A tutorial on how-to create jelly jar pen holders to come soon}.

Chalkboard Family Central Command Center for the heart of the home including a monthly calendar, kids charts, inspirational quotes, and more.  Created by @Jenna_Burger via sasinteriors.net

Chalkboard Family Central Command Center for the heart of the home including a monthly calendar, kids charts, inspirational quotes, and more.  Created by @Jenna_Burger via sasinteriors.net

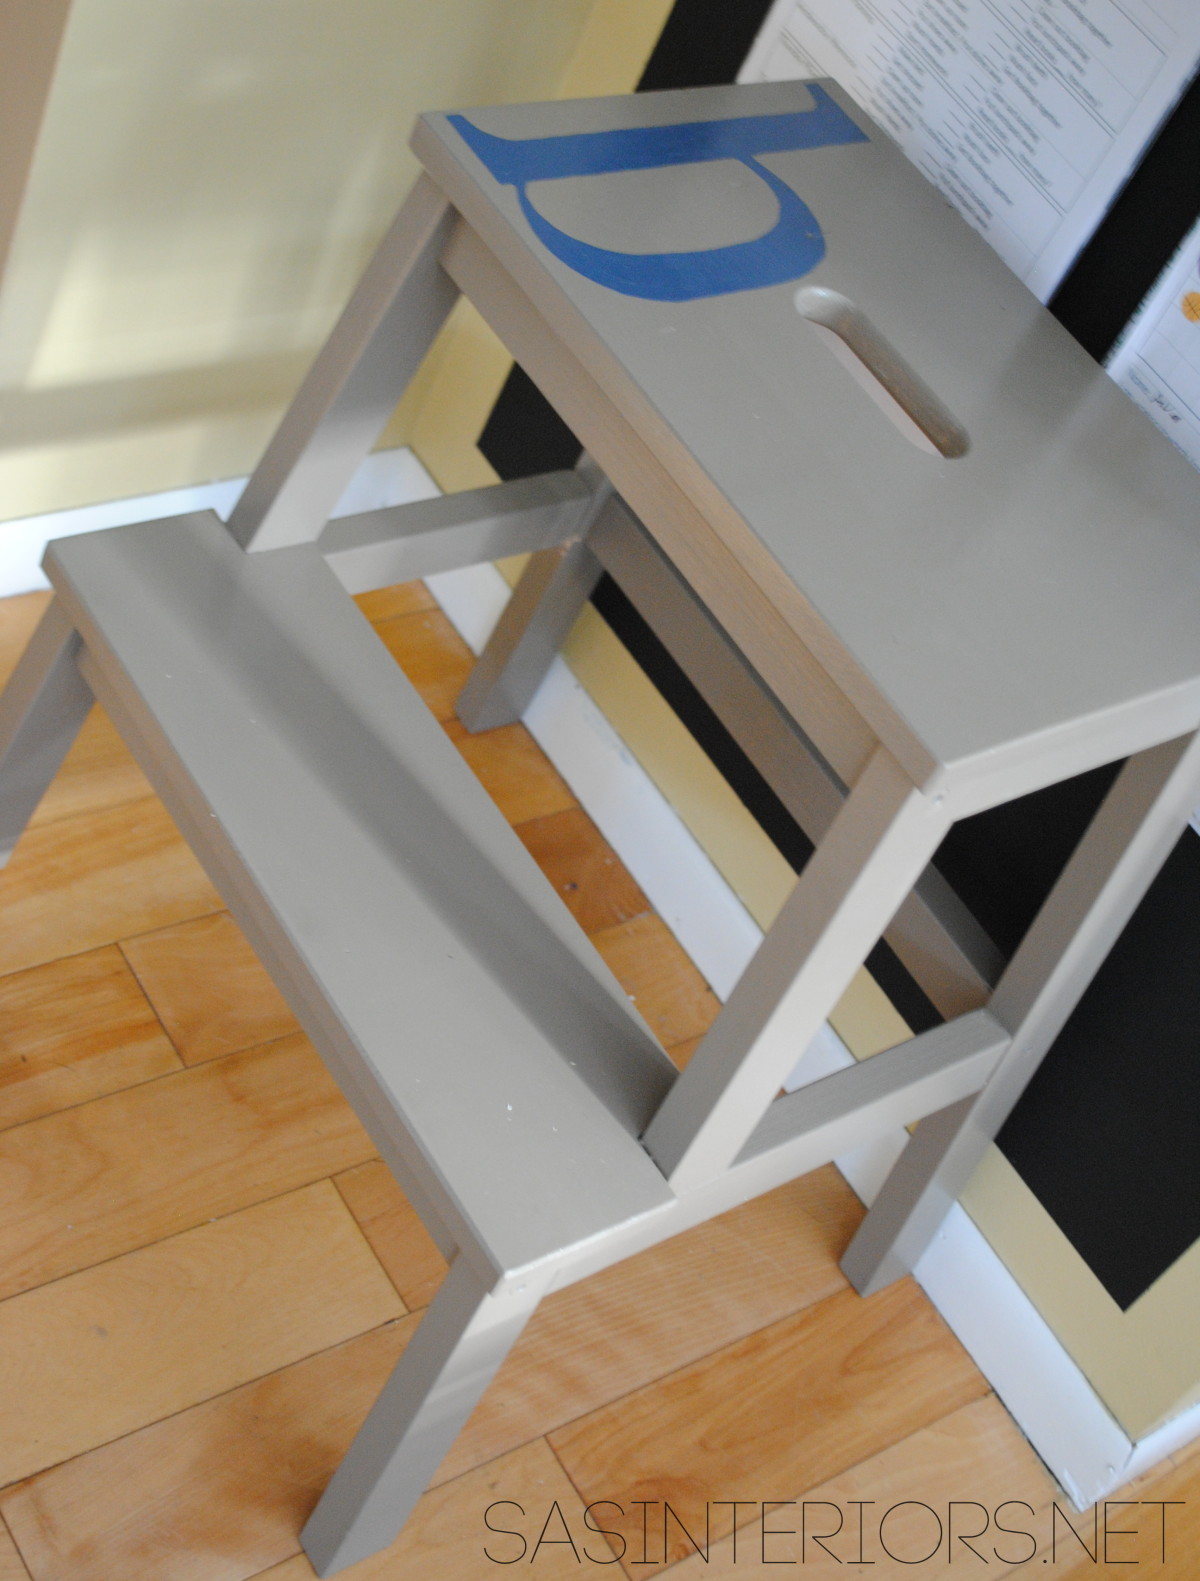
Something that I haven’t shared, but created a long time ago is our family stool.  It’s something so simple, but used everyday!  From using it in the kitchen and closet or as an extra seat, our Ikea step stool is awesome.  When I bought it, it had a natural wood finish, but with a little paint (the same color as the kitchen), I revamped it.  Then using the same stencil that I created for my pallet box, I added our family initial: b.

Chalkboard Family Central Command Center for the heart of the home including a monthly calendar, kids charts, inspirational quotes, and more.  Created by @Jenna_Burger via sasinteriors.net

Lastly, of course we had to chalk-up our new wall!  That’s the point of chalkboard!!

Chalkboard Family Central Command Center for the heart of the home including a monthly calendar, kids charts, inspirational quotes, and more.  Created by @Jenna_Burger via sasinteriors.net

I love how a chalkboard wall allows you to continually change it.

Chalkboard Family Central Command Center for the heart of the home including a monthly calendar, kids charts, inspirational quotes, and more.  Created by @Jenna_Burger via sasinteriors.net

And that sums up the tour of our 30″ wide everything wall!

Chalkboard Family Central Command Center for the heart of the home including a monthly calendar, kids charts, inspirational quotes, and more.  Created by @Jenna_Burger via sasinteriors.net

 How does your family stay organized?  Do you have a central “spot” in your home?