
Tag: Jenna Burger Design

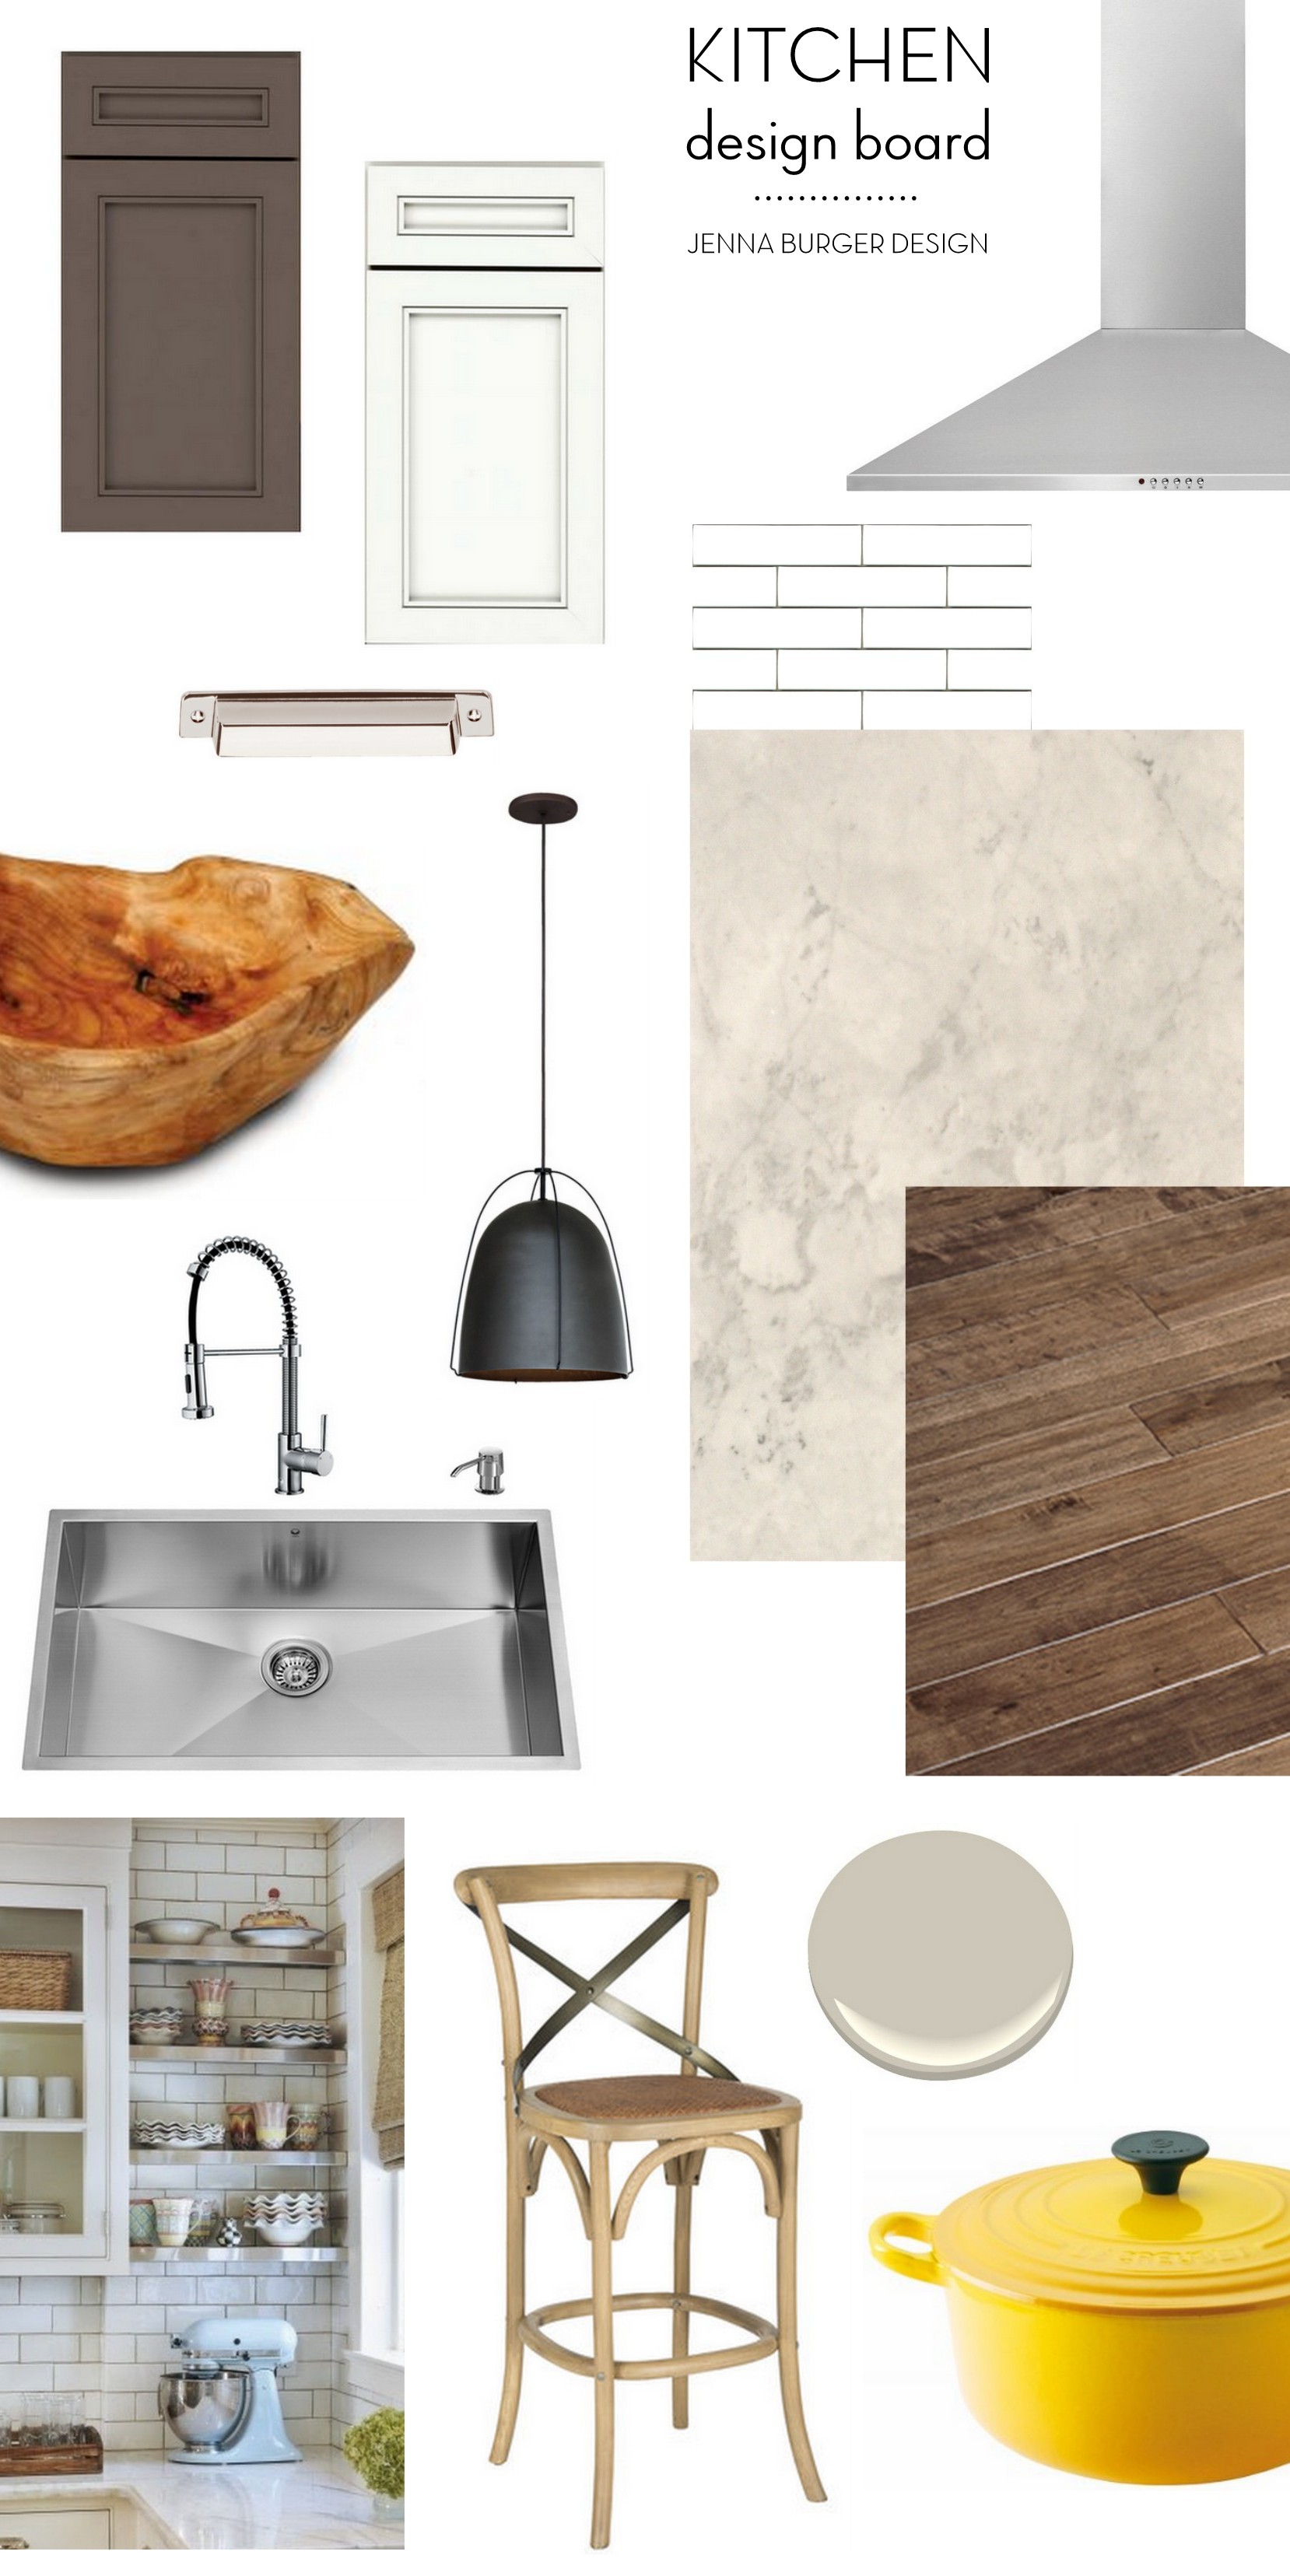
Stunning Stained Kitchen Reveal

While I am in the midst of renovating my own kitchen, I’ve been immersed in designing + project managing a few client renovations as well. One that just wrapped up is this stunning stained kitchen…

Stunning Stained Kitchen REVEAL: before & after of a kitchen renovation by www.jennaburger.com

As of late, I am seeing that 90% of new kitchens have painted cabinetry – 85% of which are white – so when this client was adamant about wanting stained cabinets for their new kitchen, I happily obliged. For this project, the client had a clear vision & many decisions were already made when we started working together. It made my job easier + my role less than typical compared to working with clients that need more ‘hand-holding’. With my assistance, I was able to steer / direct them in making design choices that suited their style to achieve the kitchen they envisioned.

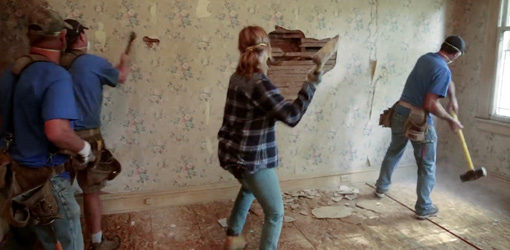
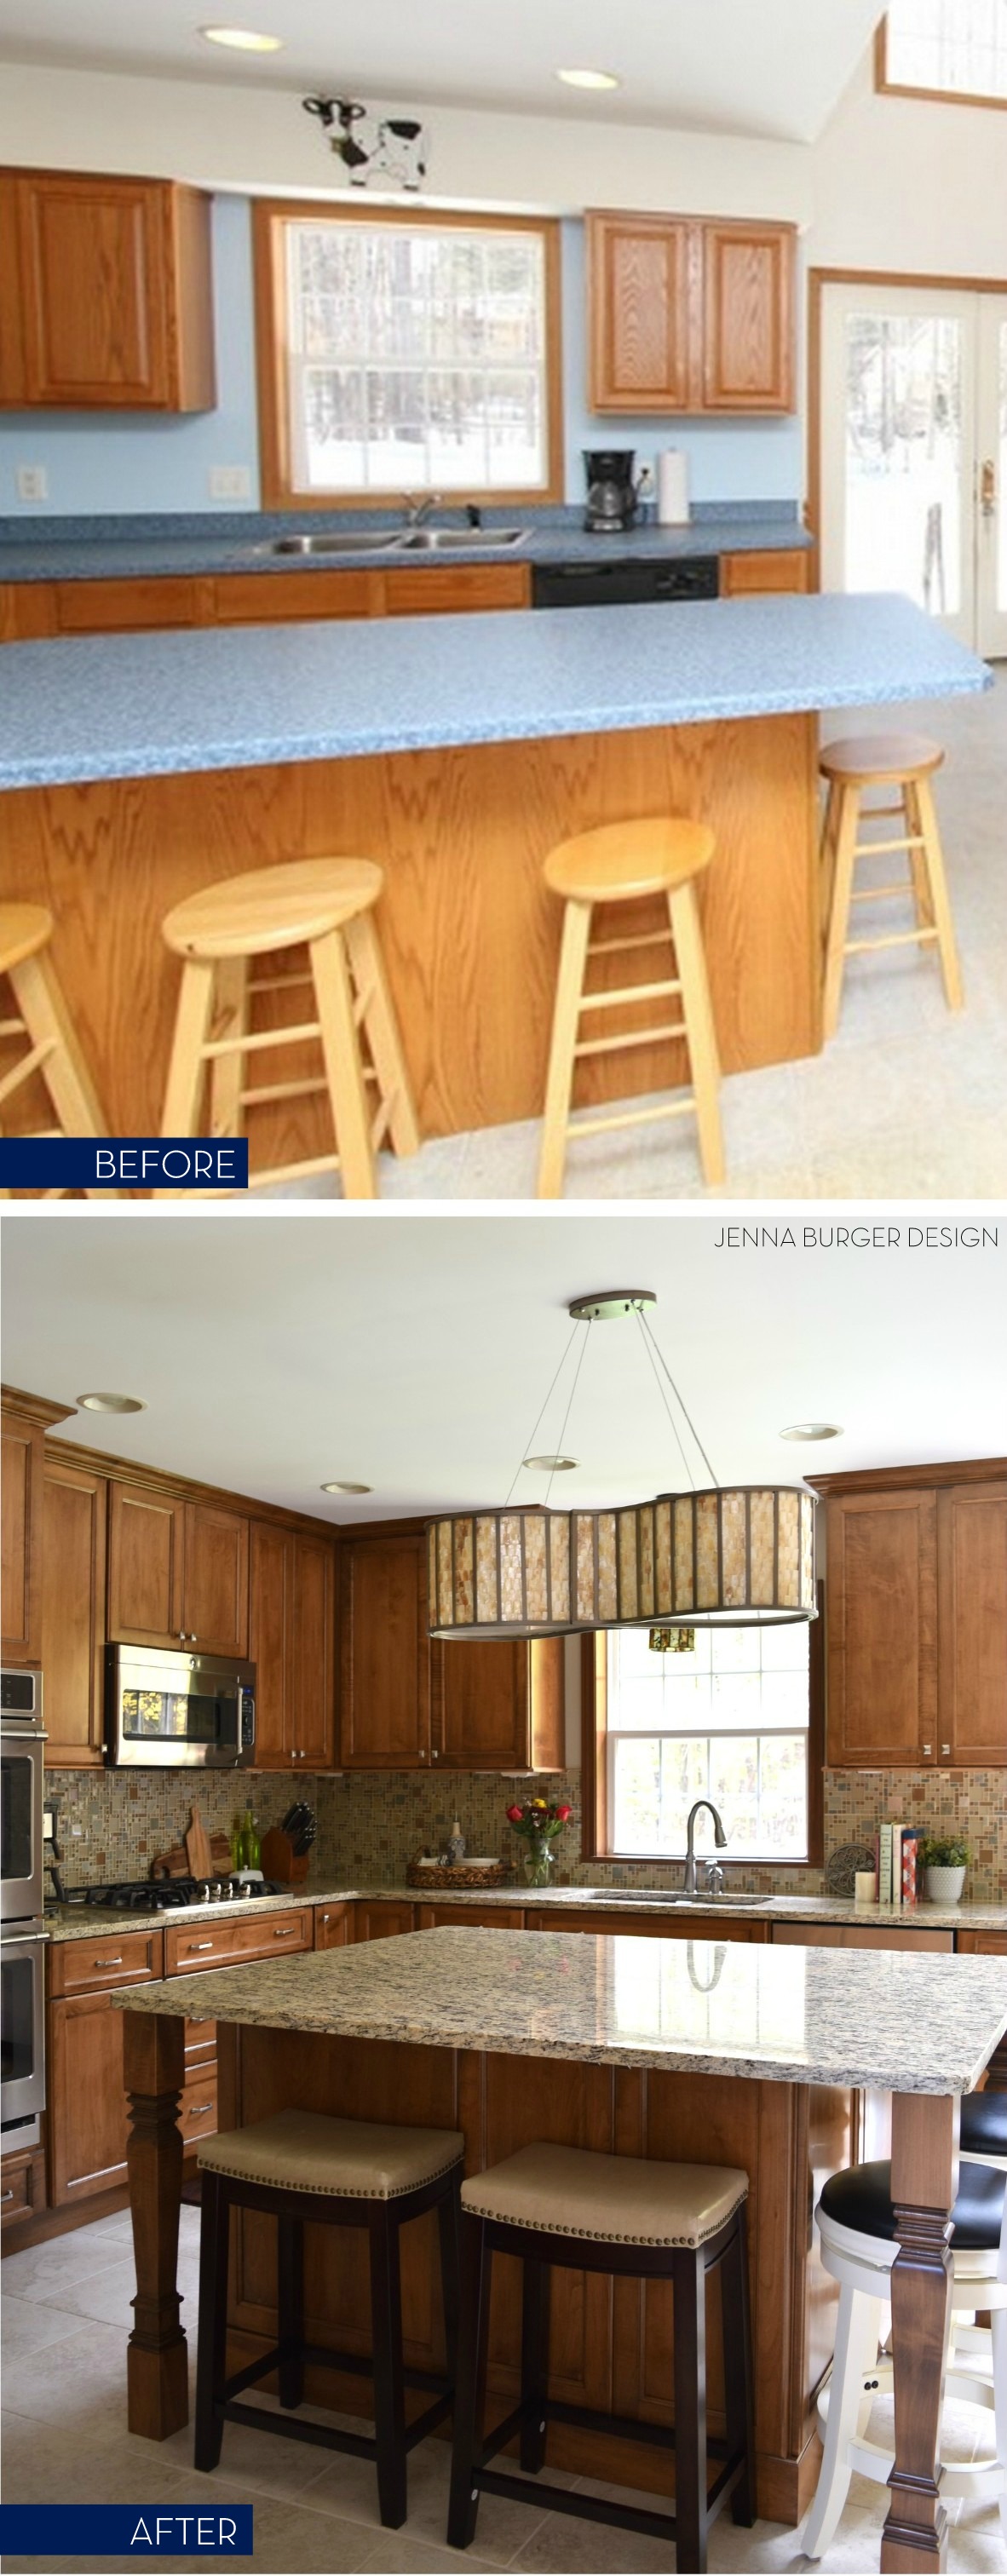
Before I share more of what the kitchen looks like now, you’ve gotta see what it looked like prior to demo…

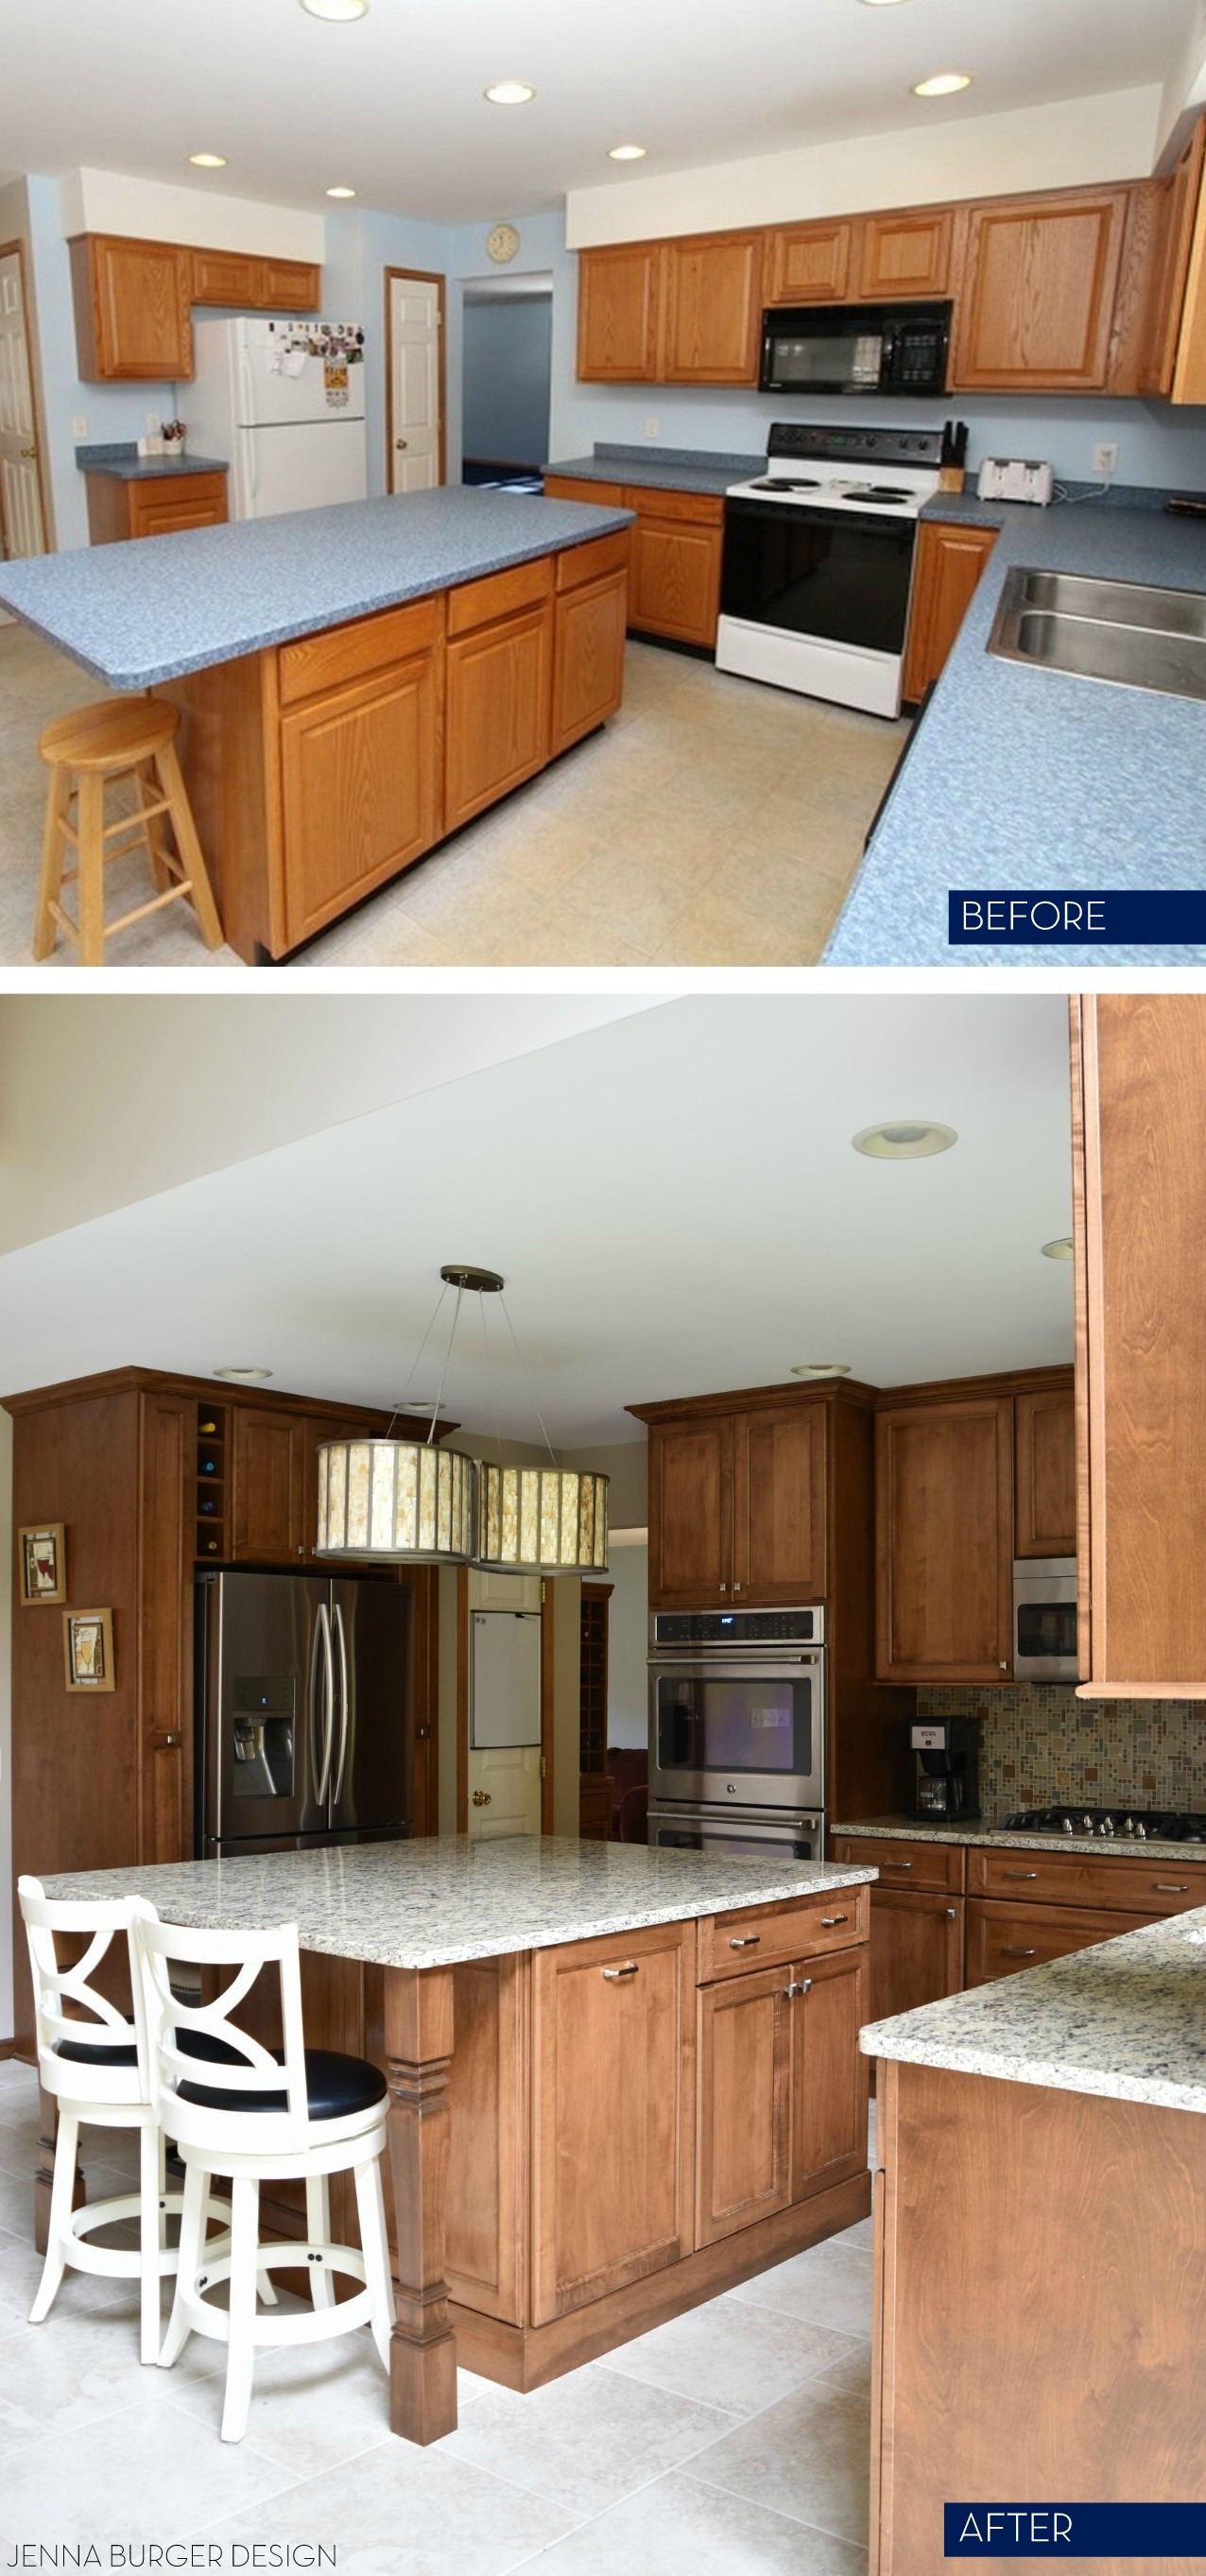
Like I always say, you have to see the before to really appreciate the after. And the kitchen before really needed some TLC.
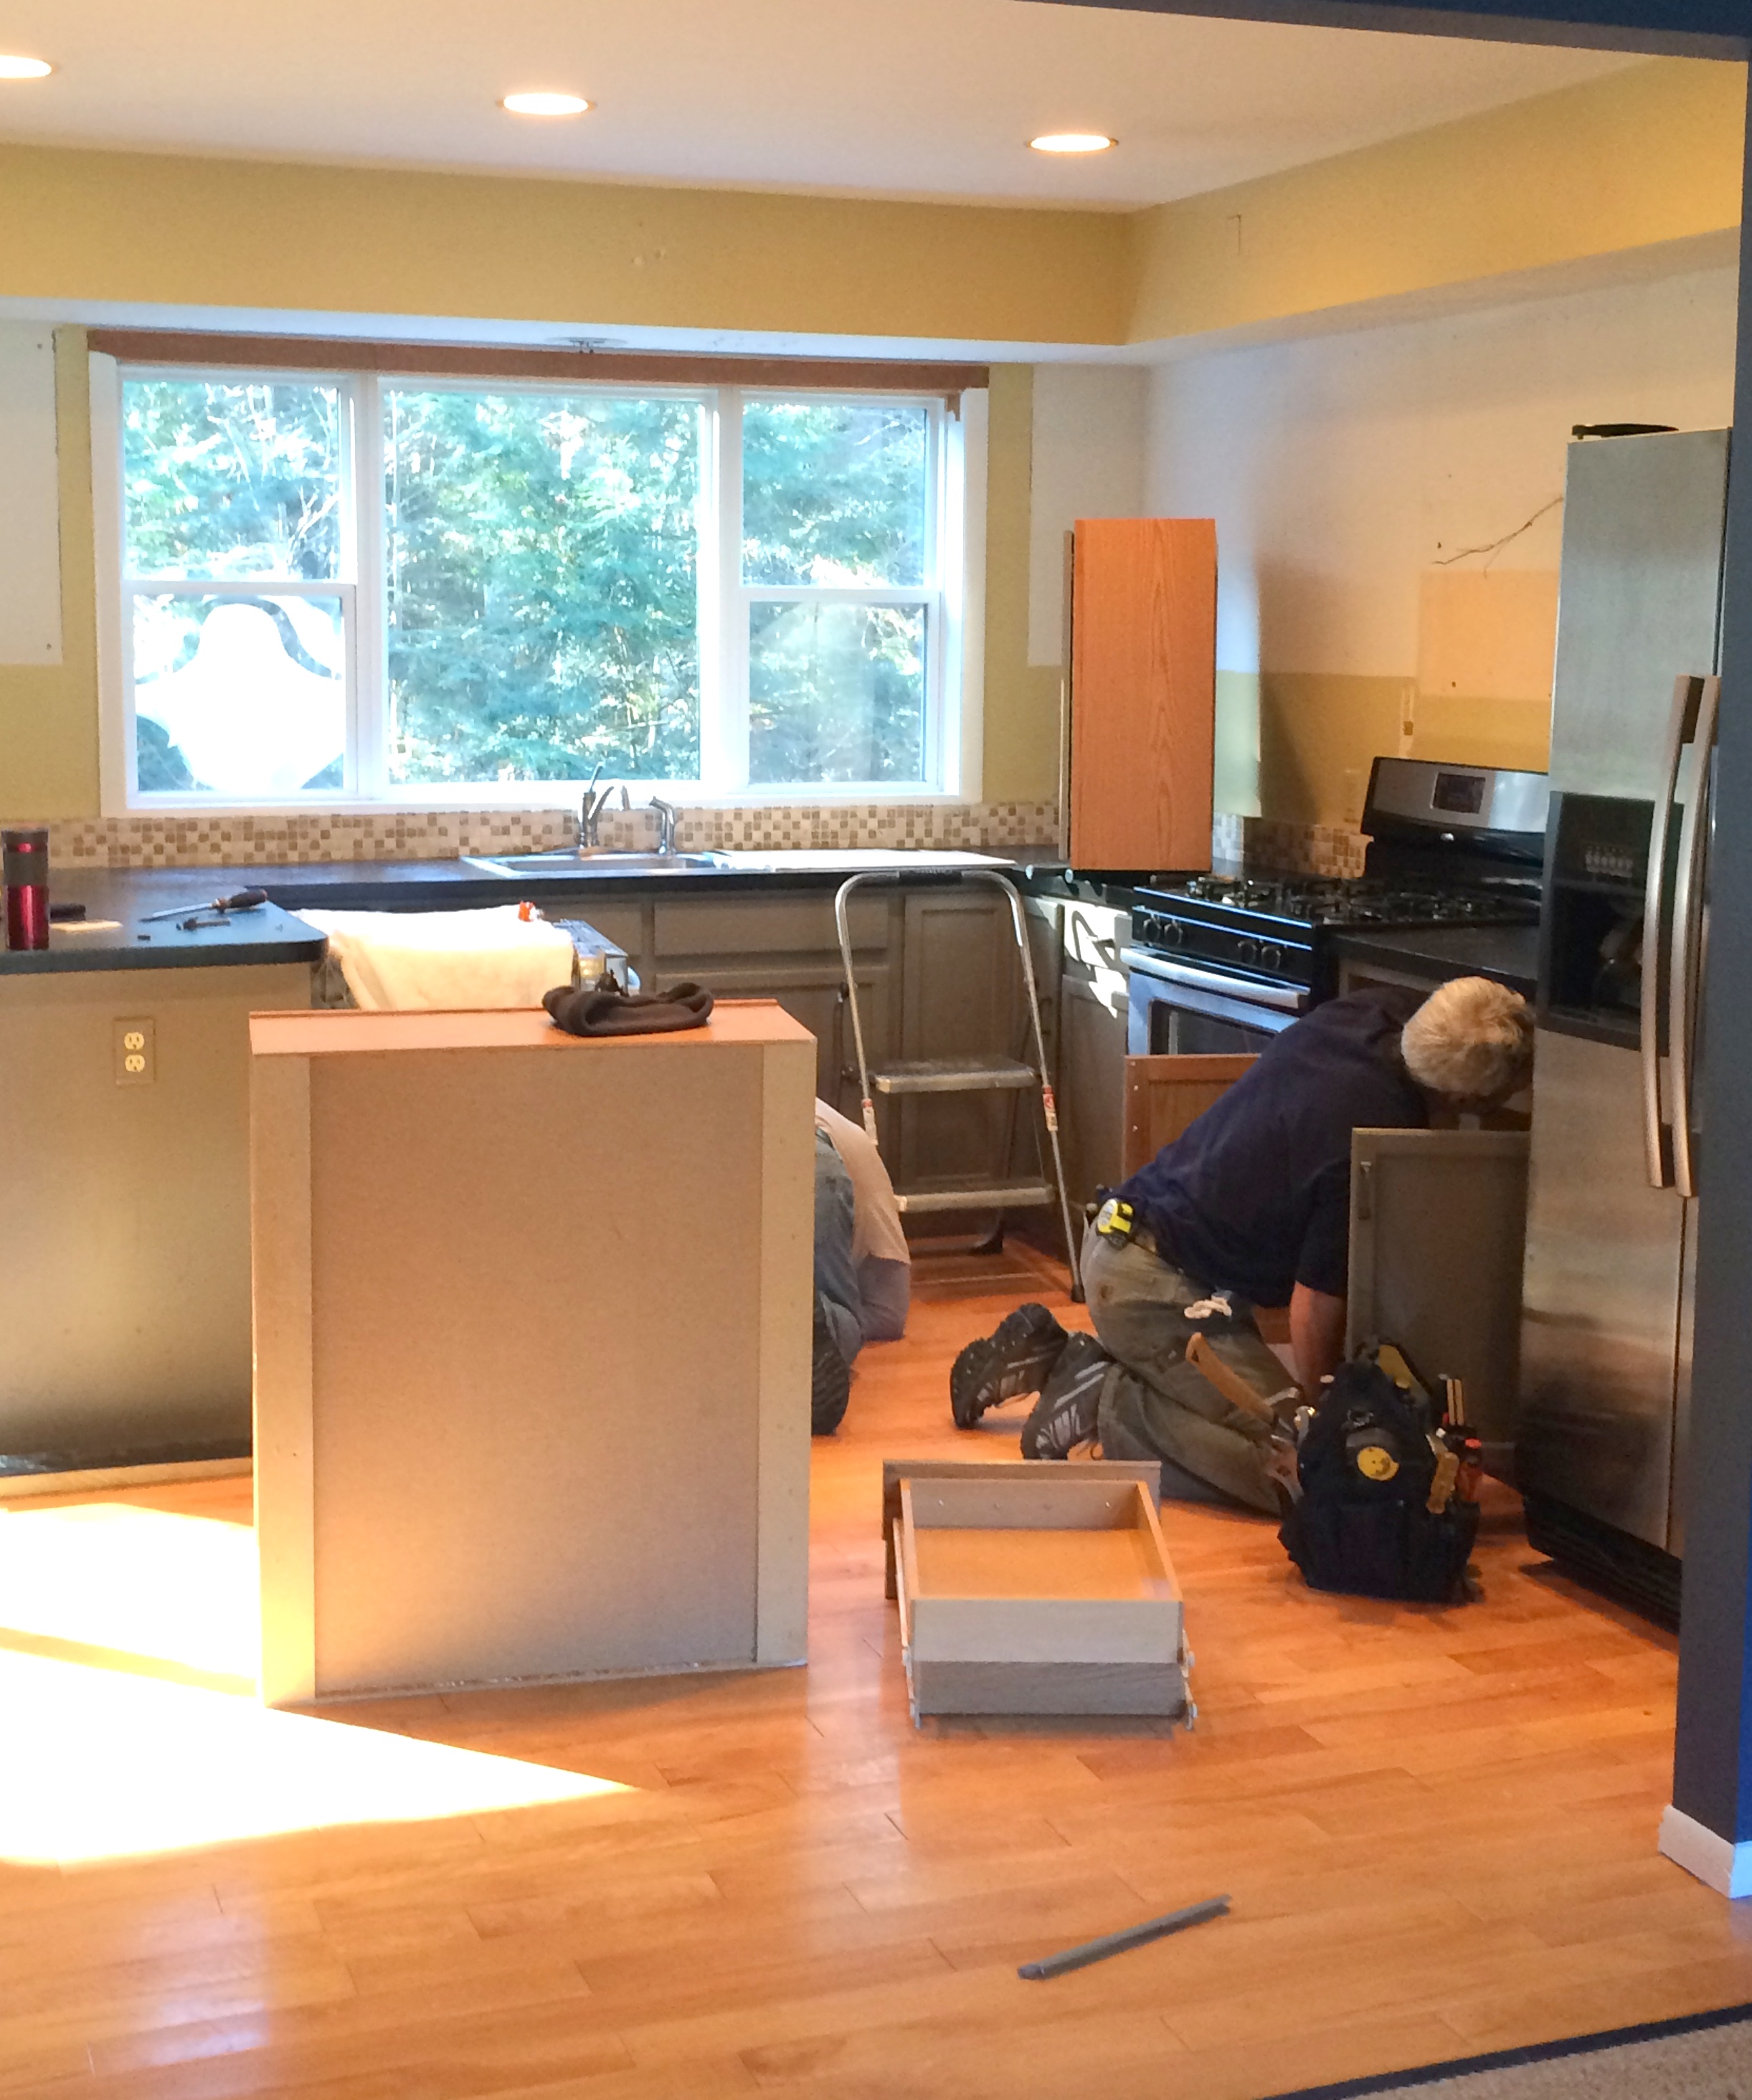
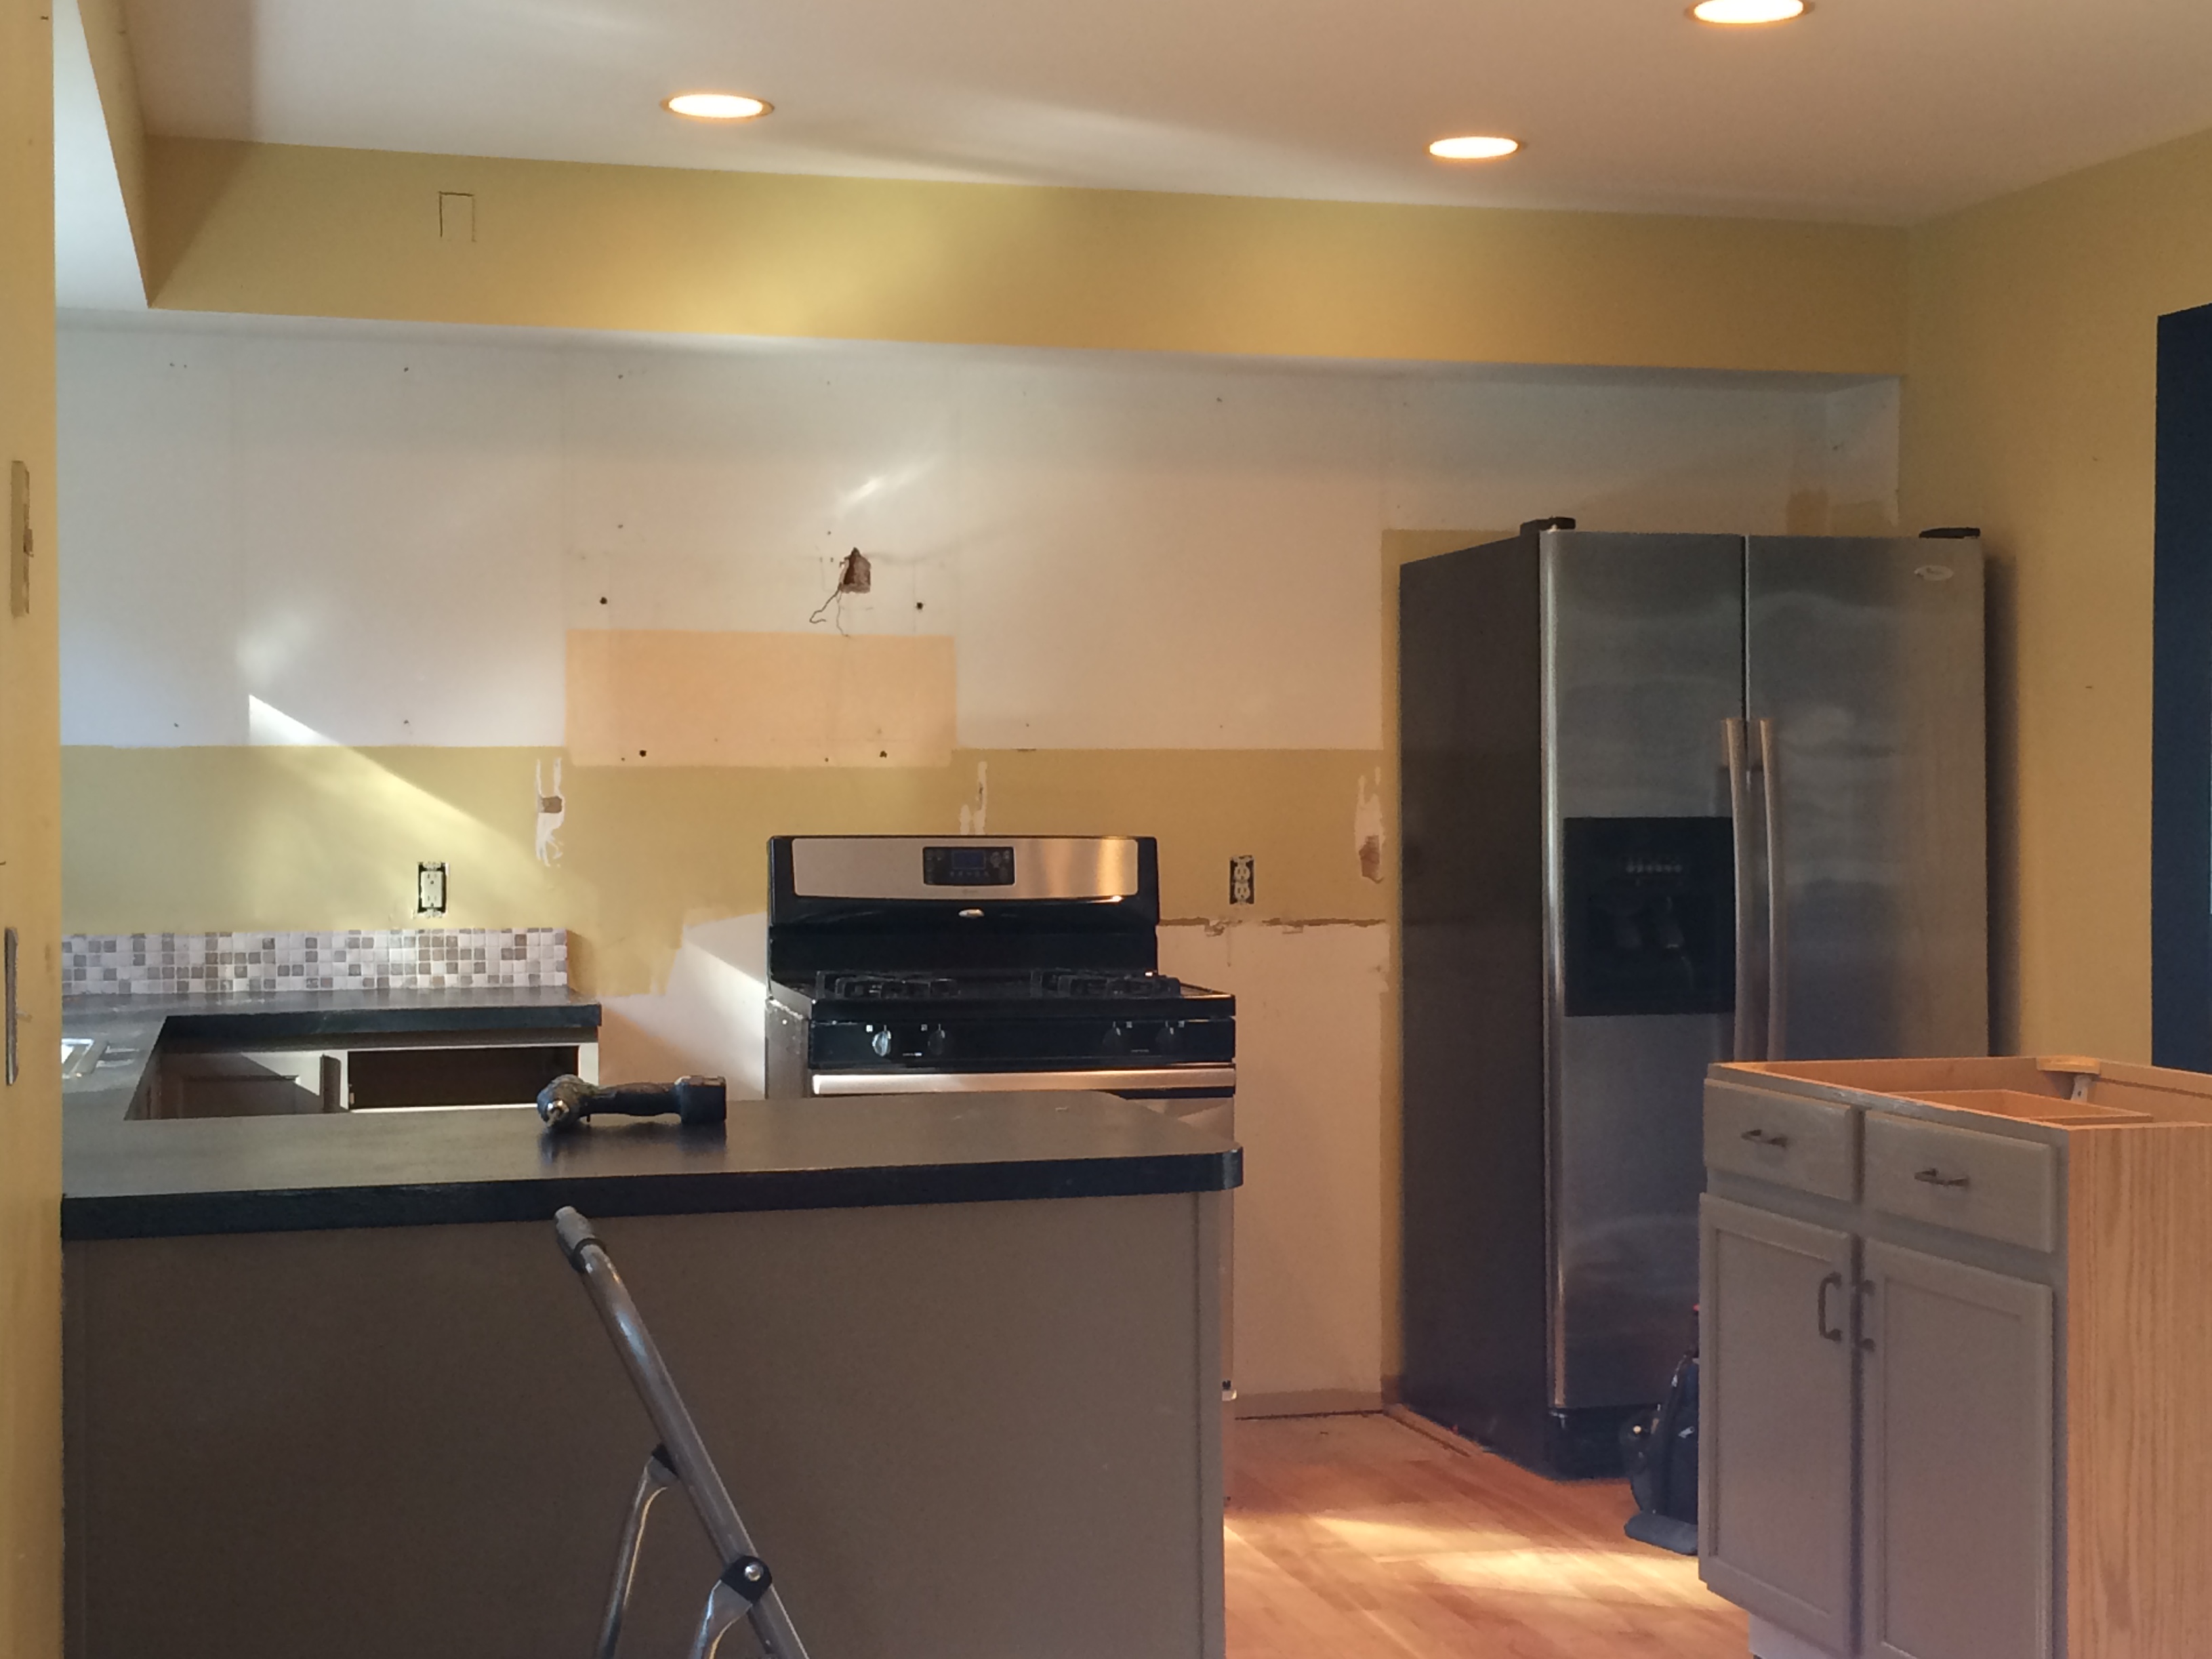
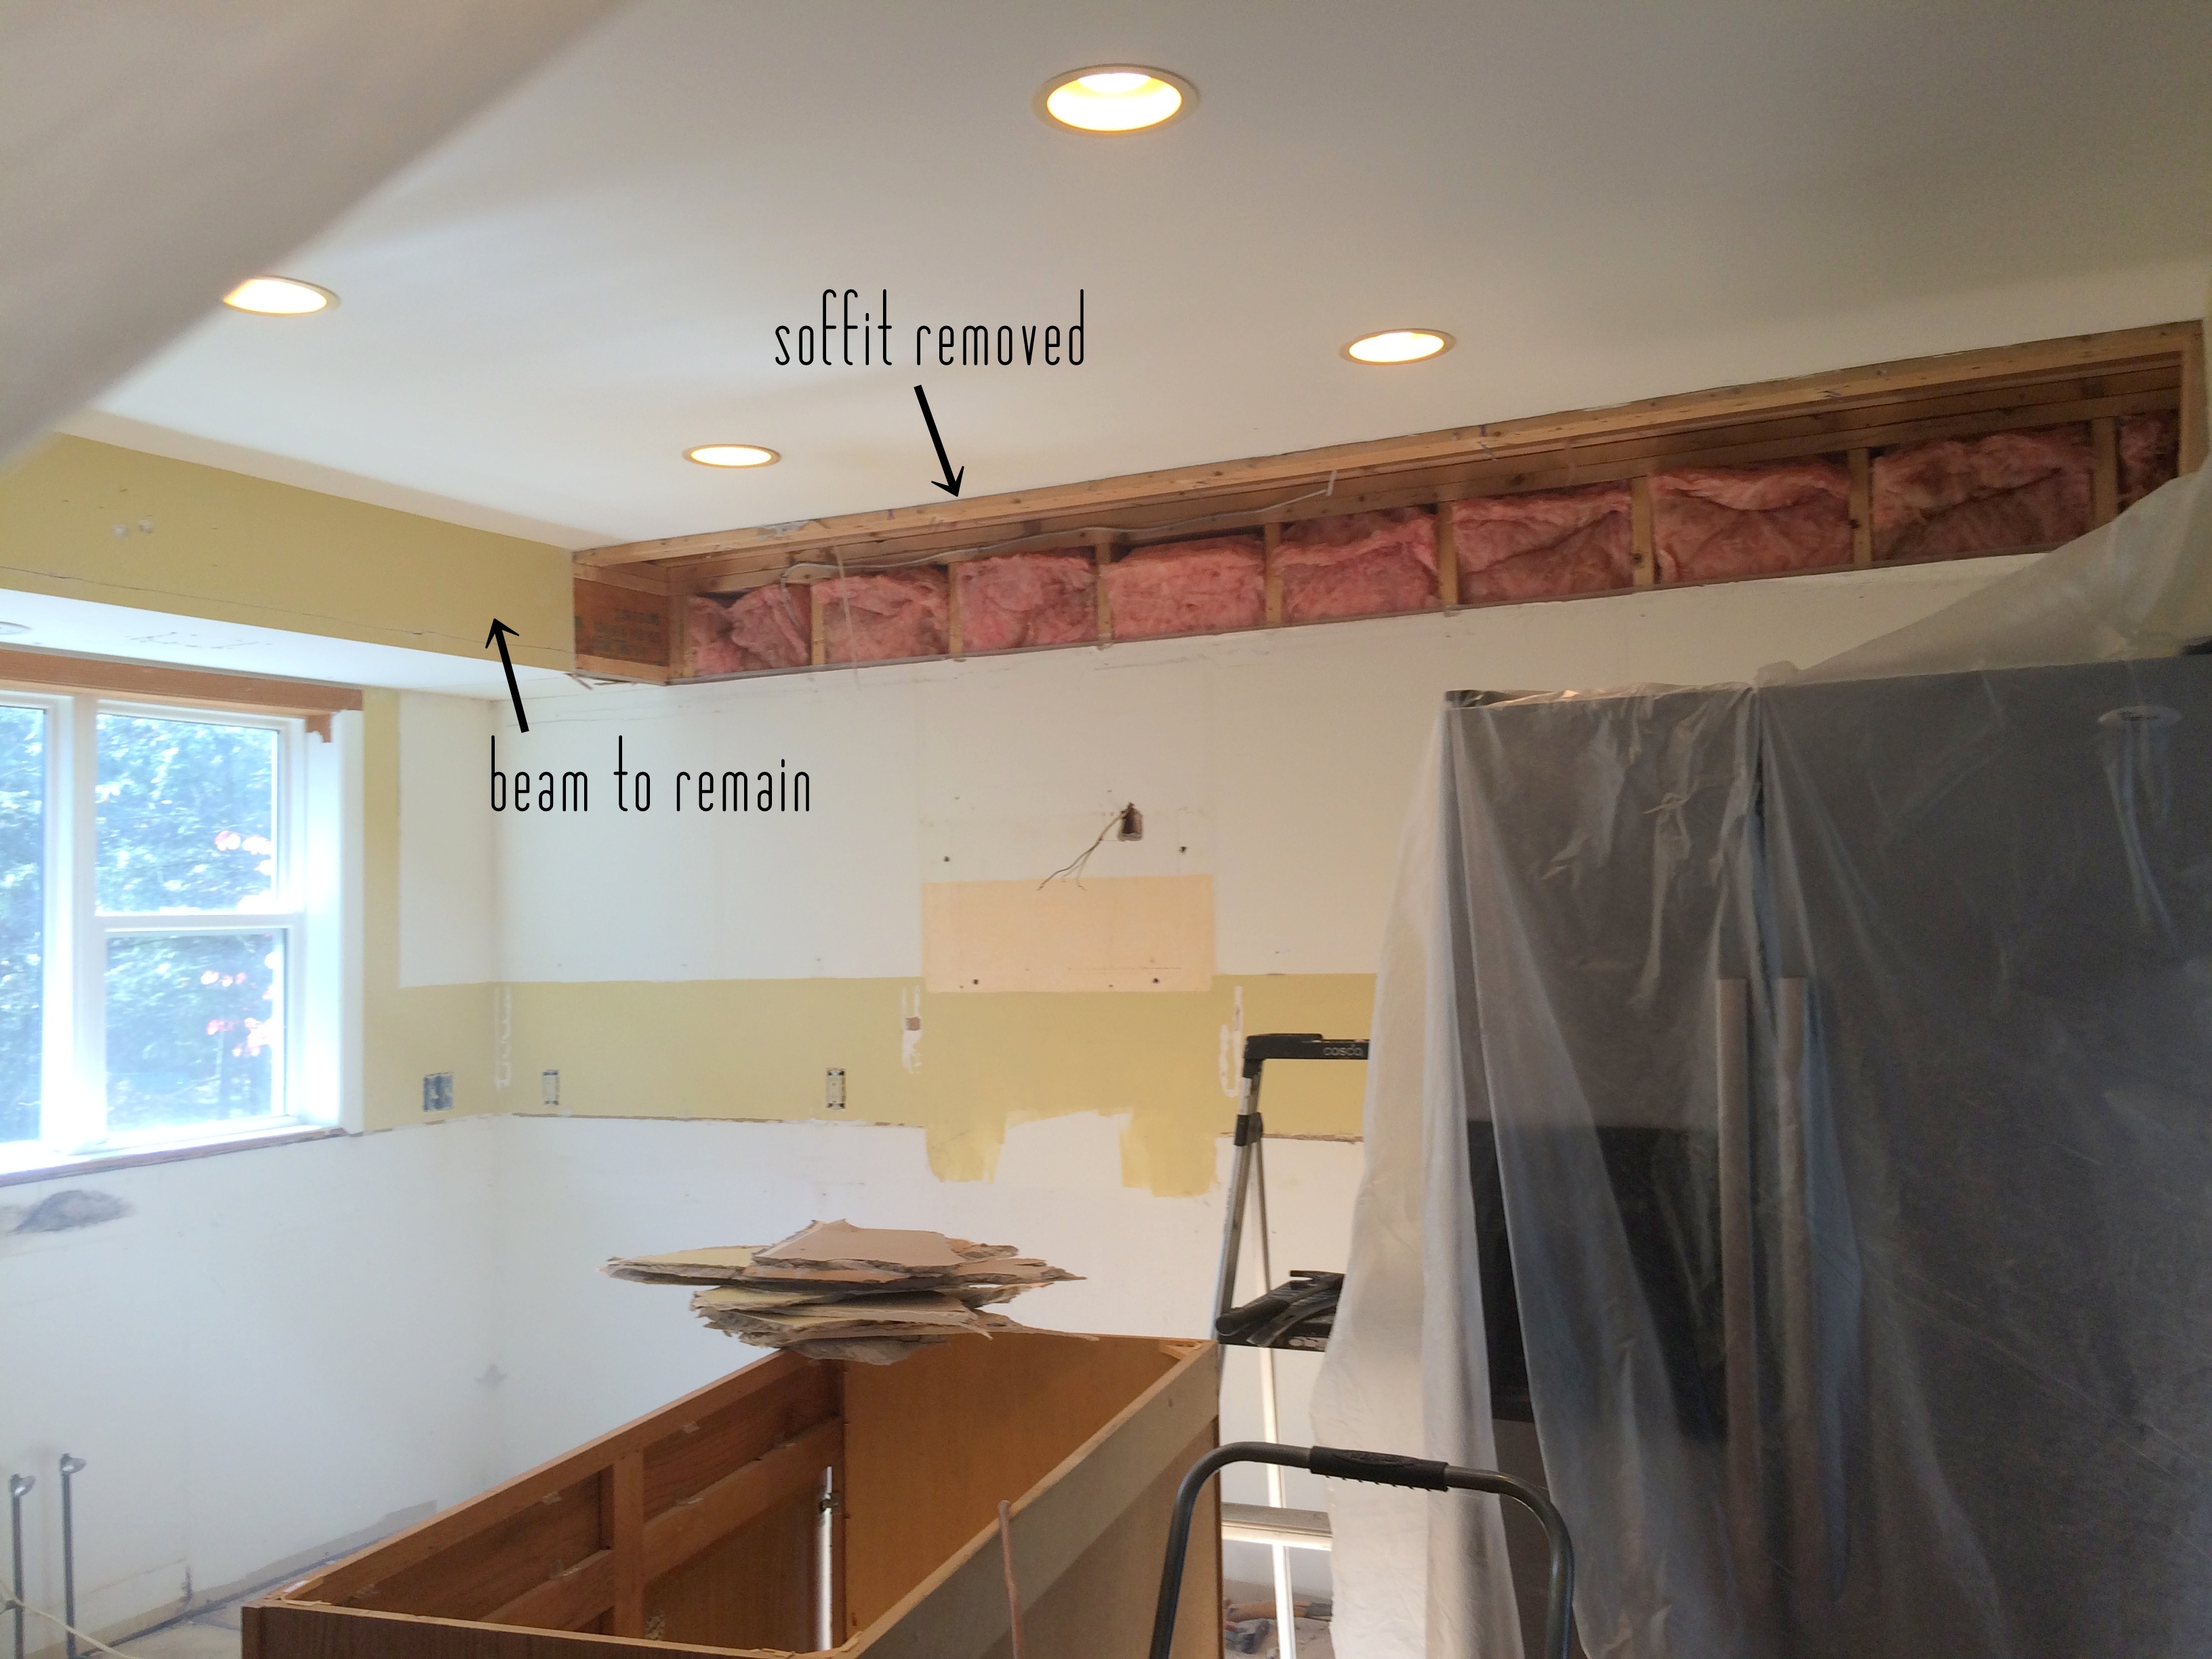
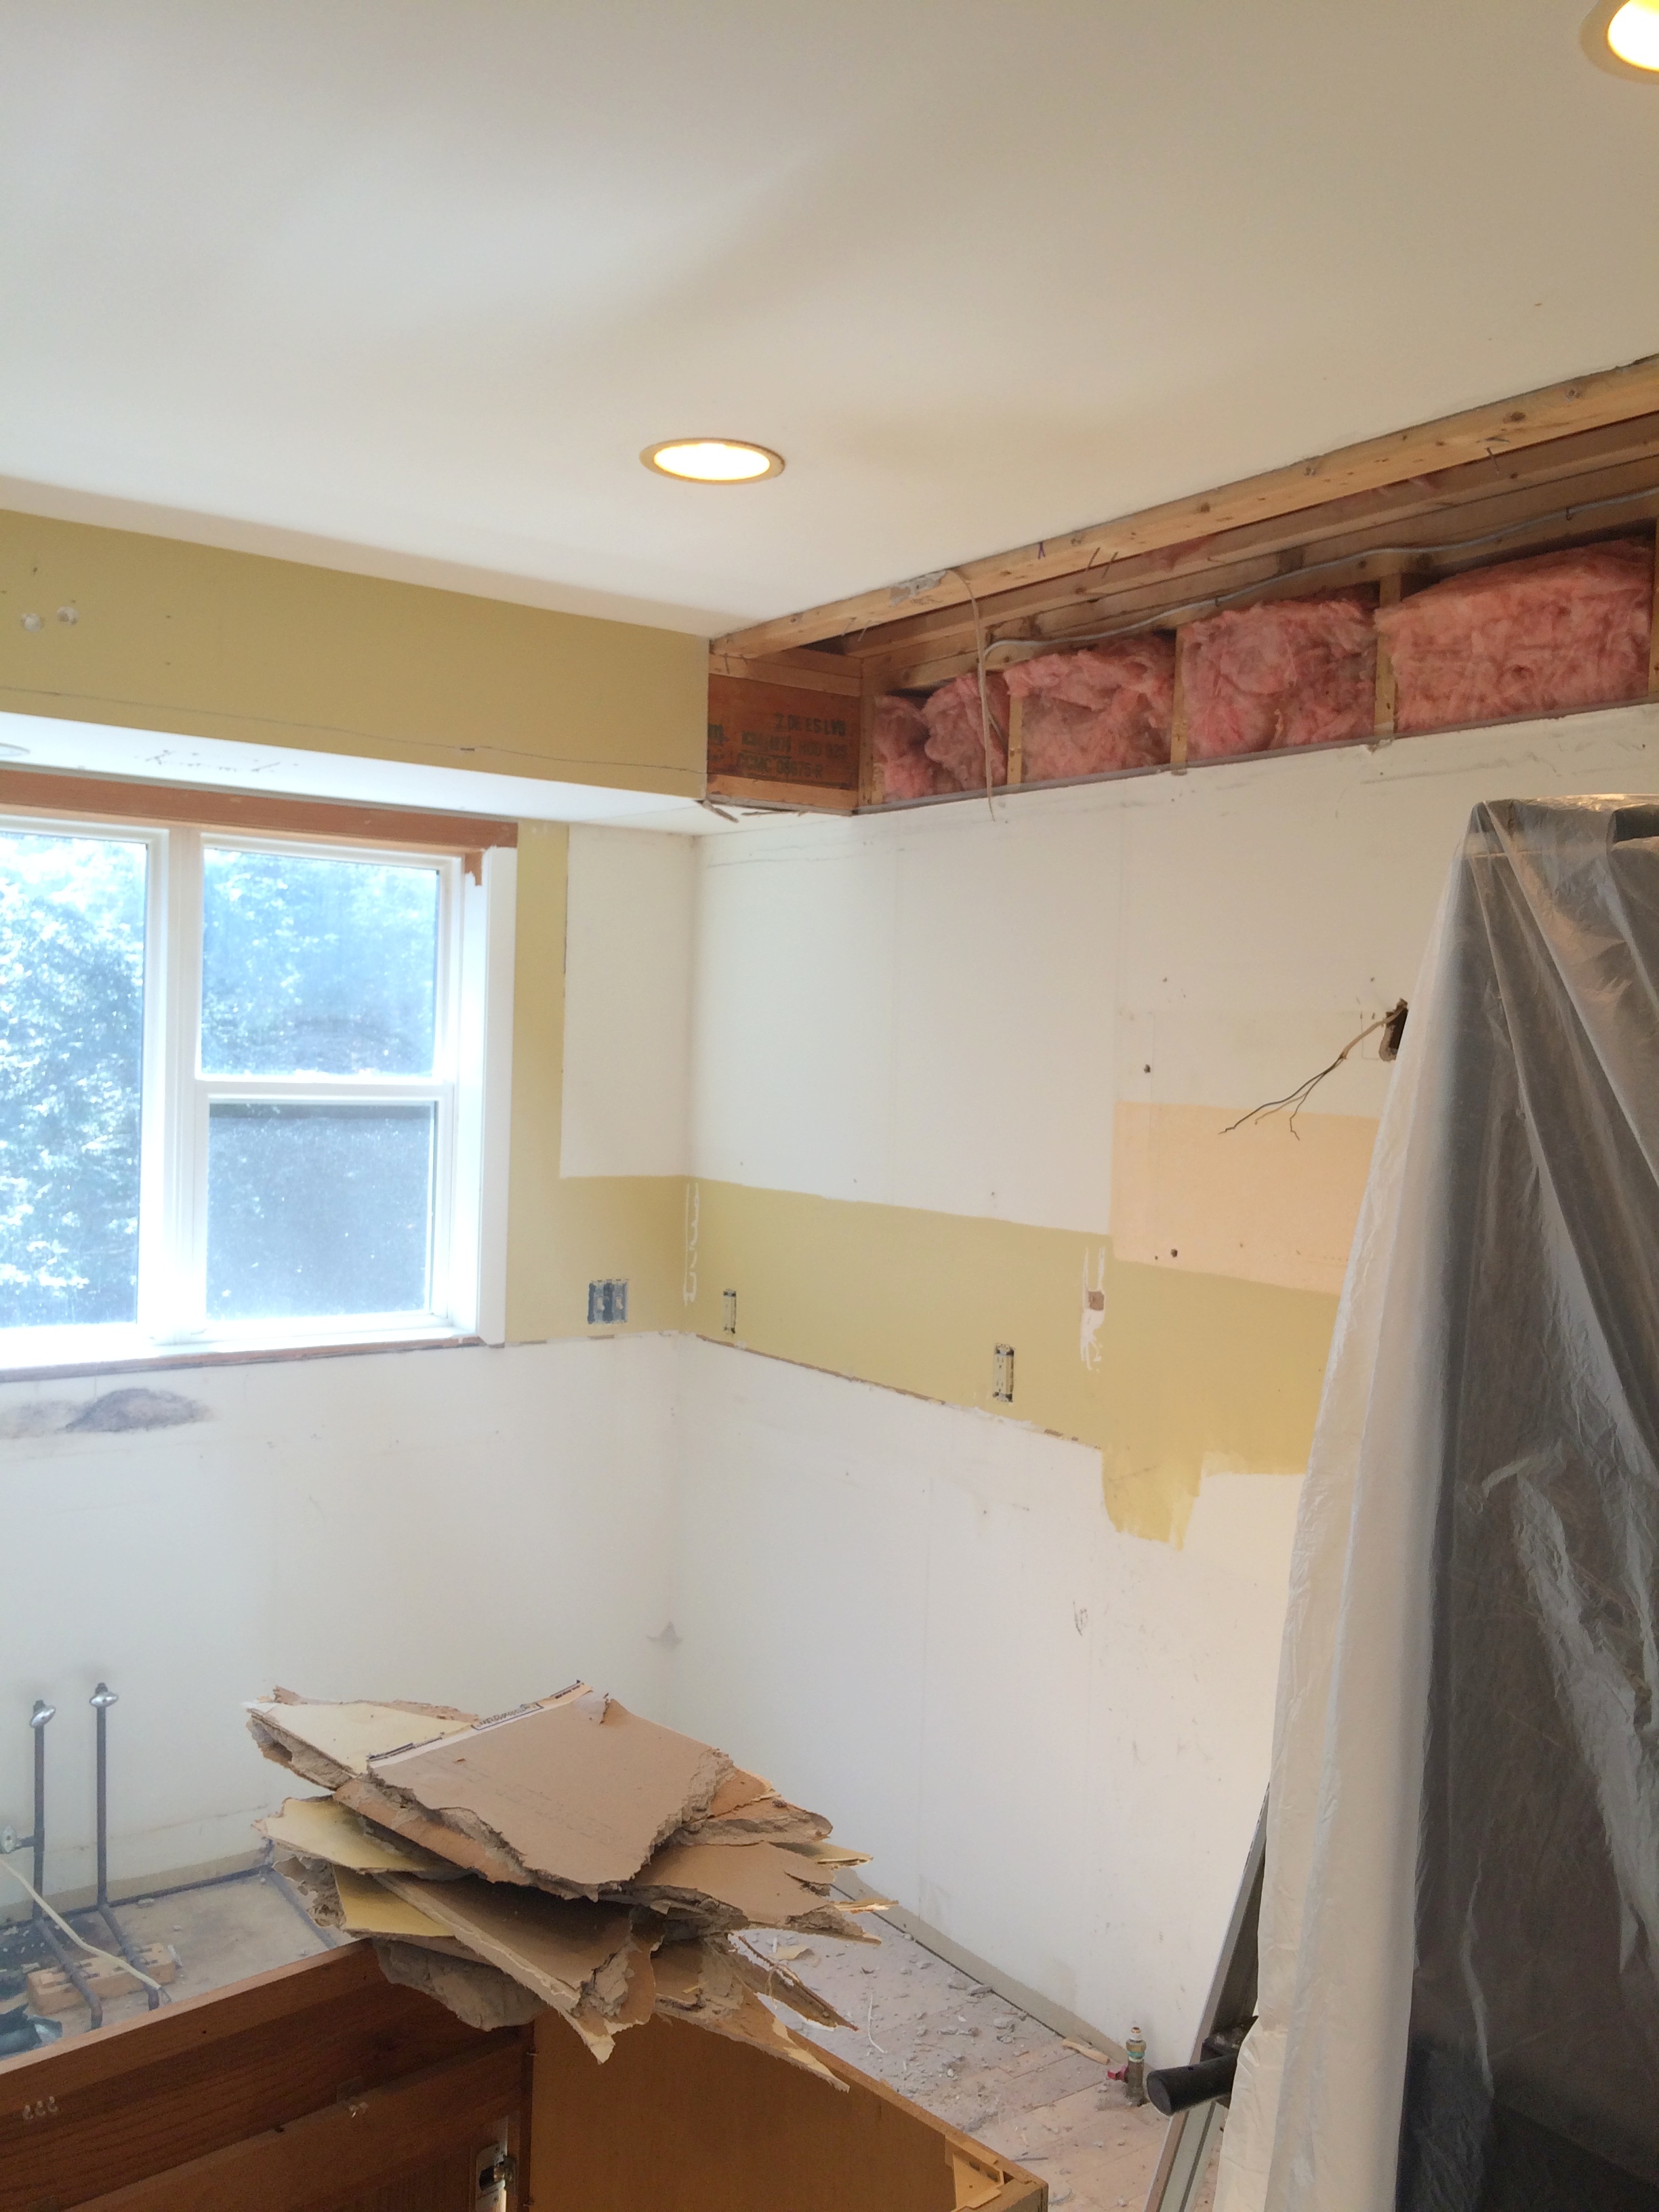
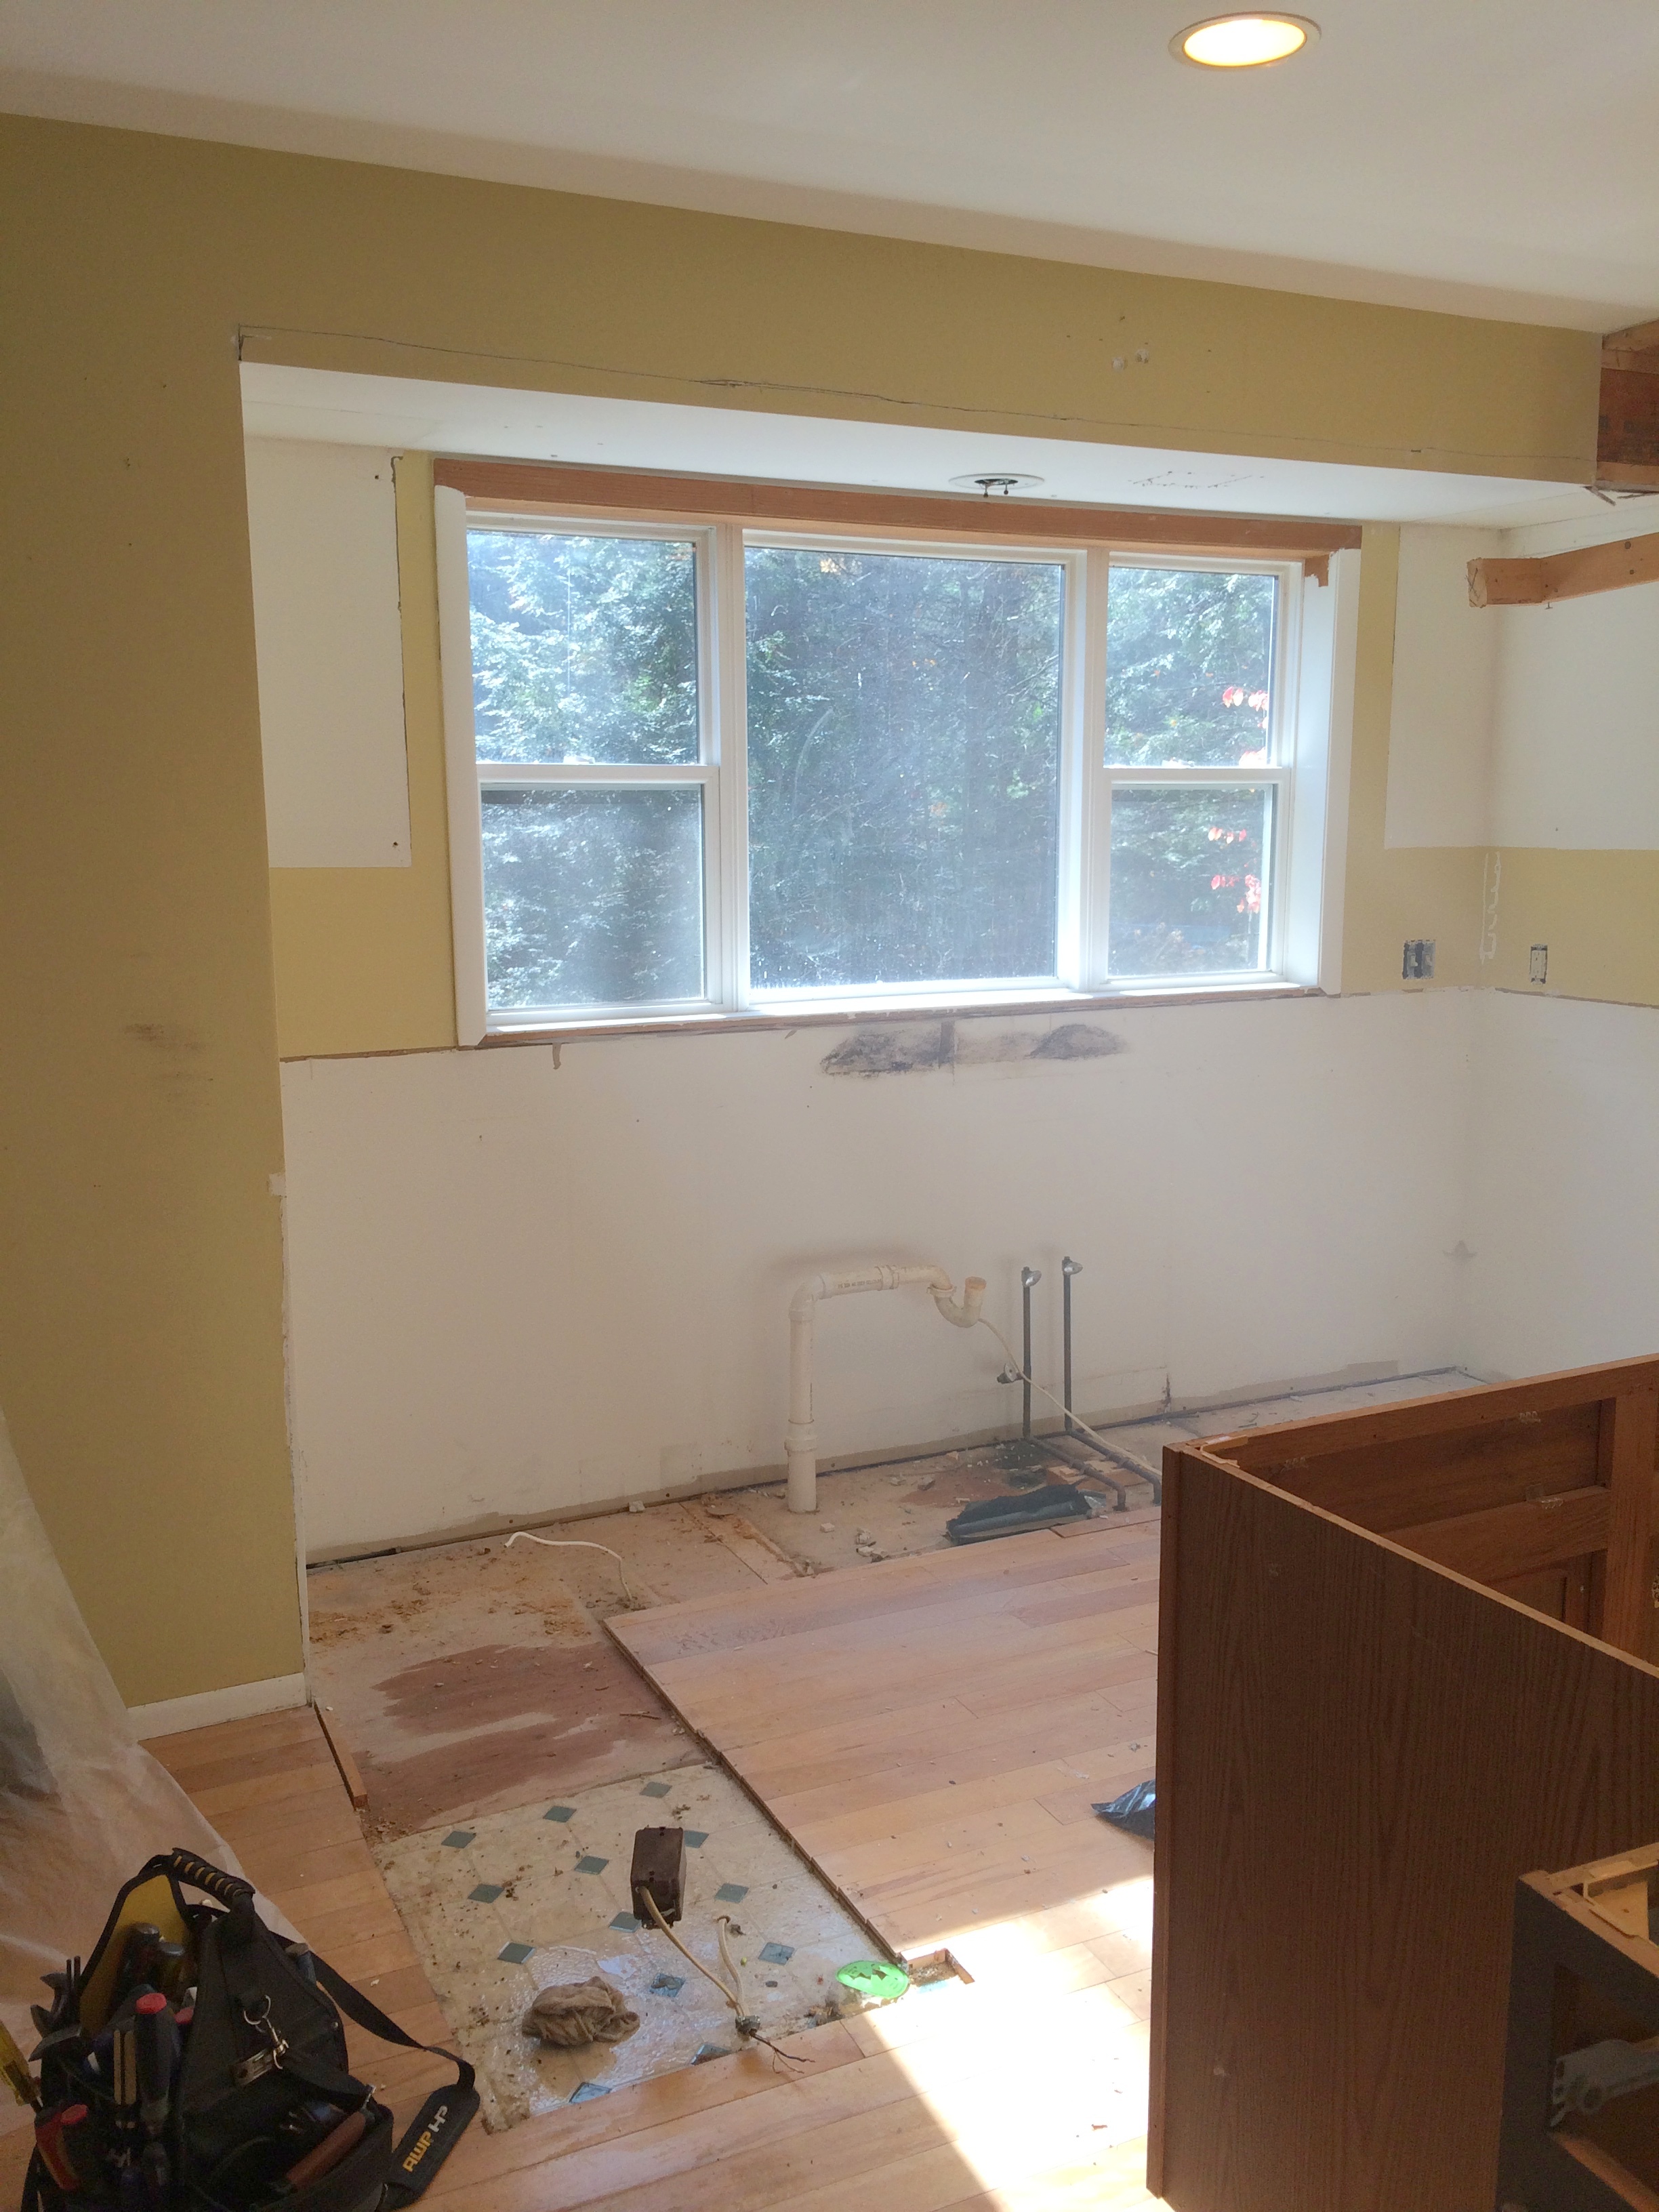
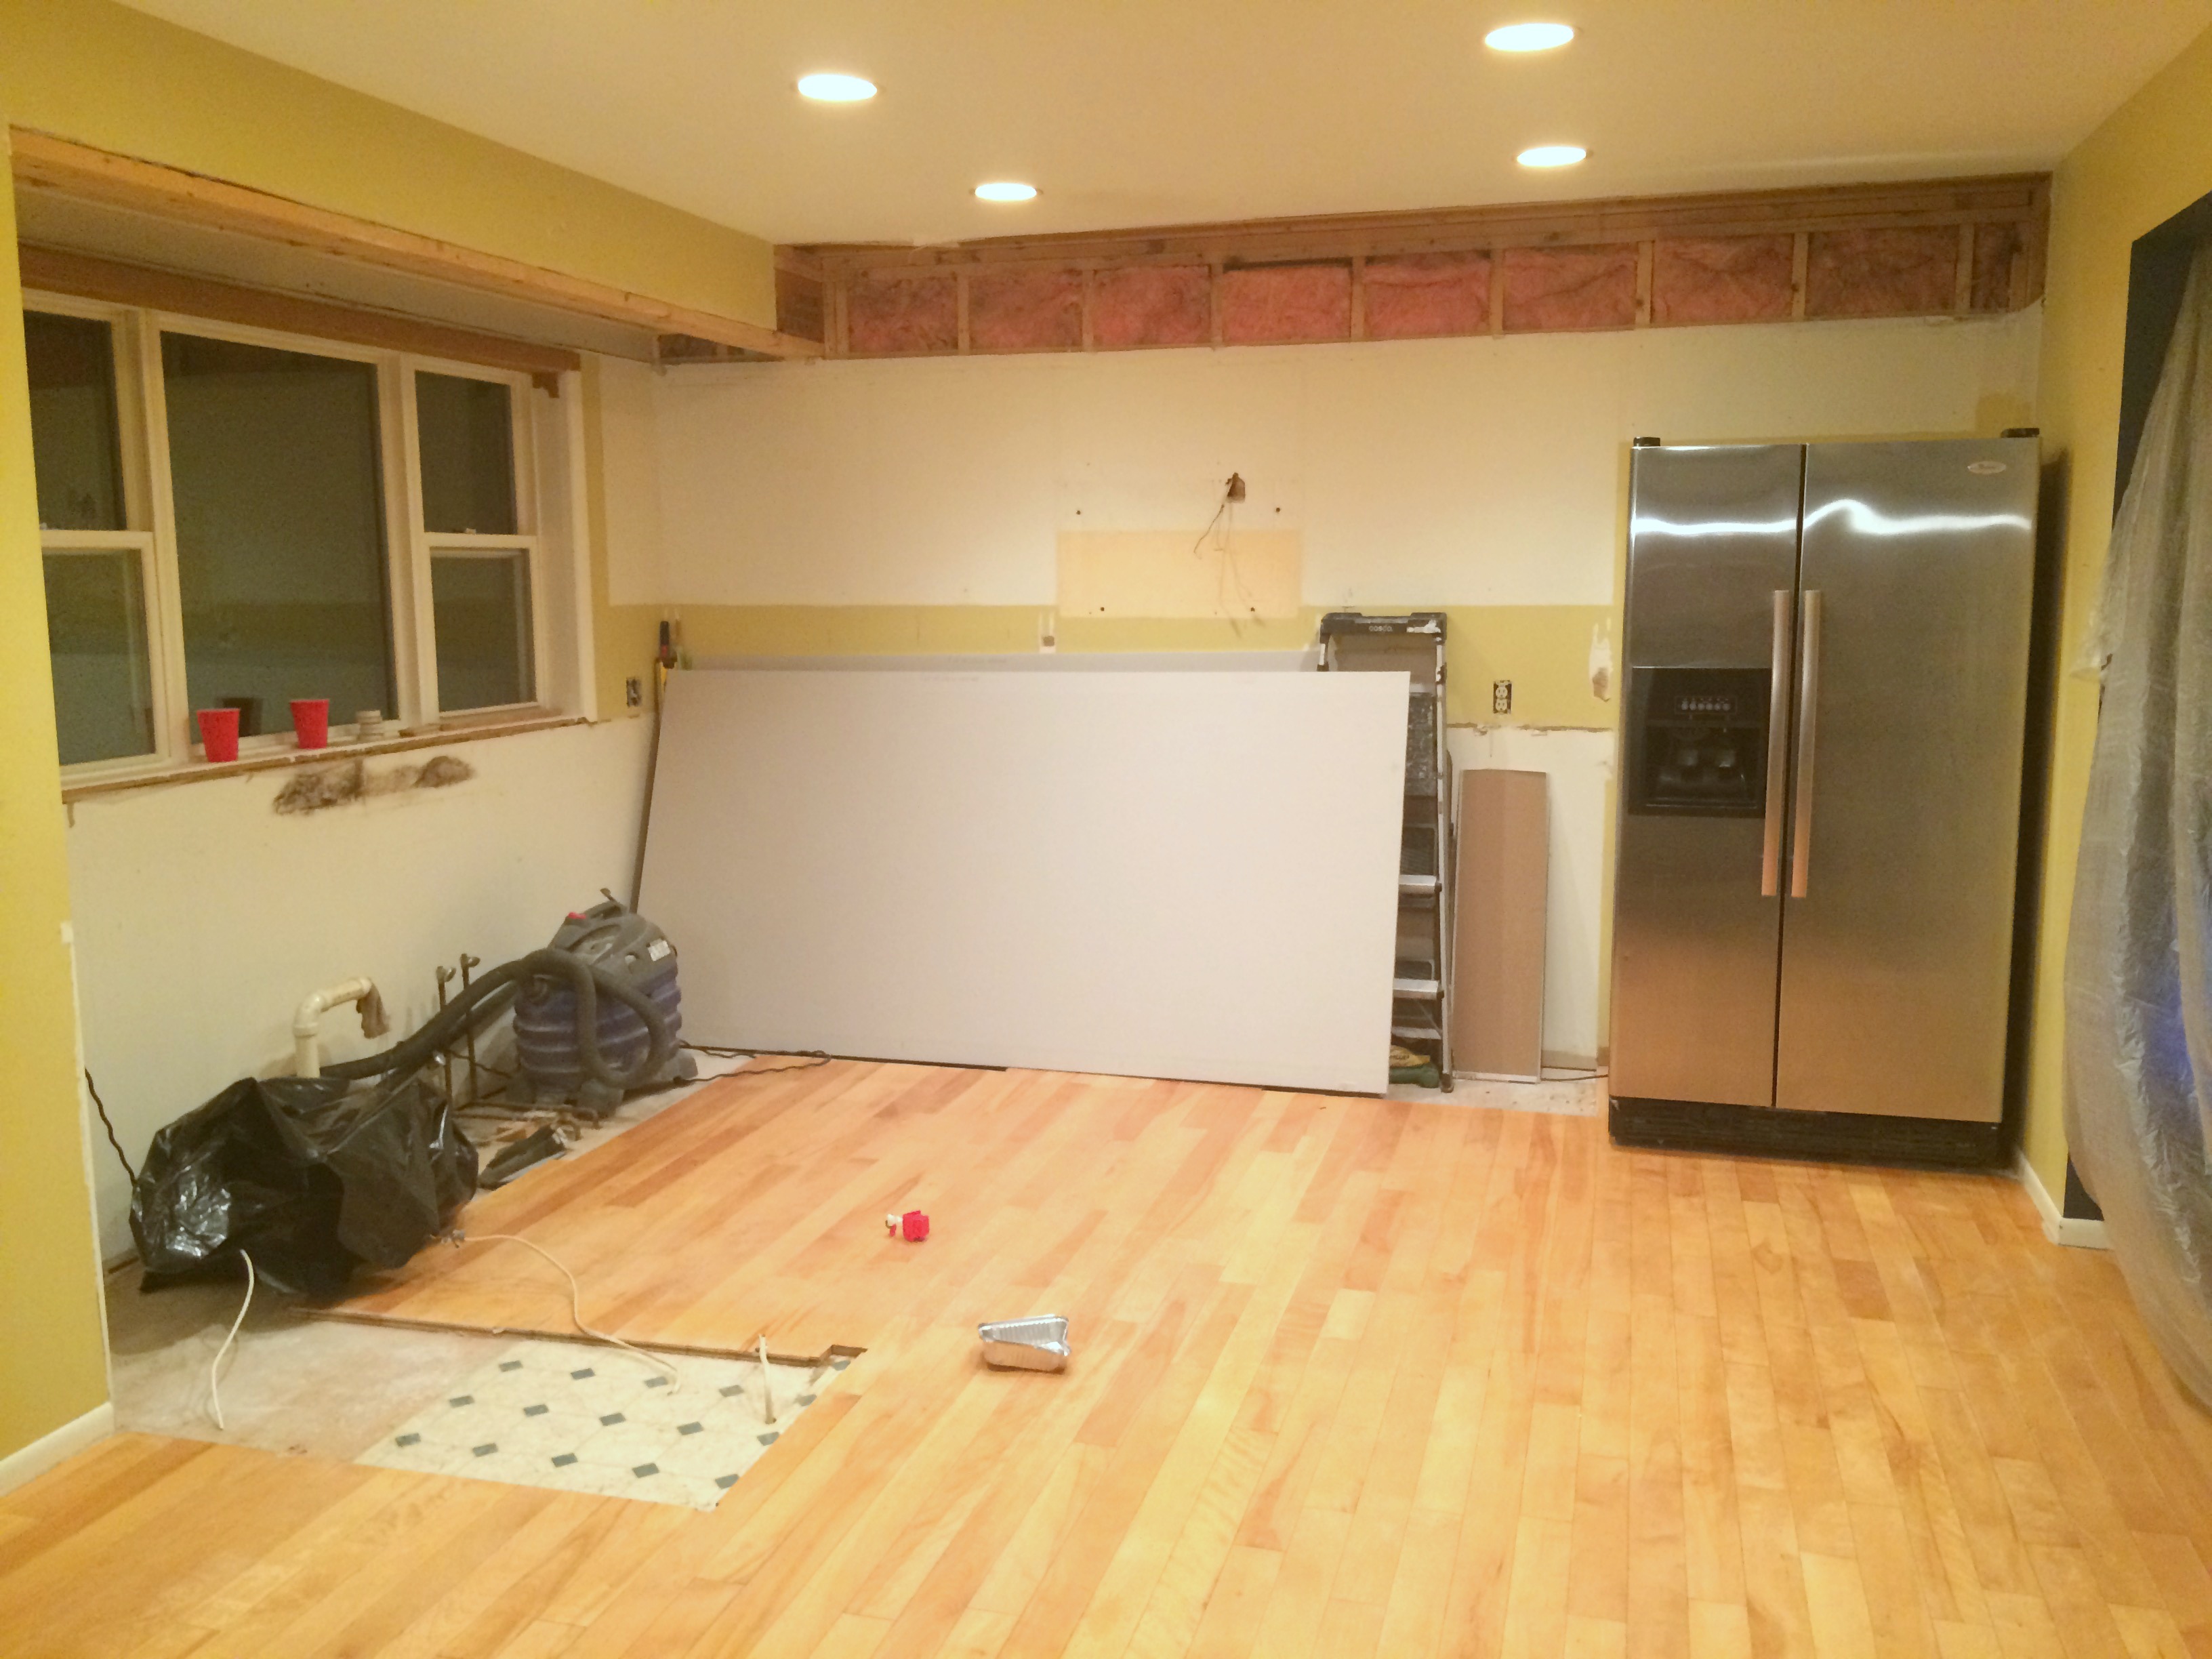
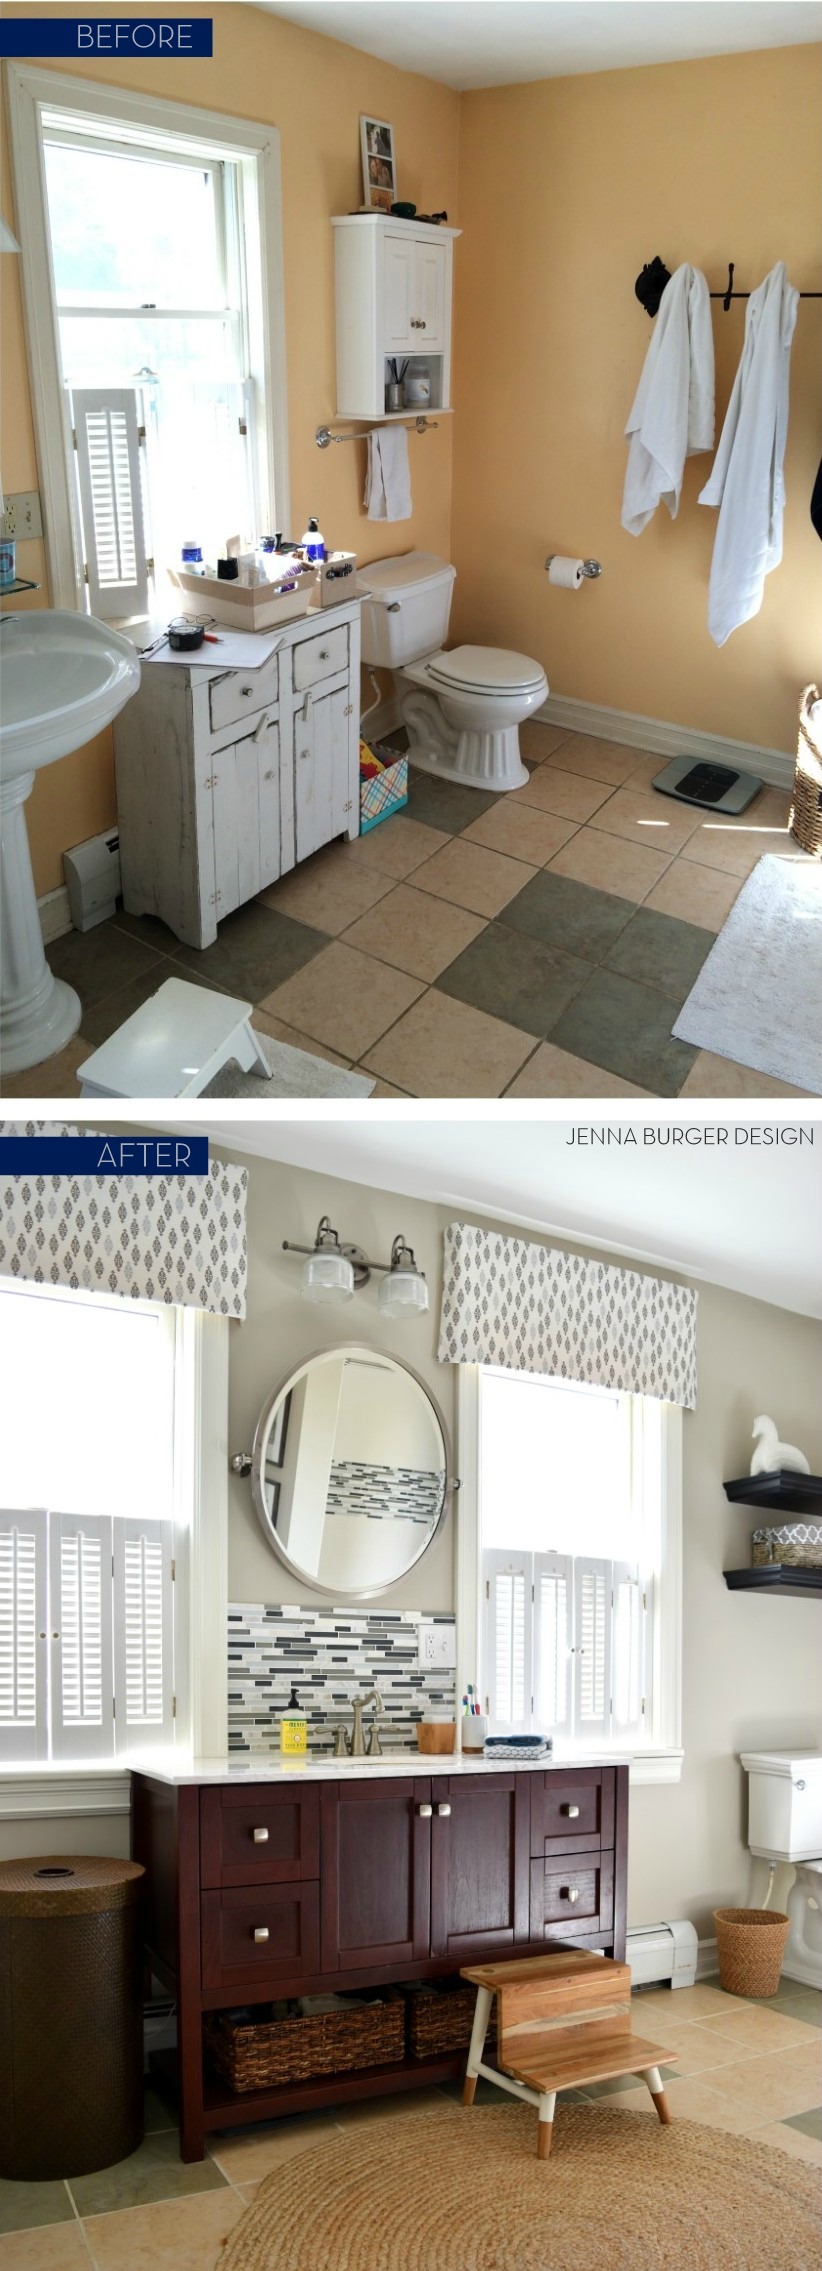
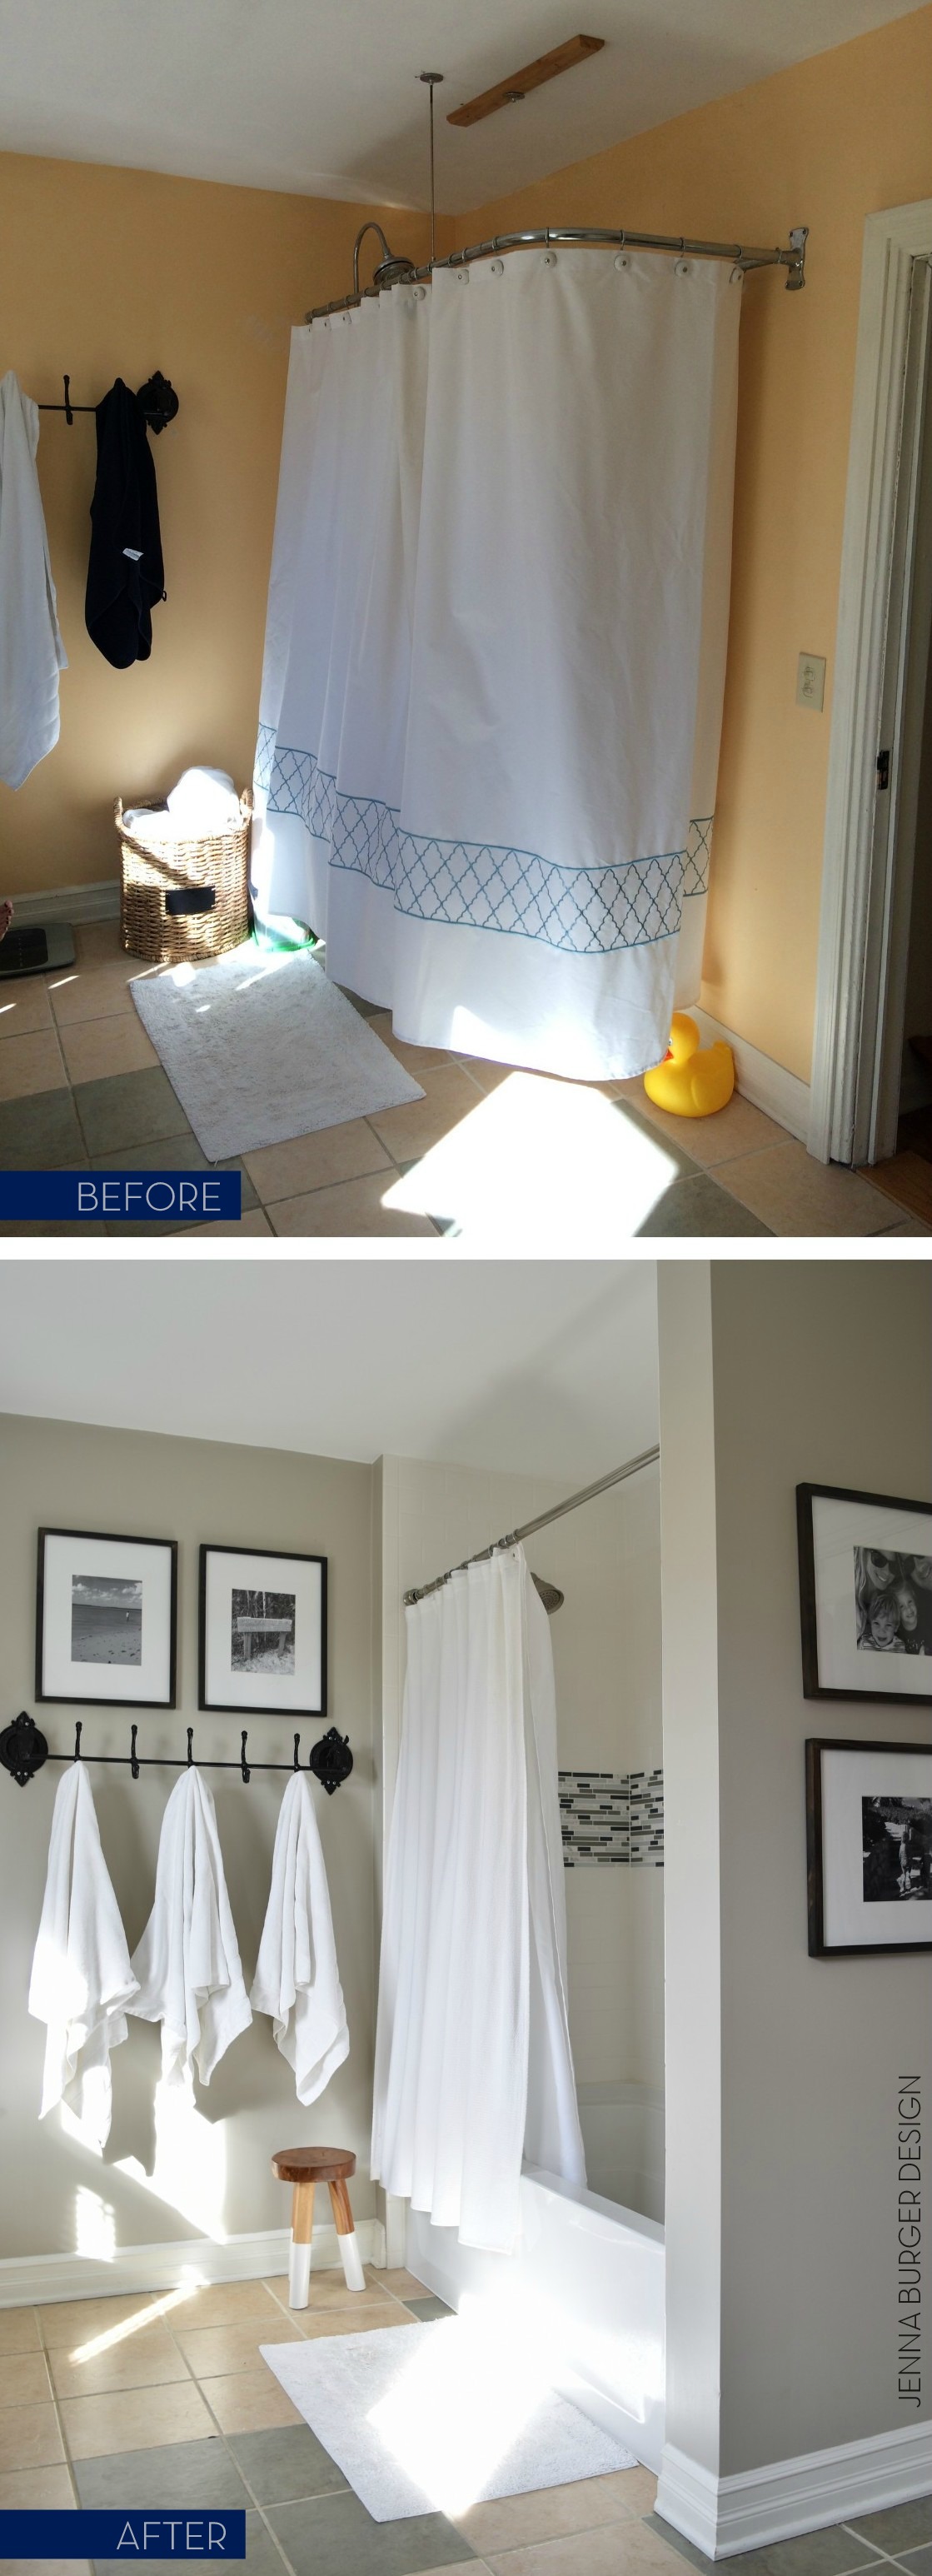
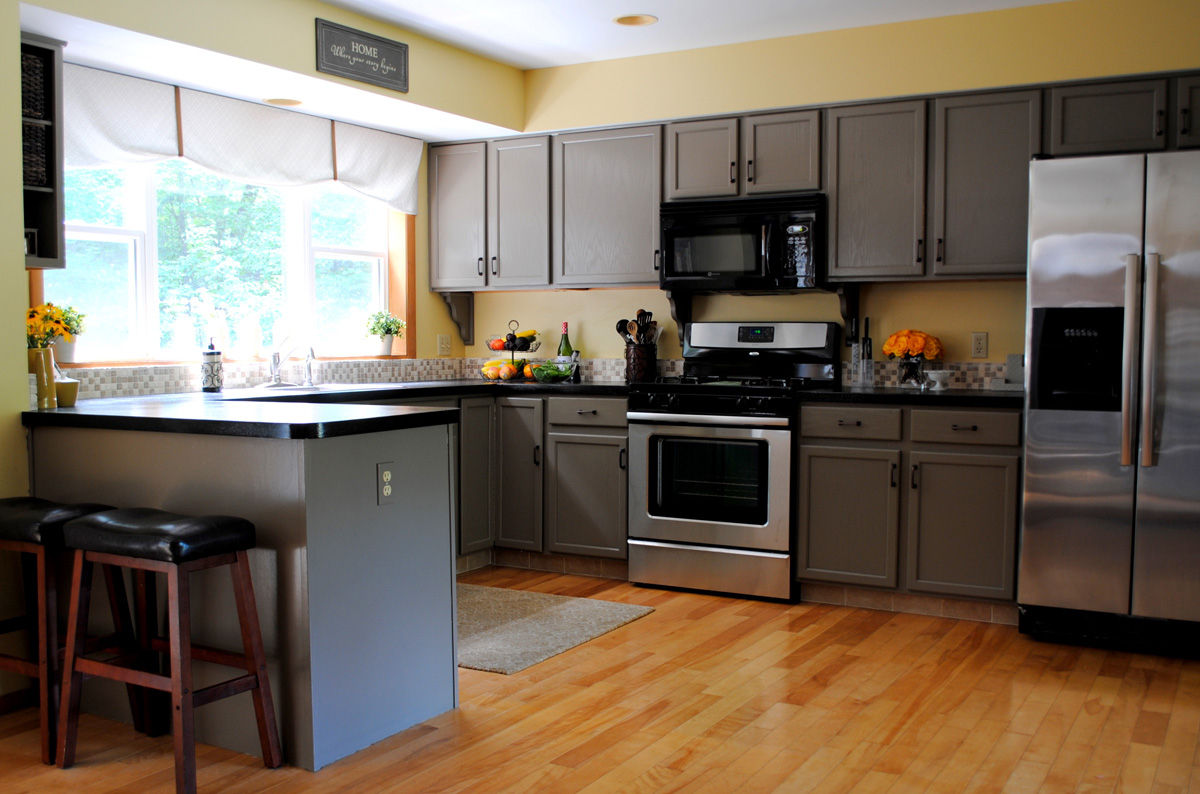
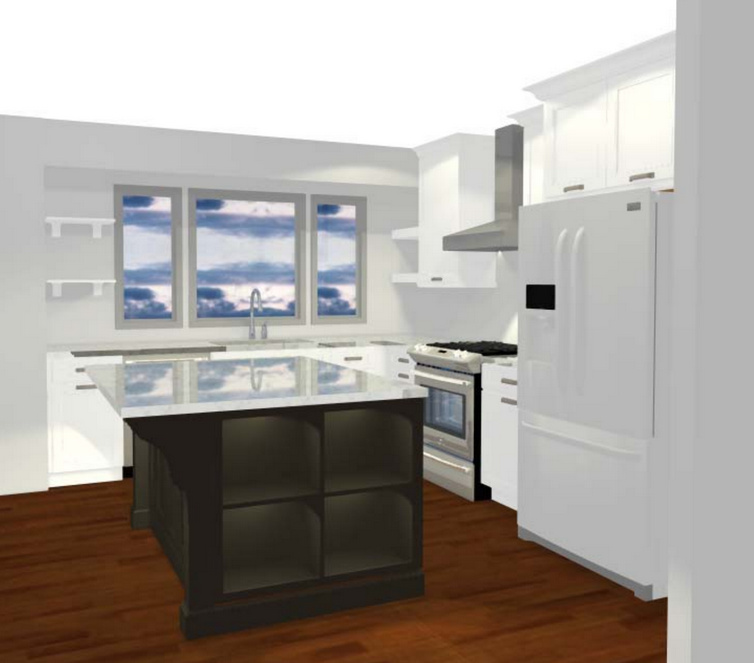
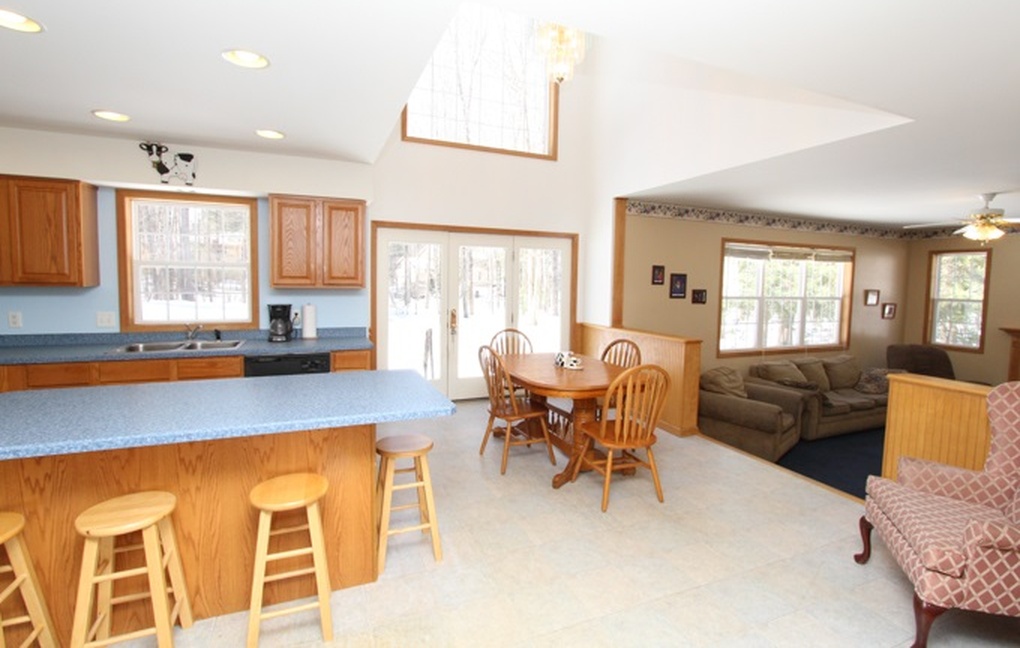
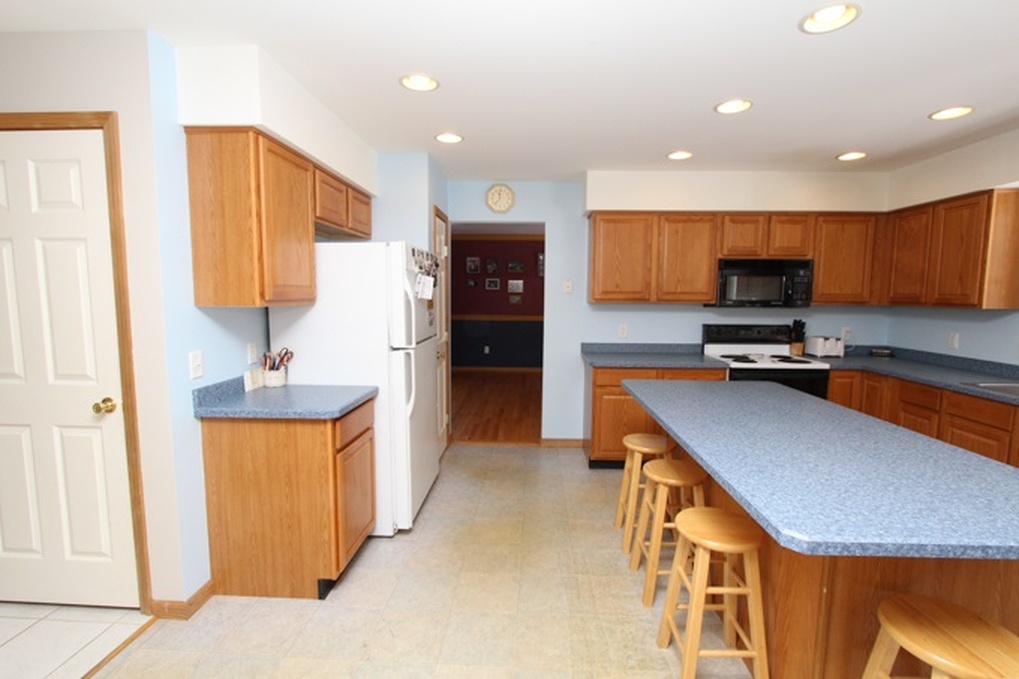
BEFORE

Kitchen Before

The construction of this kitchen was a bit unique and easier than most because the renovation took place before the clients moved in. This home was a new purchase for them and during the time before the closing, the design process was started. Yes, a bit risky in case “the deal” fell through, but once they closed on the home, construction began the following day. All the prep work + purchases were complete and we were ready to move forward.

The client had about a month before they needed to move in, so everything was scheduled on a tight timeline. Aside from some hiccups with waiting for the countertops to be installed, demo + repair + installation of the new cabinets went fairly smoothly.

Kitchen Before

Aside from the old kitchen being worn + dated, the space was also not being utilized to it’s maximum potential.

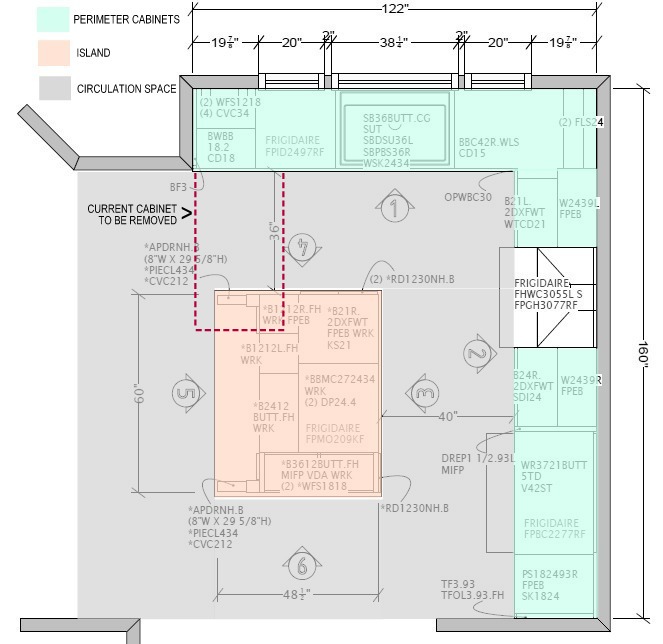
As the new plan evolved, there was no question that first to go was the soffit above the existing cabinets. The new upper cabinets would be taller and continue to the ceiling, then be finished with a decorative crown moulding.

The next area of focus was the island – a larger, more substantial island with lots of storage + space to eat-at was a must.

Kitchen Before

Following that, the refrigerator area needed updating to maximize storage.
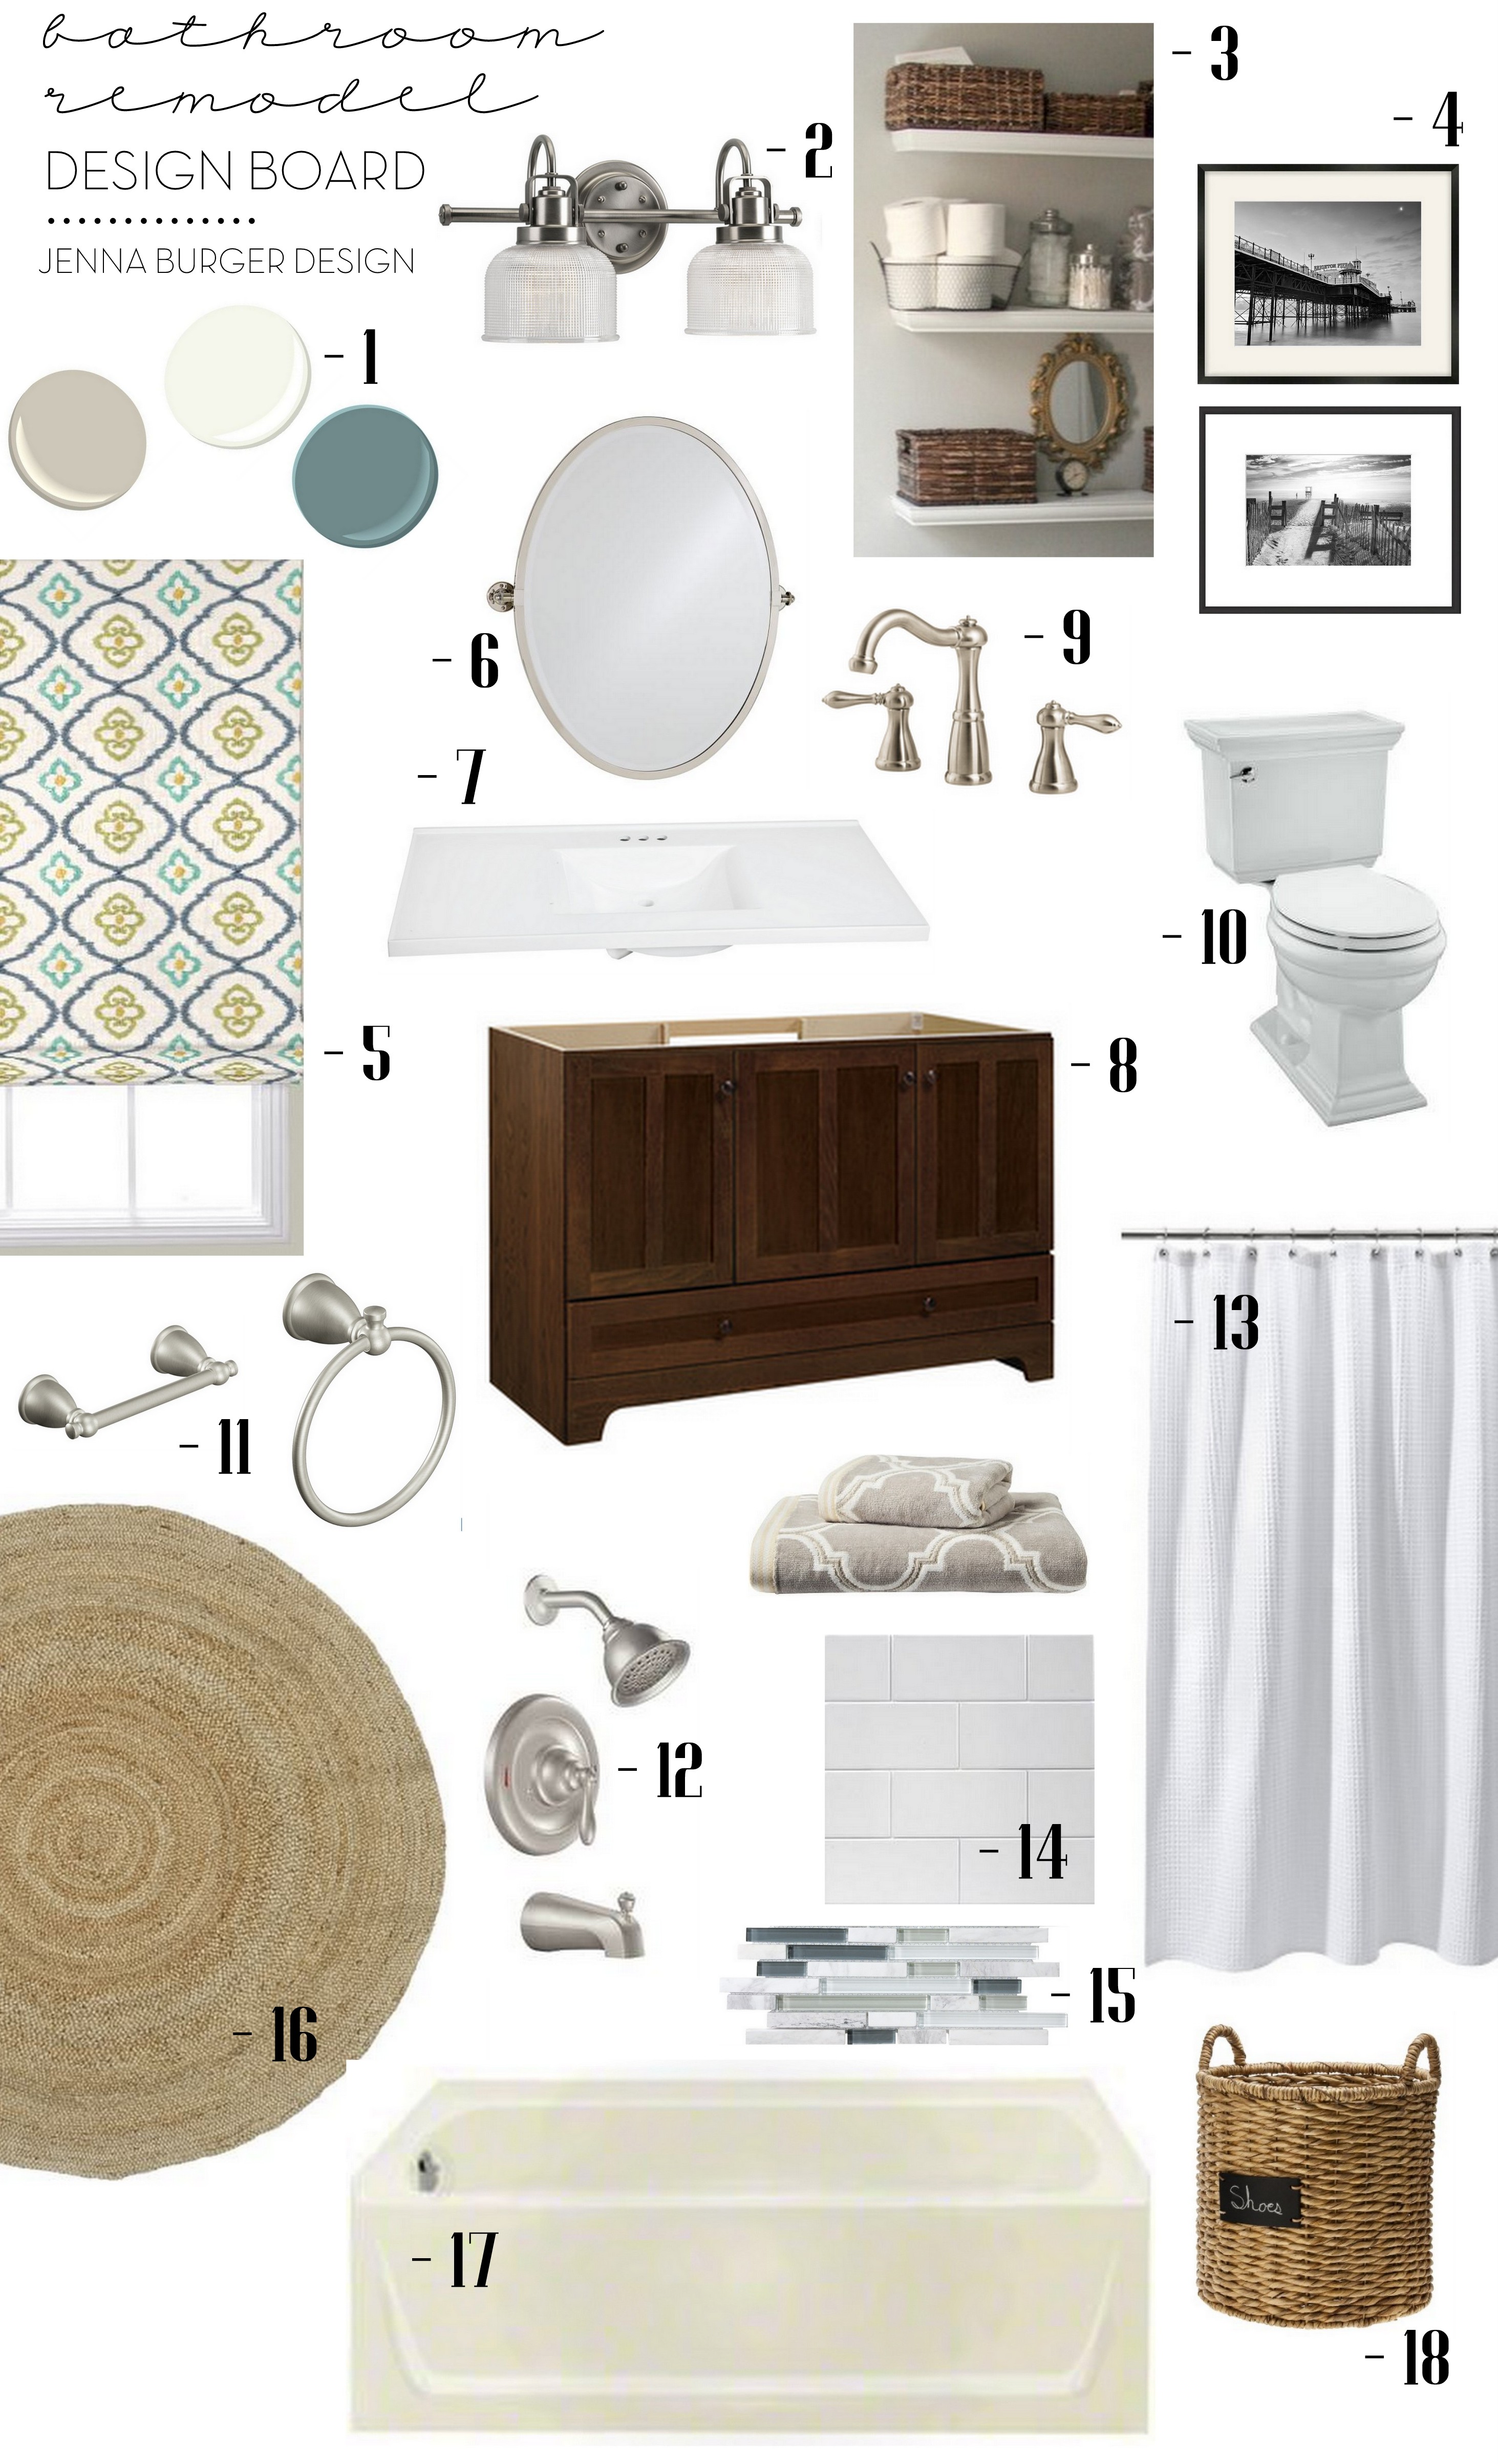
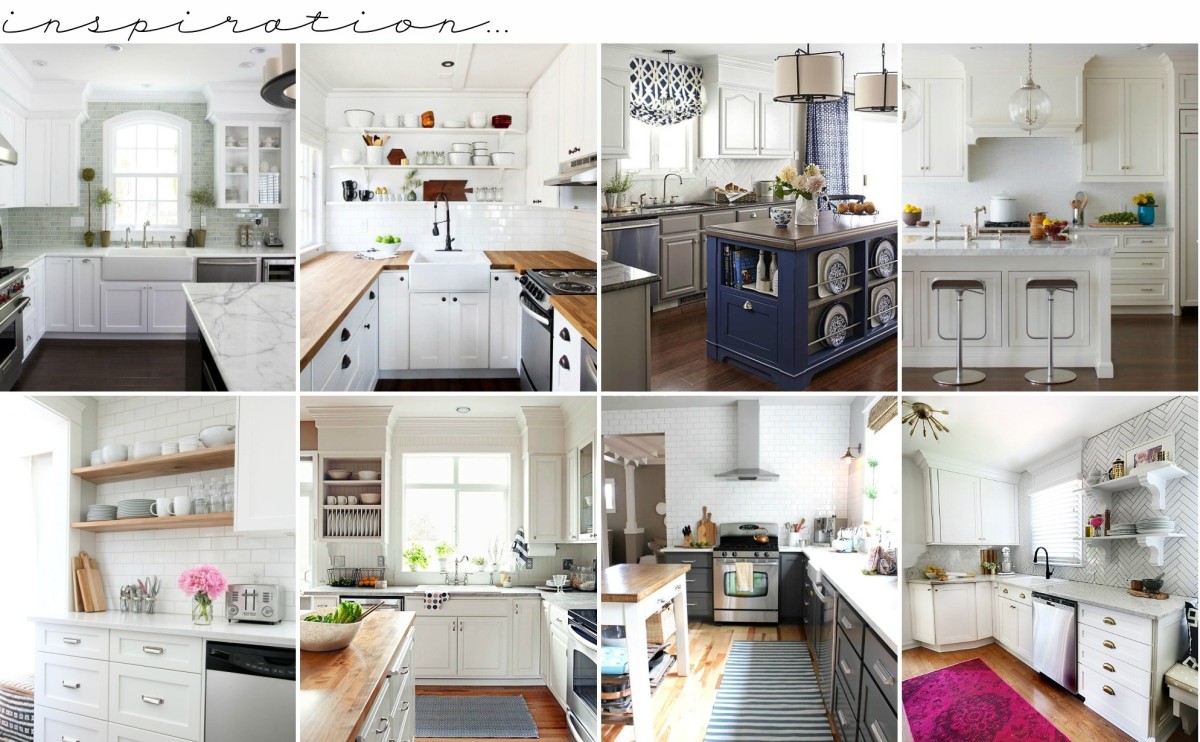
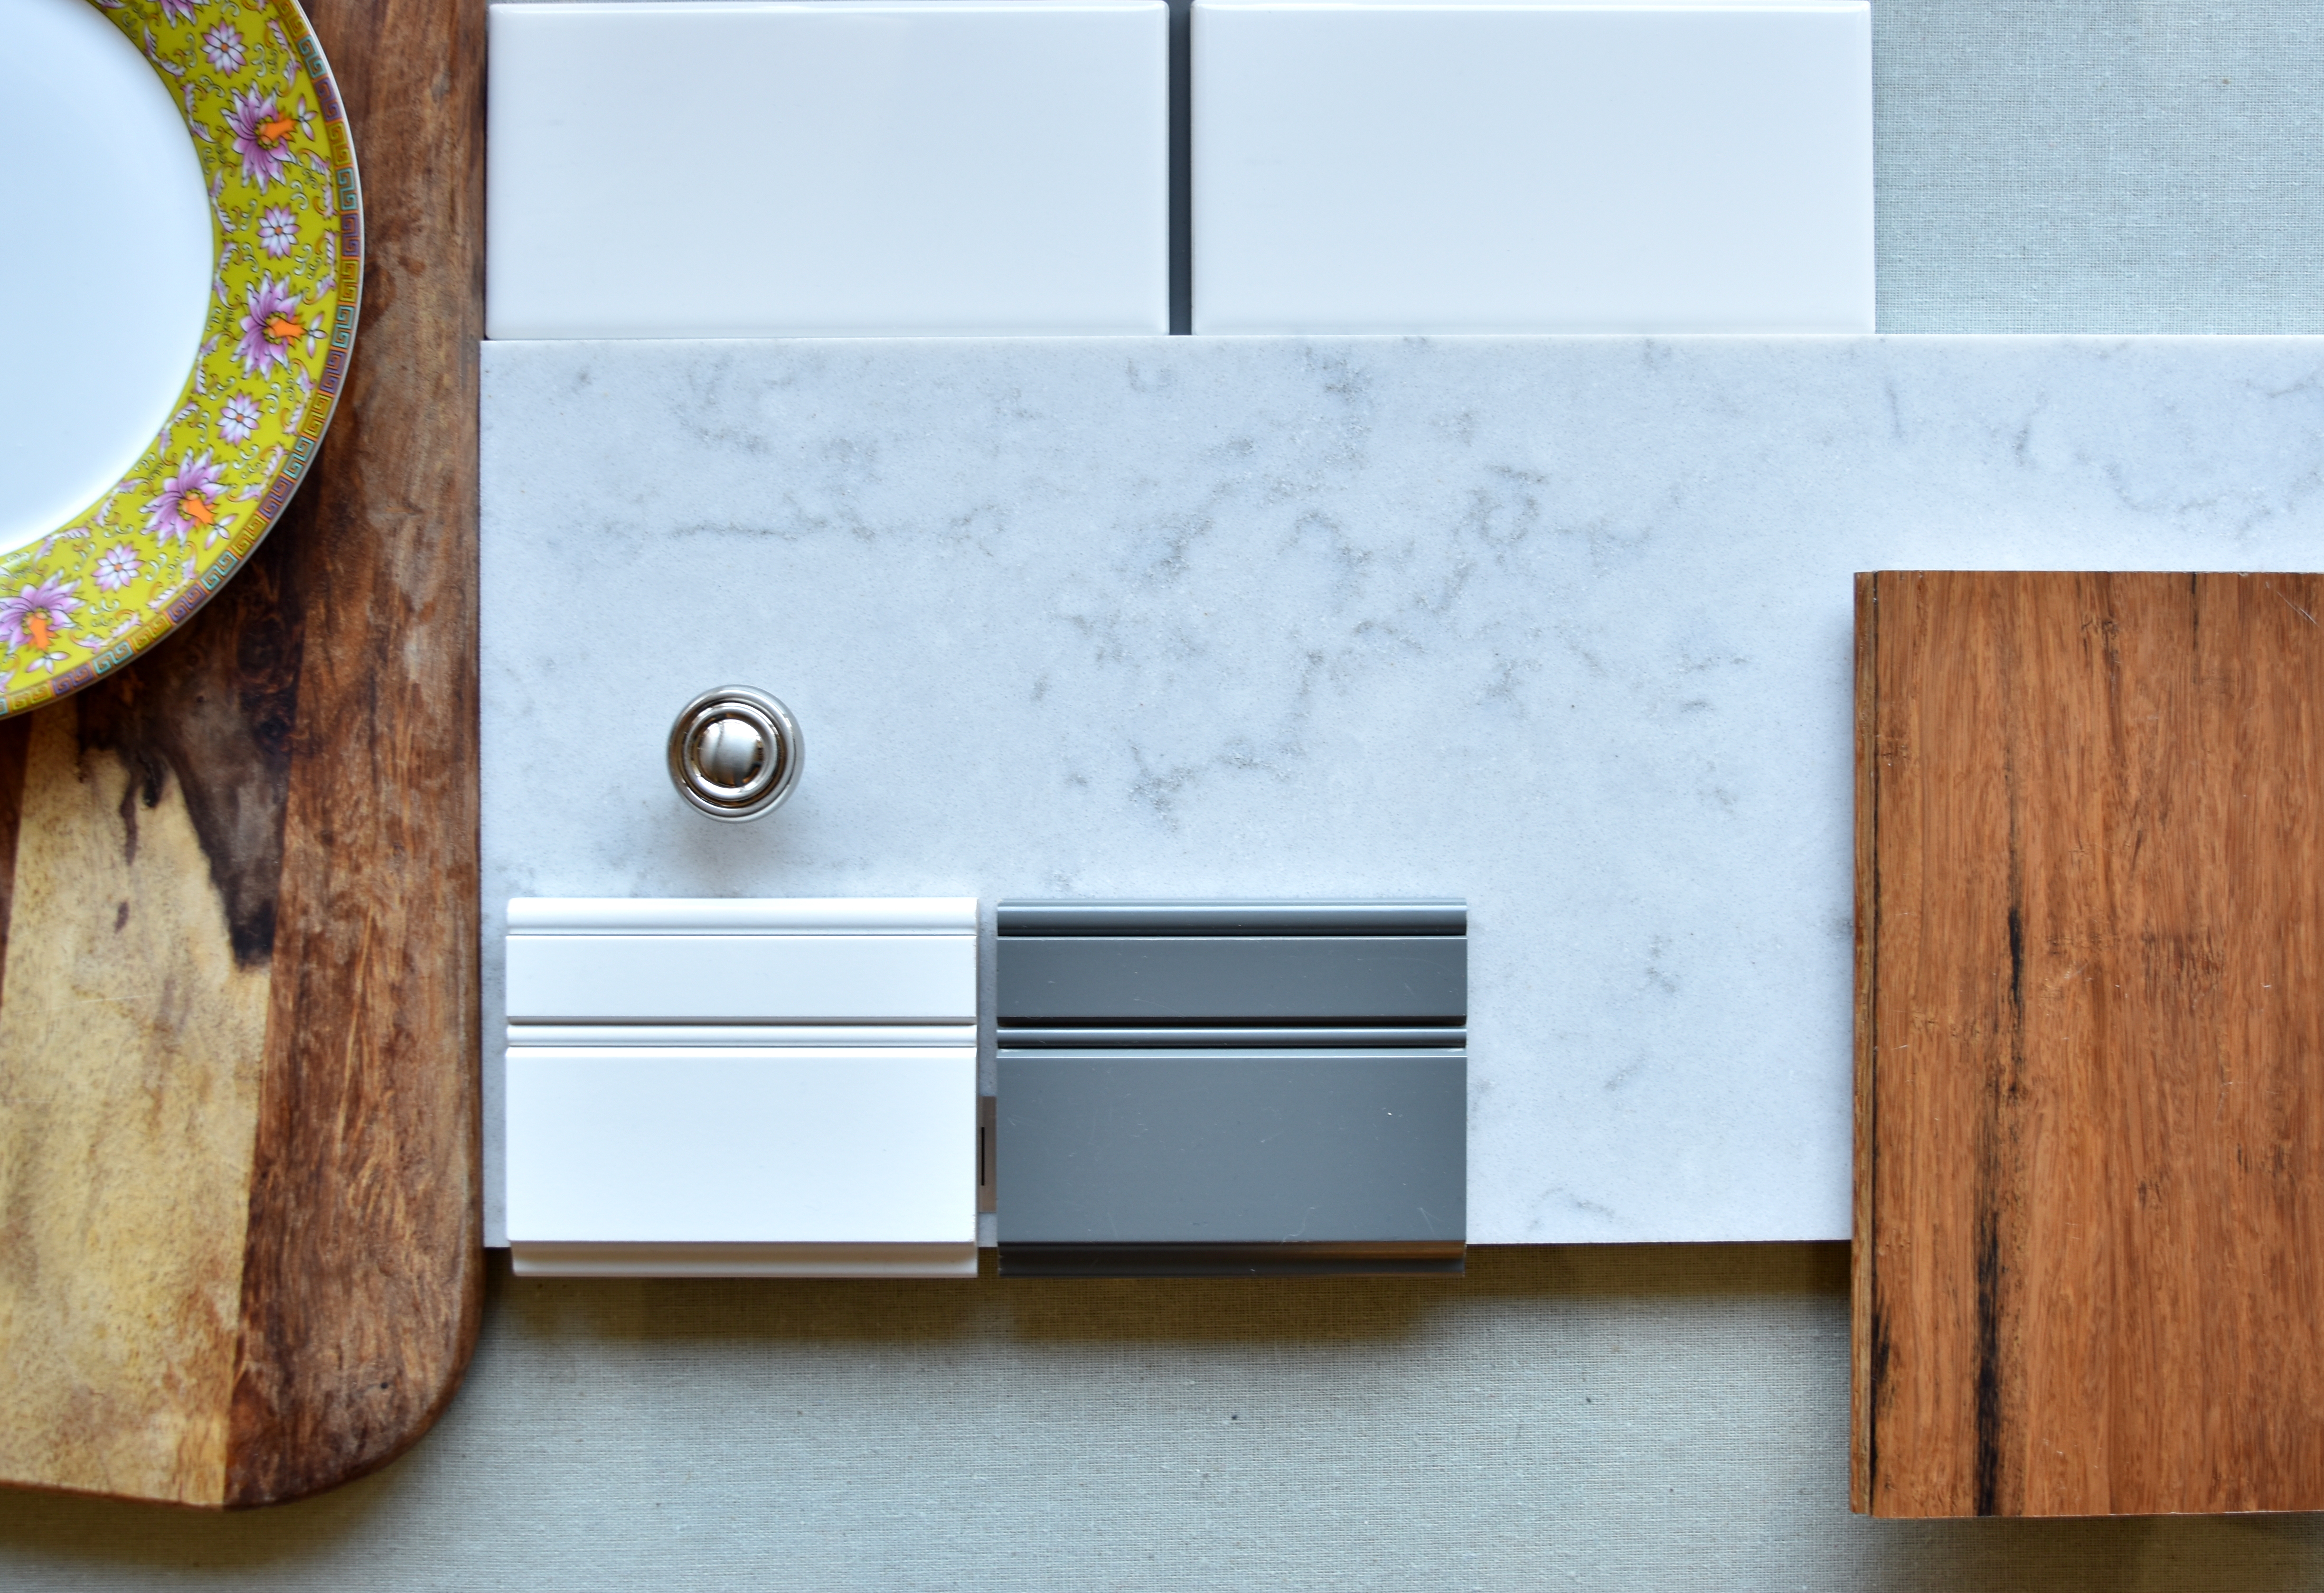
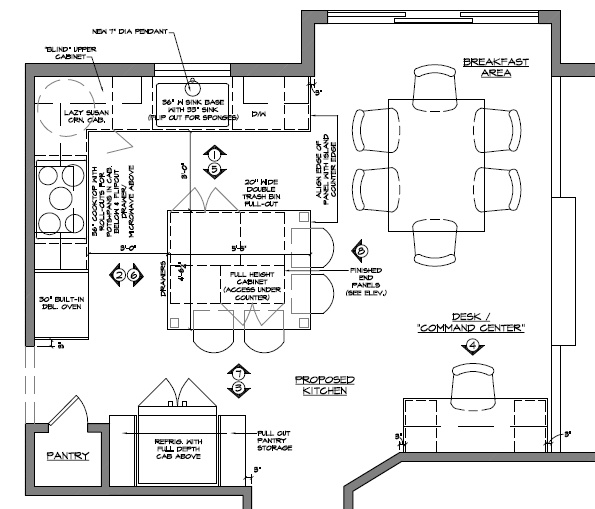
THE VISION

Upon working through the updates that were needed to create a better flowing space + listening to the clients desires, I created the proposed plan + Vision Board…
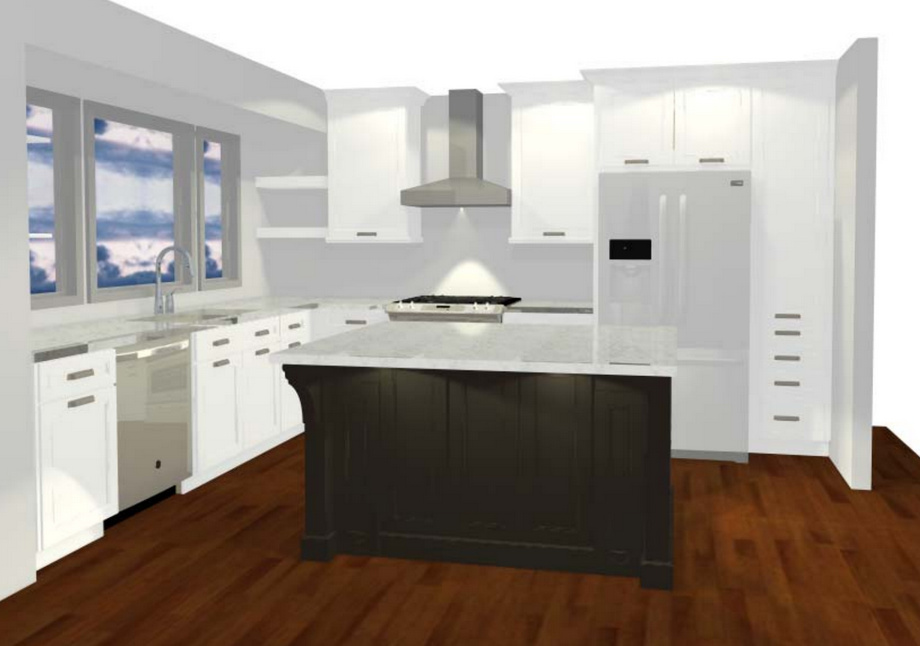
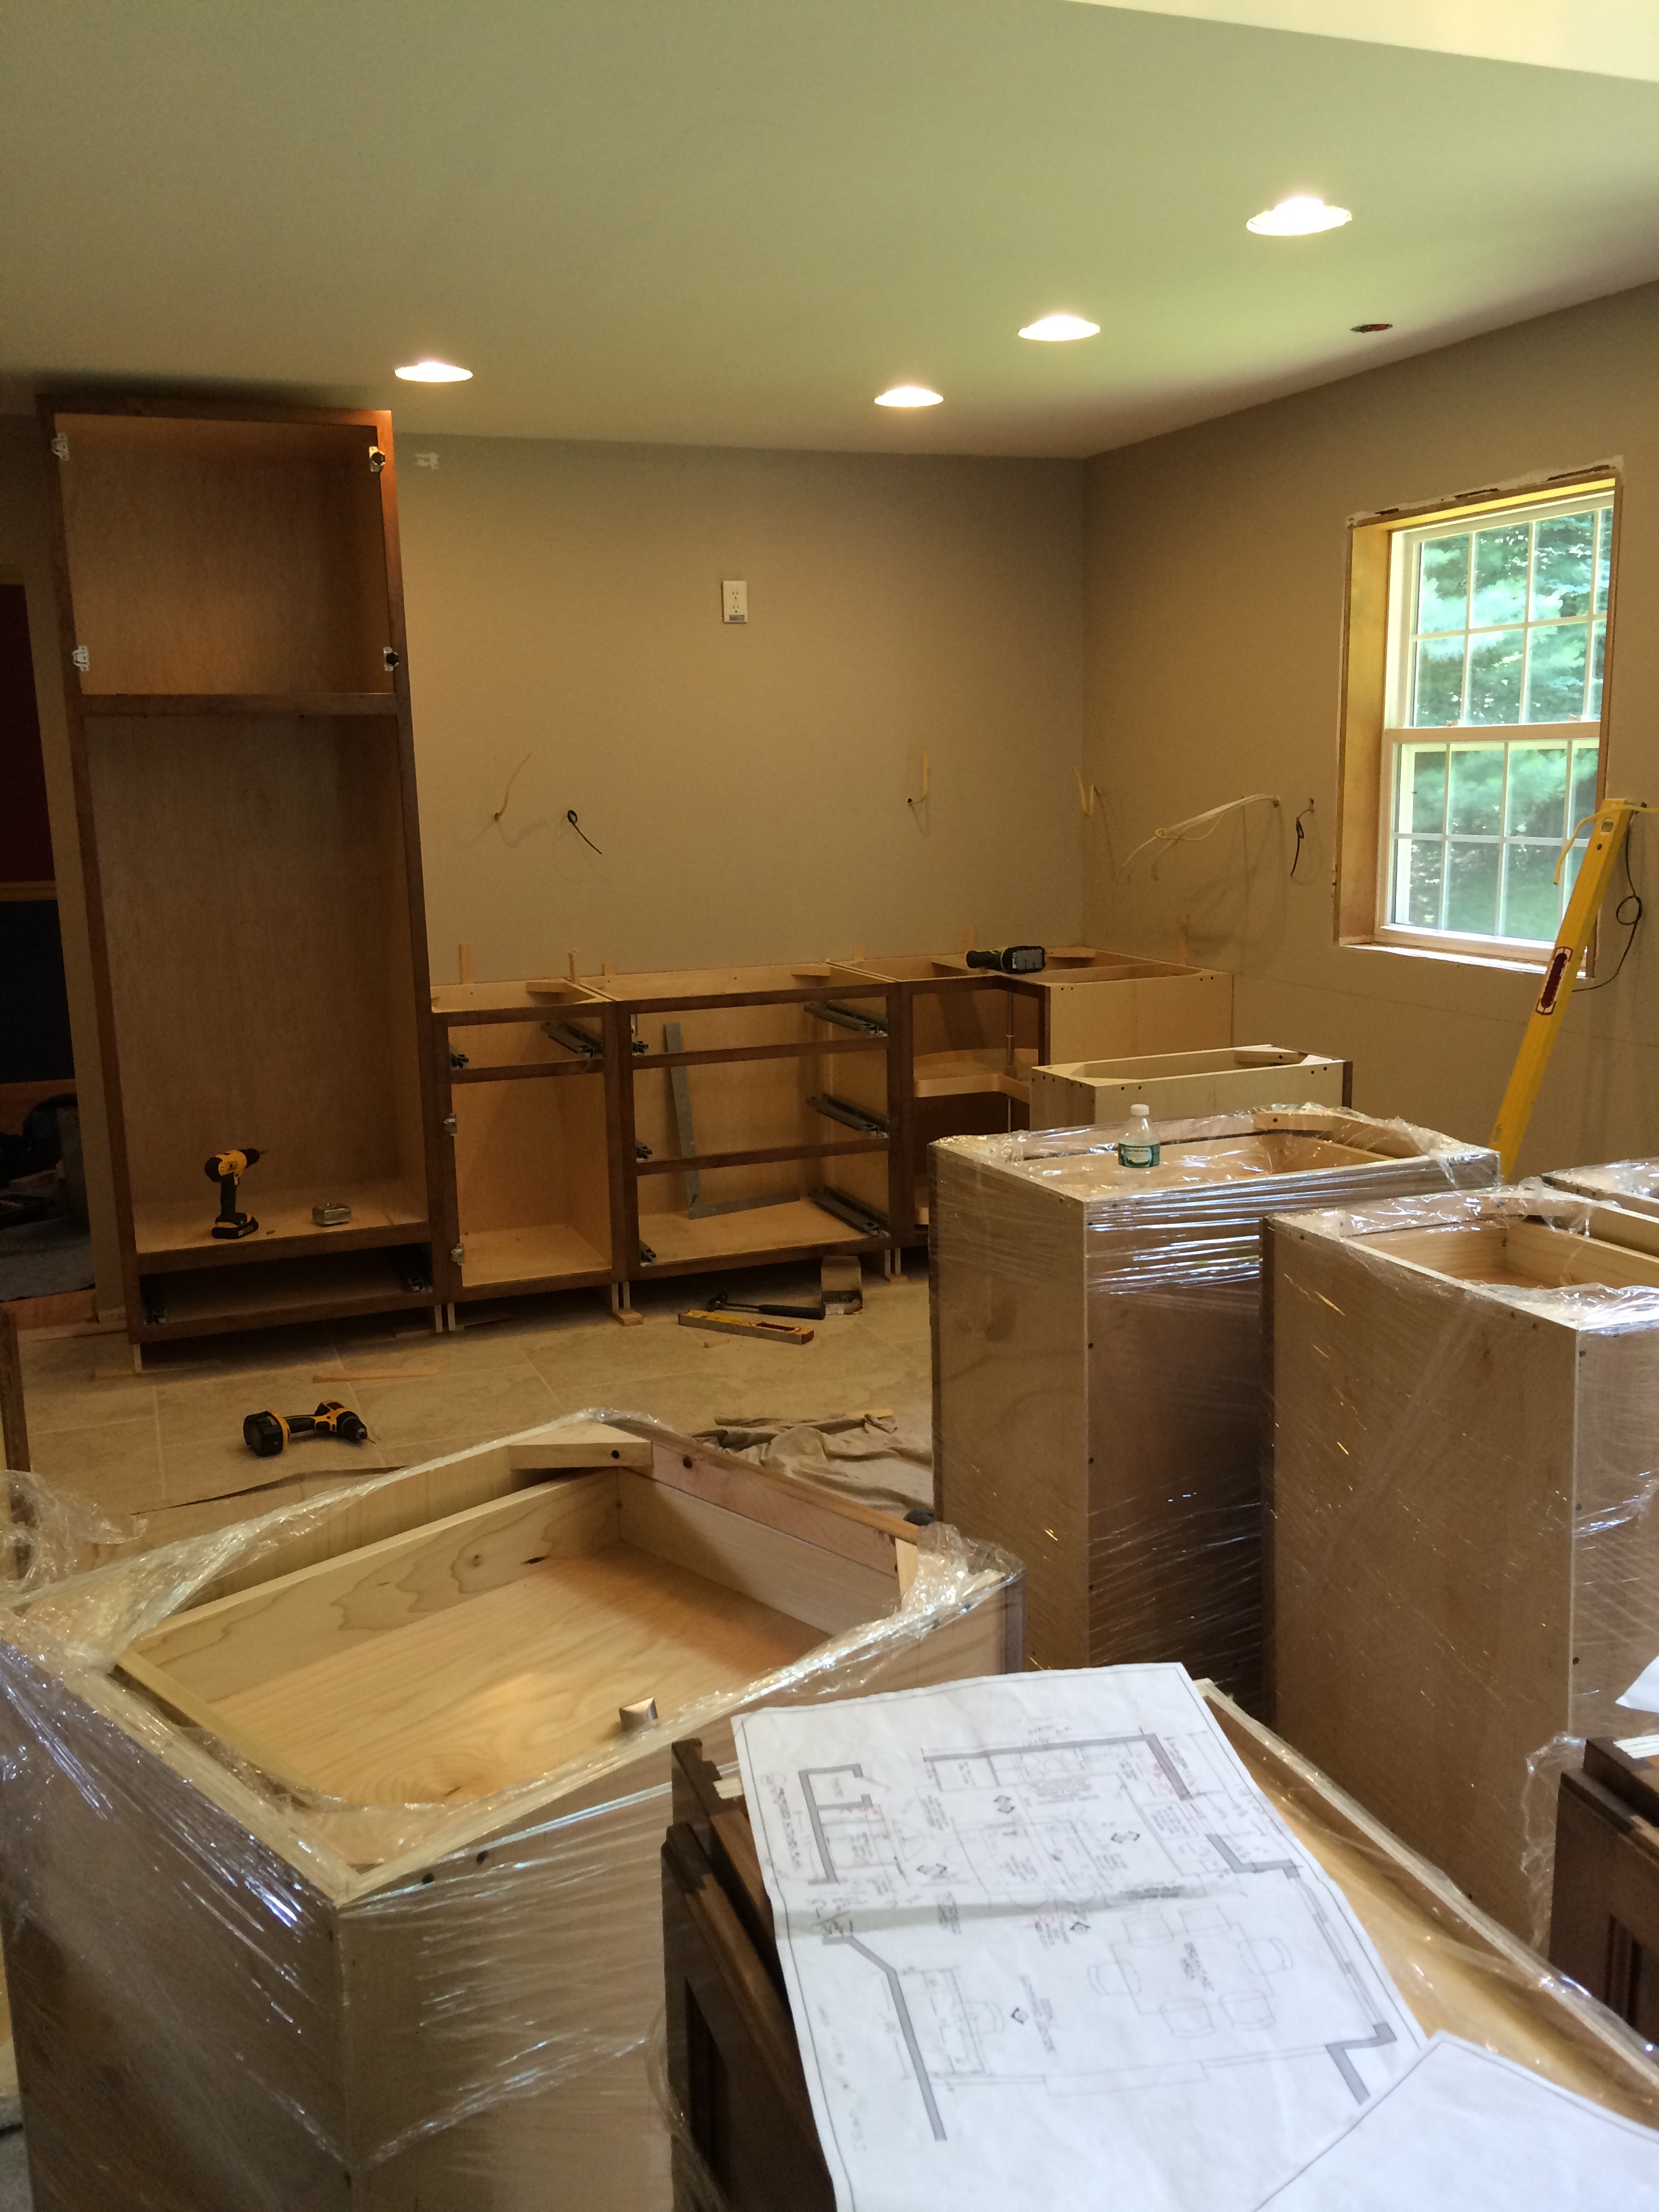
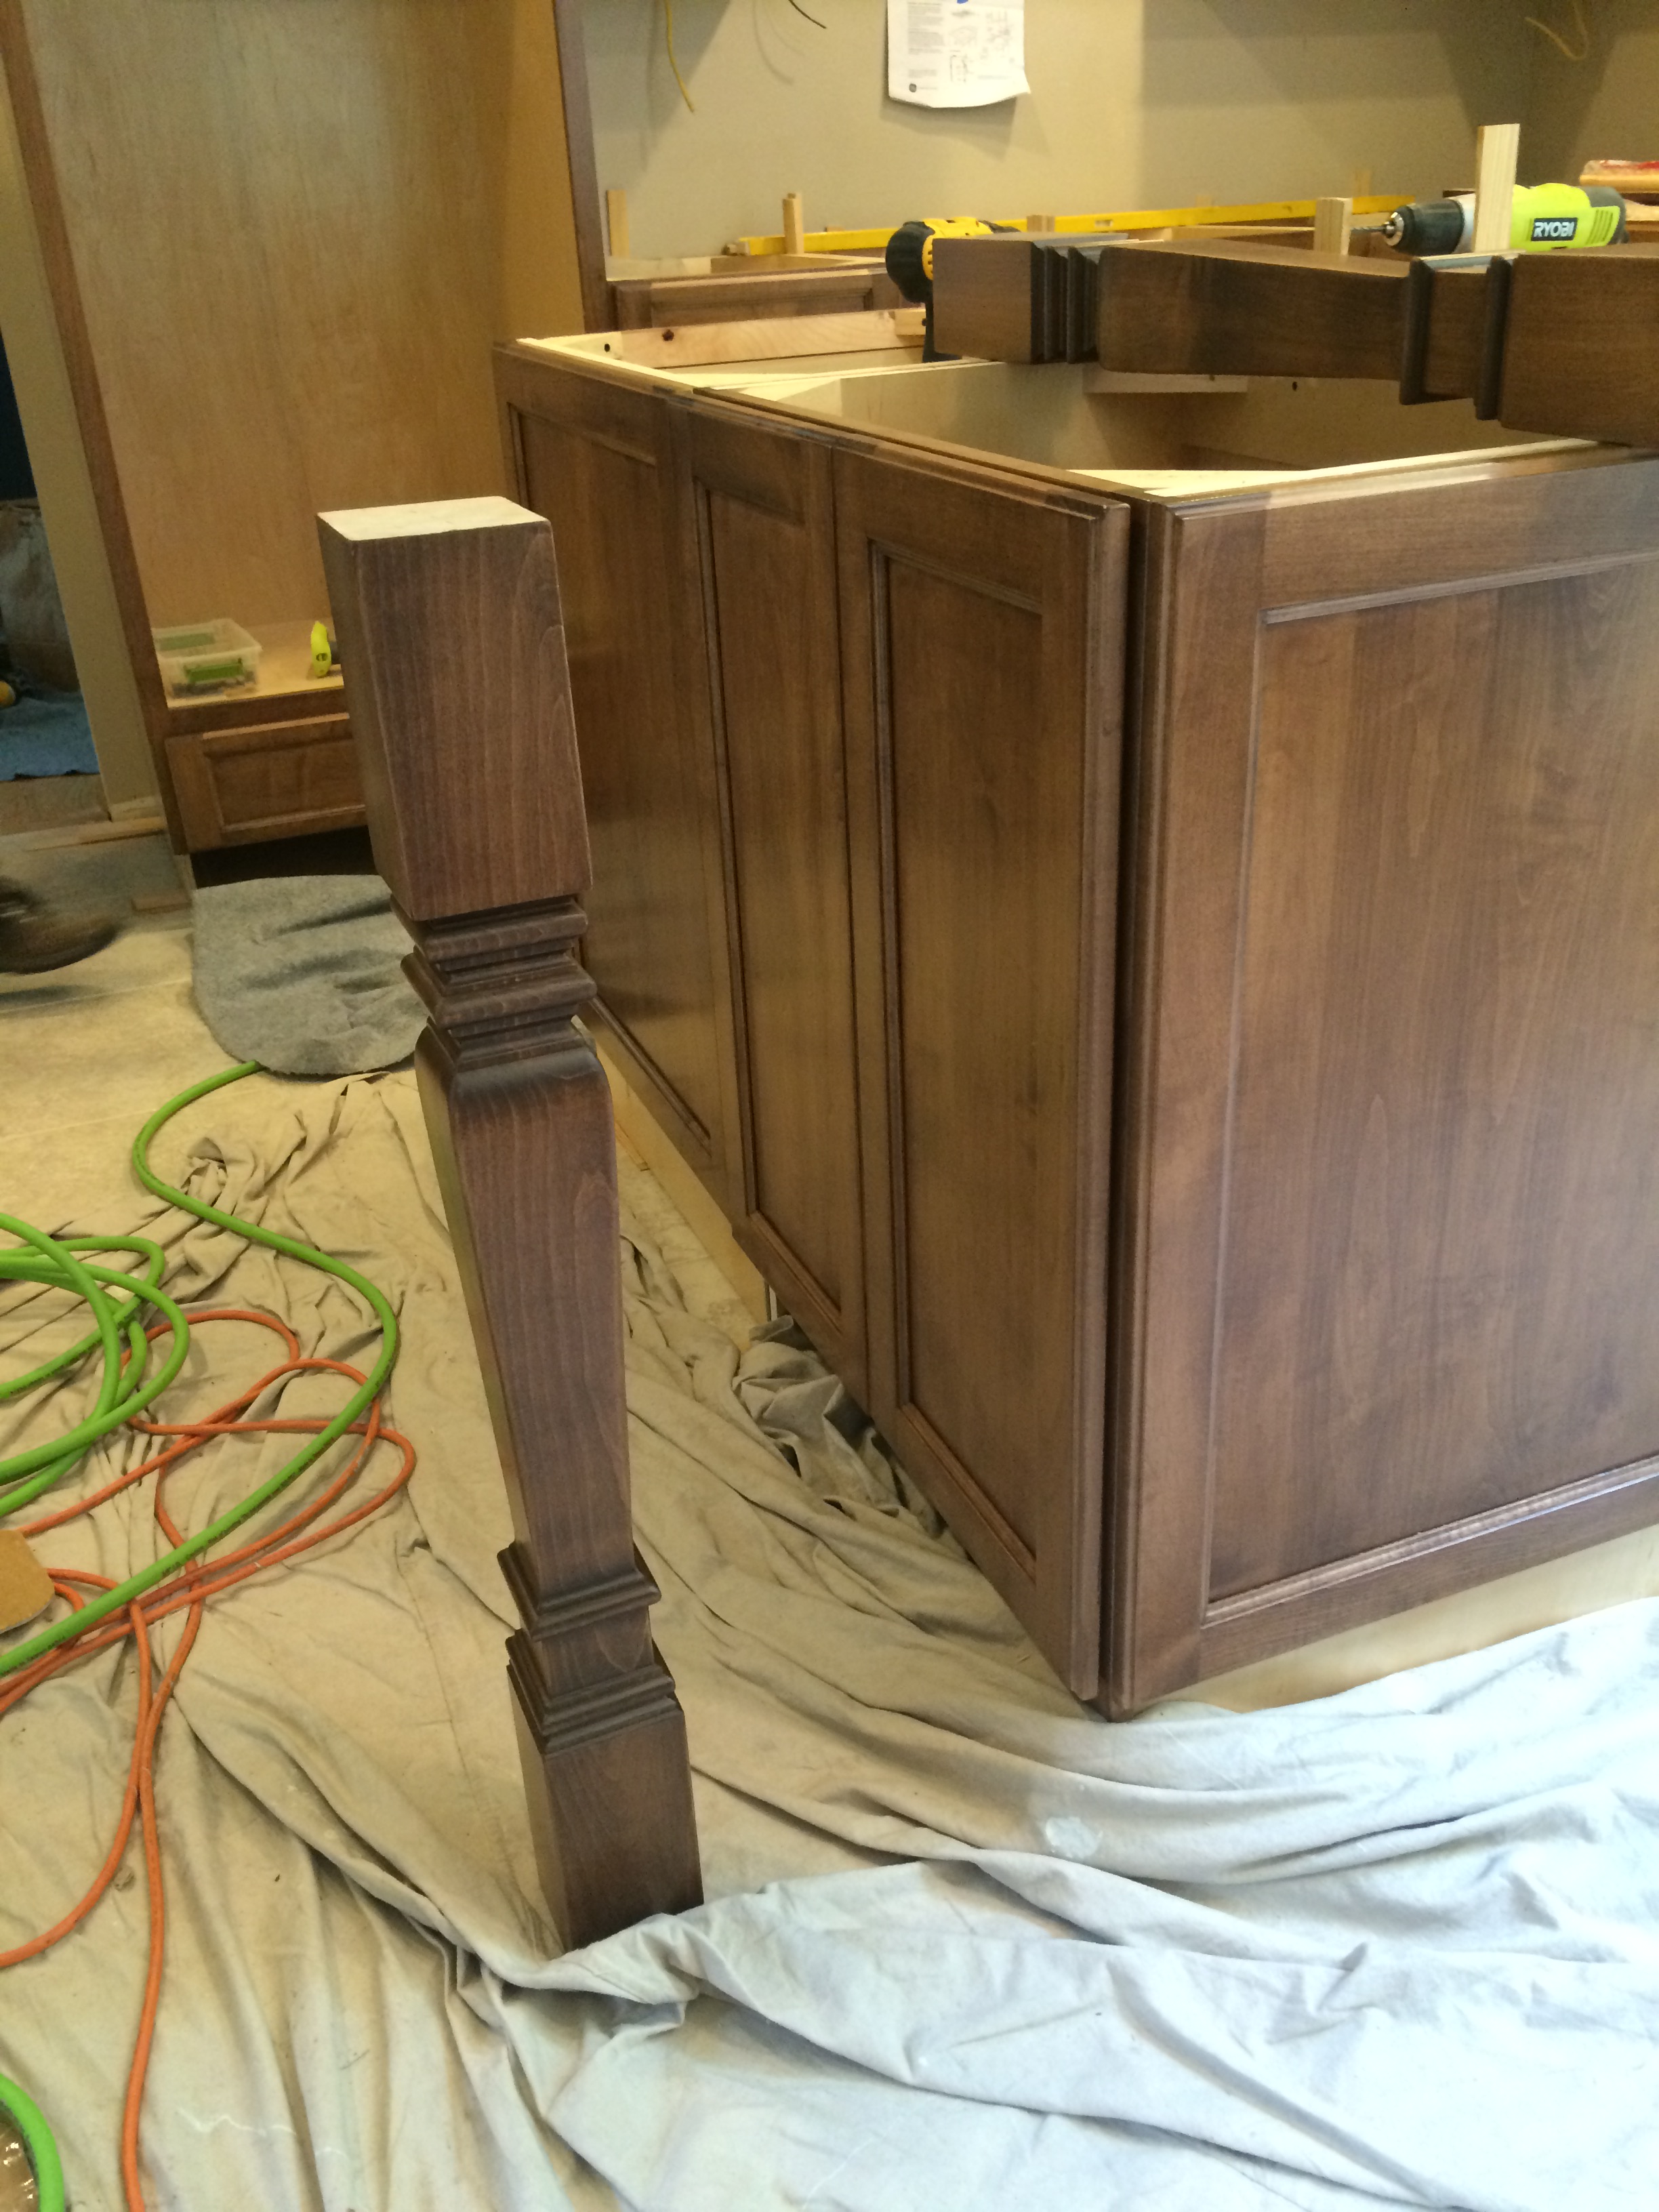
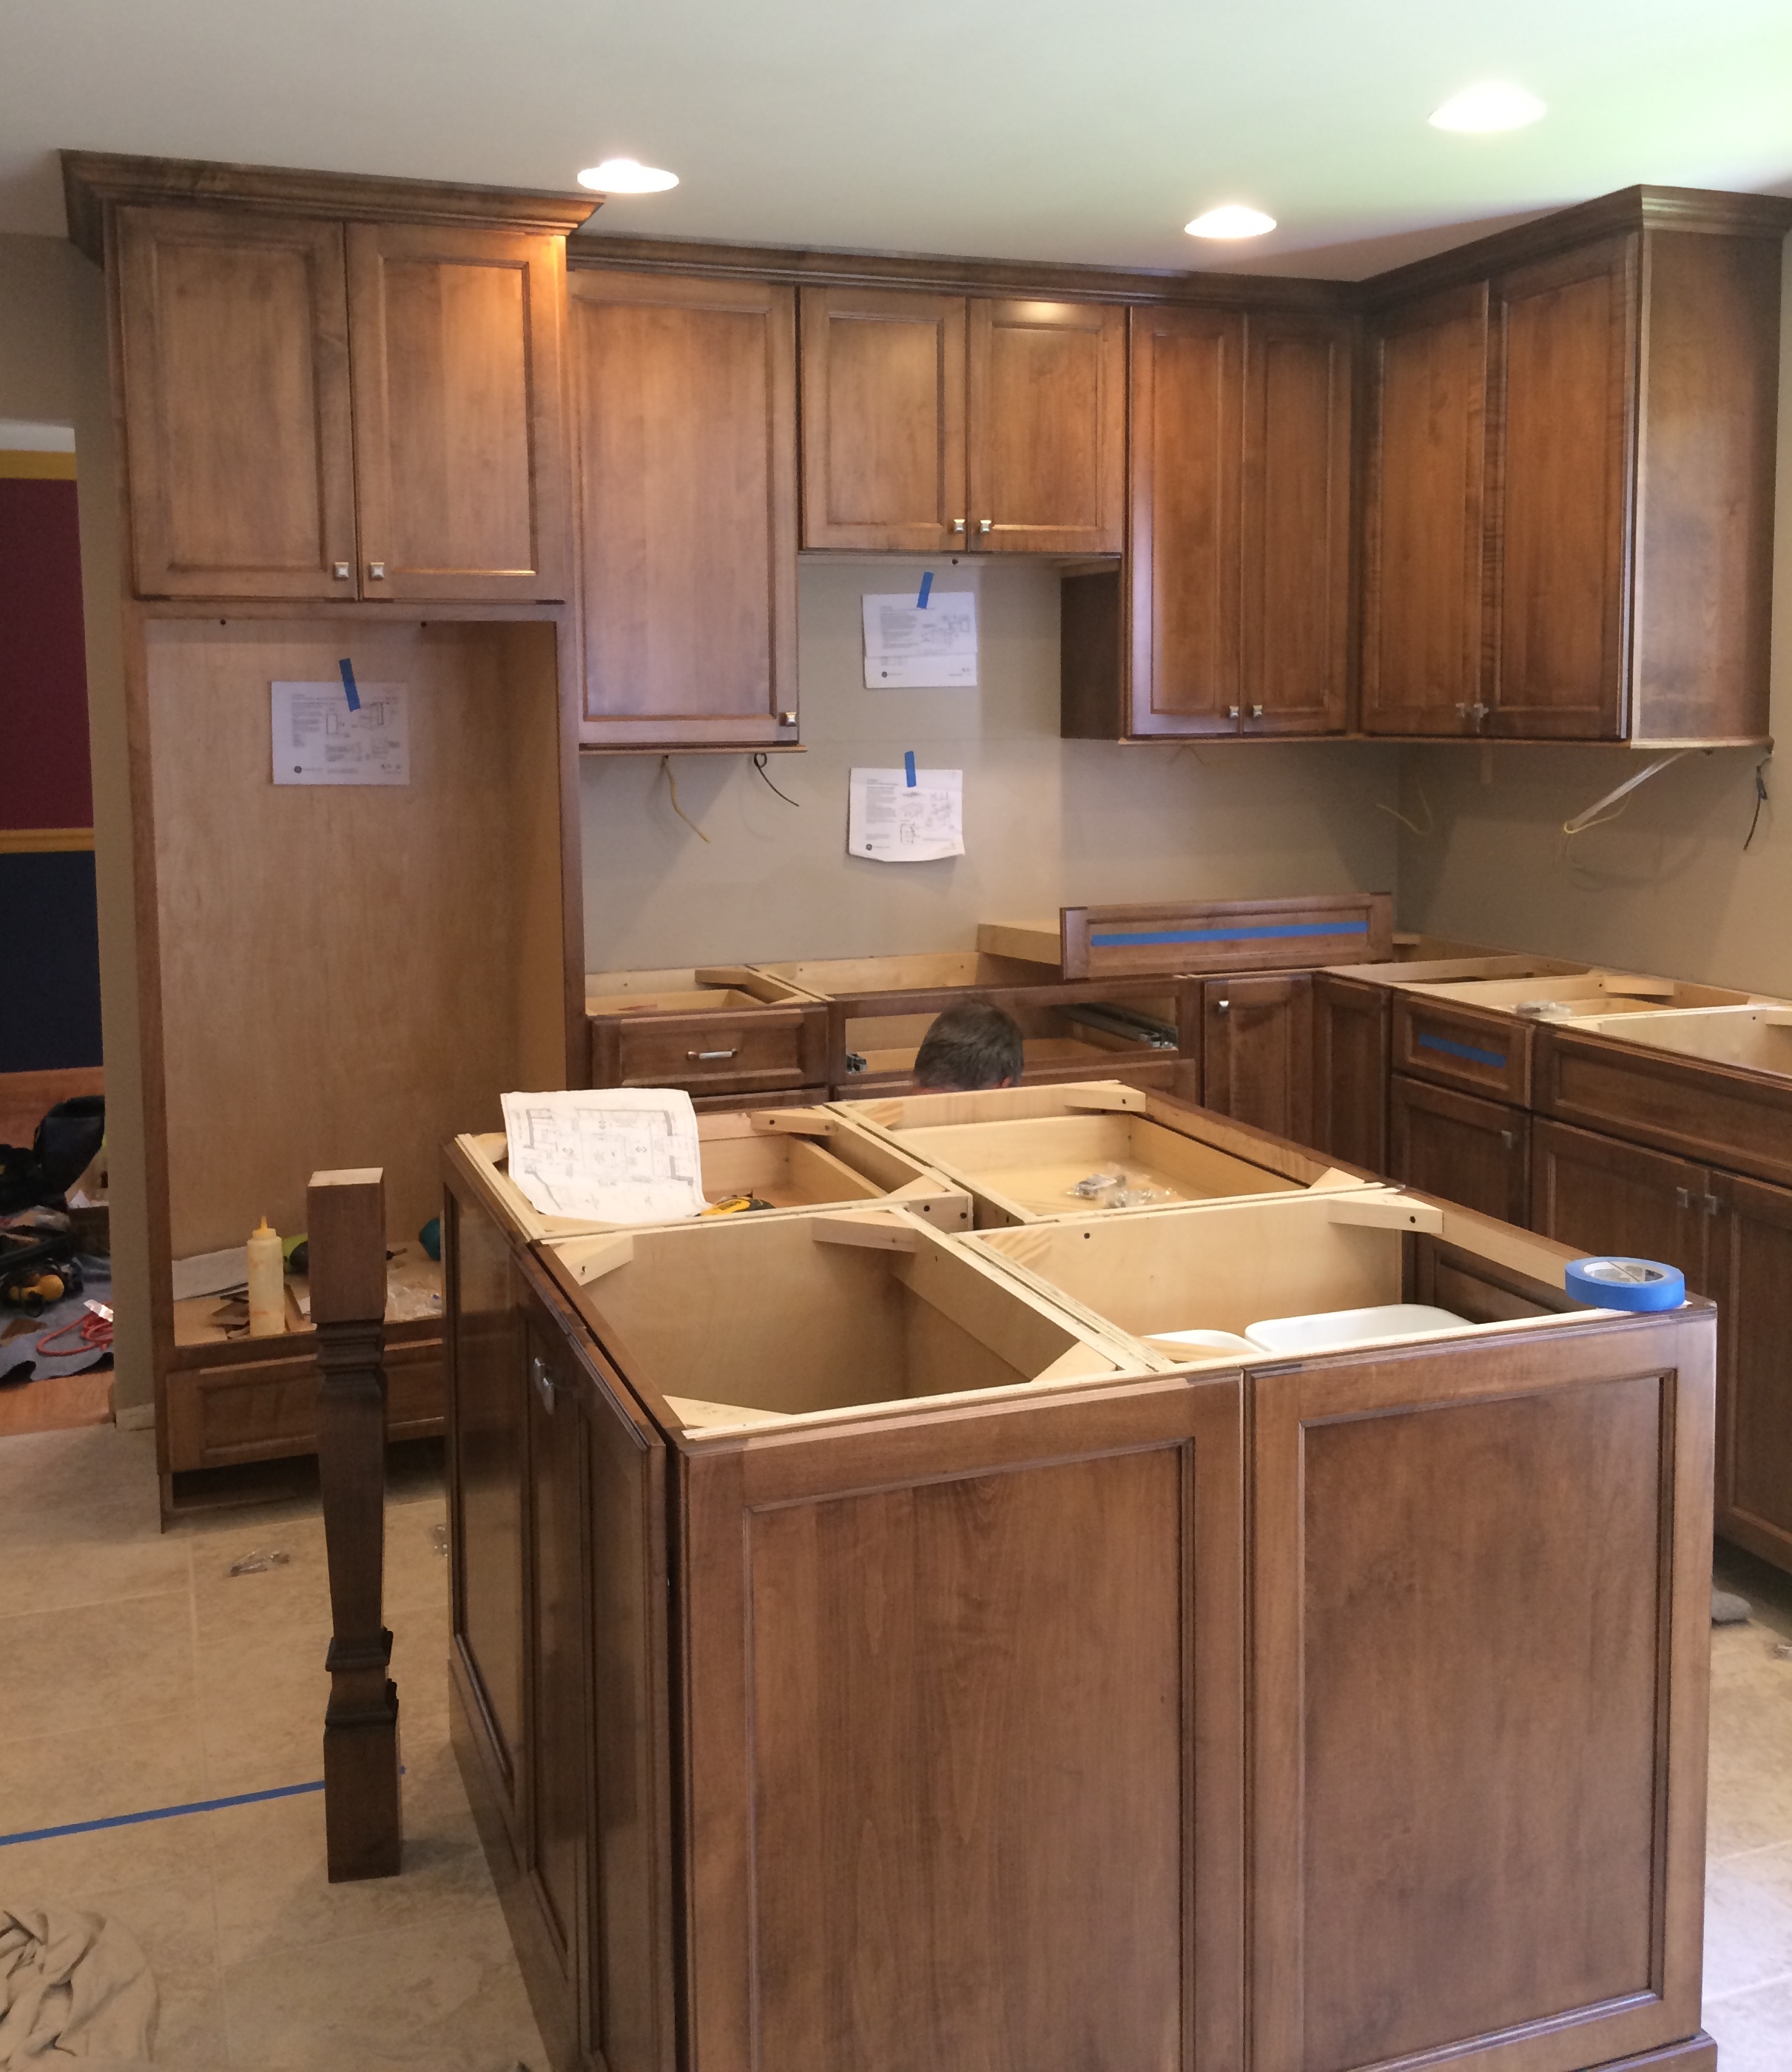
Stunning Stained Kitchen REVEAL: before & after of a kitchen renovation by www.jennaburger.com

Stunning Stained Kitchen REVEAL: before & after of a kitchen renovation by www.jennaburger.com

CONSTRUCTION

After months of designing, fabricating, and building, construction began…

In-Progress of Kitchen Renovation

In-Progress of Kitchen Renovation

In-Progress of Kitchen Renovation

In-Progress of Kitchen Renovation

And then it was complete. The result…

AFTER

Welcome to this stained stunner…

Stunning Stained Kitchen REVEAL: before & after of a kitchen renovation by www.jennaburger.com

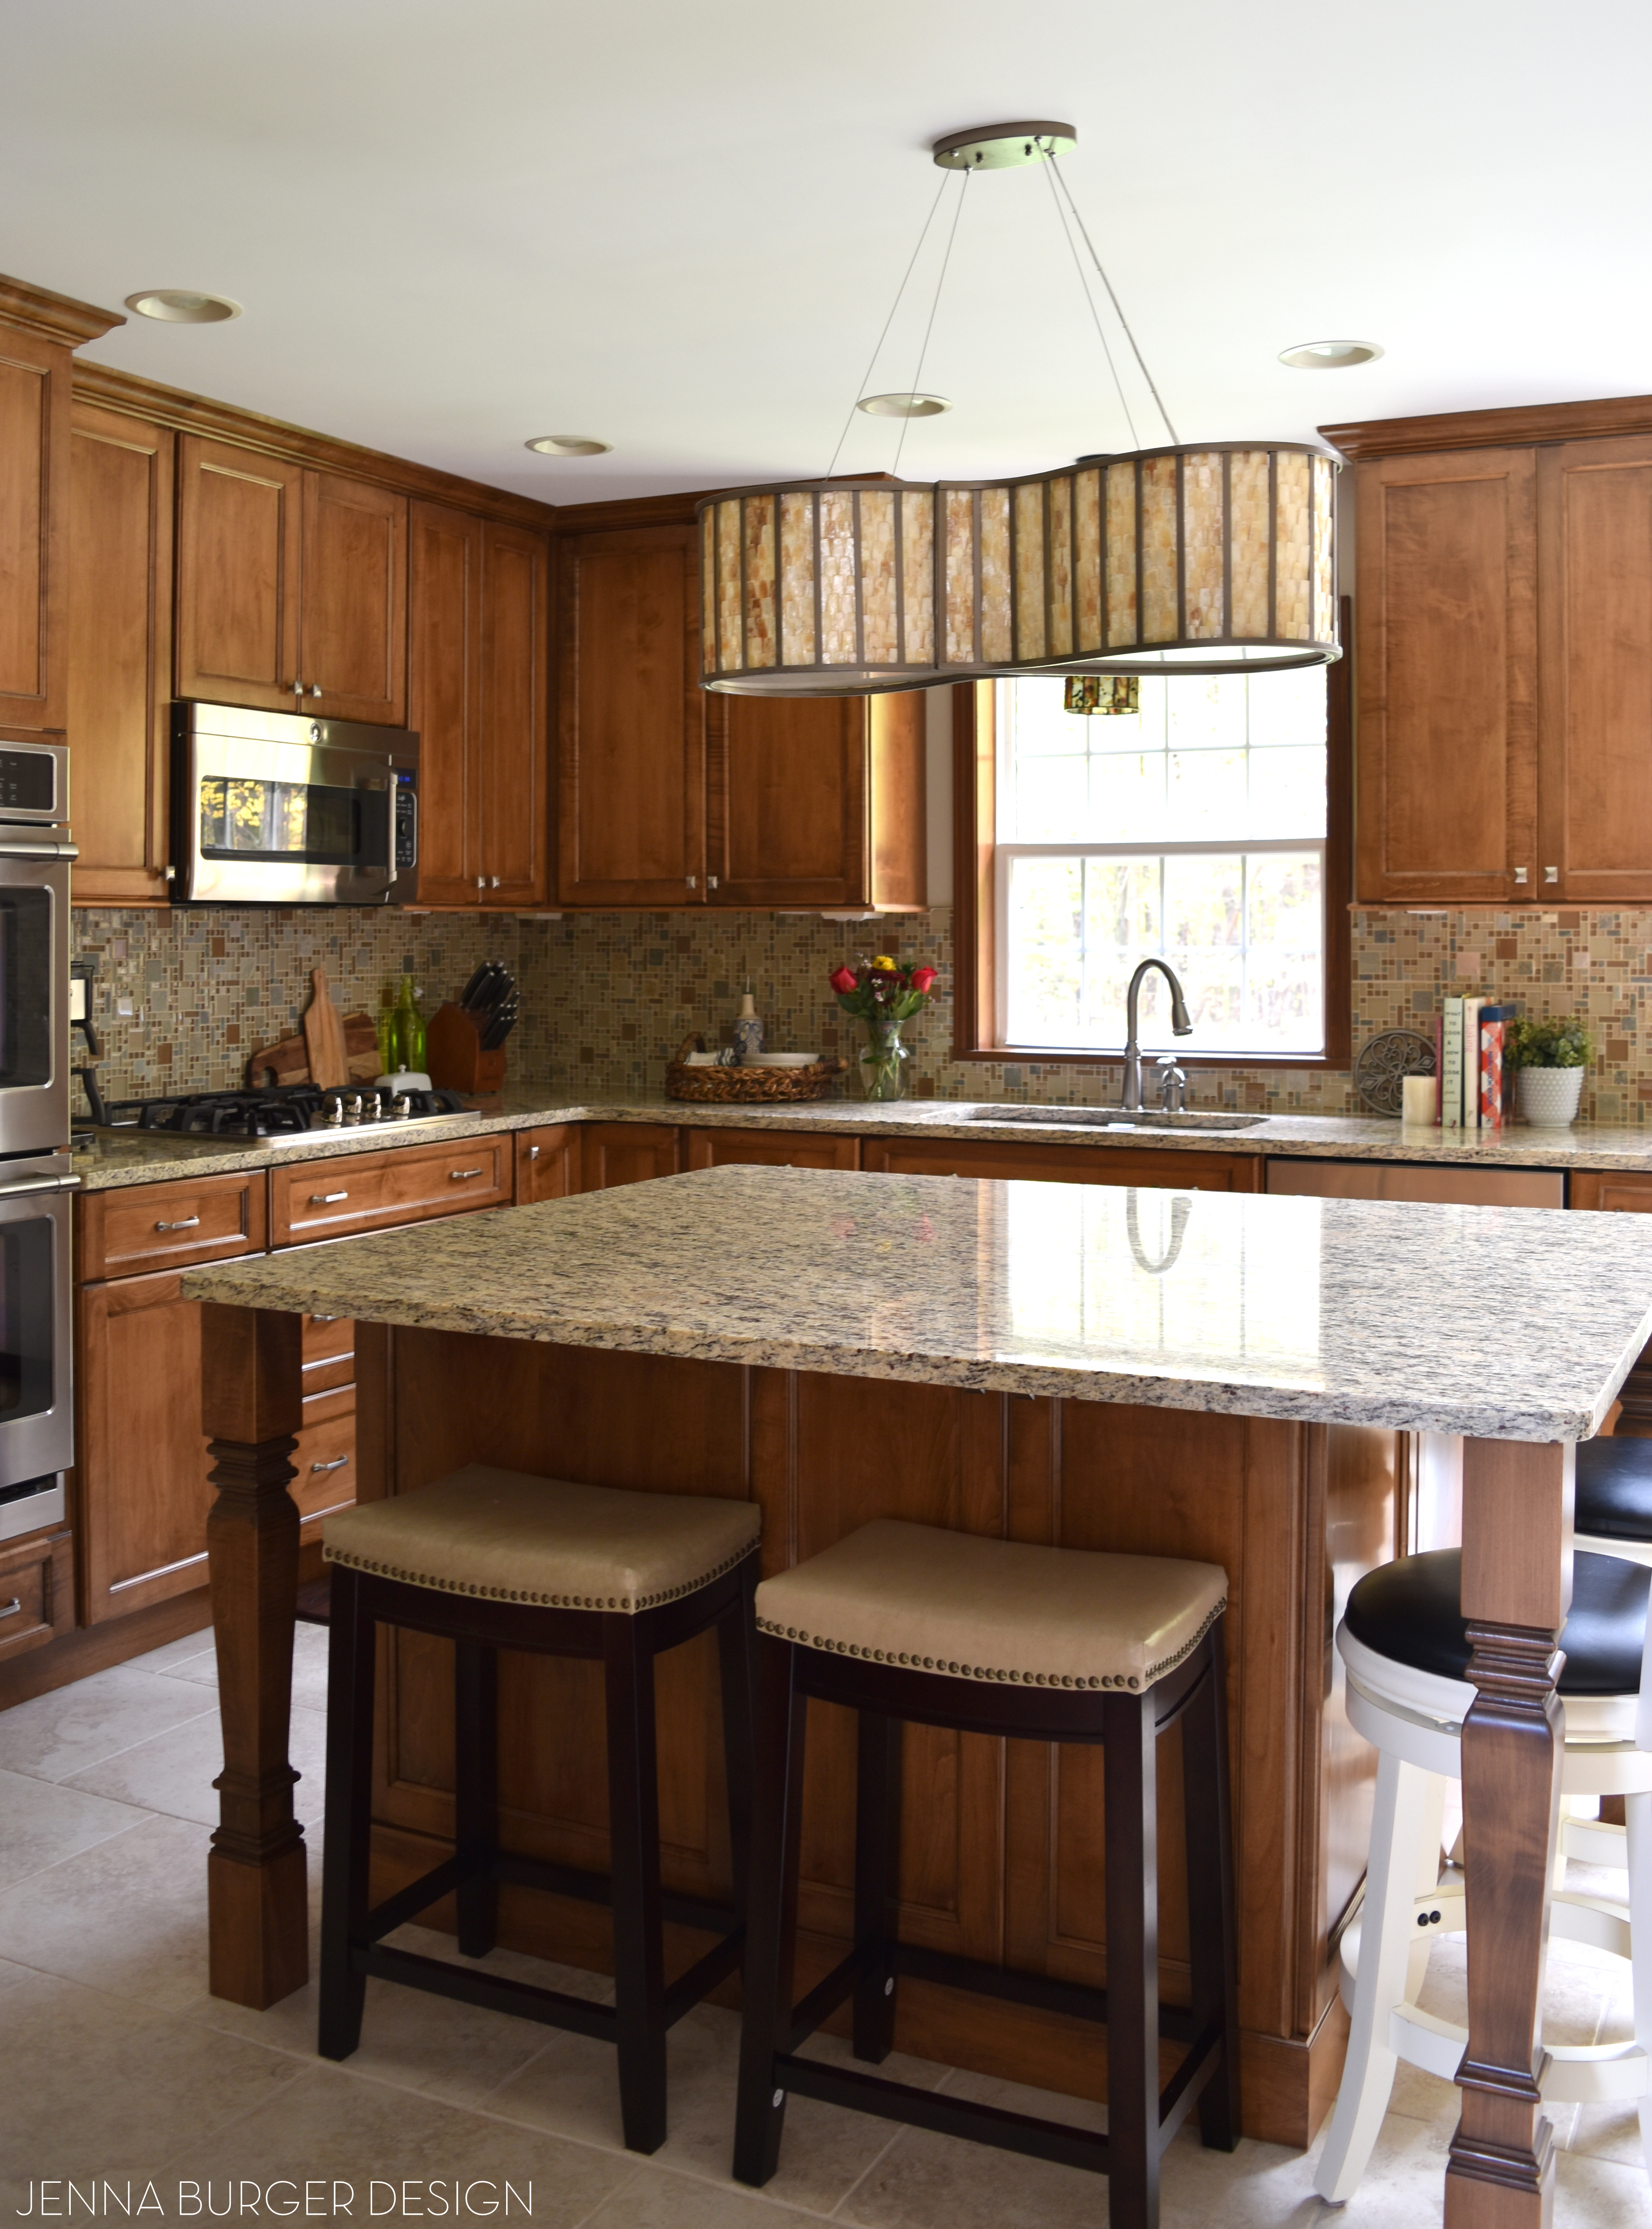
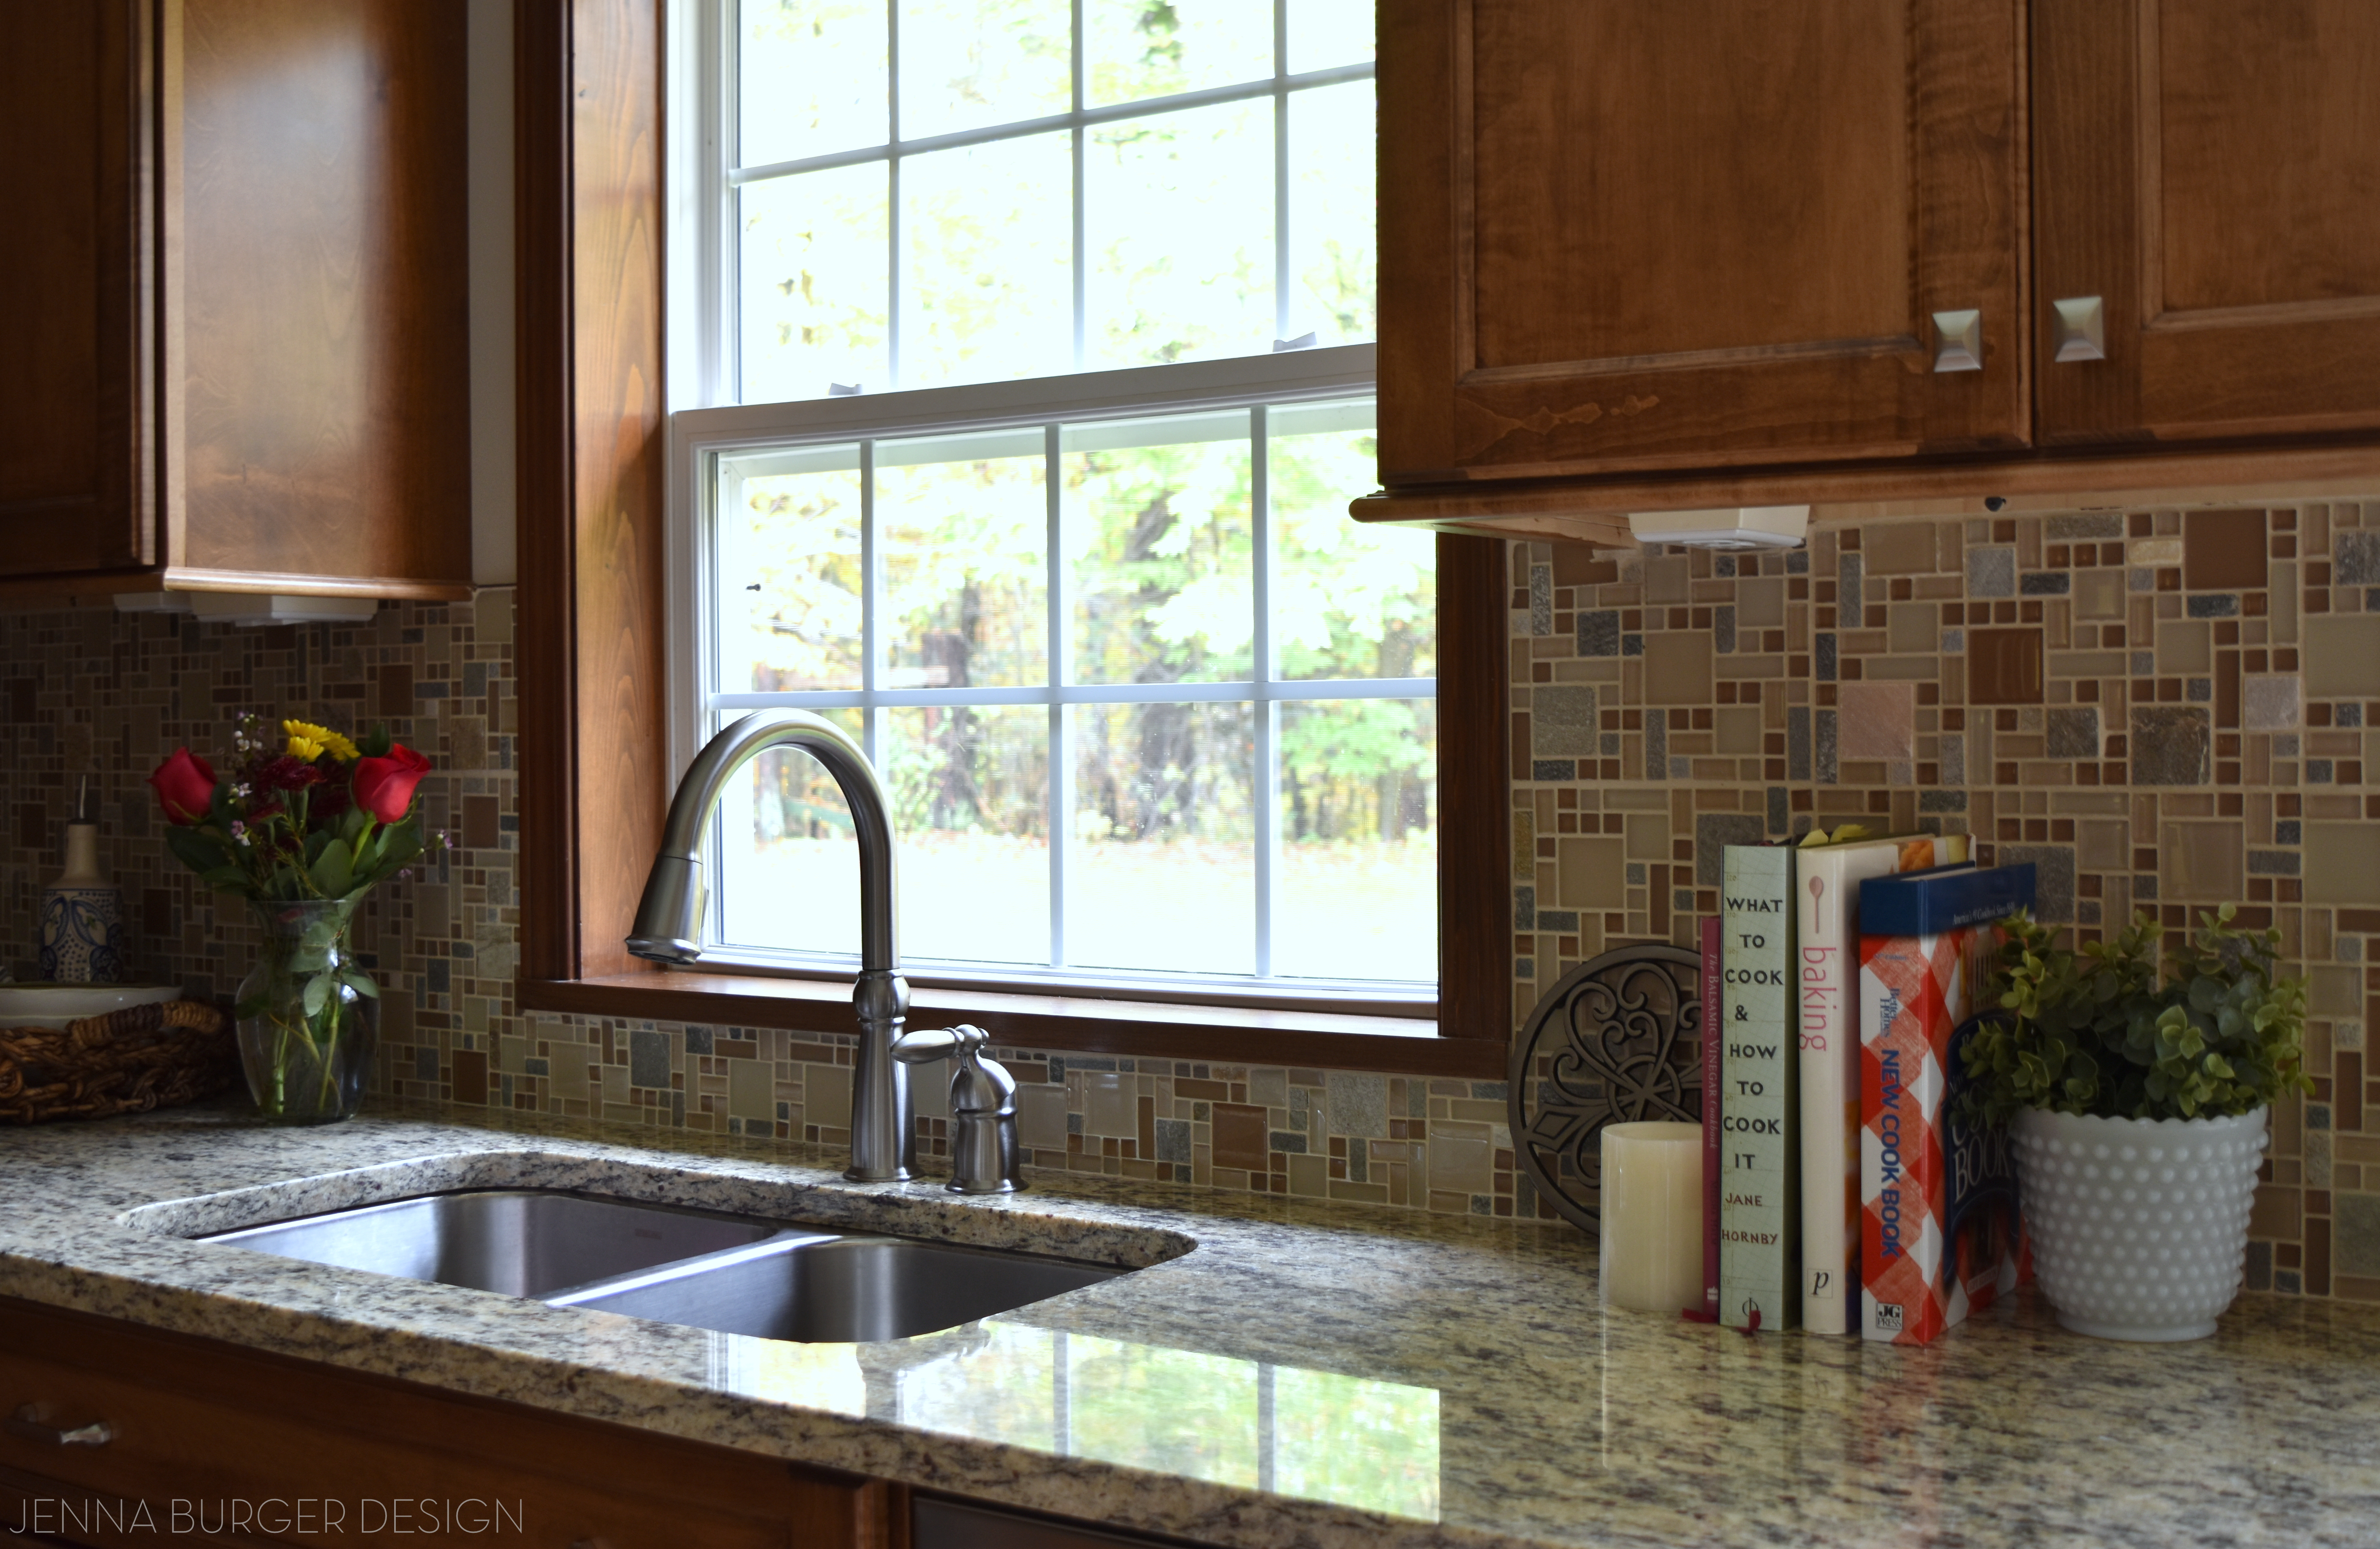
This is the view as you walk into the kitchen from the entry foyer and it’s gorgeous. Light shines in from the exterior and the space feels bright & fresh.

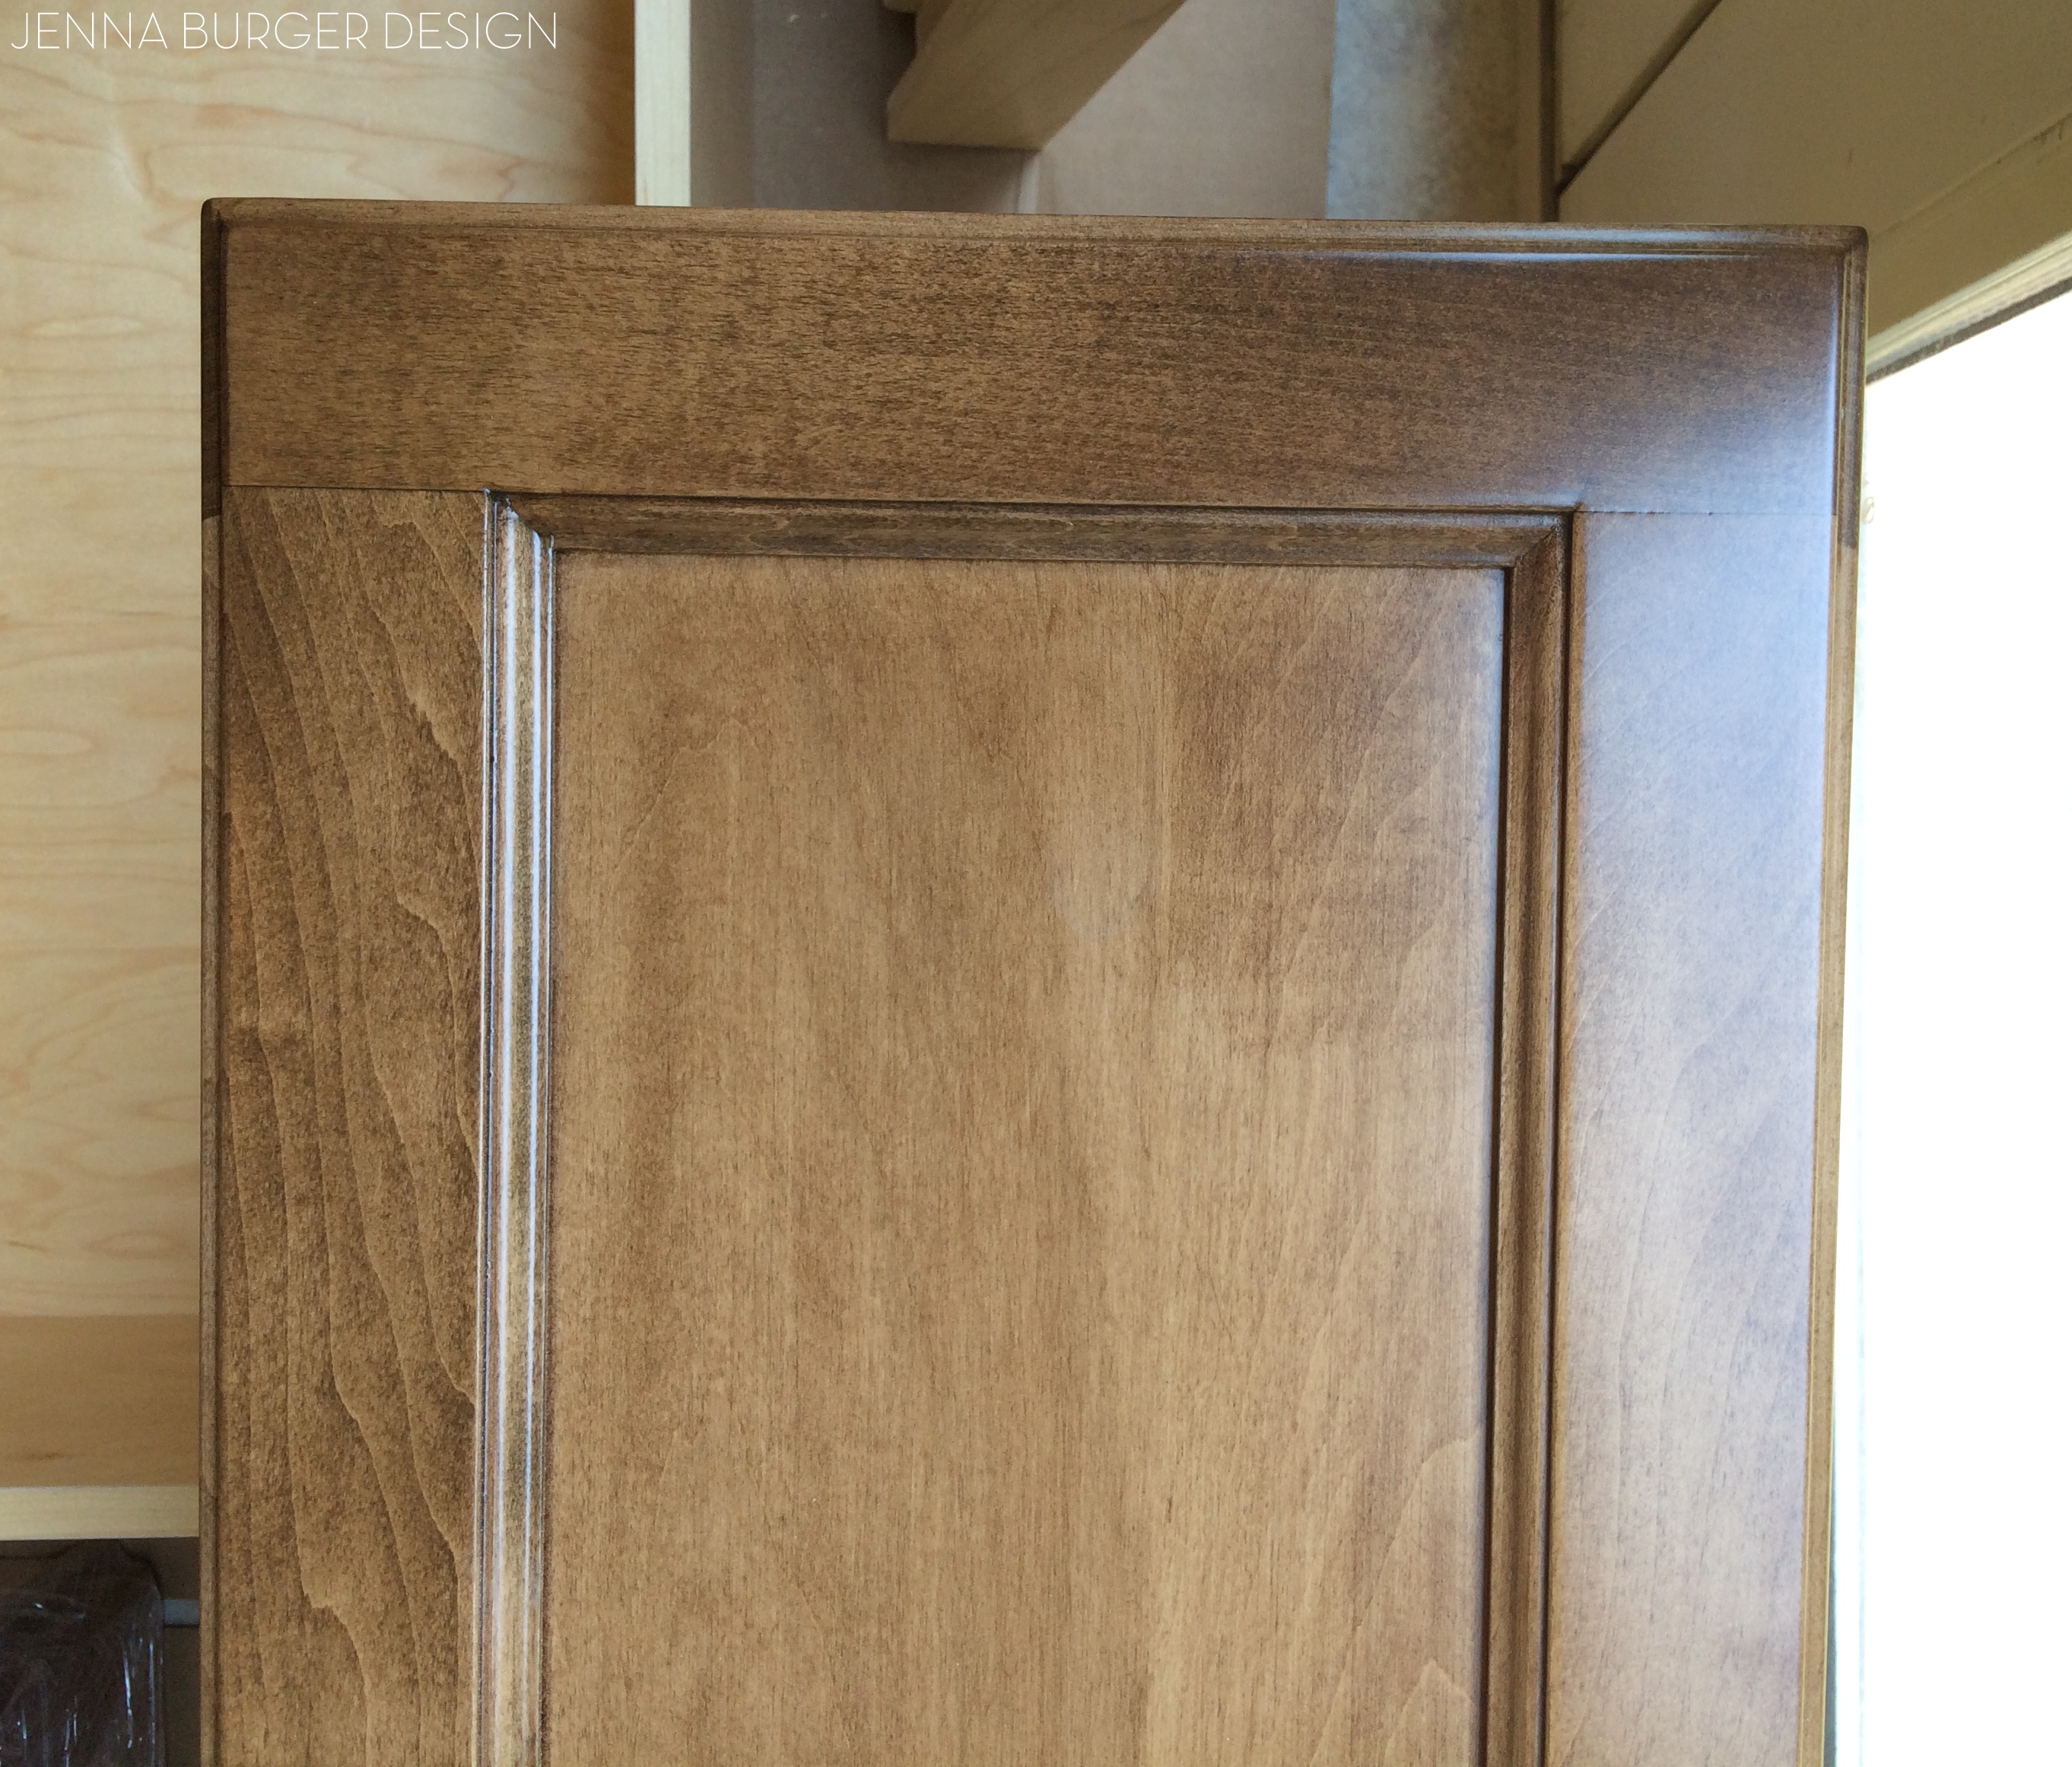
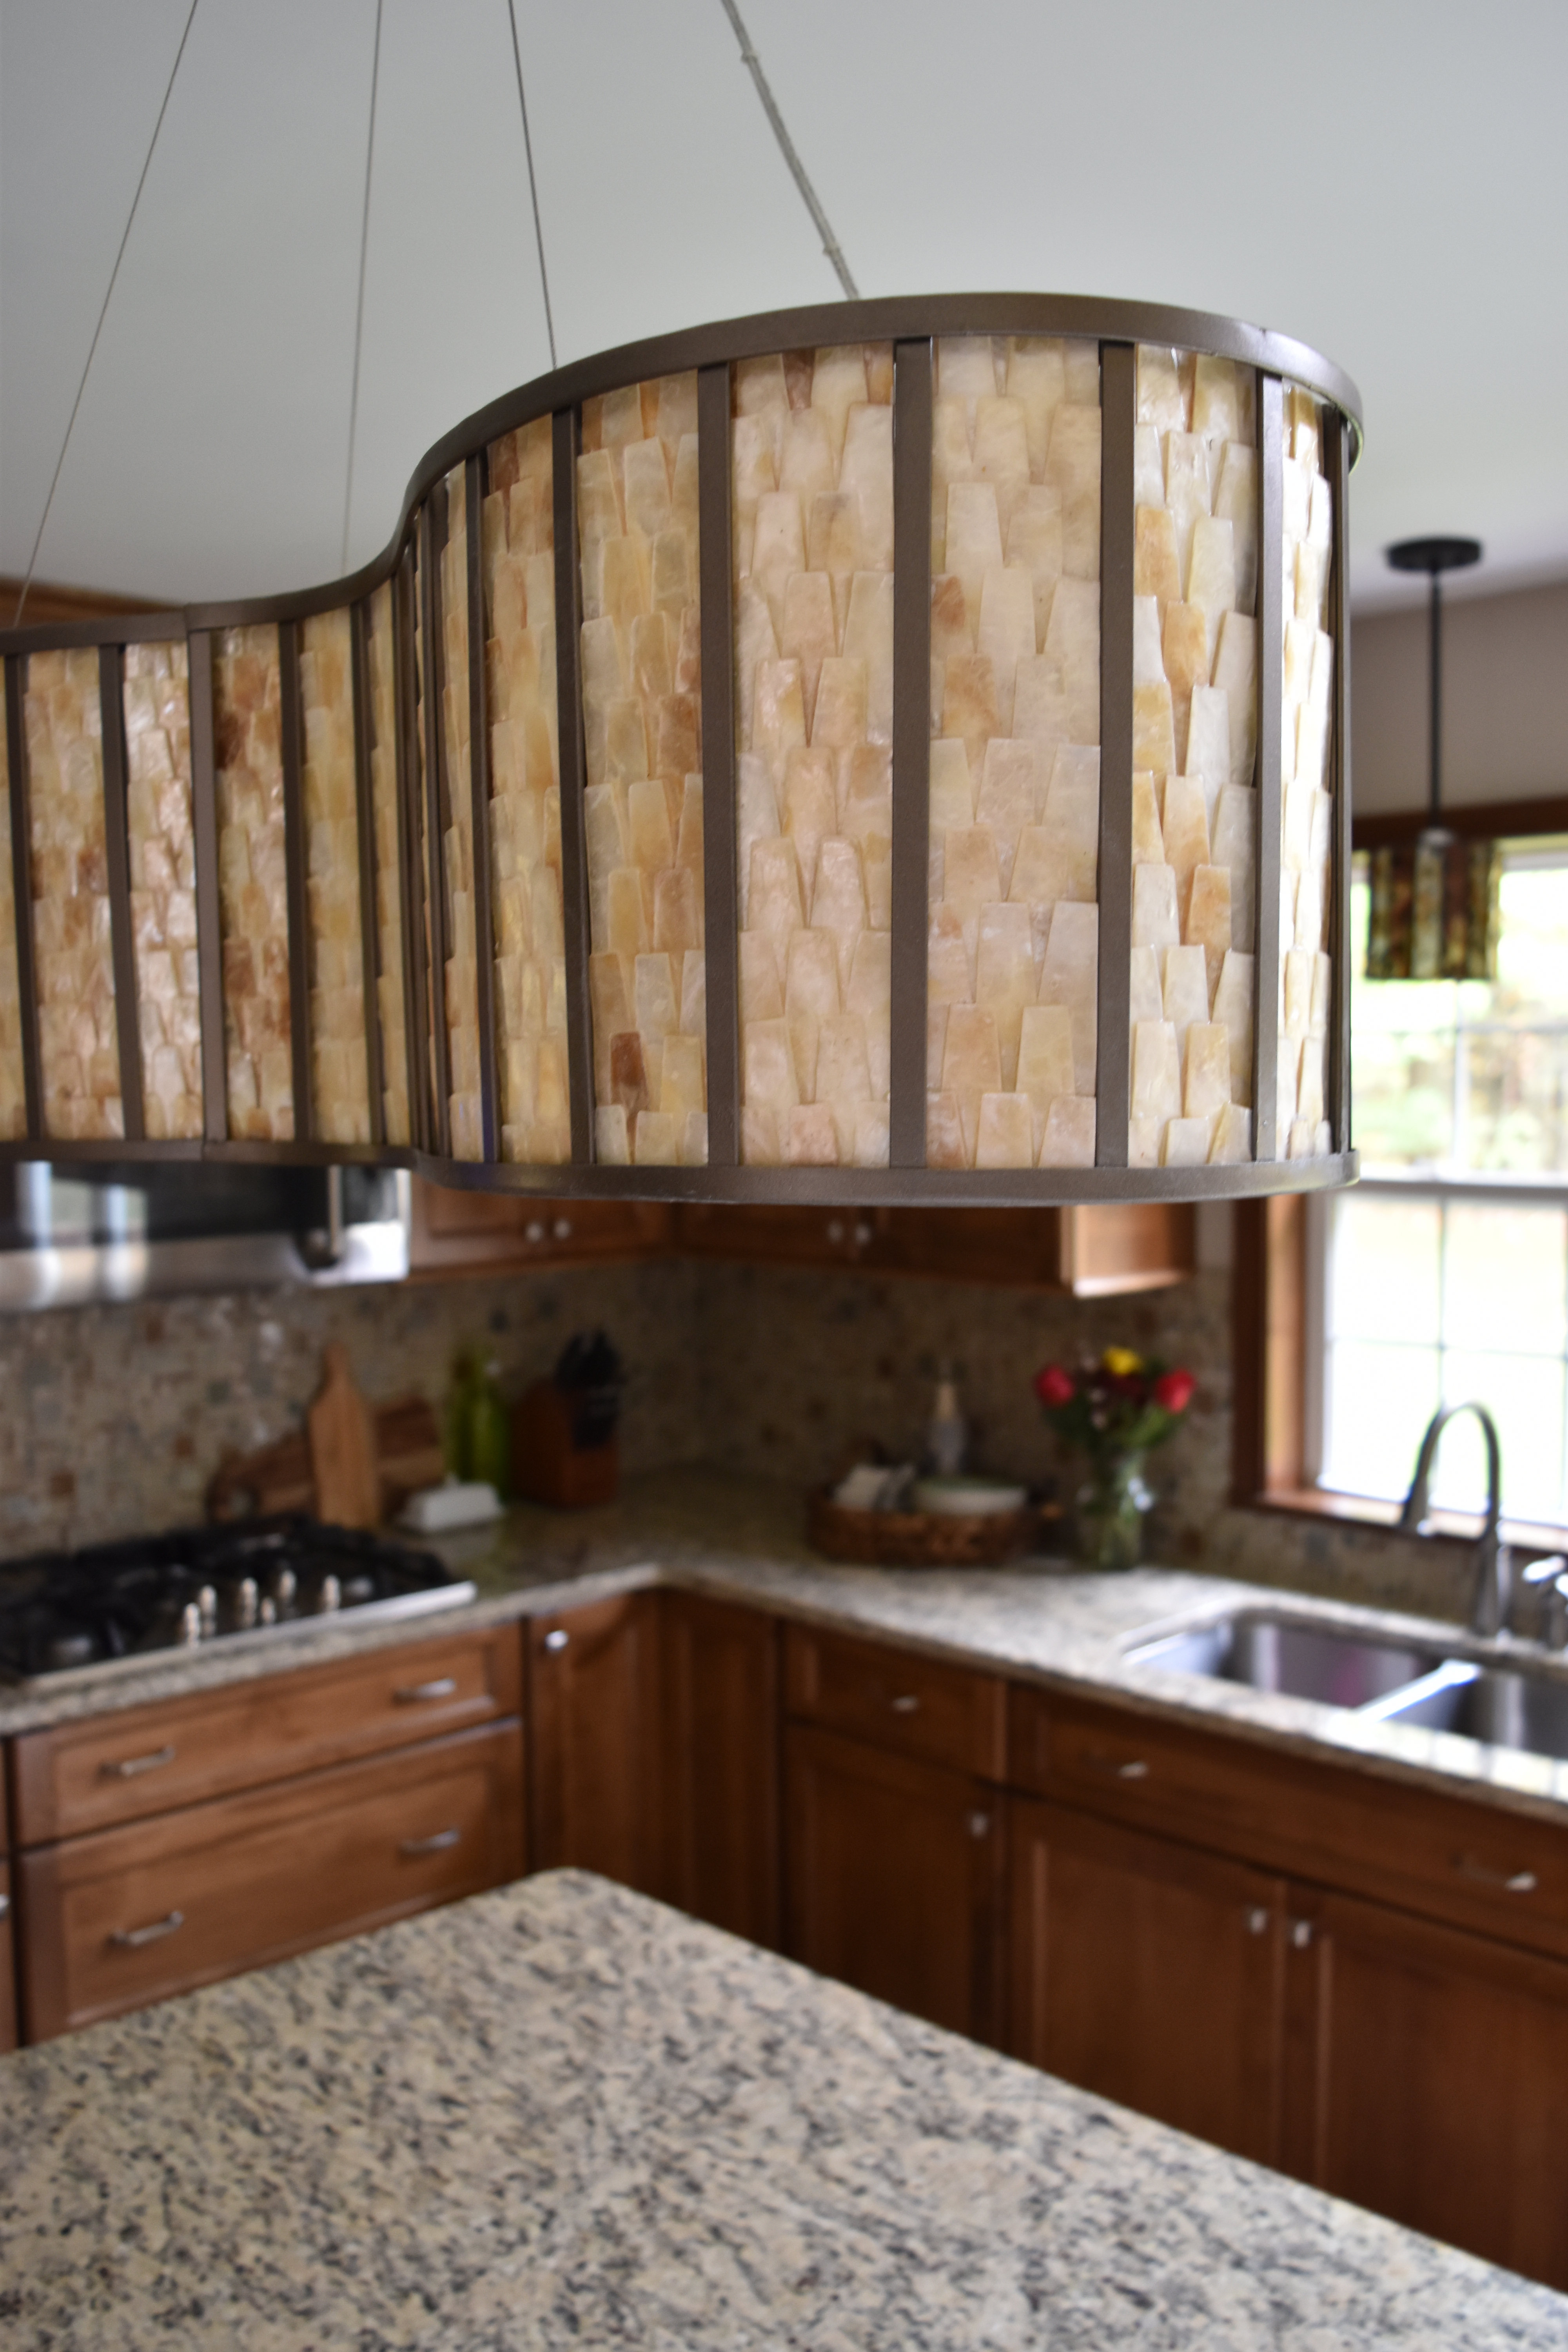
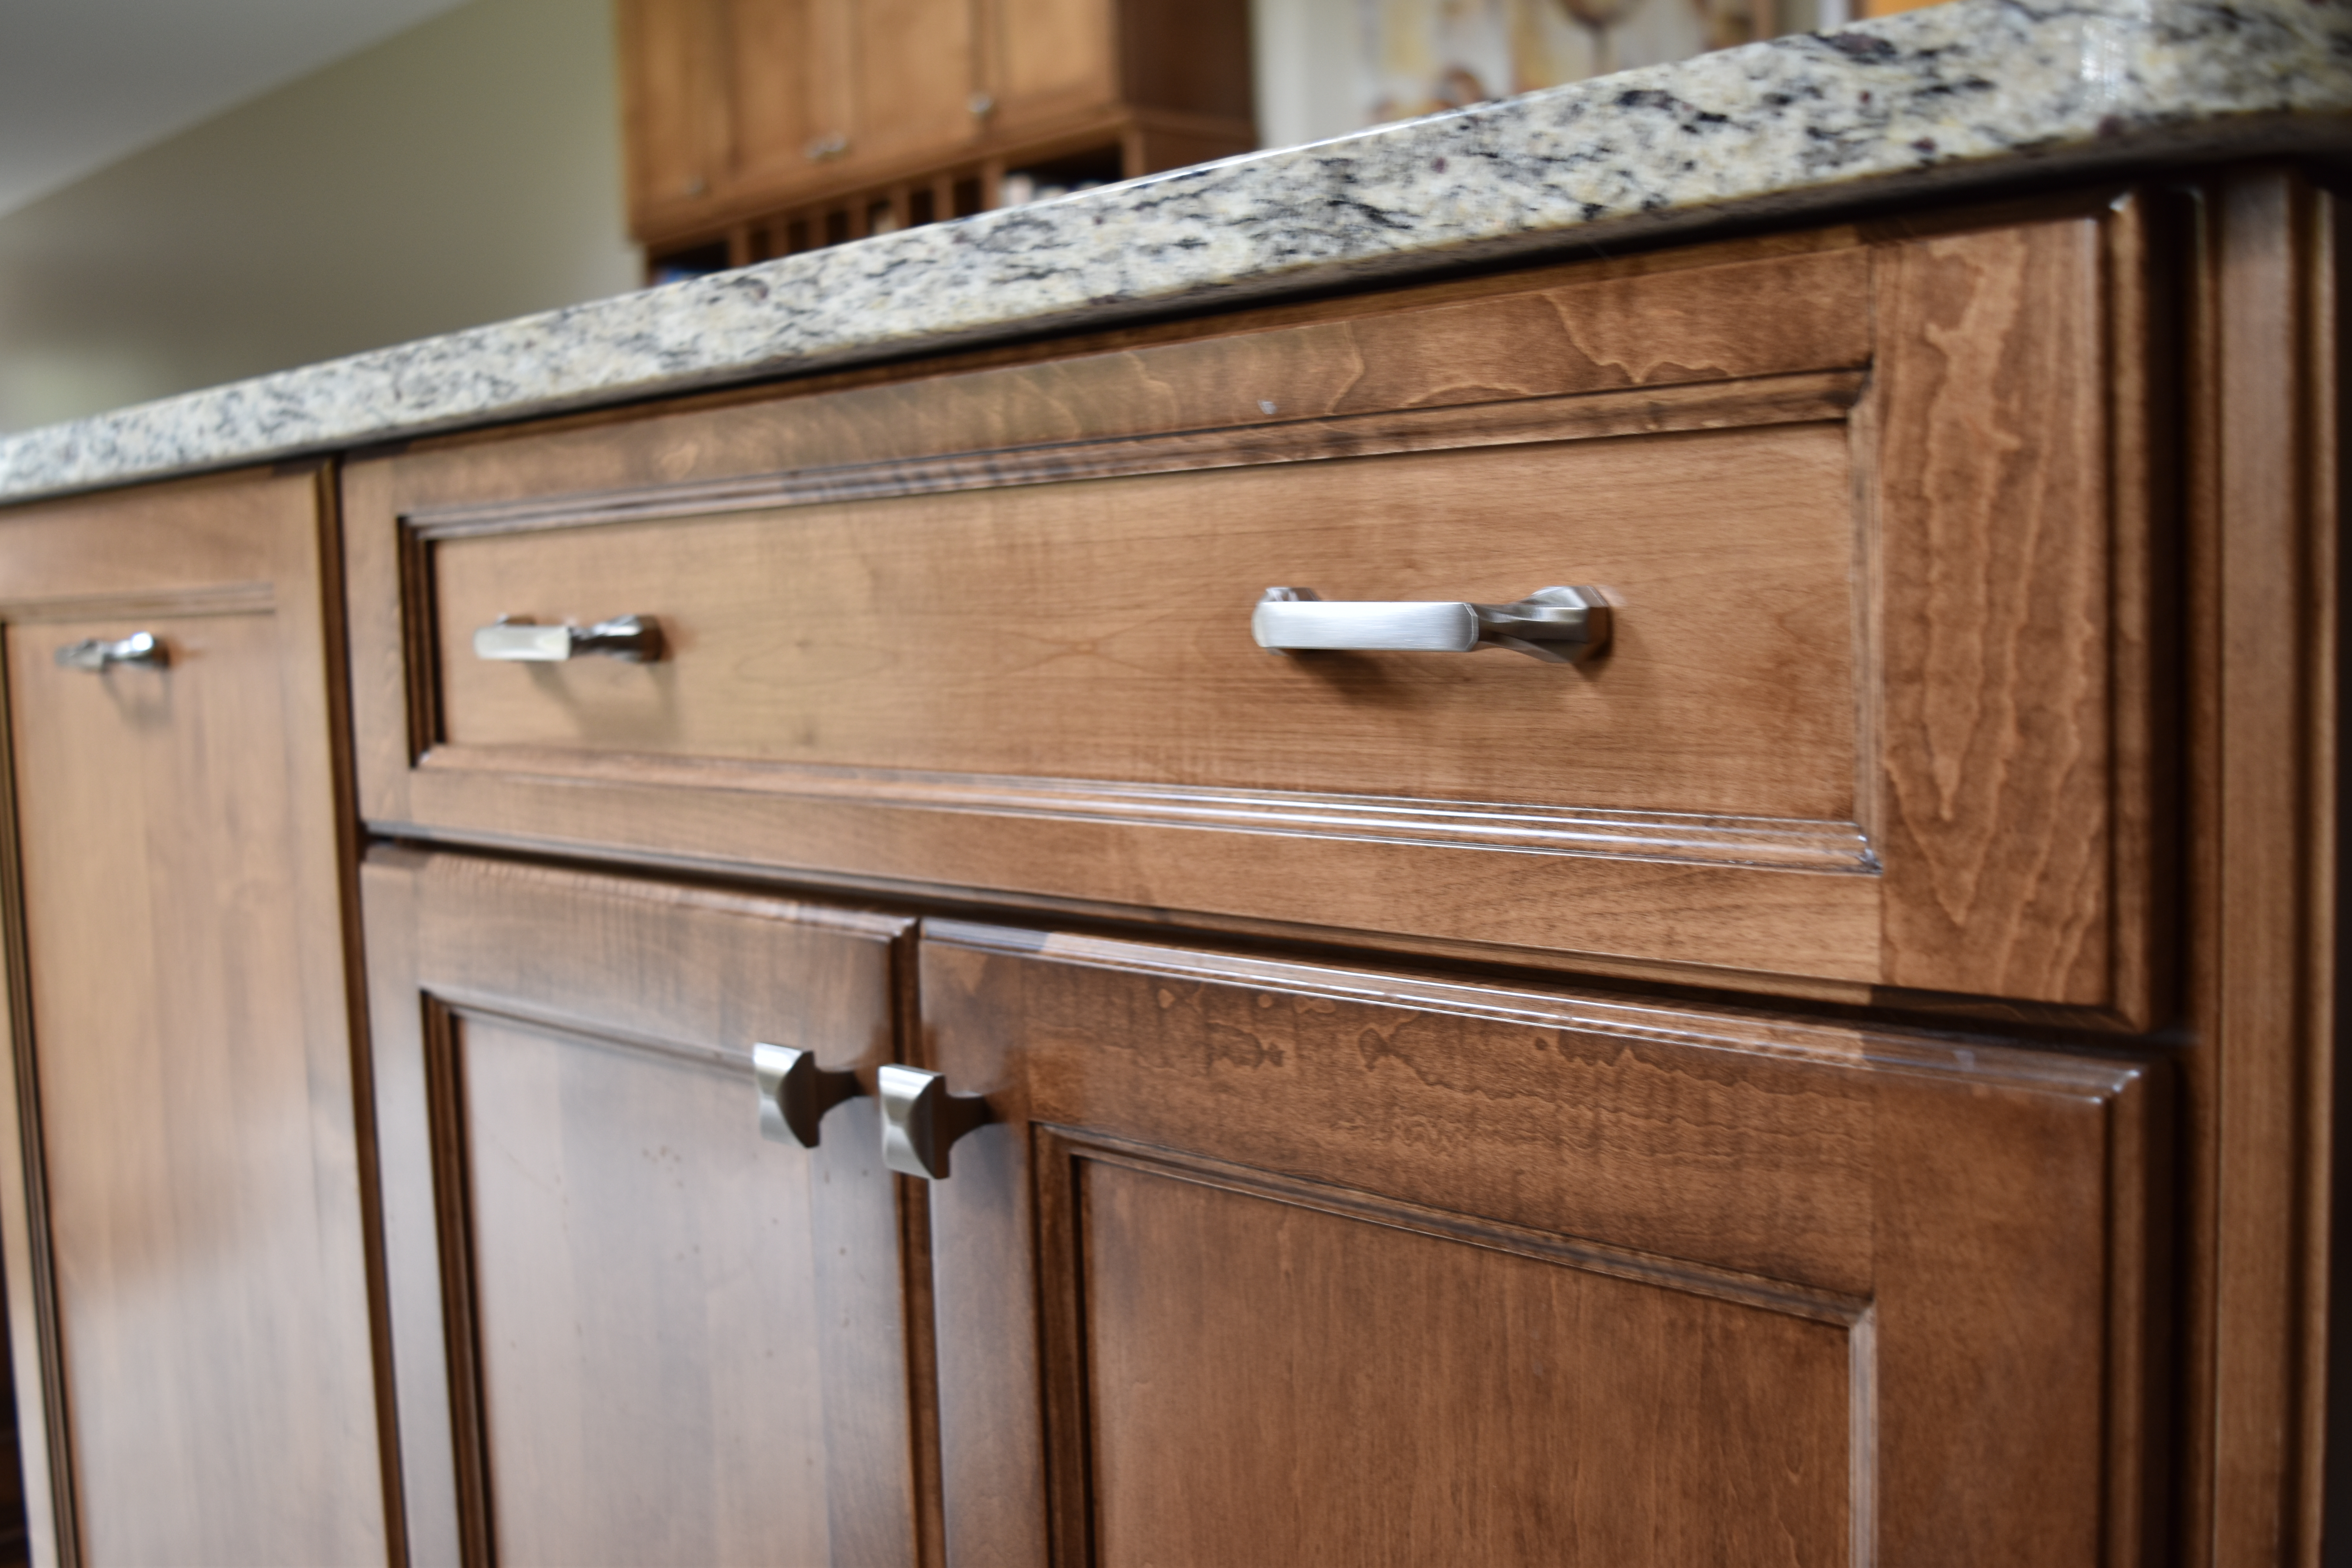
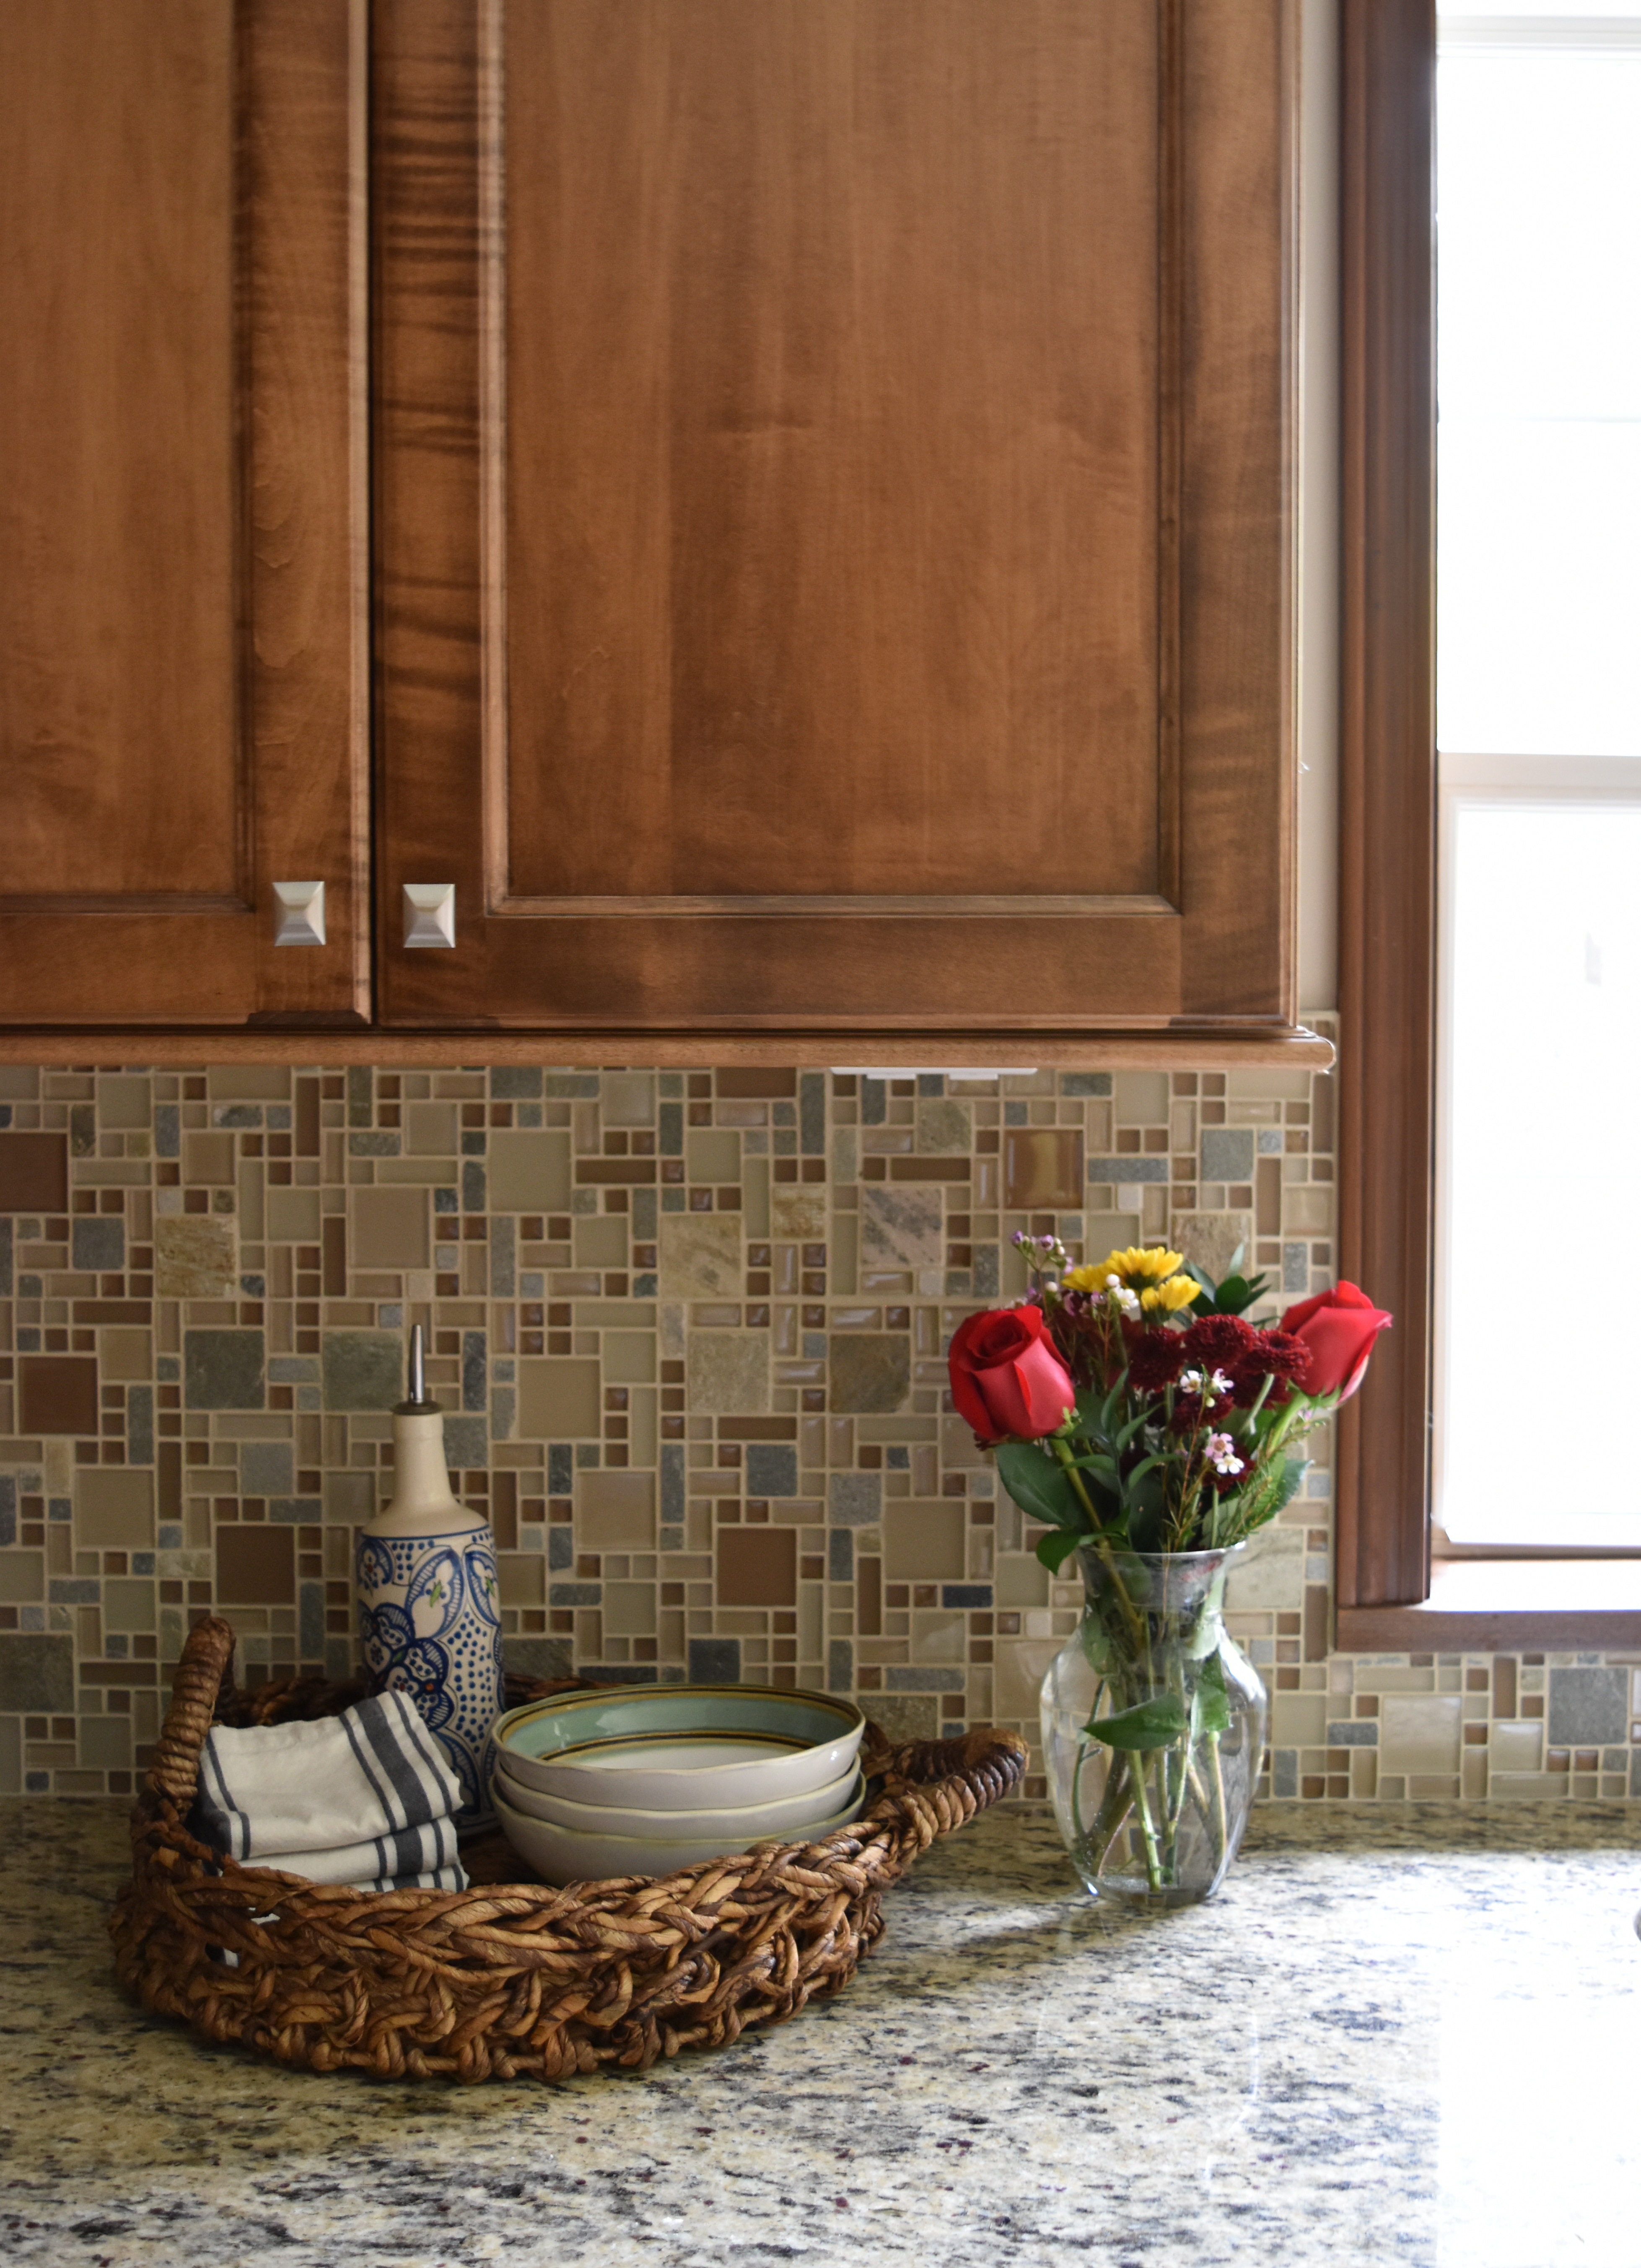
The cabinets are a mix of a few stains, which took a several tries to get just right. The hue we wanted to achieve was a light-medium brown with no orange or red undertones. In the end, the result is rich and warm.

The cabinets are a full overlay door style (which means the door sits proud of the frame instead of being inset) with a recessed panel door. The door itself has a decorative edging on the outer perimeter + at the recessed panel.

Stunning Stained Kitchen REVEAL: before & after of a kitchen renovation by www.jennaburger.com

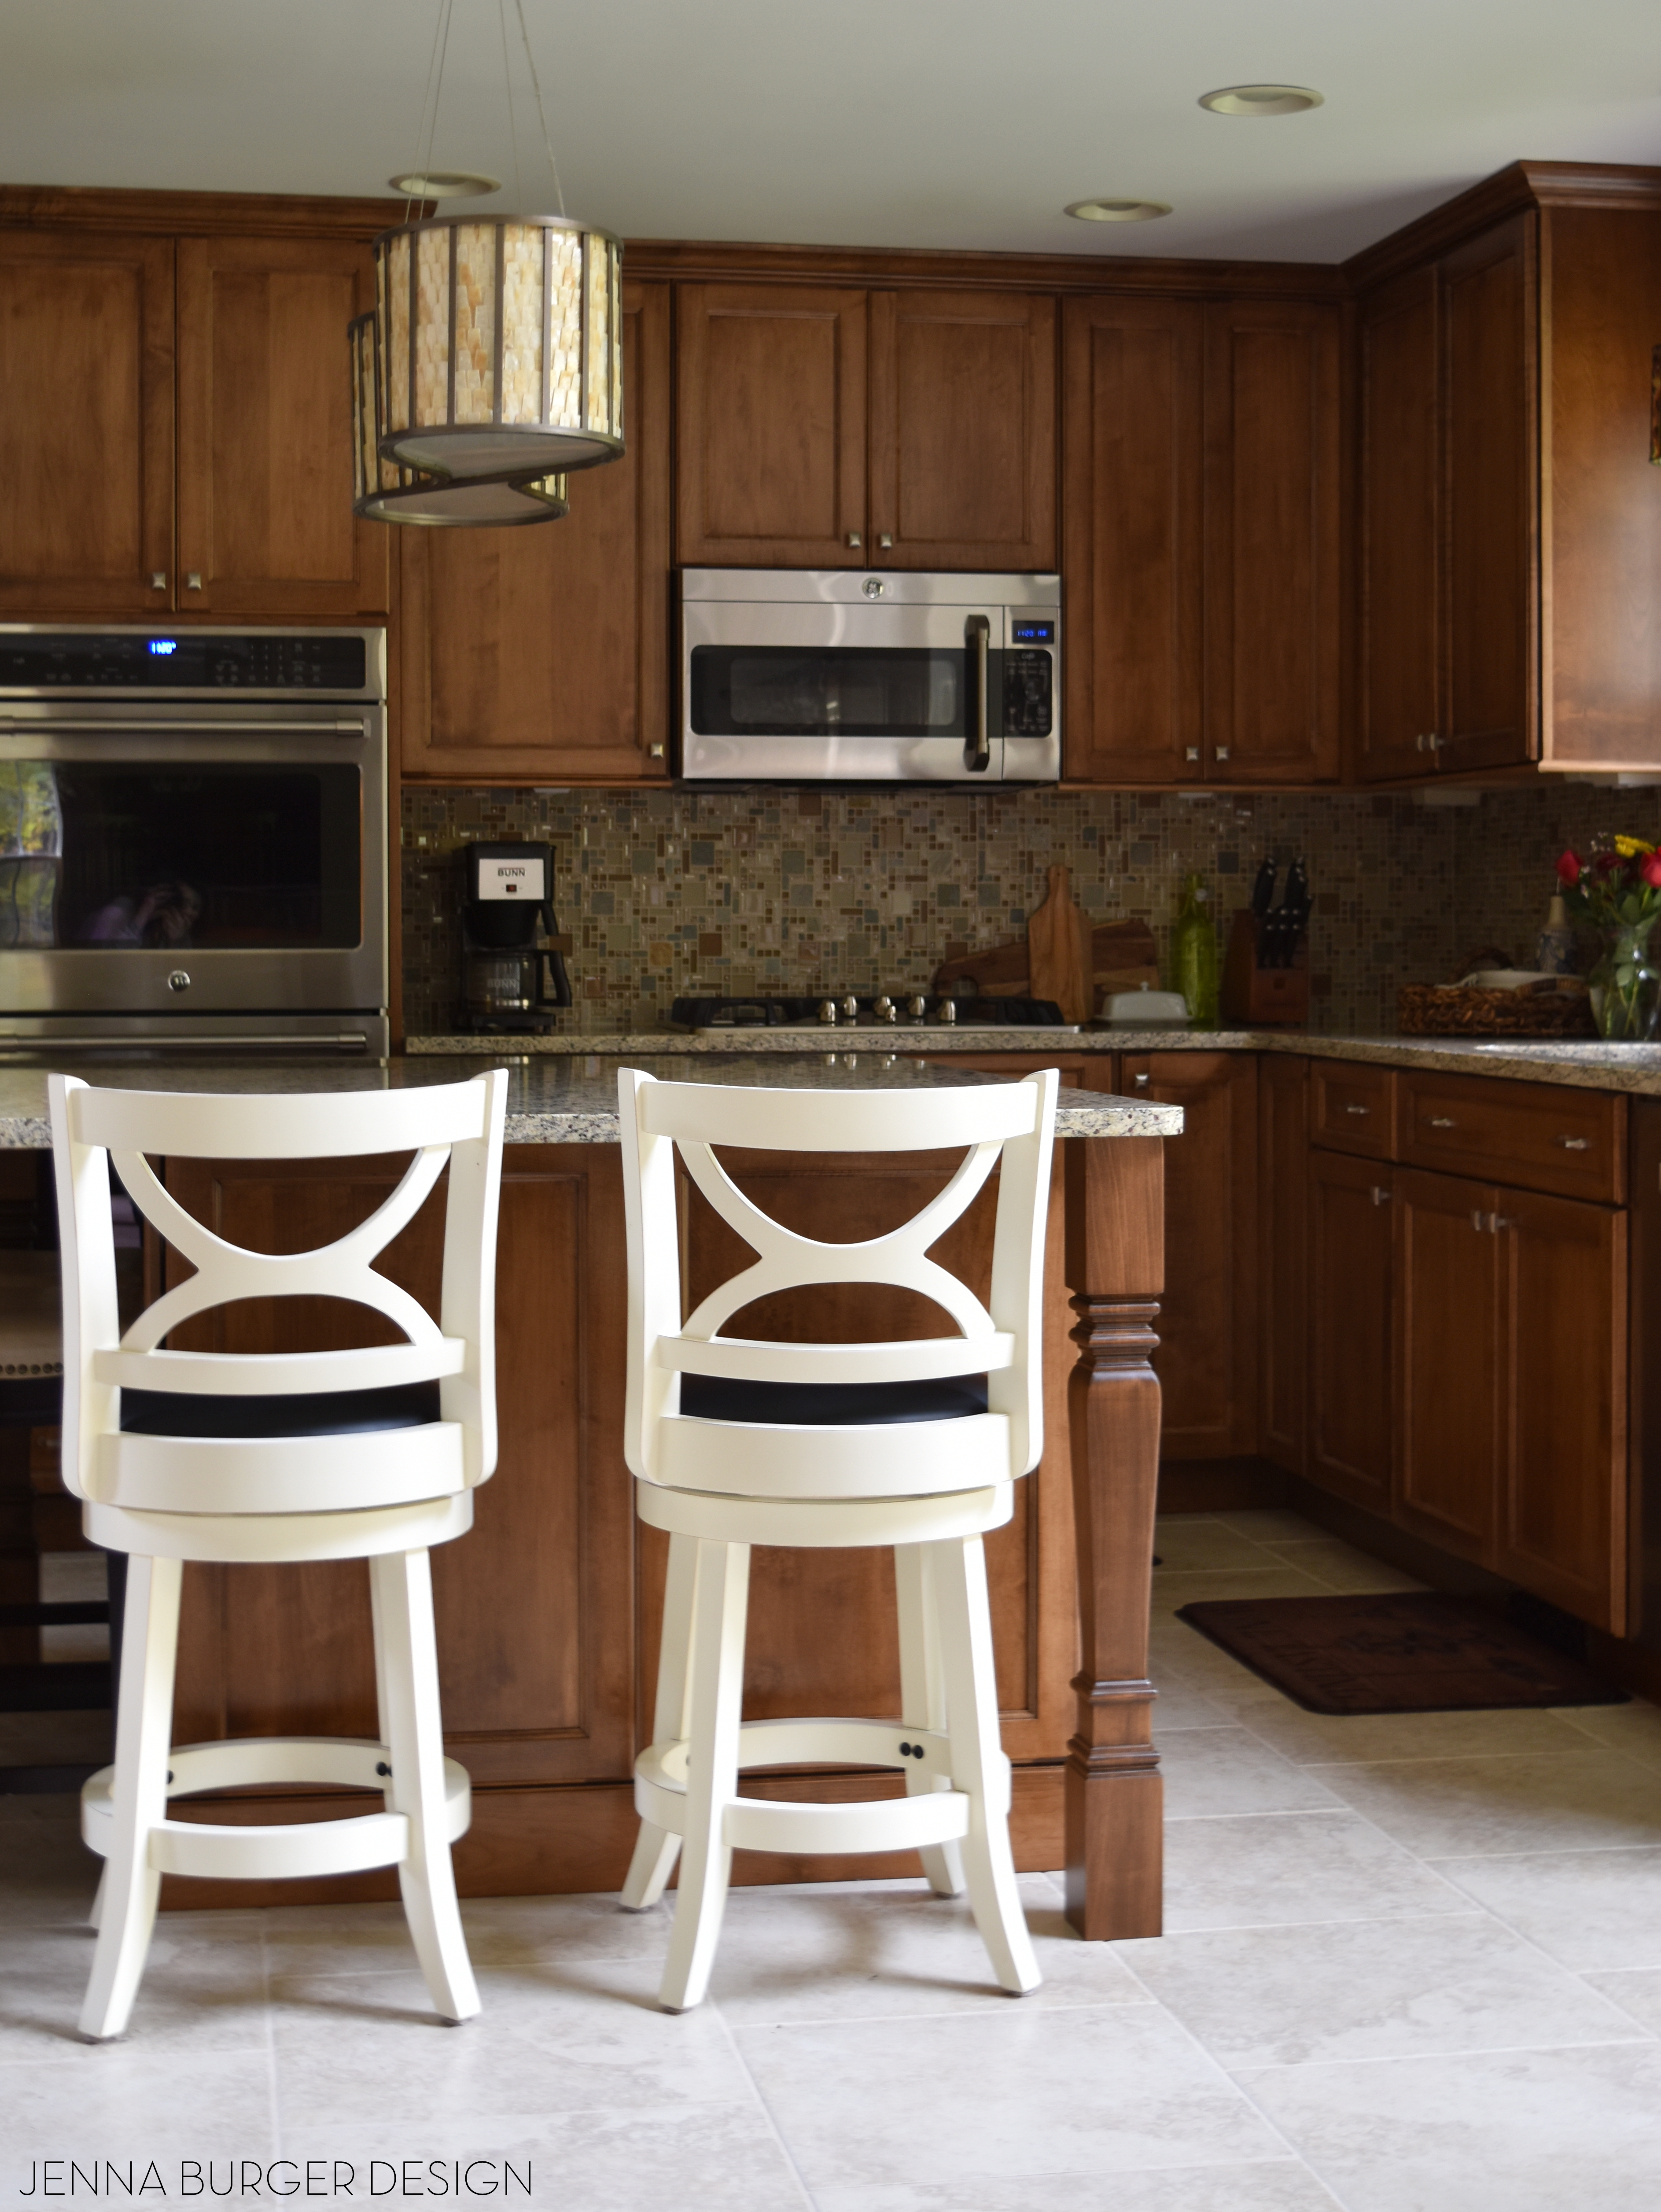
The lighting was chosen by the clients and even though I had suggested other fixtures, these look great.

Stunning Stained Kitchen REVEAL: before & after of a kitchen renovation by www.jennaburger.com

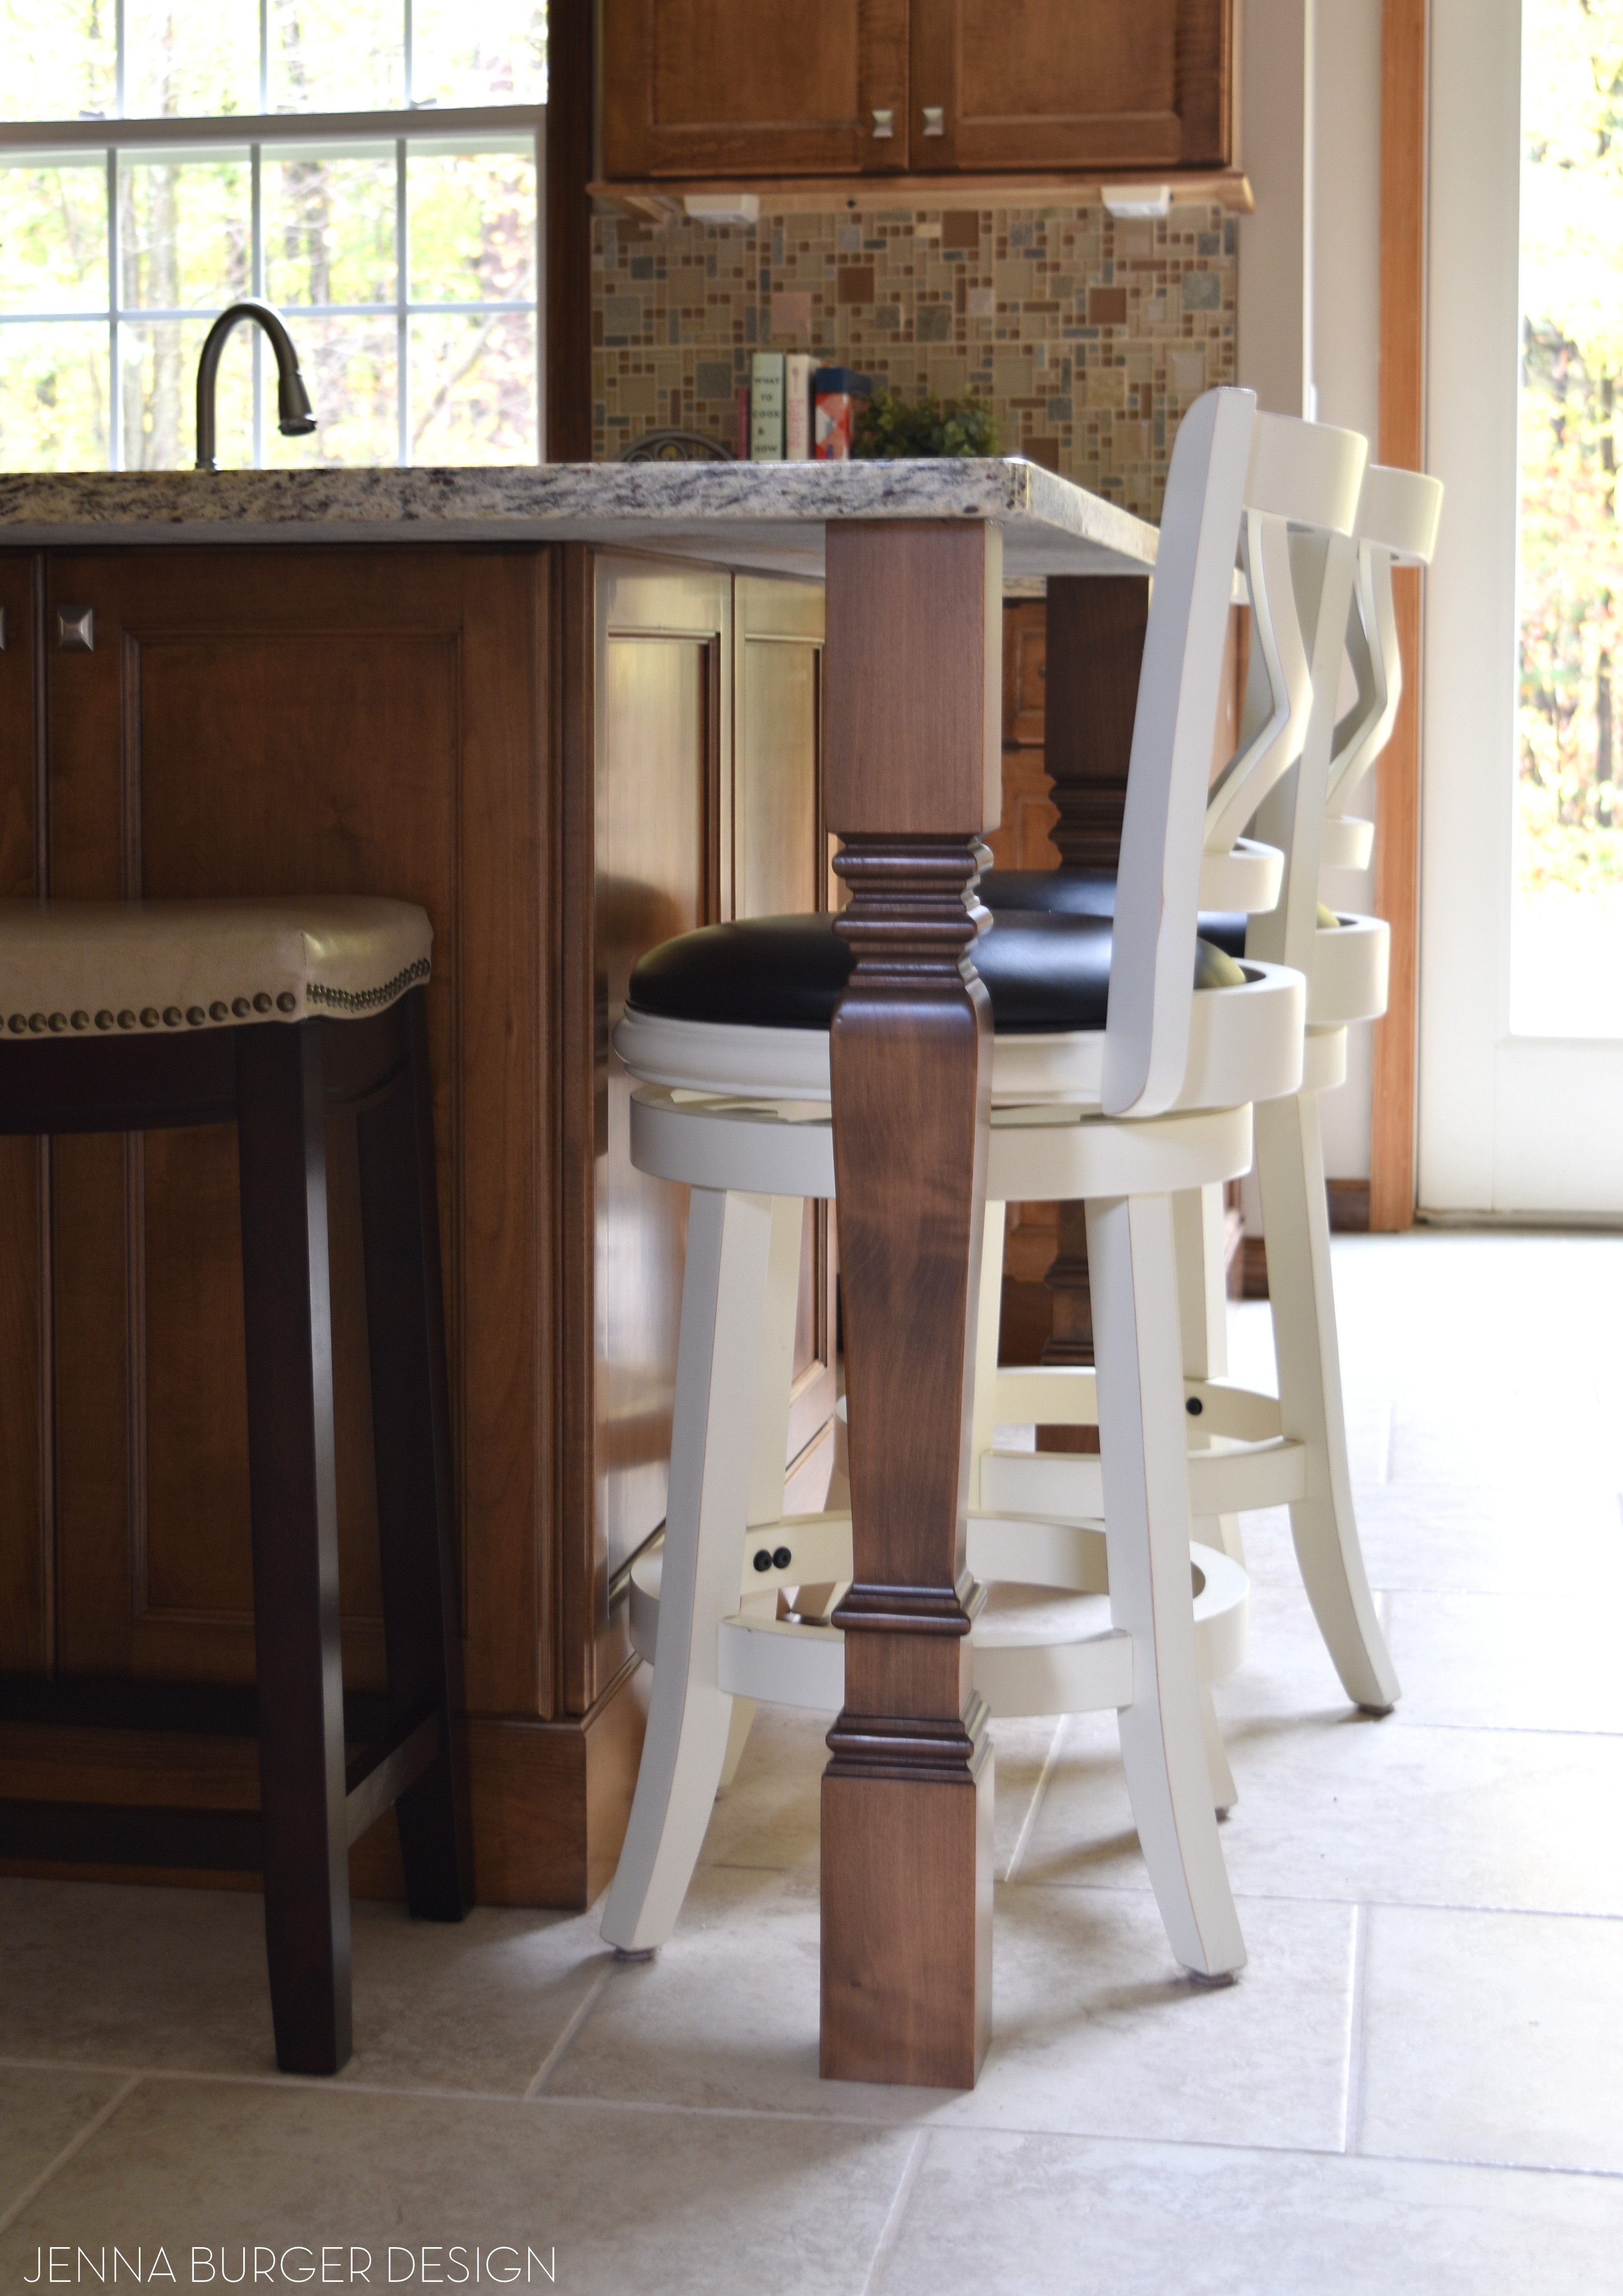
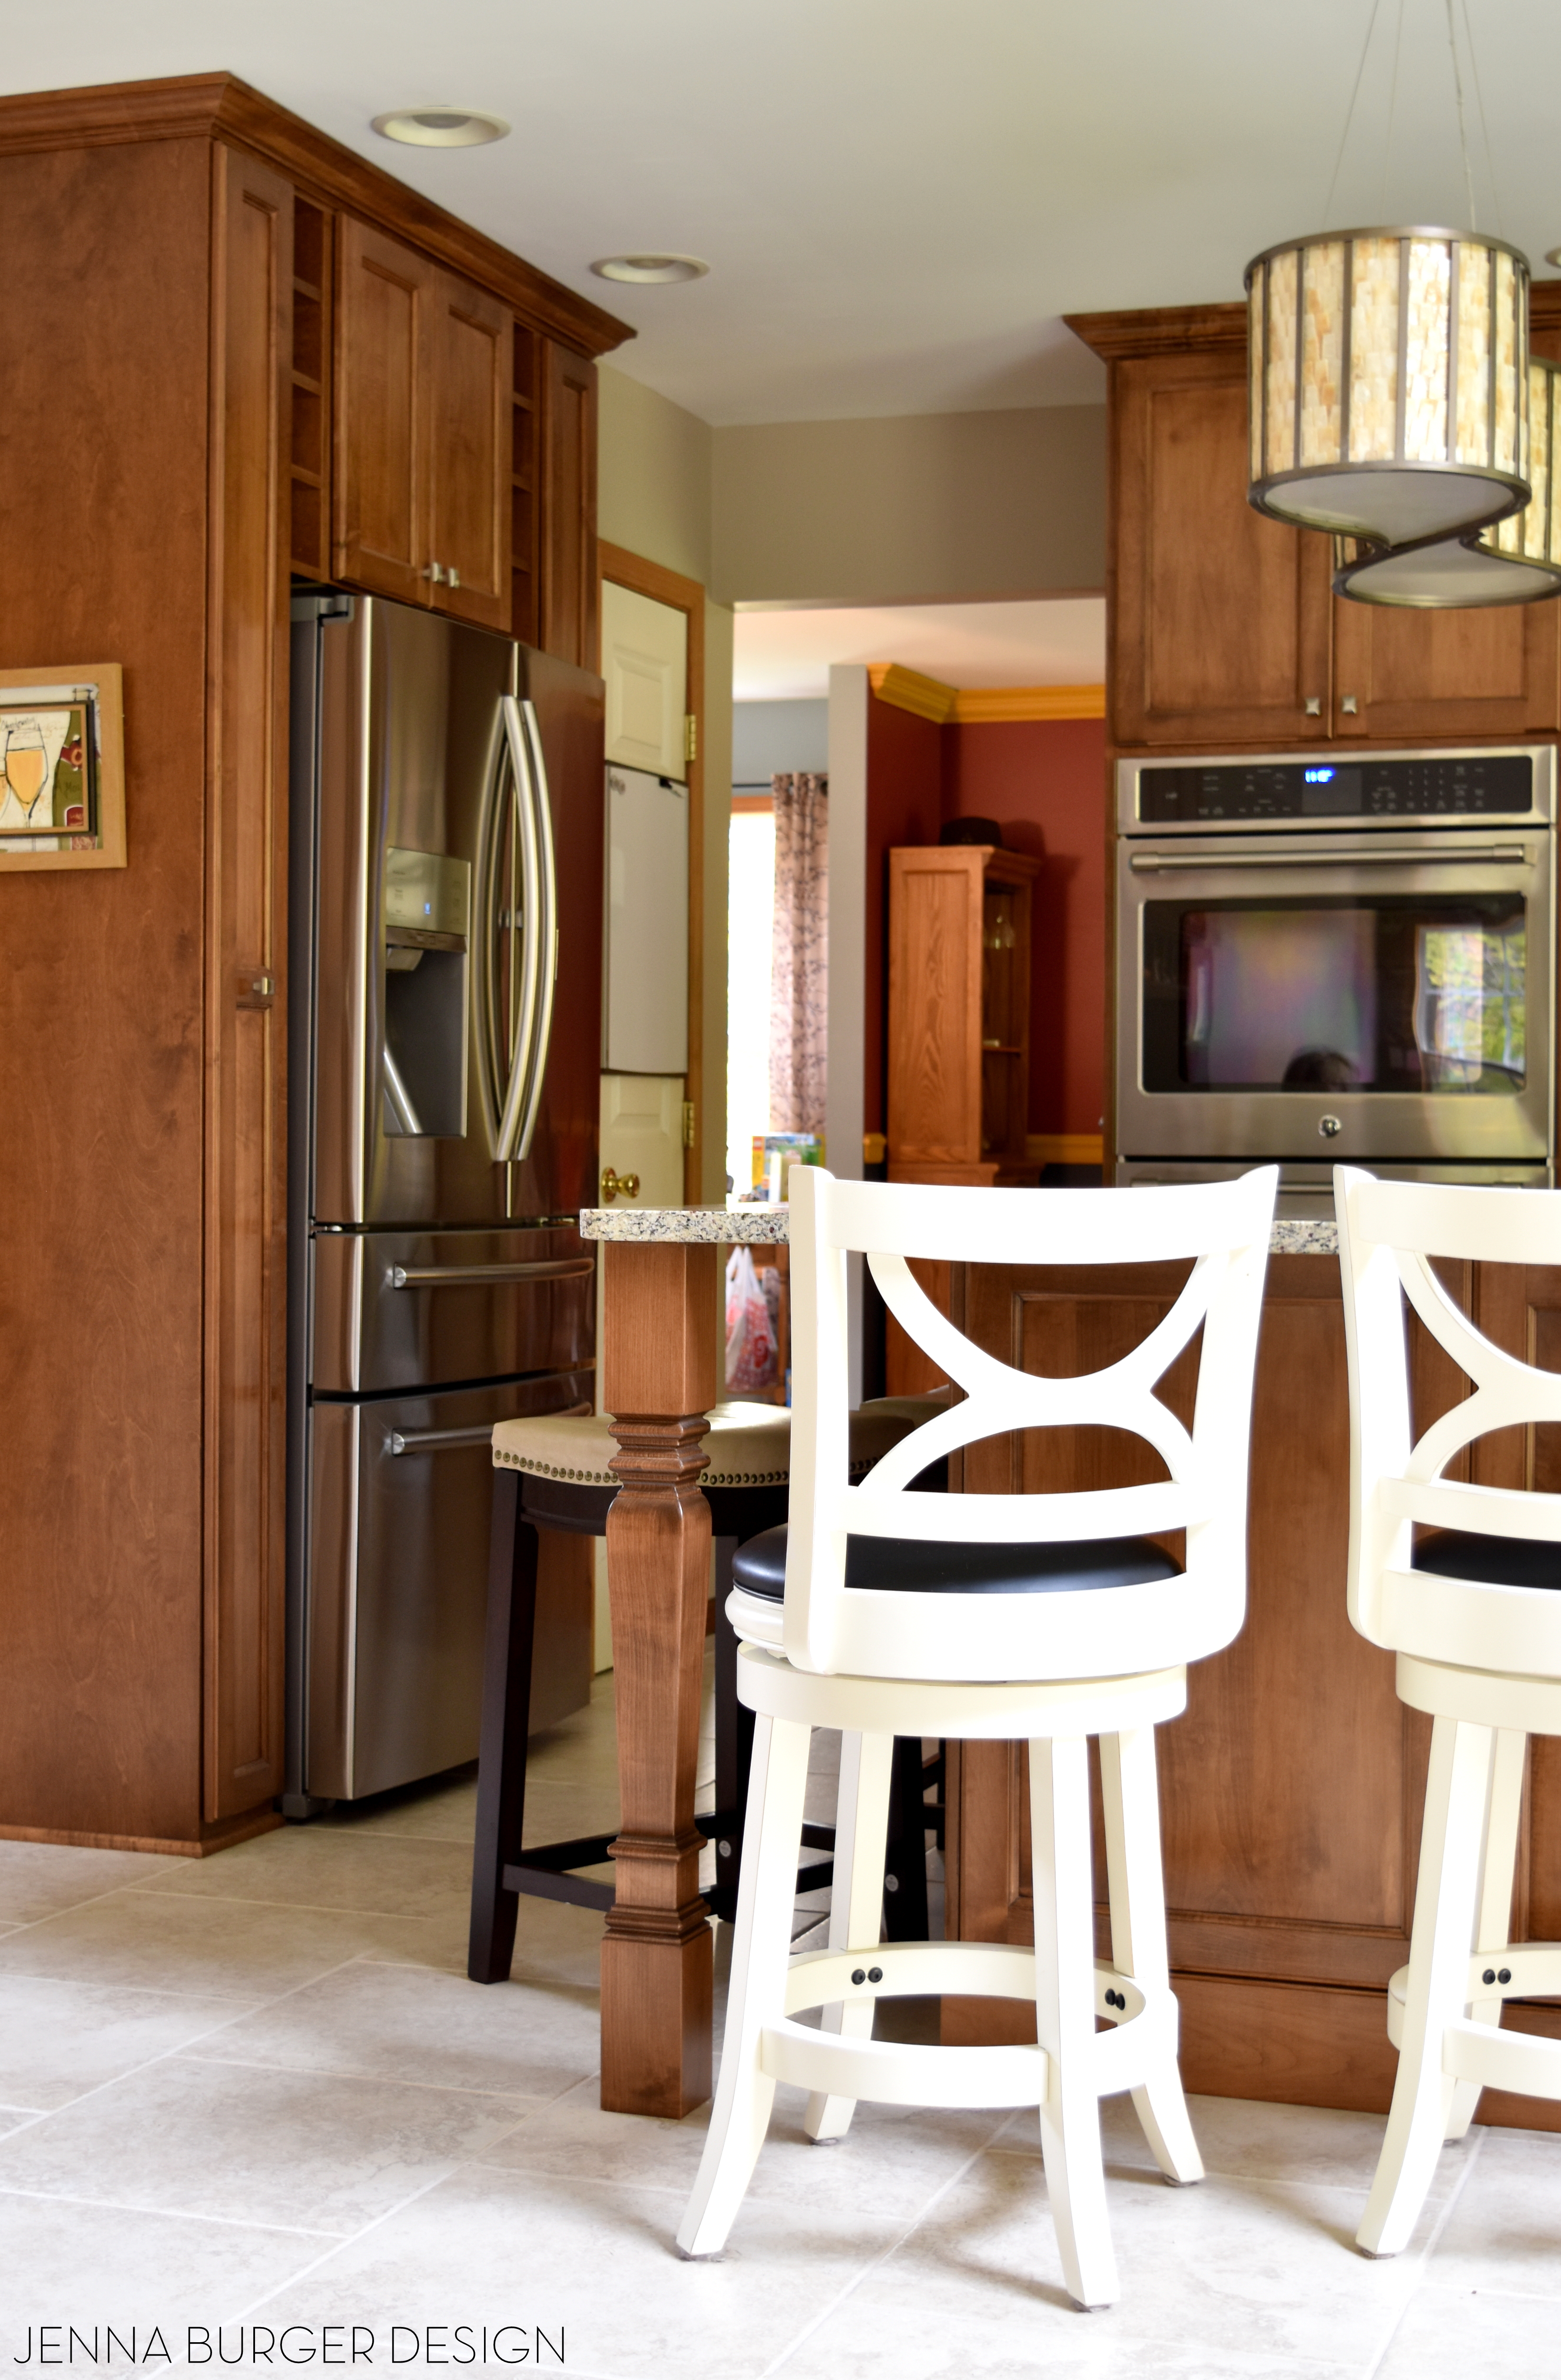
Cream colored counter stools beautifully compliment the stained cabinets.

Stunning Stained Kitchen REVEAL: before & after of a kitchen renovation by www.jennaburger.com

The home is a combination of hardwood, carpet, and tile. The tile for this kitchen continues from the foyer and it’s a 18 x 18 ceramic with a staggered layout. It’s lighter tone is the perfect backdrop to the darker cabinets.

Stunning Stained Kitchen REVEAL: before & after of a kitchen renovation by www.jennaburger.com

Stunning Stained Kitchen REVEAL: before & after of a kitchen renovation by www.jennaburger.com

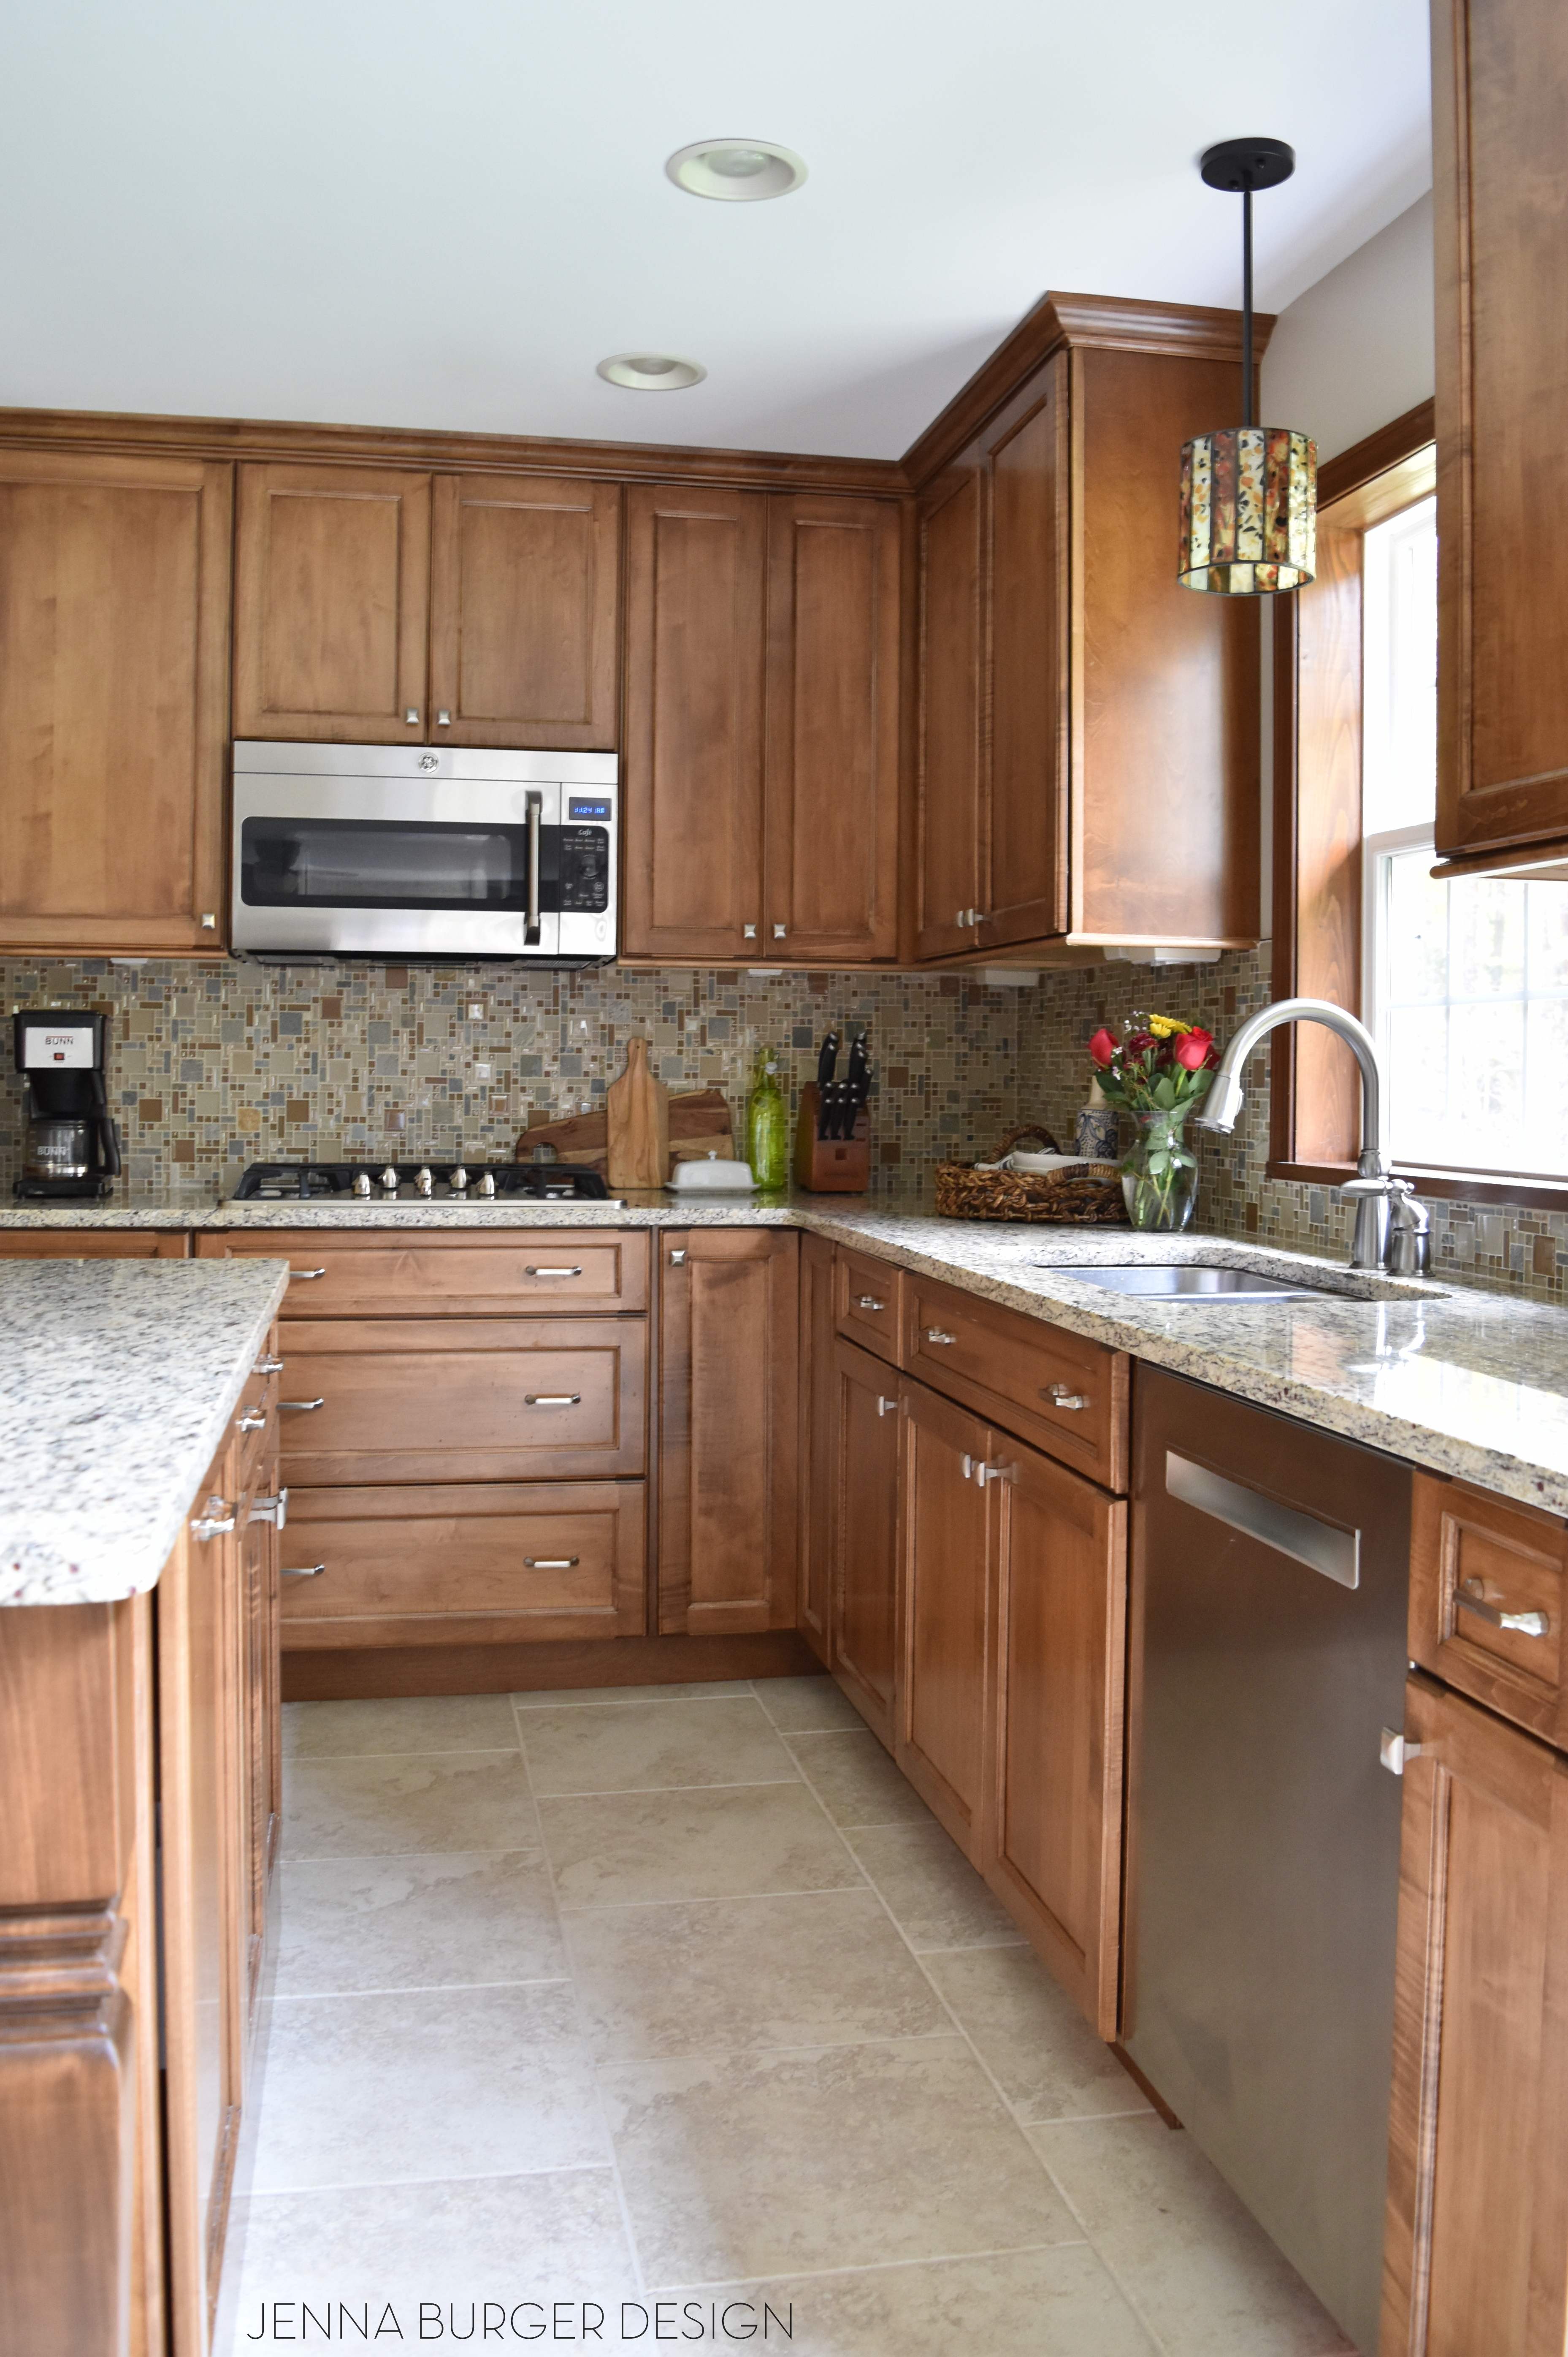
When it came time to choose the countertop and backsplash, it was important to select something that enhanced the beauty + tones of the stained cabinets. We decided on a granite that has flecks of caramel, black, and taupes – it’s so rich with lots of depth. For the backplash, a mosaic with varying-sized square glass pieces was what suited the clients style best.

Stunning Stained Kitchen REVEAL: before & after of a kitchen renovation by www.jennaburger.com

Stunning Stained Kitchen REVEAL: before & after of a kitchen renovation by www.jennaburger.com

Stunning Stained Kitchen REVEAL: before & after of a kitchen renovation by www.jennaburger.com

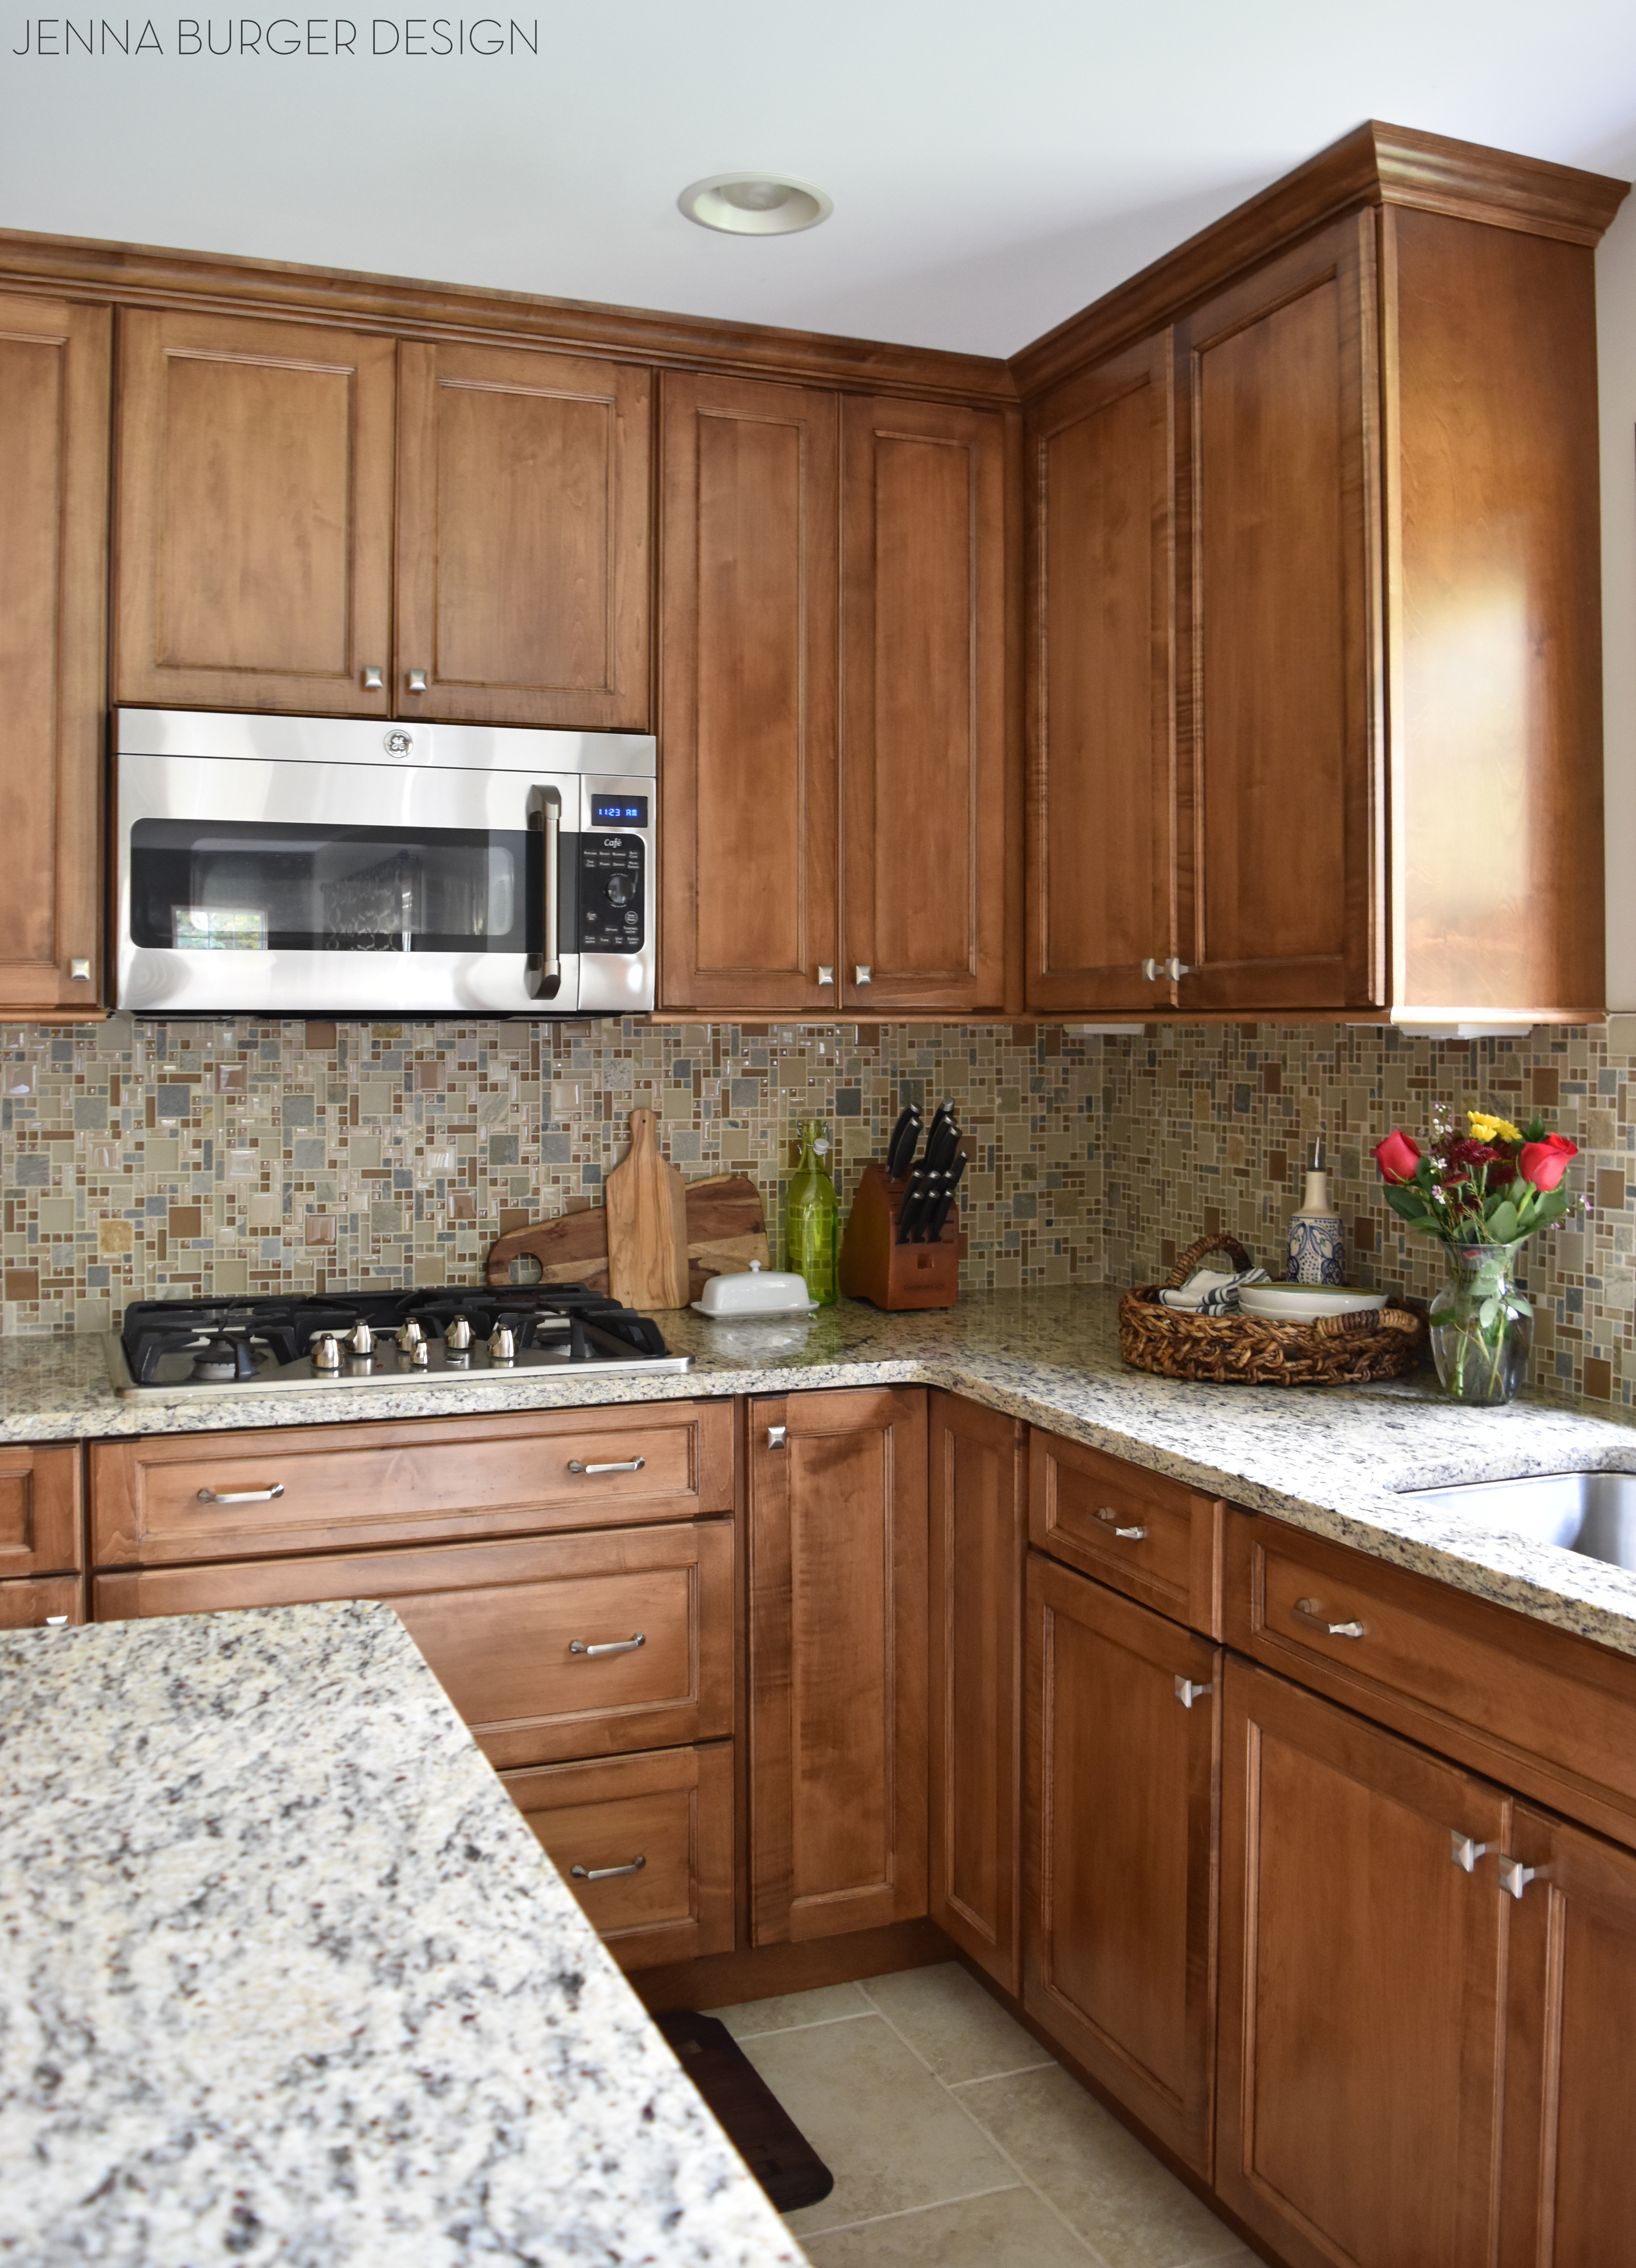
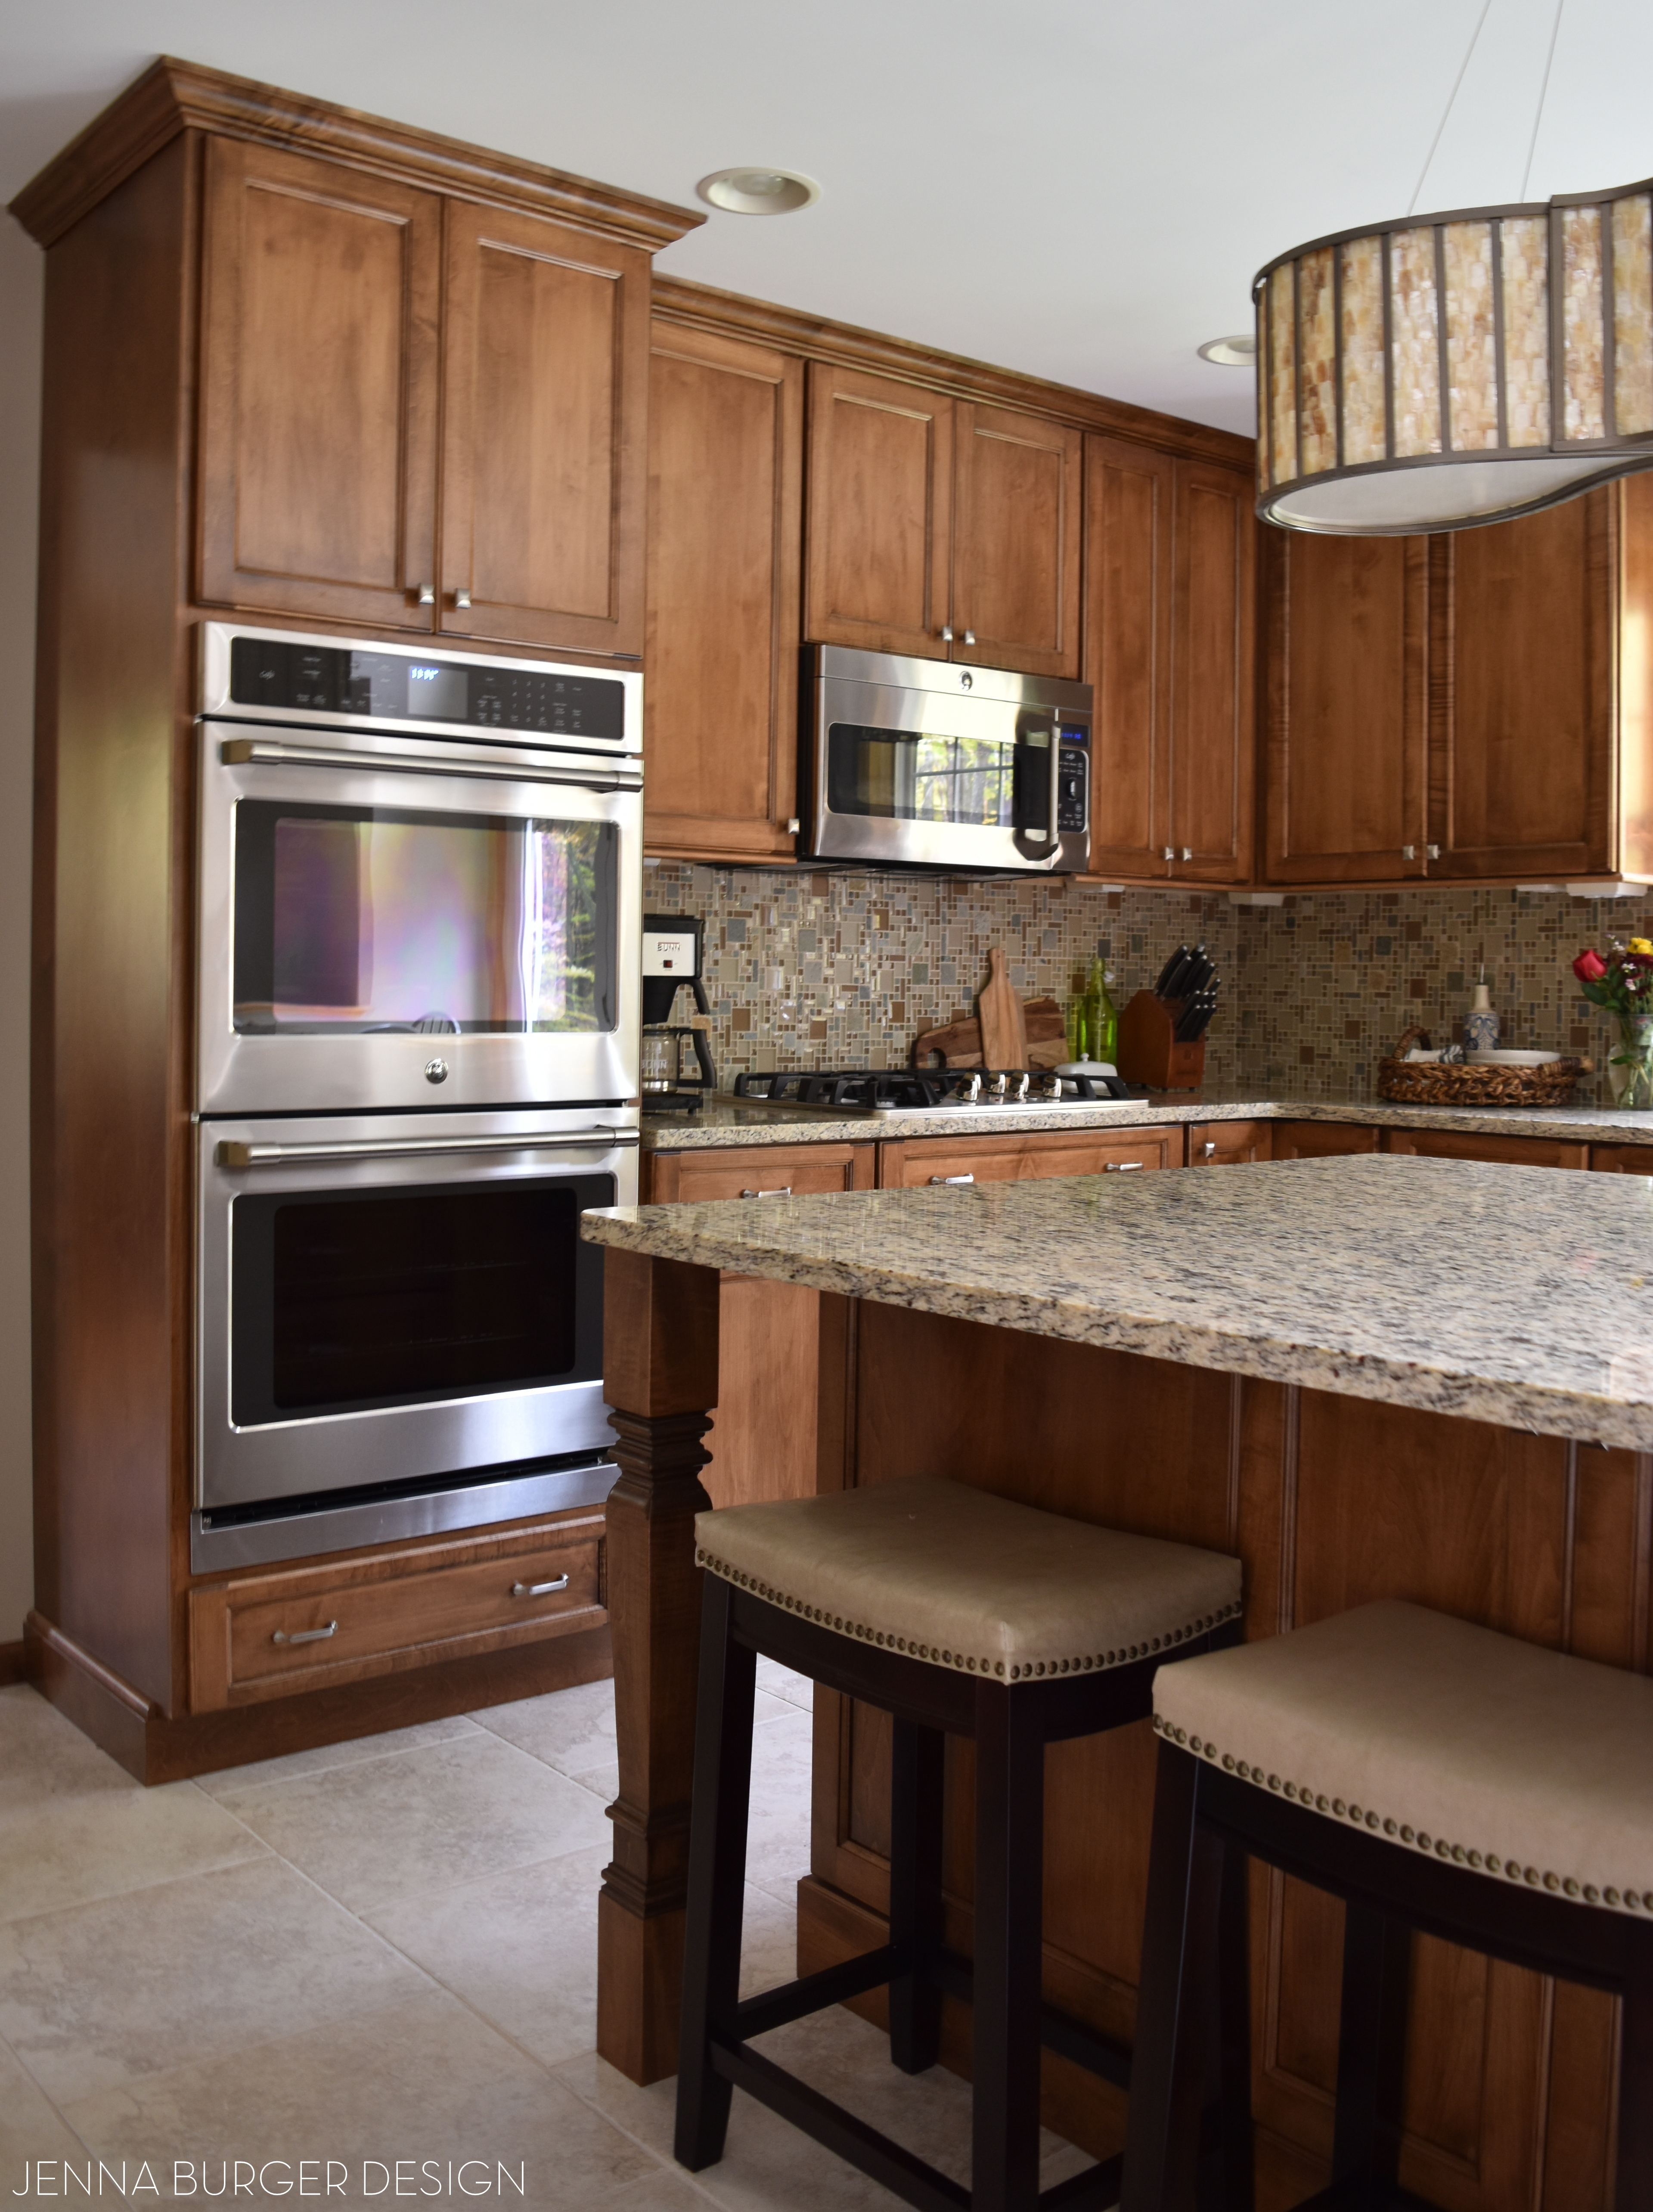
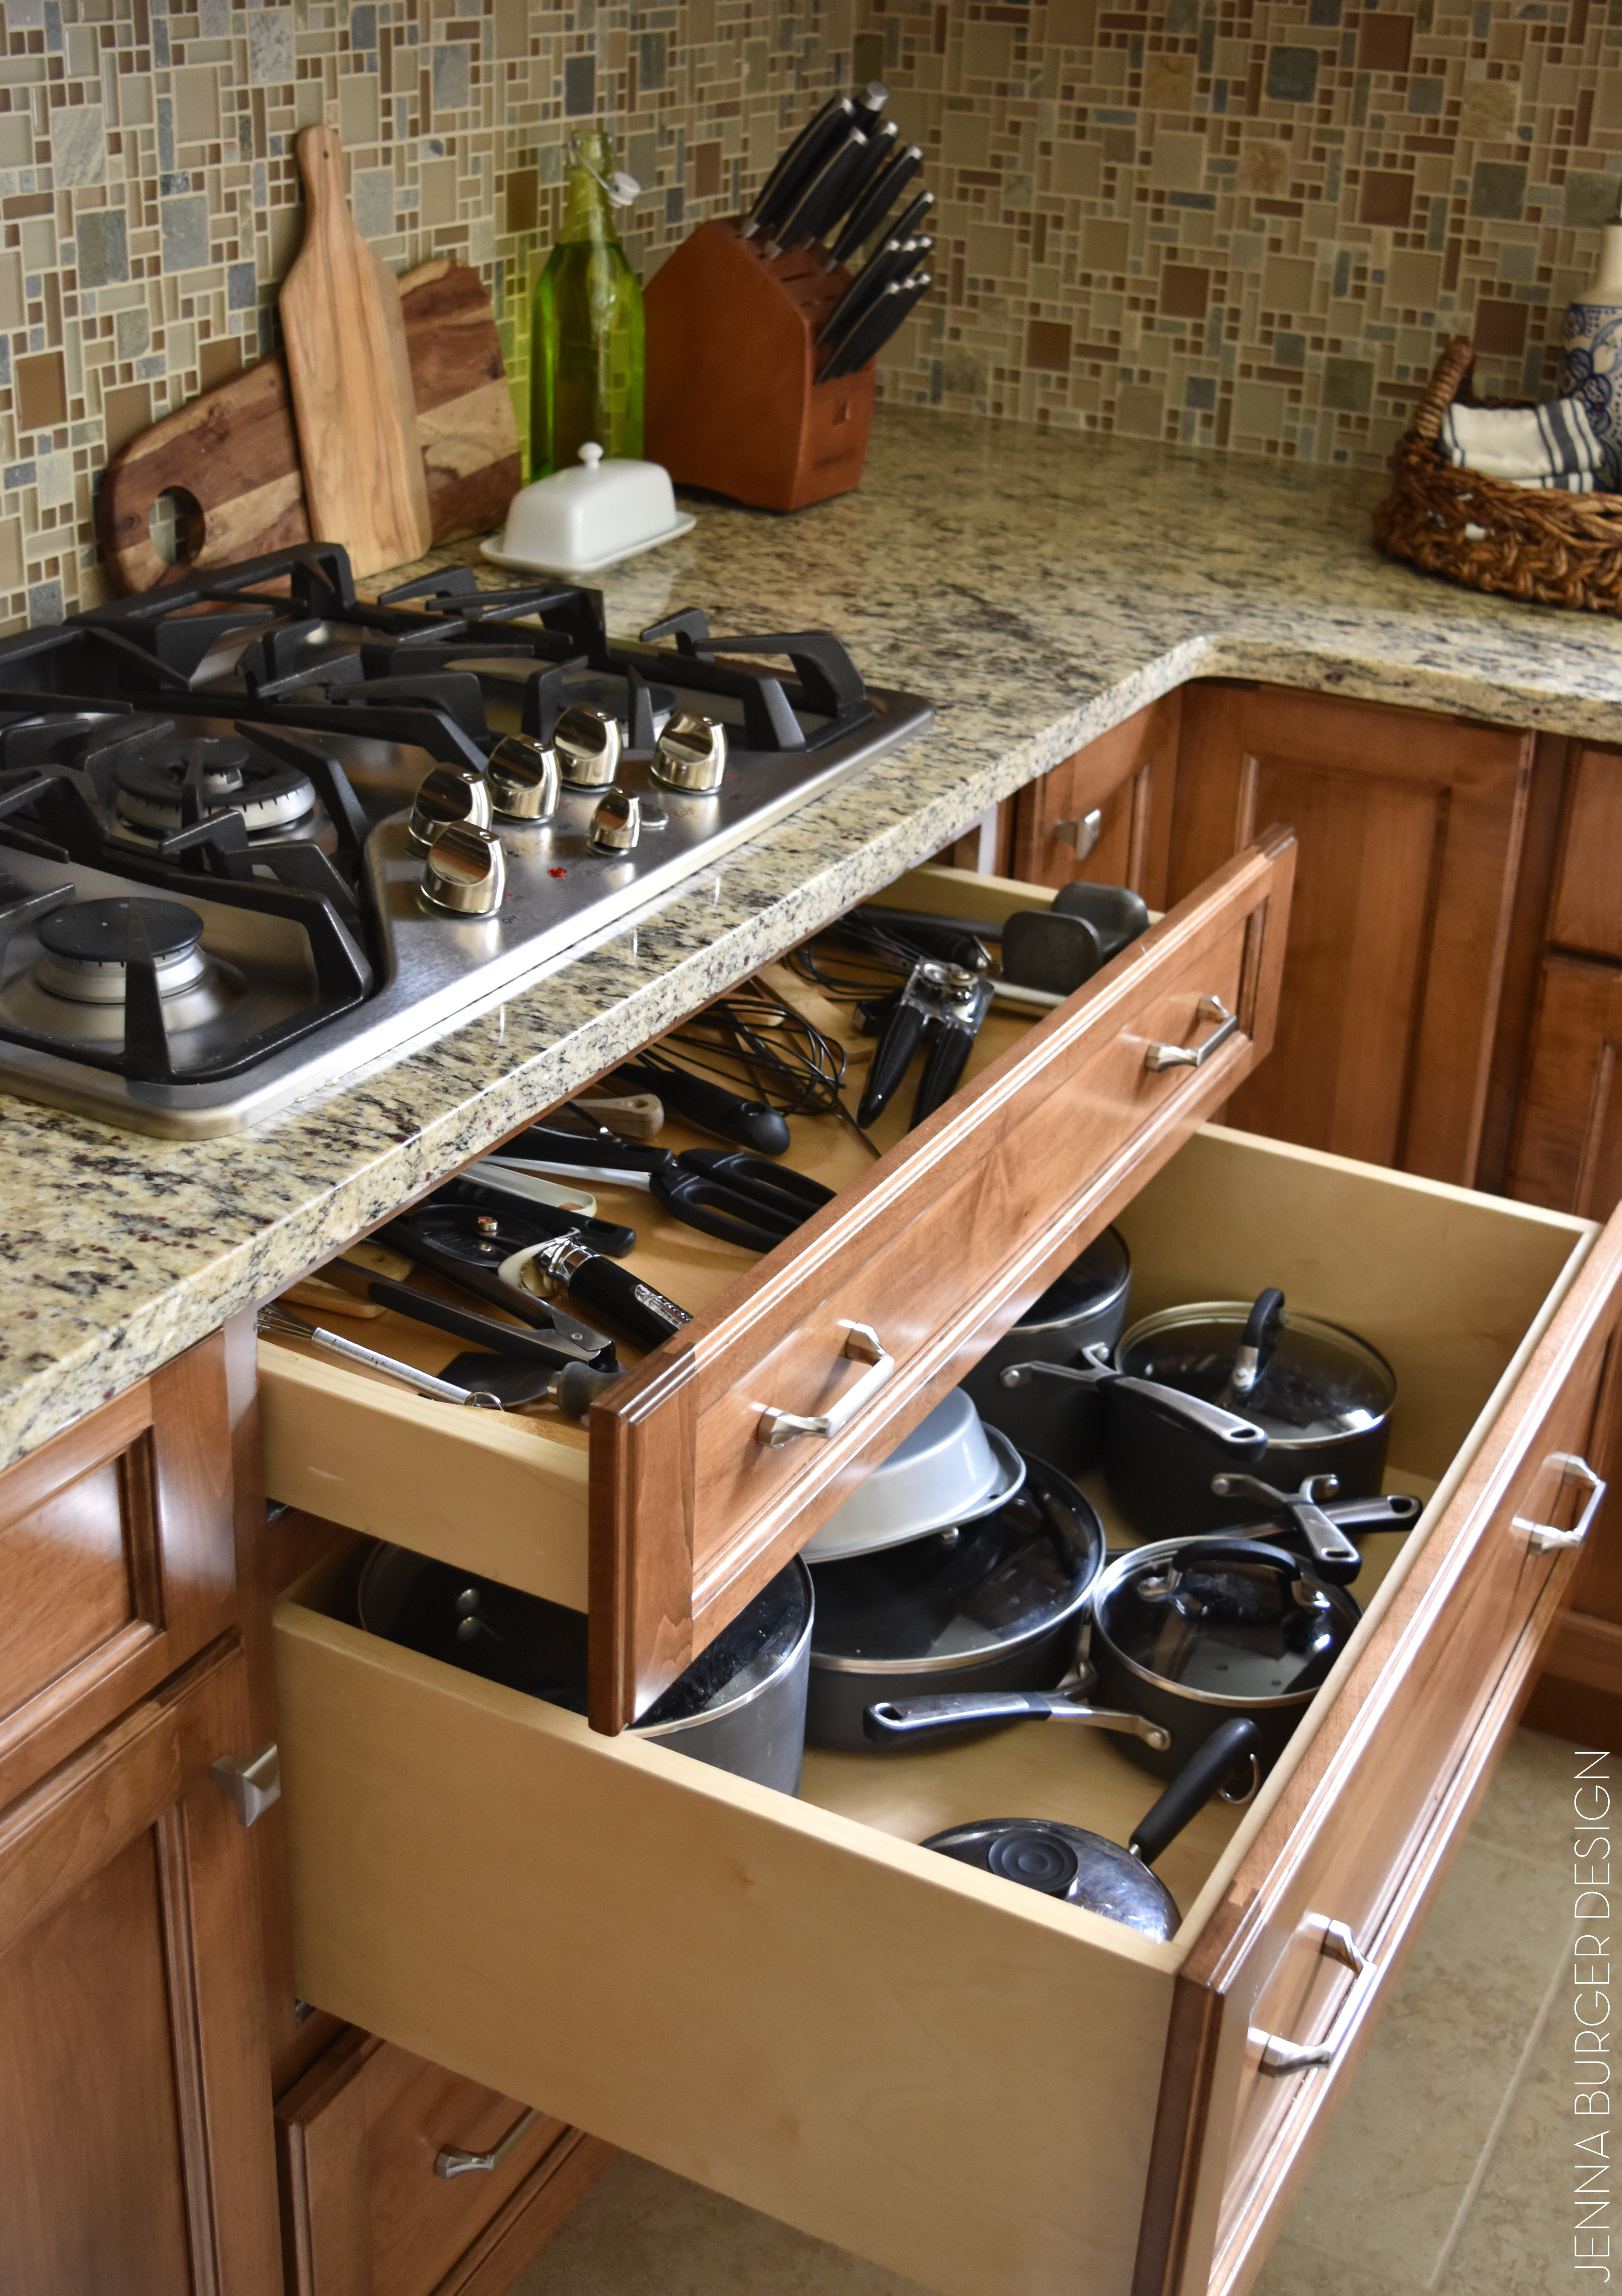
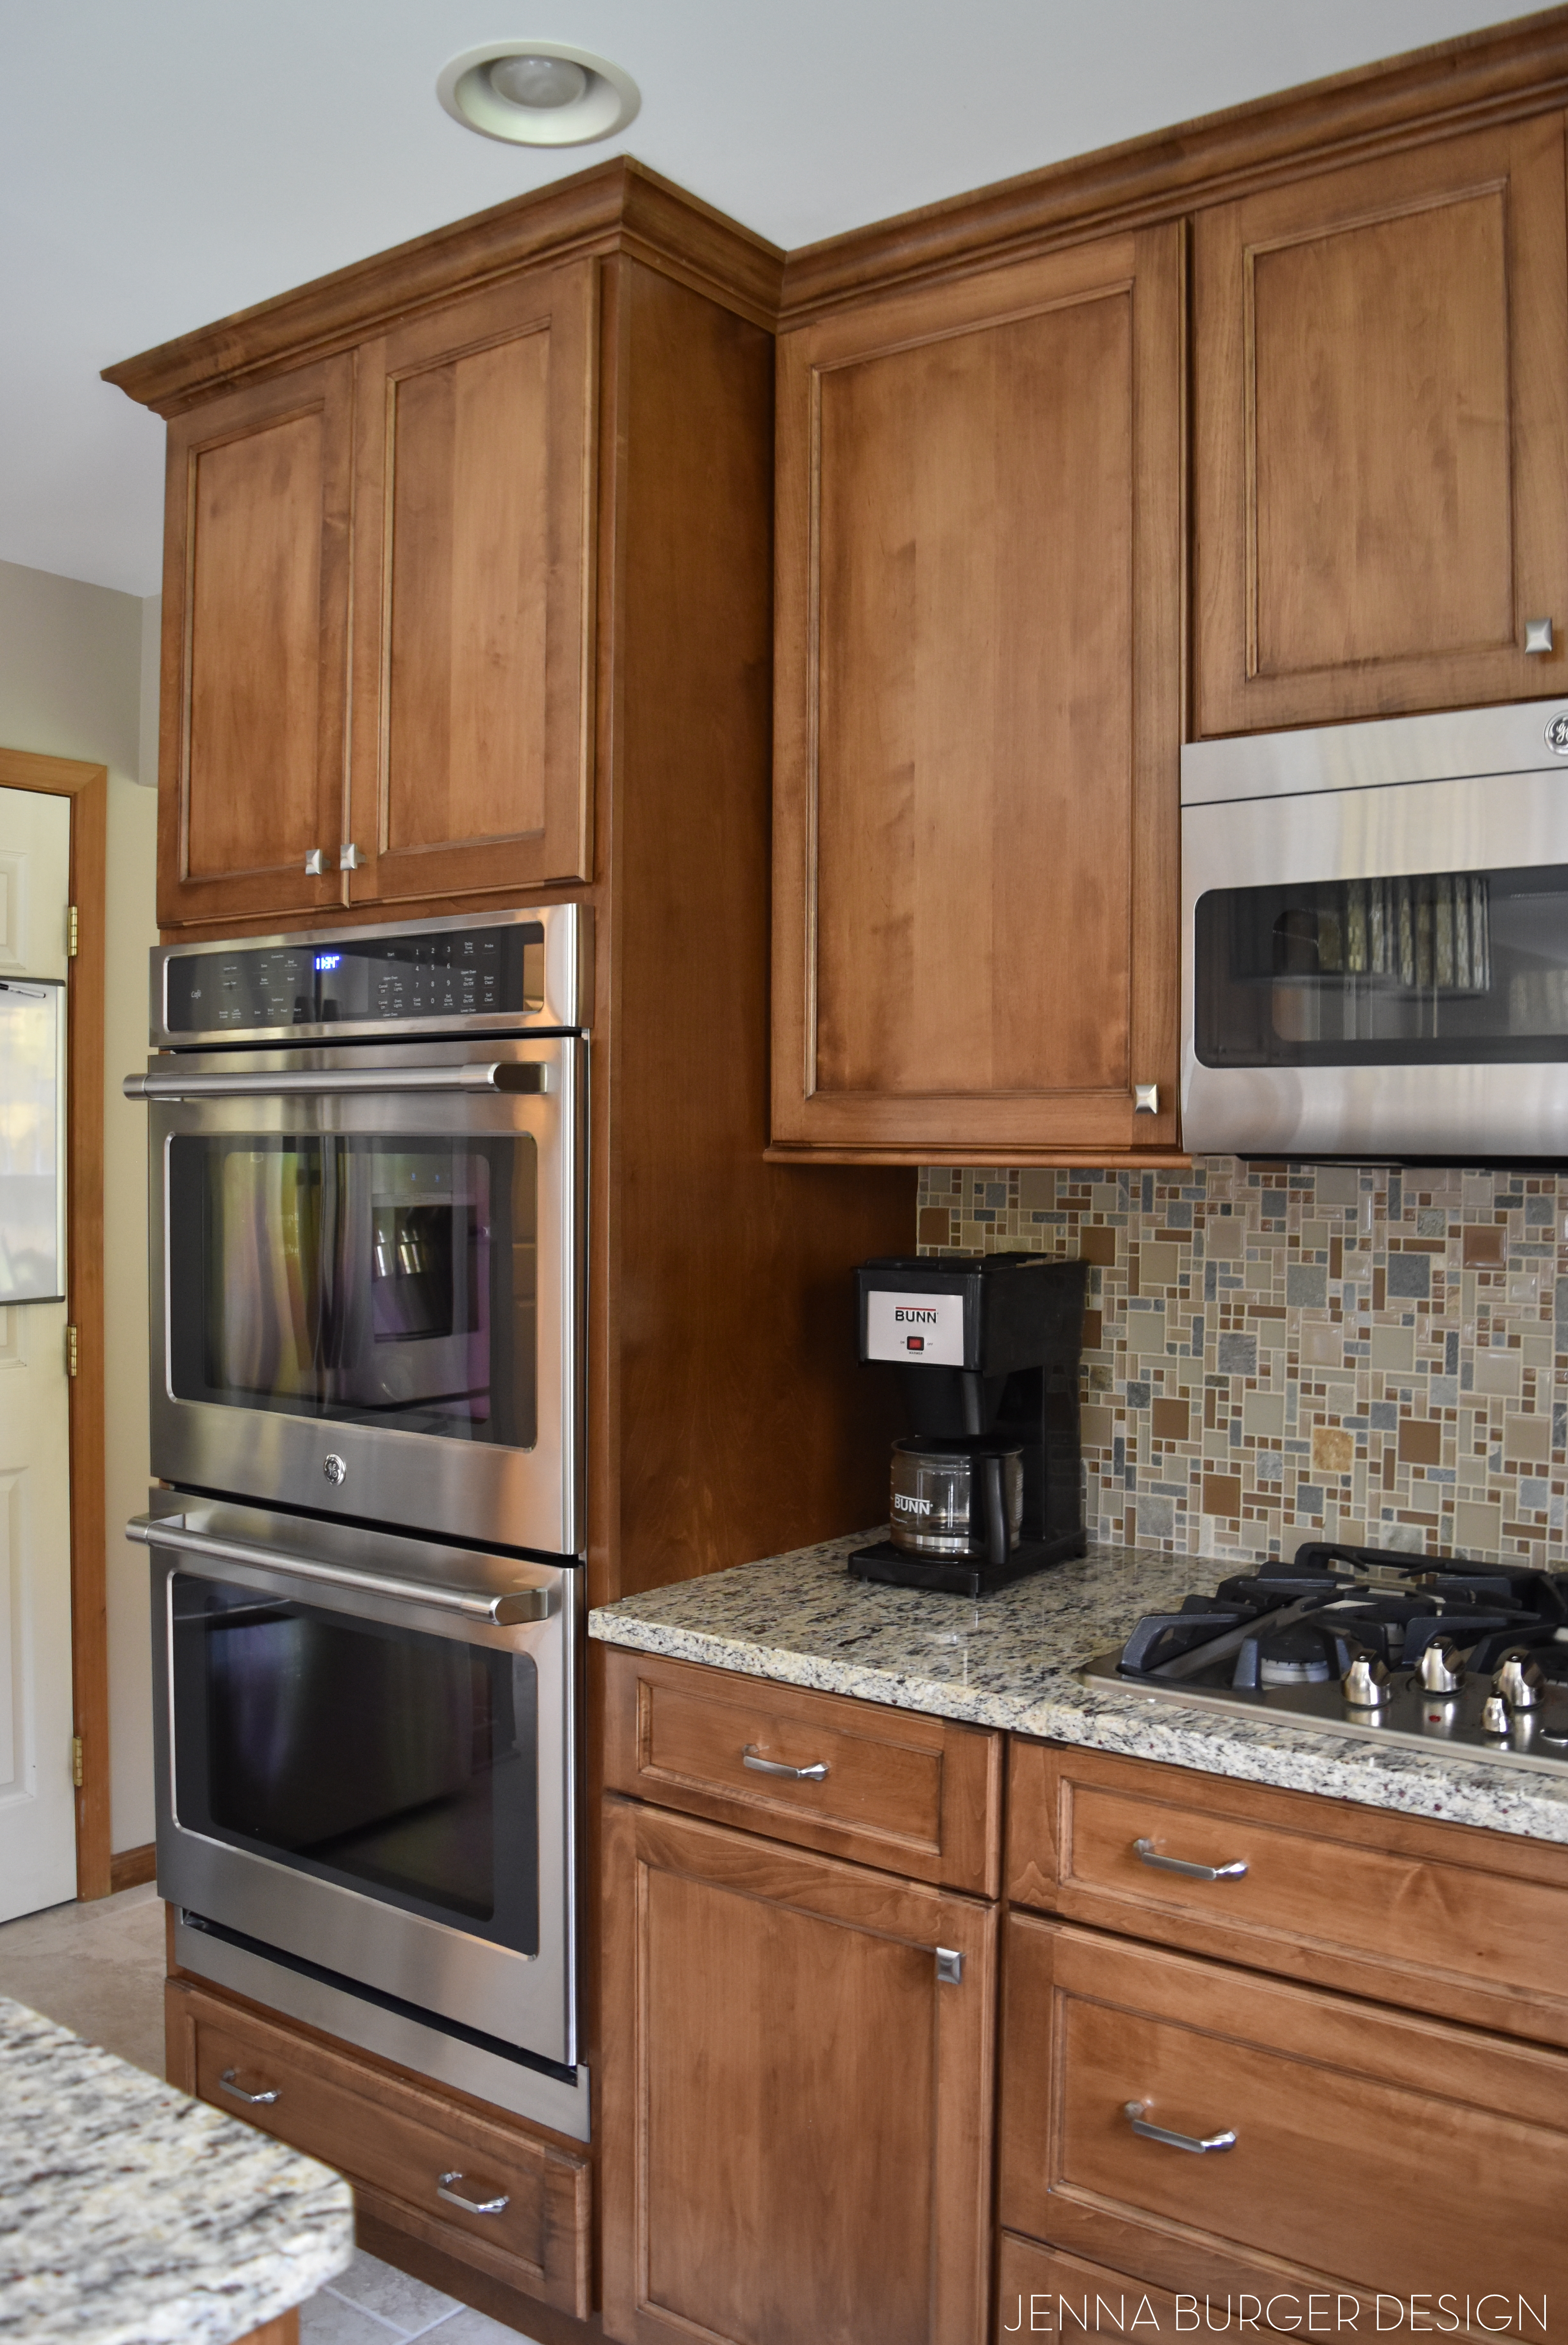
The cooktop is set into the counter and 3 roll-out drawers were added underneath which gives ample storage for pots, pans, and cooking utensils.

Stunning Stained Kitchen REVEAL: before & after of a kitchen renovation by www.jennaburger.com

Stunning Stained Kitchen REVEAL: before & after of a kitchen renovation by www.jennaburger.com

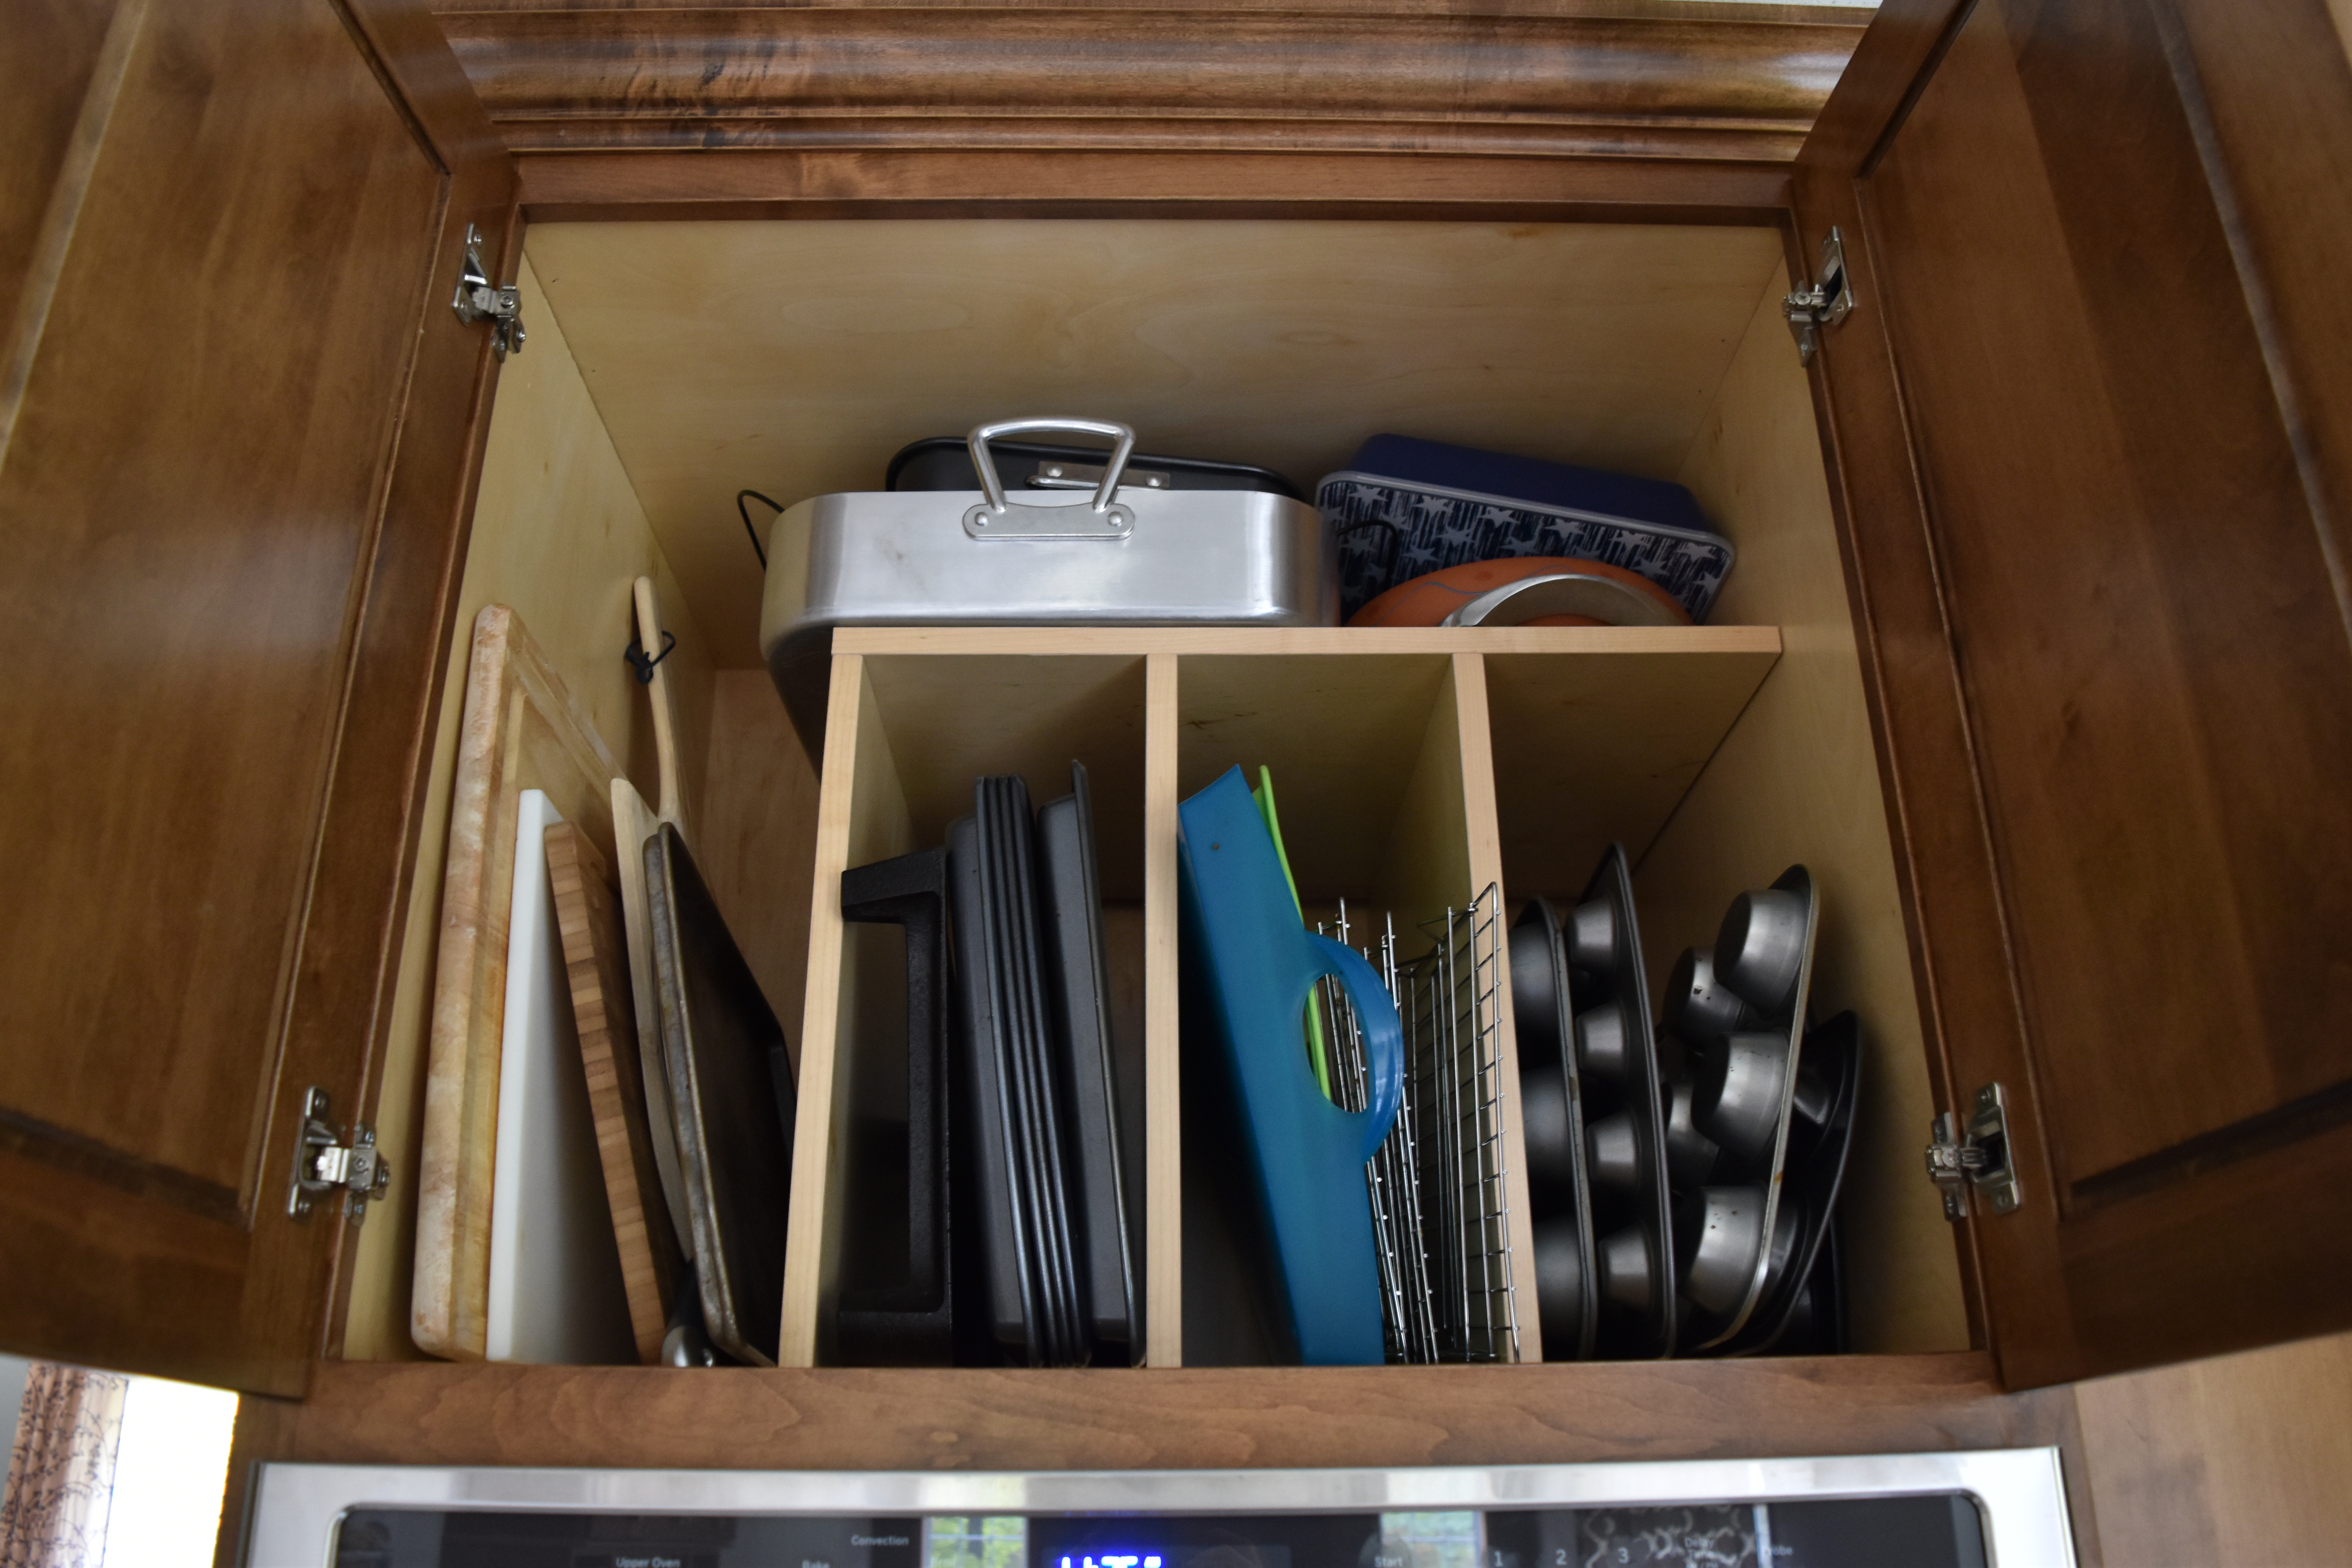
A double oven sits to the left of the cooktop. Above is full-depth vertical dividers for large trays and platters.

Stunning Stained Kitchen REVEAL: before & after of a kitchen renovation by www.jennaburger.com

Vertical cabinet storage above a refrigerator or oven in a kitchen

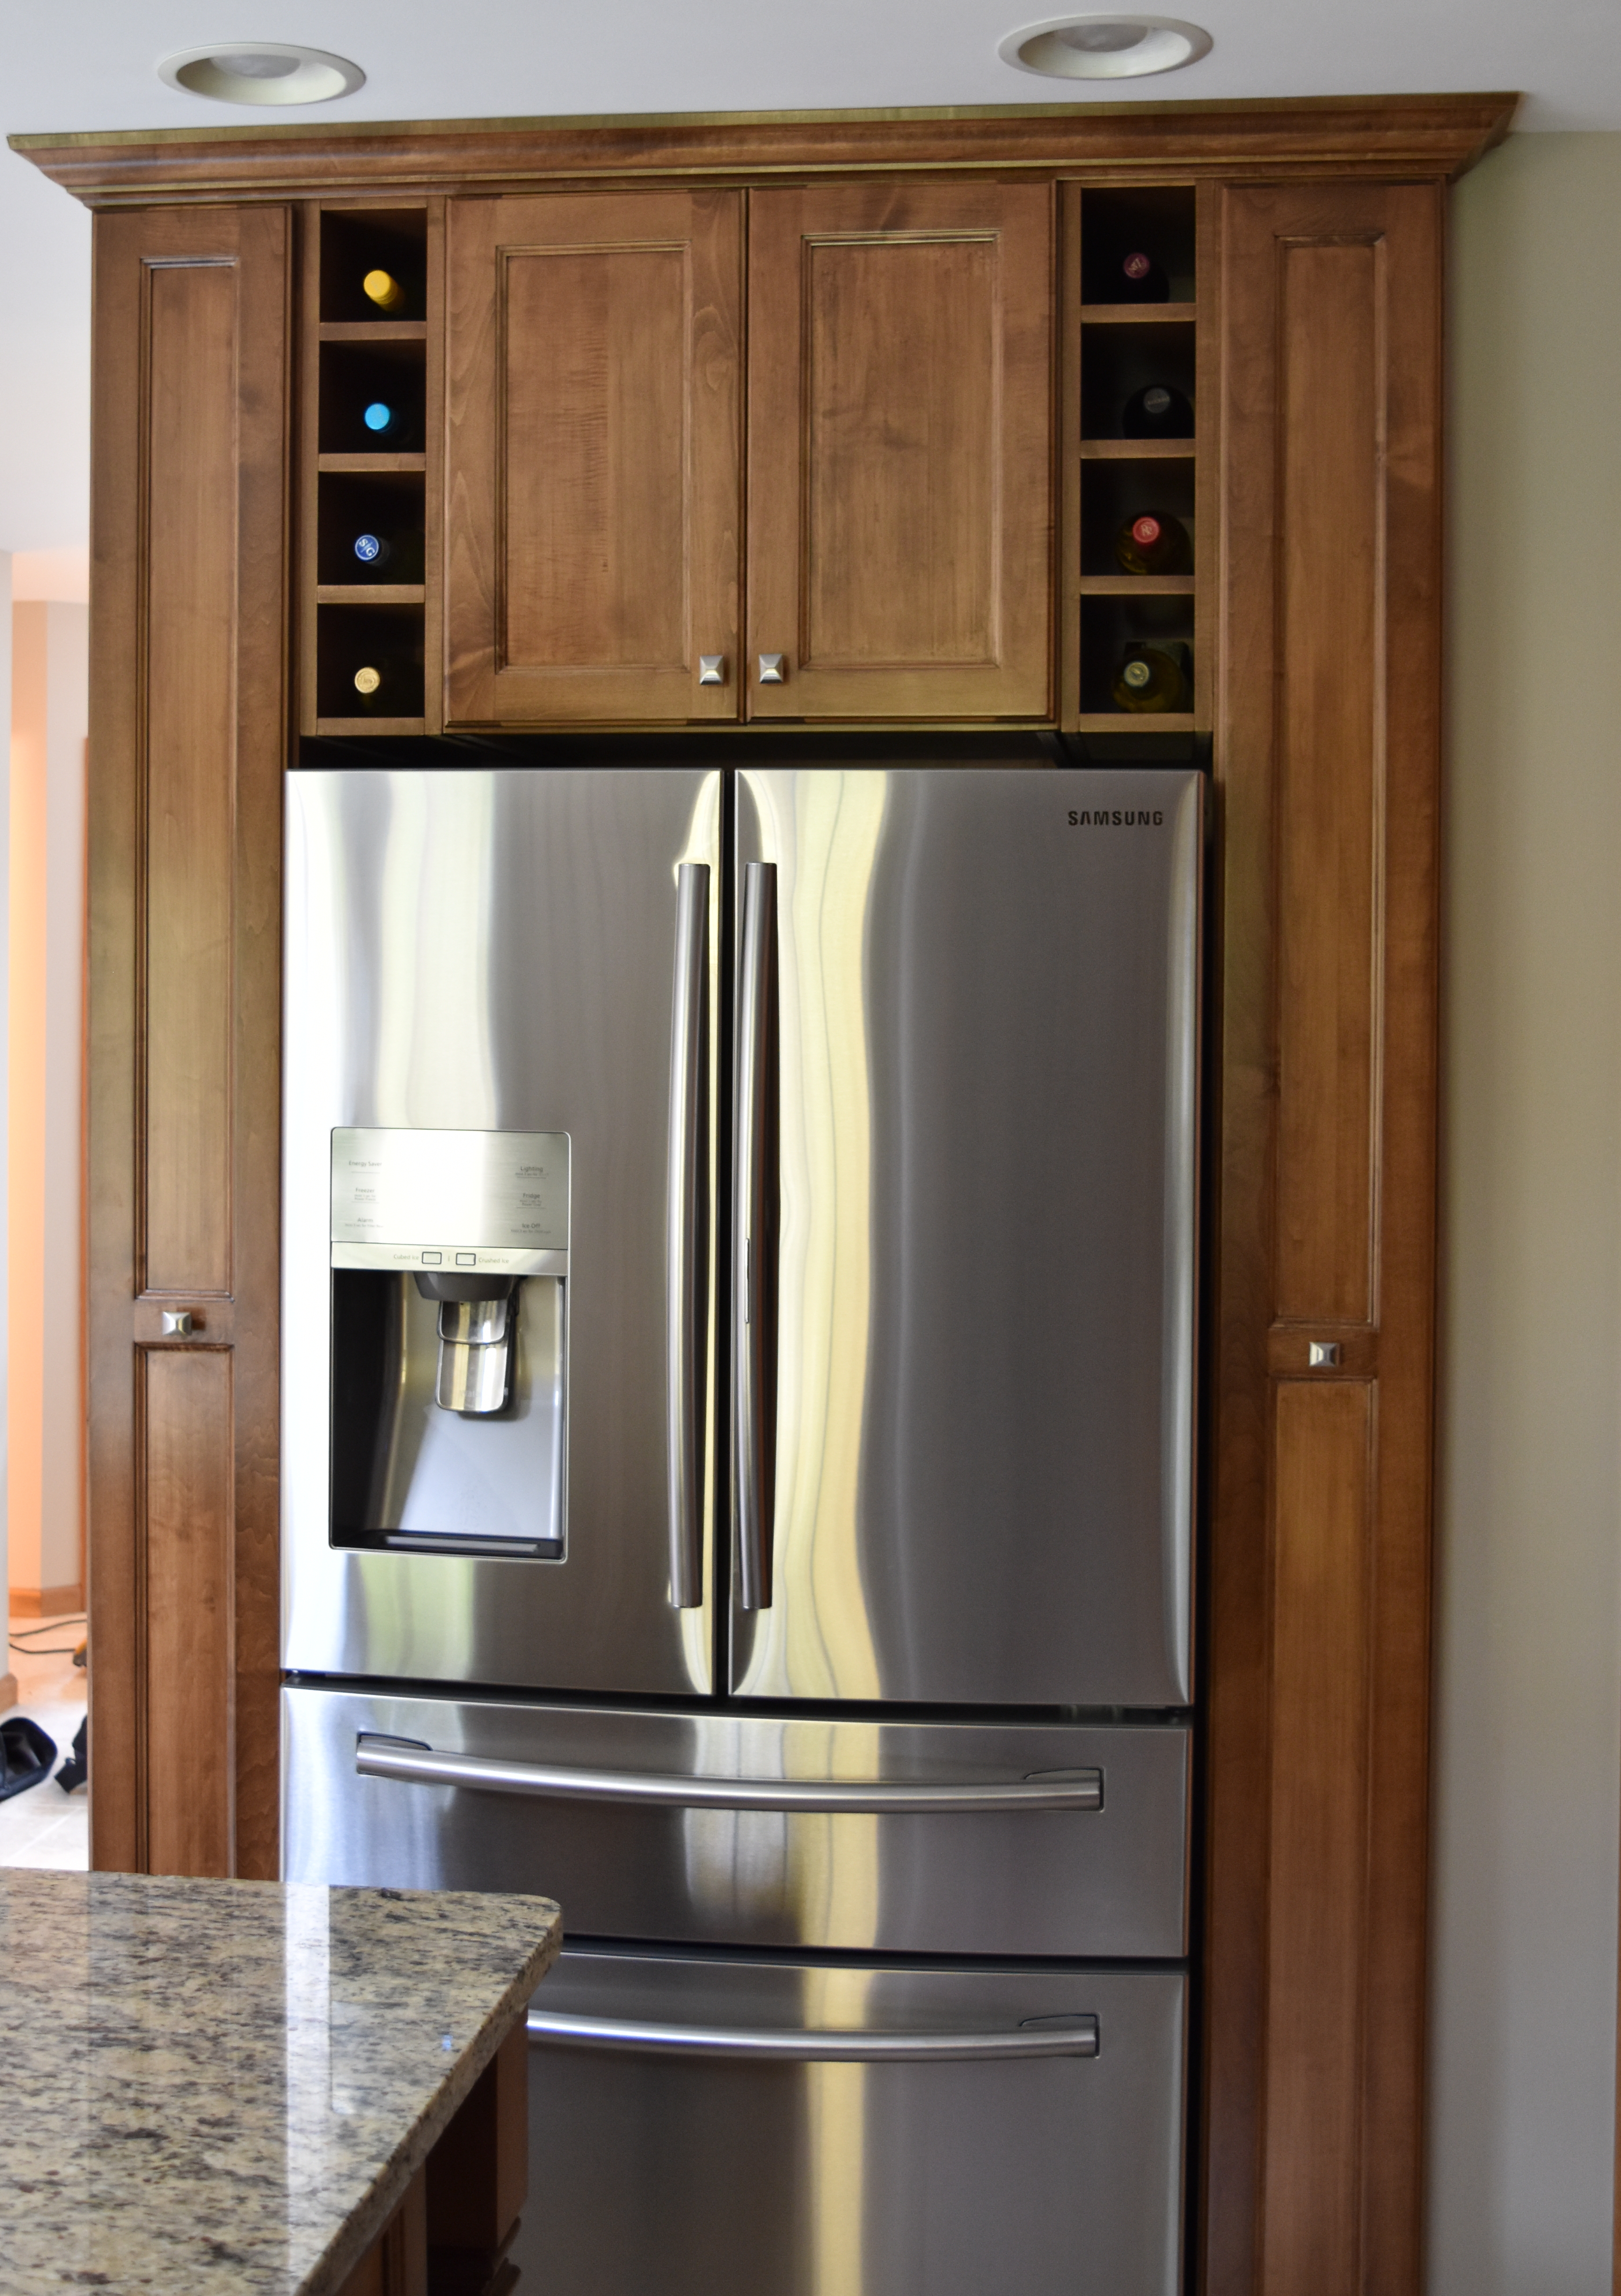
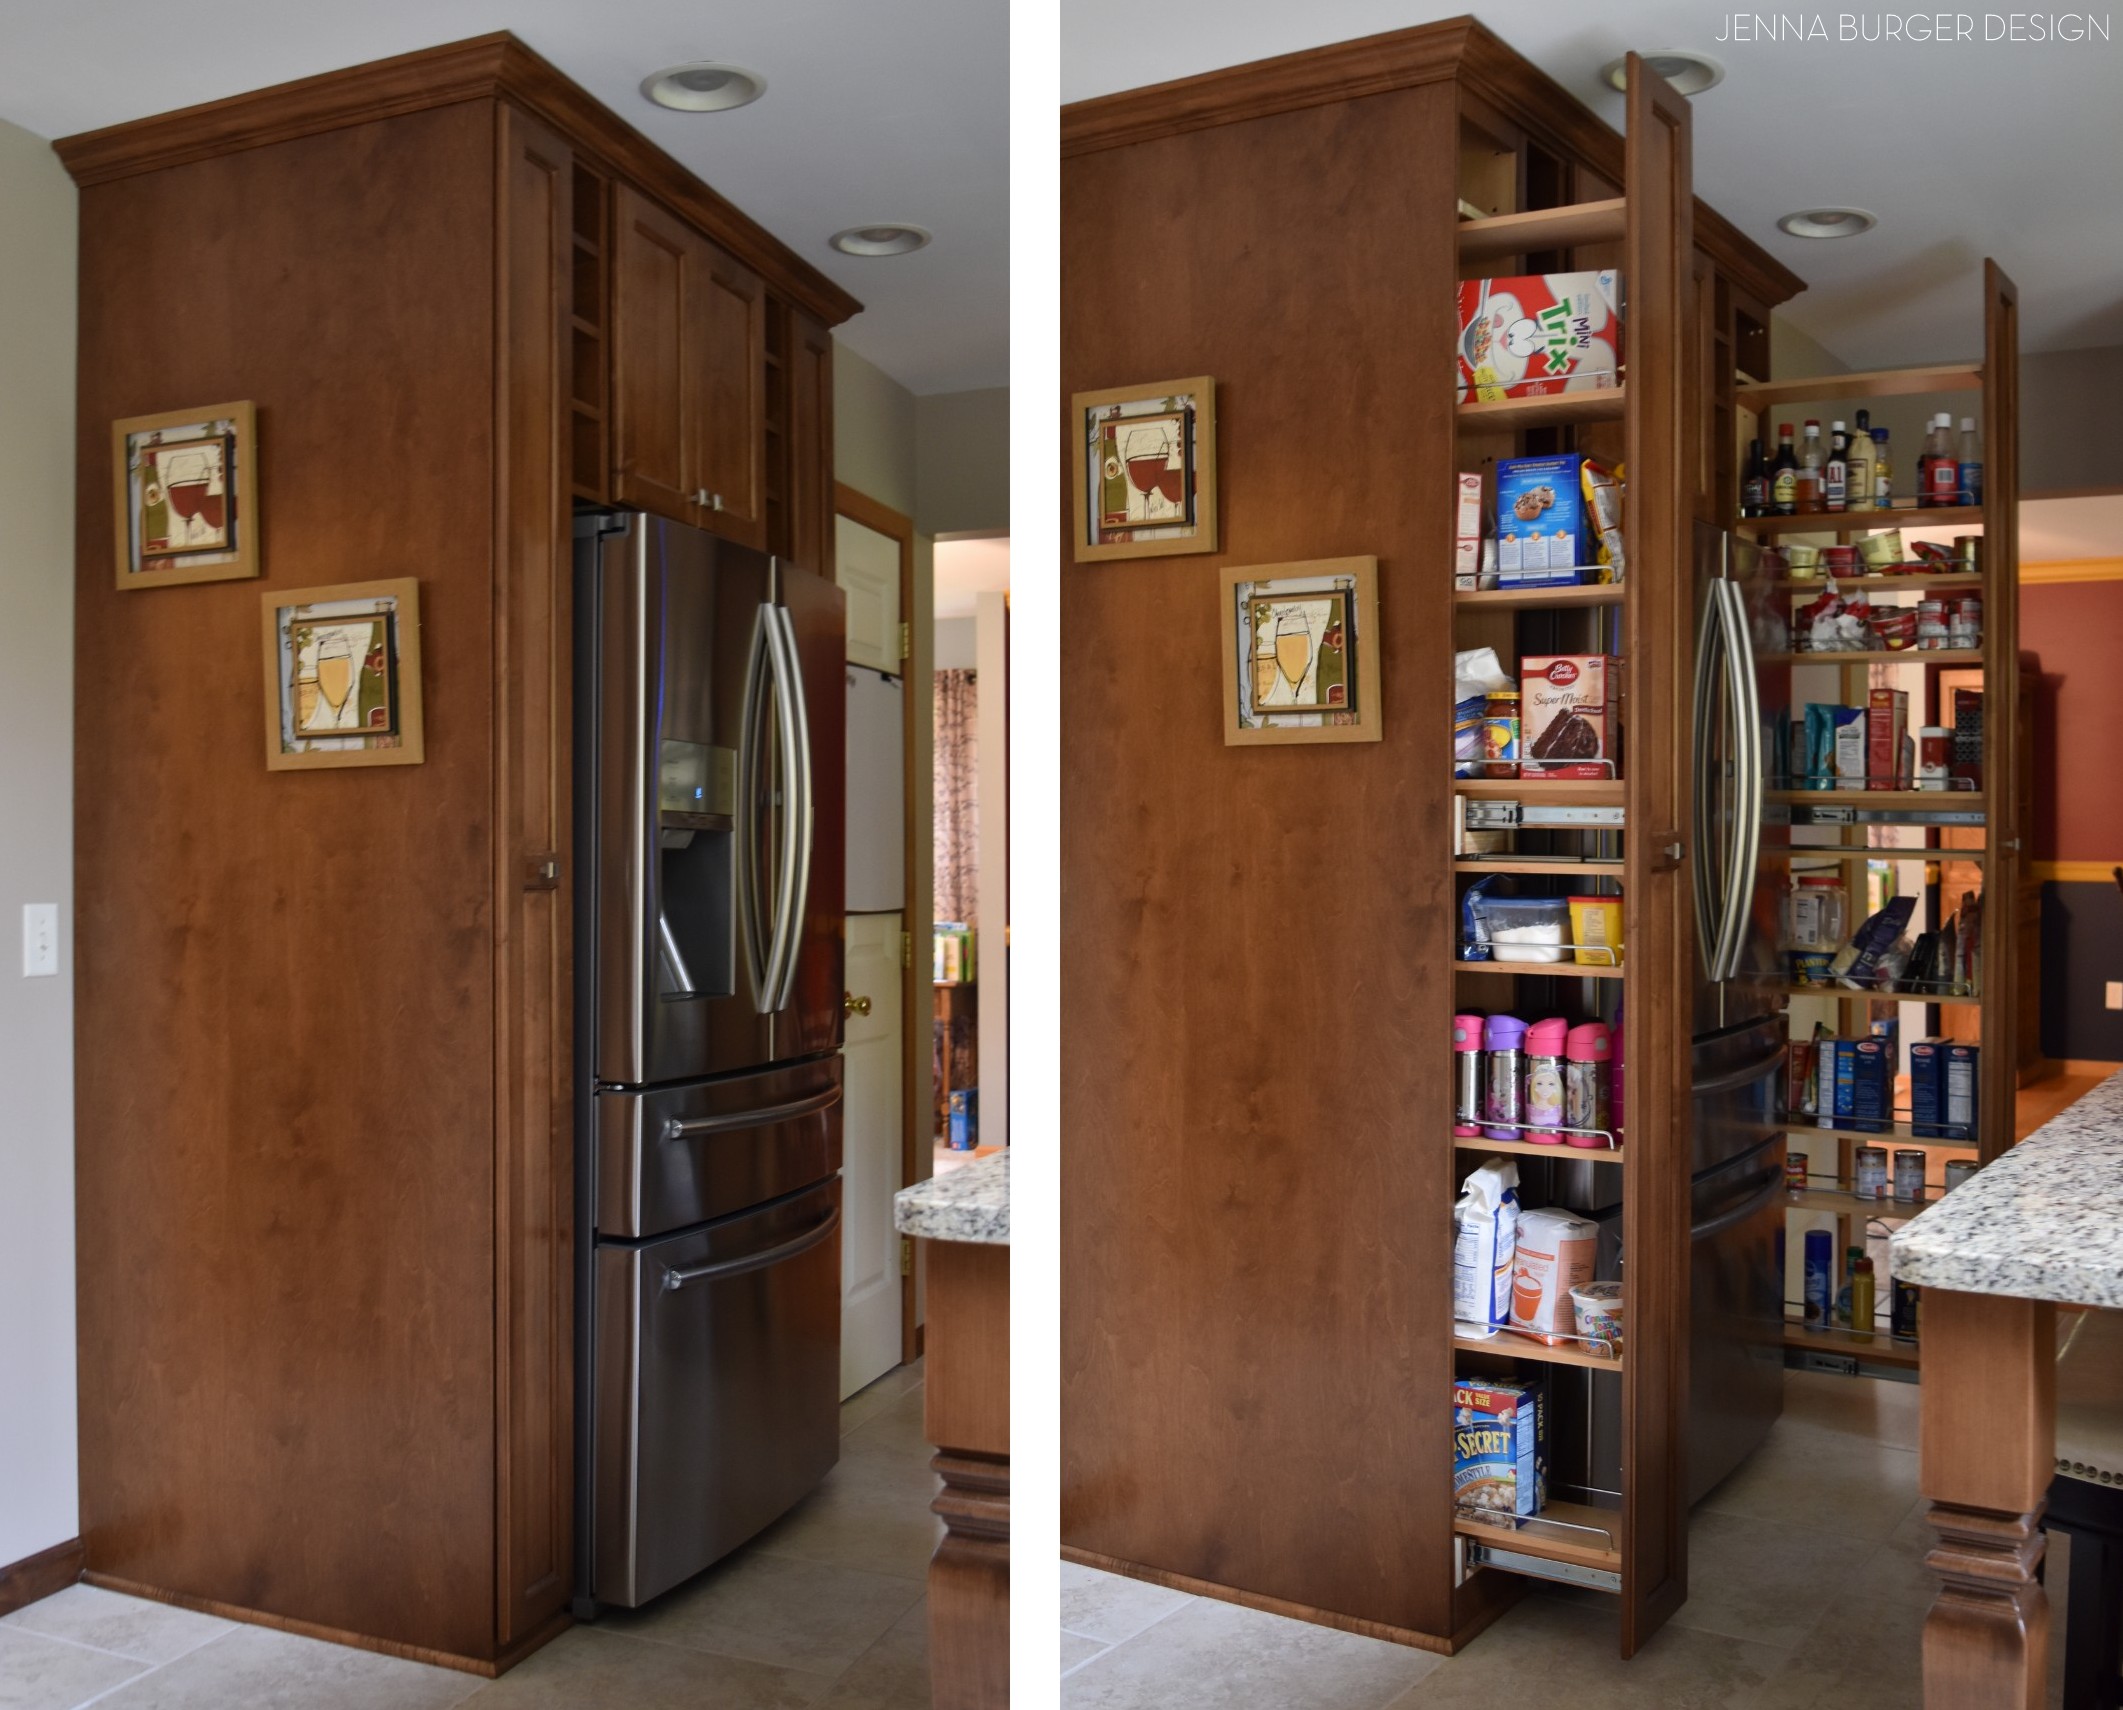
Where the non-functioning refrigerator space was before, a new refrigerator + pull-out pantry storage was added.

Stunning Stained Kitchen REVEAL: before & after of a kitchen renovation by www.jennaburger.com

These slide-outs with adjustable shelves have been a wonderful update and the amount of storage is incredible!

Stunning Stained Kitchen REVEAL: before & after of a kitchen renovation by www.jennaburger.com

Taking a step back, this is another view of the overall newly revamped kitchen.

Stunning Stained Kitchen REVEAL: before & after of a kitchen renovation by www.jennaburger.com

I am so smitten over the island legs!

Stunning Stained Kitchen REVEAL: before & after of a kitchen renovation by www.jennaburger.com

Stunning Stained Kitchen REVEAL: before & after of a kitchen renovation by www.jennaburger.com

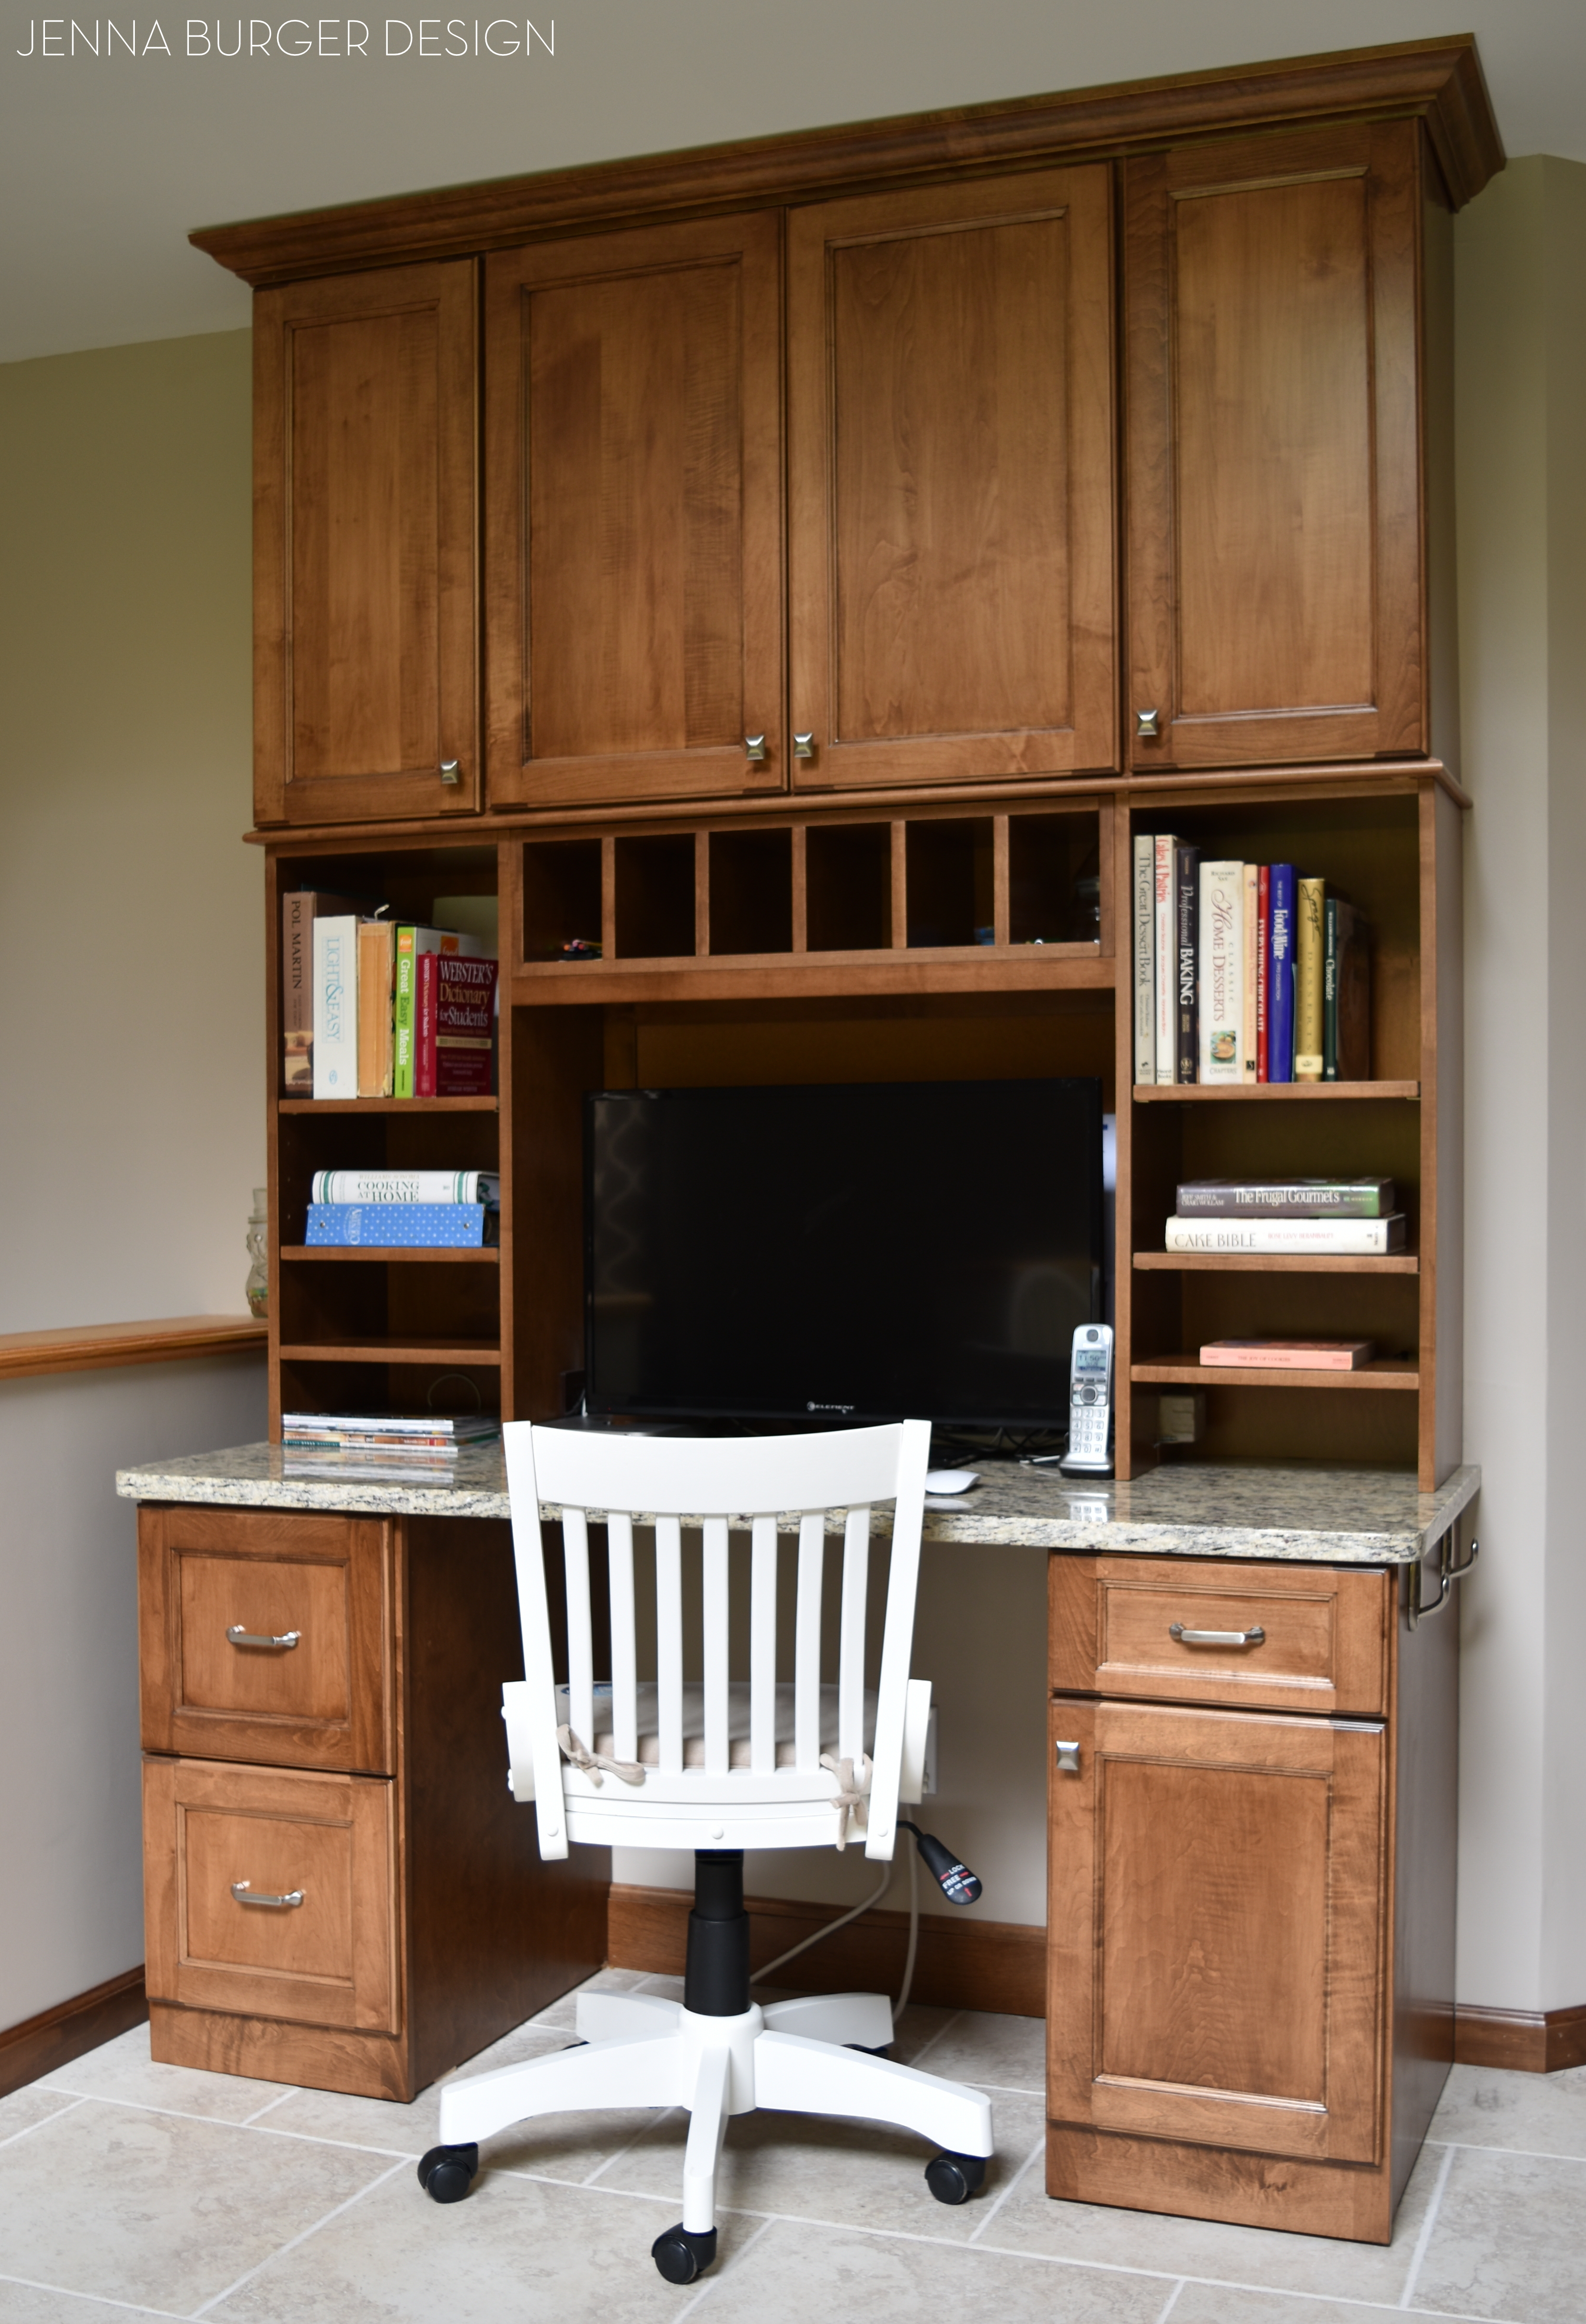
This new space doesn’t only stop at the kitchen cabinets, but a desk was also added. With a combination of open & closed cabinetry, this desk space is the command center for this family.

Stunning Stained Kitchen REVEAL: before & after of a kitchen renovation by www.jennaburger.com

Another hidden gem + must-have in the kitchen, a trash bin pull-out! This is a double for trash + recycling and in the island was the perfect placement.

Stunning Stained Kitchen REVEAL: before & after of a kitchen renovation by www.jennaburger.com

And there you have it. The before & after of this kitchen renovation is pretty incredible!

Stunning Stained Kitchen REVEAL: before & after of a kitchen renovation by www.jennaburger.com

Stunning Stained Kitchen REVEAL: before & after of a kitchen renovation by www.jennaburger.com

It was such a wonderful job to be a part of. Another project complete!

Do you like stained cabinets or do you prefer painted?

Demo Day: Steps for Demolishing the Kitchen

Demo Day: Steps to Demolishing an Existing Kitchen + Creating a new renovated space. Remodel by www.jennaburger.com

Demo Day means one thing… construction has begun!

Last week demolition of the existing kitchen started and I was full of emotions from excitement to nervousness.  After months of planning, I just couldn’t believe the day had come.

After spending the weekend clearing + cleaning out the kitchen and adjacent areas, the kitchen was ready to be teared down.

I was anticipating DEMO DAY to be rugged & raw with sledgehammers flying and earsplitting noise of walls being tore down.  Like this…

via

Yay, not so much. Guess it’s a good thing with a baby in the house who typically naps for 3+ hours…

I was a little disappointed that I couldn’t get the days anxieties out with a haul of a hammer, but I got over it quickly.

A few hours in to demo day, the window treatments were down, the cabinets were out, and the contractors were well on their way to clearing out the kitchen area.

Demo Day: Steps to Demolishing an Existing Kitchen + Creating a new renovated space. Remodel by www.jennaburger.comDemo Day: Steps to Demolishing an Existing Kitchen + Creating a new renovated space. Remodel by www.jennaburger.com

The kitchen cabinets came out first, followed by the soffit above the existing cabinets. The new upper cabinets will continue to the ceiling with decorative moulding, which will really heighten the space+ provide more storage space inside.

The ‘soffit’ in front of the window (above the sink) we discovered is a beam, which will need to remain.  Can’t take out what is holding up the house!

Beyond the beam though, we will be able to heighten the soffit, which will allow new tile to continue up and around all sides of the window.  A pretty new pendant over the sink will also be installed.

Demo Day: Steps to Demolishing an Existing Kitchen + Creating a new renovated space. Remodel by www.jennaburger.com

Over the coming days once demo is complete, other areas of focus will be the plumbing + electrical.  The electrical changes will include relocating + adding outlets, repositioning the recessed lights in the ceiling, and adding pendant lights over the island.

All the wiring for the electrical will take place now during the demo + repair phase, then when the cabinets are in, the contractor will be able to cut the exact locations in the sheetrock, so they are in the exact position that I’d like.  Not too shabby…

Demo Day: Steps to Demolishing an Existing Kitchen + Creating a new renovated space. Remodel by www.jennaburger.com

Demo Day: Steps to Demolishing an Existing Kitchen + Creating a new renovated space. Remodel by www.jennaburger.com

See that ugly tile?  That was the original floor for the kitchen + dining space.  I couldn’t imagine…   The hardwood flooring was installed by the previous owners and since the kitchen was already in place, they followed the footprint perimeter of the cabinets.

Demo Day: Steps to Demolishing an Existing Kitchen + Creating a new renovated space. Remodel by www.jennaburger.com

The challenging part that we’re going to encounter with our proposed plan is weaving new flooring into this area where the dishwasher once was because we are eliminating the footprint of this “peninsula” and instead creating a big ole’ island.

Once the new floor is installed, ALL the first floor hardwood floors will be sanded & restained.  By weaving in new floor with the old though, it’s unknown how the stain will take and the new floor boards might be obvious & stand out.  I was told, the darker the floor, the higher probability that it’ll be apparent.  It’s an unknown at the moment, so we shall see what happens…

By days end, just the shell of the space was left.

I couldn’t believe how everything was out & already how different the kitchen space felt.  And all I kept thinking was, it’s really happening…

Demo Day: Steps to Demolishing an Existing Kitchen + Creating a new renovated space. Remodel by www.jennaburger.com

It’s amazing how a room can look + feel so different when everything is removed.  Your eye isn’t drawn to what it sees anymore, but instead with a clear palette a world of new thoughts + ideas come flurrying in.

For months (maybe even years in my head), I planned + designed every nook & cranny of the new kitchen, but having it actually go from a dream to reality is mind-boggling.

As my kitchen adventure continues, I plan to share the good, the bad, and all the steps in between with hopes to inspire + educate if you ever decide to renovate the kitchen in your home.

Next up for this kitchen renovation… finishing repairing the walls & then the patching + staining of the hardwood floors.  After that, cabinets will be delivered.

Thanks for following along!

Demo Day: Steps to Demolishing an Existing Kitchen + Creating a new renovated space. Remodel by www.jennaburger.com

If you want to see all the posts documenting the kitchen renovation, here they are from start to finish:
Wonderful White Kitchen Inspiration
Kitchen Remodel: Before + Plan of Action
Demo Day: Steps for Demolishing the Kitchen
Kitchen Progress: Staining Hardwood Floors
The Cabinets Arrive + Get Installed
Natural Quartz Countertops in the Kitchen
10 Countertop Materials to Consider for the Kitchen
Subway Tile Installation + Choosing the RIGHT Subway
Kitchen Backsplash Tile Options + Inspiration
Choosing a Paint Color + Wallpaper for the Kitchen and Dining Room
Kitchen Renovation: The Appliances
Dissecting the Details
Kitchen Renovation: REVEAL + RESOURCES

DISCLAIMER: THIS KITCHEN RENOVATION IS A COLLABORATION WITH LOWE’S.  ALL OPINIONS + SELECTIONS ARE MY OWN WITH THE ASSISTANCE OF THE LOWE’S DESIGN TEAM.

Budget Bathroom Renovation Reveal

What a whirlwind of a week. Renovation of the kitchen is underway, which is keeping me busy, but I had a few moments over the past days to sit + reflect + appreciate all the kind comments that were left on the blog + + Instagram & Facebook about the plan of action for the new space. It’s going to quite a ride over the coming weeks. More on that soon!

In the meantime, I am excited to share a before & after bathroom renovation that I recently completed for a client / friend.

Budget BATHROOM RENOVATION Reveal: Before + After of this cool-toned cottage style bathroom by www.JennaBurger.com

This bathroom remodel was a labor of love! With a tight budget in mind, smart solutions + affordable, yet stylish choices were a must. Some elements had to stay, but others – like the vintage clawfoot tub – were a MUST TO GO!

When my friend reached out to me about freshening up the bathroom space – which is the only bathroom on the 2nd floor of her 1920s home – the major need/want was a new tub. The overall look & feel of the space were also important and for that I created a Vision Board that suited their style & was an extension of the rest of their home.

Design Board for the Budget BATHROOM RENOVATION Reveal: Before + After of this cool-toned cottage style bathroom by www.JennaBurger.com

Let’s take a step back to see what the ‘before’ space looked like…

BEFORE.

With budget in mind, all the plumbing fixtures needed to stay in the existing locations but be upgraded.

The toilet would be swapped out…

Before Bathroom

The pedestal sink (with absolutely NO surface space) would be changed out for a new 5′ long cabinet with storage!

Before Bathroom

The clawfoot tub, which looked beautiful but wasn’t functional at all for this family of 4, was the main focus for this bathroom renovation. The tub went from a clawfoot style to a built-in tub with custom tile surround – more on that in a bit.

Before Bathroom

Before Bathroom

Additionally, different decor was added to the walls, the laundry area got a fresh coat of paint, and a new mirror + light were installed.

Once the design was complete, the items were ordered + delivered, the contractor was able to get started. Of course, with all renovations there were a few hiccups along the way, but the renovated bathroom was soon complete and has been the highlight ever since!

AFTER.

Welcome to this new serene + sophisticated cottage-style bathroom…

Budget BATHROOM RENOVATION Reveal: Before + After of this cool-toned cottage style bathroom by www.JennaBurger.com

What a change!

The pedestal was replaced with a 5′ long vanity that not only has more surface area for getting ready in the morning, but there is plenty of storage below – closed and open.

One tricky part of this bathroom was the existing baseboard heaters. With a 20″ distance between the heaters, the pedestal base fit just perfect. But a vanity wouldn’t. The challenged lied in finding a vanity that not only fit the aesthetic for the space, but also had legs that could be removed / notched in the back to fit around the heaters. Take a 2nd look at the picture above… Do you see the missing legs in the back?

Budget BATHROOM RENOVATION Reveal: Before + After of this cool-toned cottage style bathroom by www.JennaBurger.com

Another challenge was the small space – again only about 24″ – between the 2 windows to fit a new mirror and light. The mirror width just fit.

Tile was added to the backsplash above the vanity, which was a beautiful addition that ties into the tile in the tub.

Budget BATHROOM RENOVATION Reveal: Before + After of this cool-toned cottage style bathroom by www.JennaBurger.com

Budget BATHROOM RENOVATION Reveal: Before + After of this cool-toned cottage style bathroom by www.JennaBurger.com

The toilet was an easy switch to a new style. Above, floating decorative shelves were installed to hold baskets and fun layers.

Making way around the new bathroom, the clients chose to hang their vintage horse hooks for the towels. This was in their previous bathroom and I love that they reused them in this new space.

Budget BATHROOM RENOVATION Reveal: Before + After of this cool-toned cottage style bathroom by www.JennaBurger.com

Above are black and white pictures from their travels.

Budget BATHROOM RENOVATION Reveal: Before + After of this cool-toned cottage style bathroom by www.JennaBurger.com

Budget BATHROOM RENOVATION Reveal: Before + After of this cool-toned cottage style bathroom by www.JennaBurger.com

Budget BATHROOM RENOVATION Reveal: Before + After of this cool-toned cottage style bathroom by www.JennaBurger.com

Ah, the new tub area! What a big change. No more clinging plastic shower curtains while in the tub.

For this area of the bathroom, we designed a wall to the right of the entry door which allowed the new tub to be tiled on 3 sides. The new wall was built thicker than a typical 4″ wall and a vertical niche was created for holding shampoos, soaps, etc.

Budget BATHROOM RENOVATION Reveal: Before + After of this cool-toned cottage style bathroom by www.JennaBurger.com

The main tile in the tub area is a white 3 x 6 subway and a glass accent tile was added on the 3 walls as border + was used in the backs of the niches.

This accent tile is what was also used for the backsplash above the vanity.

Budget BATHROOM RENOVATION Reveal: Before + After of this cool-toned cottage style bathroom by www.JennaBurger.com

Budget BATHROOM RENOVATION Reveal: Before + After of this cool-toned cottage style bathroom by www.JennaBurger.com

As I shared above, this bathroom is really big, but it’s also the only bathroom on the 2nd floor. It not is filled with bathroom essentials, but also houses the laundry area.

The washer + dryer sit side-by-side and fit in a closet with shelving above. A large, luxe laundry would have been ideal in a dream world, but it wasn’t feasible, so we upgraded the space.

LAUNDRY BEFORE.

Beore Bathroom + Laundry

The walls of the laundry were painted a deep turquoise color & new sturdier shelving was hung. A clean space was created using beautiful baskets.

LAUNDRY AFTER.

Budget BATHROOM RENOVATION Reveal: Before + After of this cool-toned cottage style bathroom by www.JennaBurger.com

Budget BATHROOM RENOVATION Reveal: Before + After of this cool-toned cottage style bathroom by www.JennaBurger.com[this laundry makeover was actually the inspiration for my laundry revamp]

Lastly, the one element that was an eye sore before, but took on a new life after the renovation was the floor. The ceramic tile on the floor was discussed a lot and at length. In the end, because of the size of the bathroom, the cost to remove + replace the floor with new material would have cost way too much. Plus the additional time without a working bathroom would have been just shy of a nightmare.

Once all the new fittings + fixtures were installed, the client had the grout professionally cleaned and with a new rug – a 4′ round jute – was added. Today, with the new cooler colors + all the other beauty in the space, your eye never steers to the floor.

Budget BATHROOM RENOVATION Reveal: Before + After of this cool-toned cottage style bathroom by www.JennaBurger.com

And that’s a wrap, except for 2 pictures I couldn’t resist sharing… On the day of photoshooting this bathroom renovation, I brought my daughter with me. In true style, Bring Your Daughter to Work day!

Budget BATHROOM RENOVATION Reveal: Before + After of this cool-toned cottage style bathroom by www.JennaBurger.com

Budget BATHROOM RENOVATION Reveal: Before + After of this cool-toned cottage style bathroom by www.JennaBurger.com

Another blah to beautiful transformed space!

Looking for something similar in your home, check out the resource links below to get you started…

Design Board for the Budget BATHROOM RENOVATION Reveal: Before + After of this cool-toned cottage style bathroom by www.JennaBurger.com

// 1 – Paint Palette:
// 2 – Light Fixture
// 3 – Floating Shelves
// 4 – Black & White framed pictures (by client)
// 5 – Valance (I made them – DIY tutorial for simply box valance)
// 6 – Oval Tilt Mirror
// 7 – Vanity Top
// 8 – Cabinet
// 9 – Bathroom Faucet
// 10 – Toilet
// 11 – Accessories
// 12 – Tub / Shower Fittings
// 13 – Shower Curtain
// 14 – 3 x 6 White Subway Tile
// 15 – Glass Accent Tile
// 16 – 4′ Round Jute Rug
// 17 – 5′ Tub
// 18 – Basket

RECAP.

A before & after comparison…

Budget BATHROOM RENOVATION Reveal: Before + After of this cool-toned cottage style bathroom by www.JennaBurger.com

Budget BATHROOM RENOVATION Reveal: Before + After of this cool-toned cottage style bathroom by www.JennaBurger.com

Budget BATHROOM RENOVATION Reveal: Before + After of this cool-toned cottage style bathroom by www.JennaBurger.com

Thanks for checking out this budget bathroom reveal. It was such a great project to be a part of. I’ve worked on many client projects this year, which I will be sharing soon!

For now, I gotta get back to my kitchen reno…

Kitchen Remodel: Before + Plan of Action

THE KITCHEN DESIGN PALETTE: The plan of action for the proposed kitchen by www.jennaburger.com

Last week I filled your feed with over-the-top gorgeous white kitchen inspiration!

Today, I’m sharing the PLAN OF ACTION for MY kitchen makeover.

You heard it right, I’m renovating my kitchen.  It’s true and I couldn’t be happier.

I’ve had the awesome opportunity to design many kitchens for clients and now it’s my turn to create a dream kitchen space.  To be honest, I have 100% been the worst client ever – too many changes, lots of drawn-out dramatic decisions – trying to fit every best thing into this space (which didn’t happen by the way), BUT either way I know it’s going to be fabulous when it’s complete…

THE BEFORE.

Before sharing what’s to come, let’s take a step back to look at the current kitchen (soon-to-be ‘before’).

Current Kitchen

You may think the kitchen looks great in this shot.  And you’re right… here it does because this picture was snapped right after the DIY makeover 4.5 years ago.  The current state of the kitchen at this moment is a mess and I couldn’t find any other before ‘pictures’.

Anyway, in 4.5 years we used + abused this space and overall some elements have worked well, but more HAVE NOT worked!  For the new layout of this kitchen, it was key to figuring out how to make a better flowing, more efficient new kitchen.

THE PROCESS.

I started off this kitchen makeover as I typically would with my clients by creating a Vision Board with elements + inspiration to capture how I envision the overall space to look + feel.

By flipping through magazines + gathering images from the web, I set out to find overall spaces that I would love to live in + specific elements in rooms that I am drawn to.  When working with a client on a room refresh, these are the same steps we take to capture the vision + aesthetic direction to then create the unique-to-them magical, dream space.

Here are a few favorite kitchen spaces…

Wonderful White Kitchens + How To Decorate them so they're anything but VANILLA! White Kitchen Round-up @ www.jennaburger.com

Overall, there is a commonality with all these spaces.

They are all…  Crisp. Clean. Classic. White. Open Shelving. Layered with Pops of Color.

All elements I want for my new kitchen space.

Since DIYing our current kitchen a few years back, I knew I wanted painted cabinets instead of stained.  I also knew with our open concept floor plan,  I wanted + needed the new kitchen to feel light, bright, and most of all timeless; classic was key! After contemplating about one or multiple colors for the cabinets, I knew white (how much more classic can you get than white) would be the dominate cabinet color choice.  As always, I feel it’s important to add depth + contrast in a room, and so for this space the perimeter cabinets will be white, the island will be a rich deep charcoal, and many layers will be introduced atop to make the space pop with color.

THE PLAN.

For this kitchen makeover, I am thrilled to be collaborating with Lowe’s and their design team.  After I created the initial layout, I met with a design team member at my local Lowe’s who assisted me to create the most efficient + beautifully aesthetic plan possible.

At Lowe’s, they have multiple cabinet companies in a range of price points.  I decided that the Kraftmaid cabinetry line would suit my design aesthetic best and their selection of cabinet design styles + colors are extensive.

I shared with them the following to get the project started:

> Overall existing measurements of the kitchen area

> Vision Board + Room Inspiration to convey overall design direction

> Appliance selections (so they fit correctly in the new plan)

As the design evolved over a few weeks, there were several renditions, but this is the final proposed plan.  A large center island (which will have counter stool seating) anchors the space with continuous flow around.  The red dashed line shown in the plan below is where there is currently ‘peninsula’ cabinetry, which will be eliminated.

Kitchen flow space

Check out these fabulous 3-D images of how the kitchen will look when complete.

I wish with a snap-of-a-finger it would be done and looking like this.  I can see myself cooking right there on that island. soon…

3D Image of Proposed Kitchen

Seeing these perspective images really helps visualize how the finished space will look.  So different from it’s current state.

Part of the soffit above the current cabinets will be removed so the new upper cabinets will be full height to the ceiling.  Unfortunately, the soffit above the window can not be removed because it’s a structural element supporting the house.  It was a bit of a bummer, but THANKFULLY we cut a whole in the sheetrock to find this out BEFORE the cabinets went into production!

Tip: If you are renovating a kitchen and have soffits above your current cabinetry, cut a hole to see if there is ductwork or plumbing inside before ordering cabinets!  Pipes or supporting beams may be rerouted, but it could be costly.

A new full-depth pantry will be added to the right of the refrigerator which will house the small appliances (coffee maker, toaster, etc) + mobile gadgets.

The overall finished space will have a balanced mix of closed cabinetry and open shelving (on the walls + in the island).

3D Image of Proposed Kitchen

THE PALETTE.

Using my inspirational pictures, I created my materials palette.  As with most spaces (for myself & clients), I feel it’s best that the main elements that you want to “live” for a long time should be more neutral; not plain jane, but classic.  THEN color + texture can be layered in through accessories, window treatments, a rug, wall decor, etc – all elements that aren’t overall expensive & can be changed when you want a refresh.

THE KITCHEN DESIGN PALETTE: The plan of action for the proposed kitchen by www.jennaburger.com

– 1 – Painted white (Kraftmaid dove white) for the perimeter cabinets; Painted dark gray (Kraftmaid greyloft) for the island

– 2 – Polished Nickel cabinet hardware

– 3 – White subway tile on the backsplash with dark grout

– 4 – Stainless appliances (Smudge-Proof by Frigidaire – genius)

– 5 – Silestone (lagoon) for the countertops

– 6 – Organic elements, layers with texture + visual engagement

– 7 – Lighting, pendants over the island

– 8 – Sink + Faucet.  modern + functional

– 9 – Wood Floors to be refinished in a medium brown tone

– 10 – Counter stool seating at island

– 11 – Paint on the walls in a neutral light gray tone

– 12 – Pops of color with cookware, accessories, cookbooks, and more

kitchen palette


STORAGE.

The inside of the cabinets will be loaded with smart storage solutions.  Aside from the overall aesthetics of the kitchen, the organizational component has this gal smitten.  More often than not,  homeowners create a gorgeous new kitchen and regret not maximizing the interiors of the cabinetry with built-in storage.

The interiors of the cabinets ARE JUST AS IMPORTANT as the exteriors!

Kraftmaid has an extensive selection of storage elements.  Here is the plan for the cabinet interiors…

Storage Solutions inside cabinets

And there you have it!  Isn’t it incredible?!

Designing + Renovating a kitchen is, hands-down, the hardest space because it’s the ‘hub’ of the home.  We want it to look + function the best way possible.  The expense + time without the everyday essentials is difficult.  BUT, remodeling a kitchen to fit your wants + needs is the BEST INVESTMENT EVER.   For our family, morning till night, we live in our kitchen & it’s where everyone – our family & guests – congregate.  It’s going to be a rough few months to come, but I’m prepared.  i think, i hope…

Of course more details to come soon, so I’d love for you to follow along on this journey while we renovate our kitchen!

If you want to see all the posts documenting the kitchen renovation, here they are from start to finish:
Wonderful White Kitchen Inspiration
Kitchen Remodel: Before + Plan of Action
Demo Day: Steps for Demolishing the Kitchen
Kitchen Progress: Staining Hardwood Floors
The Cabinets Arrive + Get Installed
Natural Quartz Countertops in the Kitchen
10 Countertop Materials to Consider for the Kitchen
Subway Tile Installation + Choosing the RIGHT Subway
Kitchen Backsplash Tile Options + Inspiration
Choosing a Paint Color + Wallpaper for the Kitchen and Dining Room
Kitchen Renovation: The Appliances
Dissecting the Details
Kitchen Renovation: REVEAL + RESOURCES

DISCLAIMER: THIS KITCHEN RENOVATION IS A COLLABORATION WITH LOWE’S.  ALL OPINIONS + SELECTIONS ARE MY OWN WITH THE ASSISTANCE OF THE LOWE’S DESIGN TEAM.

Wonderful White Kitchens

On the gloomiest of days, a white kitchen will always put a smile on your face!

Wonderful White Kitchens + How To Decorate them so they're anything but VANILLA! White Kitchen Round-up @ www.jennaburger.com

I am so excited to share that I am in the midst of designing a kitchen that I’ve always dreamt of AND it’s for me!

I’ve created beautiful kitchens for many clients & I am thrilled that I finally have the opportunity to put all the wants + needs of a gorgeous + uber-functional kitchen into my own home.  I’ll be honest, I can walk in to a clients home and with a snap-of-a-finger see how to transform it.  With my own kitchen, it hasn’t been so easy… my finger snapping failed me.

I, like many others, have always wished for white.  And so of course, my new kitchen will have white cabinets (not all, but most).  I was hesitant about white at first feeling that it might be too sterile or too ‘white’, but with layers + pops of color throughout, I know it’s the right choice for now + later.

If you’re dreamy about white like me, here are some kitchens to be inspired by that perfectly balance white with layers of color, texture, and style…

WHITE IN A COTTAGE STYLEWonderful White Kitchens + How To Decorate them so they're anything but VANILLA! White Kitchen Round-up @ www.jennaburger.comFeatured at BHG

WHITE WITH POPS OF CITRINEWonderful White Kitchens + How To Decorate them so they're anything but VANILLA! White Kitchen Round-up @ www.jennaburger.comPhoto by Eric Piasecki; Katie Ridder Rooms; Featured on HGTV

WHITE + A COLORFUL ISLANDWonderful White Kitchens + How To Decorate them so they're anything but VANILLA! White Kitchen Round-up @ www.jennaburger.comDesigned by ME! Photographed by Laura Moss, Featured at BHG

[more details on the before & after of this kitchen can be found in this post – it’s a must see]

WHITE WITH WOODWonderful White Kitchens + How To Decorate them so they're anything but VANILLA! White Kitchen Round-up @ www.jennaburger.comKitchen of Sarah Sherman Samuel

WHITE WITH A CONTRAST TILE + FLOORWonderful White Kitchens + How To Decorate them so they're anything but VANILLA! White Kitchen Round-up @ www.jennaburger.comKitchen designed by Mary Jo Fiorella

WHITE WITH OPEN SHELVESWonderful White Kitchens + How To Decorate them so they're anything but VANILLA! White Kitchen Round-up @ www.jennaburger.comKitchen featured at BHG

WHITE REFRESH WITH NAVYWonderful White Kitchens + How To Decorate them so they're anything but VANILLA! White Kitchen Round-up @ www.jennaburger.comMood Board for White Kitchen by Emily HendersonKitchen + Mood Board by Emily Henderson

INDUSTRIAL STYLE WHITEWonderful White Kitchens + How To Decorate them so they're anything but VANILLA! White Kitchen Round-up @ www.jennaburger.comDesigned by Fixer Upper‘s Joanna Gaines; Featured in HGTV Magazine

A MIX OF WHITE + GRAY Wonderful White Kitchens + How To Decorate them so they're anything but VANILLA! White Kitchen Round-up @ www.jennaburger.comKitchen by Melissa of The Inspired Room

WHITE BACKSPLASH WITH DARK GROUTWonderful White Kitchens + How To Decorate them so they're anything but VANILLA! White Kitchen Round-up @ www.jennaburger.comKitchen by Taste Interior Design

SMALL BUT SOPHISTICATEDWonderful White Kitchens + How To Decorate them so they're anything but VANILLA! White Kitchen Round-up @ www.jennaburger.comKitchen by Hunted Interior

GO BOLD WITH A BACKSPLASHWonderful White Kitchens + How To Decorate them so they're anything but VANILLA! White Kitchen Round-up @ www.jennaburger.com Photography By: Kim Cornelison; Home of Kim Cornelison + Alfie Ferreyra ; Featured at HGTV

WHITE IN A TRADITIONAL SETTINGWonderful White Kitchens + How To Decorate them so they're anything but VANILLA! White Kitchen Round-up @ www.jennaburger.comKitchen featured at BHG

WHITE WITH OPEN WOOD SHELVESWonderful White Kitchens + How To Decorate them so they're anything but VANILLA! White Kitchen Round-up @ www.jennaburger.comKitchen by Our House

WHITE WITH POPS OF COLORWonderful White Kitchens + How To Decorate them so they're anything but VANILLA! White Kitchen Round-up @ www.jennaburger.comKitchen designed by: Lauren Muse; Featured at HGTV

FLOOR TO CEILING WHITE IN A GALLEY LAYOUTDP_Design-Development-white-traditional-kitchen_3x4.jpg.rend.hgtvcom.1280.1707Kitchen design by: Design Development

WHITE WITH BOLD LAYERS [turquoise is a favorite]Wonderful White Kitchens + How To Decorate them so they're anything but VANILLA! White Kitchen Round-up @ www.jennaburger.com

Wonderful White Kitchens + How To Decorate them so they're anything but VANILLA! White Kitchen Round-up @ www.jennaburger.comKitchen featured at BHG

ECLECTIC WHITEWonderful White Kitchens + How To Decorate them so they're anything but VANILLA! White Kitchen Round-up @ www.jennaburger.comKitchen by White Buffalo Styling Co

Open Shelves.  Wood.  Pops of Color.  White Tile.  Contrasting Grout.  Colored Island.

Many elements from these inspirational pictures have influenced the design decisions for my kitchen.  I can’t wait to share the details + plan of action with you…  Next Week hopefully!

What colored cabinets would be in your dream kitchen?  Is it white?

DID YOU HEAR? WE’RE RENOVATING OUR KITCHEN

If you want to see all the posts documenting the kitchen renovation, here they are from start to finish:
Wonderful White Kitchen Inspiration
Kitchen Remodel: Before + Plan of Action
Demo Day: Steps for Demolishing the Kitchen
Kitchen Progress: Staining Hardwood Floors
The Cabinets Arrive + Get Installed
Natural Quartz Countertops in the Kitchen
10 Countertop Materials to Consider for the Kitchen
Subway Tile Installation + Choosing the RIGHT Subway
Kitchen Backsplash Tile Options + Inspiration
Choosing a Paint Color + Wallpaper for the Kitchen and Dining Room
Kitchen Renovation: The Appliances
Dissecting the Details
Kitchen Renovation: REVEAL + RESOURCES

Pegboard Baseball Cap Organizer

99.98% of men + boys I know have an extensive collection of baseball caps.  From teams they follow, to giveaways, to a gift shop purchase as a momento, baseball caps are a stable for most guys wardrobes.

So then the big question arises…  Where do all those caps go?   How does one organize the growing collection of baseball caps?

MY SOLUTION?  A pegboard baseball cap organizer…

DIY: Pegboard Baseball Cap Organizer - The perfect 'home' for the hat collection. Do It Yourself Tutorial @ www.jennaburger.com

I made this a couple months ago and it’s been a life saver.  Or should I say a hat saver, lol…

Honestly though, the collection of caps that my boy has acquired has gotten out of control and now they all finally have a happy home!

The best part of all, this organizer was easy to make.

MATERIALS

> (4) 1″ x 2″ x 4′ long wood pieces – cut to size

> 2′ x 4′ piece of pegboard (I purchased a 4′ x 4′ piece @ Lowe’s and they cut it to my desired size)

> “L” brackets

> Paint

1

Some pegboard already comes primed or white, but my local Lowe’s only had the brown, unfinished version.  Similar to painting walls or furniture, it’s important to use primer first.  So first I gave the face of my pegboard a quick coat of Zinsser Primer.

DIY: Pegboard Baseball Cap Organizer - The perfect 'home' for the hat collection. Do It Yourself Tutorial @ www.jennaburger.com

DIY: Pegboard Baseball Cap Organizer - The perfect 'home' for the hat collection. Do It Yourself Tutorial @ www.jennaburger.com

2

Once it was primed, I painted the pegboard with 2 fresh coats of color with a roller – a taupe-y hue was created by mixing a few leftover colors together

DIY: Pegboard Baseball Cap Organizer - The perfect 'home' for the hat collection. Do It Yourself Tutorial @ www.jennaburger.com3

For the frame, I layed the 2′ x 4′ pegboard on the wood strips allowing 1″ of exposed frame around, and marked them with a pencil.

Using a miter saw (my recommendation for a good one) I cut the wood pieces as needed.  If you don’t have a miter saw or tool to cut the wood, Lowes will cut it to your desired length.

Then I painted the wood pieces using more leftover paint.  Since this pegboard was slated for my sons room, I coordinated the blue hue with the color I used for painting his closet door

/ Color: Benjamin Moore Van Deusen Blue

DIY: Pegboard Baseball Cap Organizer - The perfect 'home' for the hat collection. Do It Yourself Tutorial @ www.jennaburger.com

4

Once the wood pieces were painted + dried, I arranged them on the floor…

DIY: Pegboard Baseball Cap Organizer - The perfect 'home' for the hat collection. Do It Yourself Tutorial @ www.jennaburger.com

…and layed the pegboard on top.  Then I aligned the 4 “L” brackets at the corners and fastened them through the pegboard and wood frame surround.

DIY: Pegboard Baseball Cap Organizer - The perfect 'home' for the hat collection. Do It Yourself Tutorial @ www.jennaburger.com

This is a view of the front and back when all 4 corners were complete.

DIY: Pegboard Baseball Cap Organizer - The perfect 'home' for the hat collection. Do It Yourself Tutorial @ www.jennaburger.com

DIY: Pegboard Baseball Cap Organizer - The perfect 'home' for the hat collection. Do It Yourself Tutorial @ www.jennaburger.com

5

I installed 2 screws + anchors into the wall and hung the framed pegboard.

I quickly + excitedly added these curved hooks.  I attempted to create a pattern to maximize the amount of hats that could hang, but it only kinda worked, so the hooks are hung part pattern / part random.

This 2′ x 4′ pegboard can hold a lot of hats. About 25 total. And it looks pretty!

DIY: Pegboard Baseball Cap Organizer - The perfect 'home' for the hat collection. Do It Yourself Tutorial @ www.jennaburger.com

This is the finished pegboard baseball cap organizer.

It fits perfectly behind my little guys door…

DIY: Pegboard Baseball Cap Organizer - The perfect 'home' for the hat collection. Do It Yourself Tutorial @ www.jennaburger.com

A similar pegboard organizer would be perfect for a slew of other things like jewelry, crafts, pantry items, kitchen essentials, etc.

The potential is endless…  Let the ideas start to flow!

DIY: Pegboard Baseball Cap Organizer - The perfect 'home' for the hat collection. Do It Yourself Tutorial @ www.jennaburger.com

His room is such an awesome space!  If you want to see the entire room, click on over for a full tour.

Since creating a similar pegboard project for my office, I’ve been hooked on this amazing element to organize with.  To “house” all of my office supplies, I also made a frame, but used a different technique + I stenciled a pretty design on the front.

Take a look > an organized office using pegboard

Pegboard Organization in the Office!

I’m on to my next organizational project using pegboard.  I can’t get enough!!

Mad About Modern Macrame

I am excited to share that as of just a few weeks ago I started as a freelance content creator for BHG.com through their new program called @Home with BHG.  Increased work load, YES, but for good reason!

@Home with BHG, contributor Jenna Burger Design

So what will I be doing?  In simple terms, sharing + inspiring what I love… design and decorating.  I will be creating and curating stories + slideshows pertaining to everything about the home including trends, styles, colors, seasonal decor, etc…  The content will then be featured on BHG.com.

No worries though, I’ll still be sharing unique + fresh do-it-yourself tutorials and decorating inspiration here on JBD.  Plus, of course, when I have a new article over on the Better Homes and Gardens website, I will surely let you know!

And that is the perfect segway into sharing with you that my first post on BHG.com is live and I would adore some love… wink, wink.

What’s goes around, comes around, and often bigger + better the 2nd (or 3rd) time!  Macrame, textile creations using knots, is once again making a splash throughout home decor and fashion.  Come over to check out stylish + in-trend (opposed to trendy) ways to incorporate beautiful Macrame creations into your home… it’s a far cry from your grandma’s knitted owl designs of the 70s!

Click to read the full article on Mad for Macrame >

Trend Alert: Modern Macrame

More content coming soon to be featured on BHG.com!


How I Organize Kids Toys

If I could, in an ideal world, I’d have a dedicated room just for toys.  Oh, and clean laundry. All tucked away behind a pretty closed door.

Can’t a girl dream?

Since I don’t live in fantasyland (or a huge house with endless rooms for that matter) + I want my kids to be where we are and be surrounded by what they love, I am constantly changing and updating how I store my kids toys.

I want my kids to play with their precious possessions as much as they want, but *I* just don’t want to see them ALL out, ALL of the time.   With 3 kids in a range of ages (1, 6 and 9), toys could easily consume our home as each are interested in something different.

How do I avoid TOY TAKEOVER?  I strive to continually improve on creative ways to store their stuff to keep everyone in our humble abode happy.

How I Organize My Kids Toys: TIPS + unique EASY & STYLISH for how I organize my kids toys, www.jennaburger.com

How I organize and store my kids toys…

BASKETS + BINS

Using baskets + bins for storage certainly isn’t new or innovative, but it really works.  Having one or multiple baskets in most rooms of the home, helps make cleanup time quick & easy. In our home, I have baskets in many rooms so that as we move from space to space, there is something new to play with.  This is specifically geared towards little ones who attention spans are small.

For the older kids who have a lot of a specific items (animals, superheros, legos, etc), I have labeled baskets + bins. As they’ve grown, their toys have gotten fewer and smaller in size so much of it is in their room instead of in the living room.  But even moving their stuff to their space, I still have created spots for everything.  If everything has a specific place, then it will make it easier to put away items + STAY ORGANIZED!  The easier the better!

How I Organize Kids Toys: tips + unique EASY & STYLISH ways to organize kids toys, www.jennaburger.com

Pretty bins make a difference!  Baskets or bins don’t need to match.  Create a vignette of differing baskets in varying sizes + shapes.  Toys will all of a sudden ‘disappear’ when surrounded by stylish decor.

How I Organize Kids Toys: tips + unique EASY & STYLISH ways to organize kids toys, www.jennaburger.com

UNIQUE TOY STORAGE IDEAS

Storage for toys + kids stuff doesn’t have to be a traditional toybox or a typical basket.  Outside-of-the-box ideas for organizing + storing toys can be anything that will hold something.

One of my favorite items for kids storage are old chests.  Of course, you have to be careful with little fingers, but chests are large (to hold A LOT) and great to look at.   They can be a beautiful element for any interior and serve a dual purpose – toy storage + end table or coffee table.

A chest for storing toys: TIPS + unique EASY & STYLISH for how I organize my kids toys, www.jennaburger.com

I have several vintage chests around the house. Found from thrift stores and garage sales, they hold a multitude of kids favorites, like the collection of trains that all my kids still enjoy.

A chest for storing toys: TIPS + unique EASY & STYLISH for how I organize my kids toys, www.jennaburger.com

In our living room, the old world style chest sits under the modern, minimalist lucite coffee table.  Not only does it serve the purpose of storage, the play of old and new makes for a sophisticated styled setting.

Open up this old chest and voila, it holds the kids entire train set (which they still enjoy playing with)…

A chest for storing toys: TIPS + unique EASY & STYLISH for how I organize my kids toys, www.jennaburger.com

When my daughter got to the age when she was introduced to Legos, the collection of Lego Friends began and has since exploded.  She has quite A LOT and all the creations needed to be organized in some way.   I chose to use and convert the ever-so-popular colorful toy bin, which wasn’t being used anymore, by adding flat shelves to create a ‘bookcase’.Toy Organizer turned Bookshelf: TIPS + unique EASY & STYLISH for how I organize my kids toys, www.jennaburger.com

Using a 1″ x 12″ cut to the specified width, new wood shelves fit in perfect to create a 4-tiered shelf.  This upcycle idea was easy & inexpensive.  Plus there was no need to buy something – score!

Toy Organizer turned Bookshelf: TIPS + unique EASY & STYLISH for how I organize my kids toys, www.jennaburger.comGO LOW. GO VERTICAL.

Maximize your storage capabilities by using every inch possible.  Wall space is ideal for vertical storage to organize books, collections, etc.

My son is a hoarder collector so when decorating his room, I introduced more storage than he needed and since, he’s filled the extra space with more stuff.   Pallet shelves hold books. Honeycomb shelves give space for displaying favorites.  Leaning shelves hold collections.

How I Organize Kids Toys: tips + unique EASY & STYLISH ways to organize kids toys, www.jennaburger.com

The space under the bed is prime real estate for storage, especially in a kids room.  For my son’s space, these rolling carts (a do-it-yourself project) hold baseball cards, small skateboards, etc.

How I Organize Kids Toys: tips + unique EASY & STYLISH ways to organize kids toys, www.jennaburger.com

Going low and going vertical helps to get things off the ground, thus creating more clear floor area. In closets, add shelving as high as possible for extra storage of blankets or non-everyday items. Add hooks in the entry for additional coat/bookbag storage. Hang additional shelving in the basement and/or garage for more space to put large bins.

COMMIT

Getting organized is one thing, but staying organized is truly a commitment. Rotate toys every month or few months to keep them interesting and fresh. Once you’re organized, take the extra 10 minutes each day to tidy up and monthly to go through each room to purge any unused items or papers – both of these I personally do and IT HELPS!

Expect that there will be minor setbacks throughout the year, but remaining positive will help keep you motivated to stay organized.  Conquering in small doses is best.  It’s continuous work, but worth it to create a home you love and enjoy living in!

The simpler we live, the saner we are! Rid your lives of the clutter and unused things to achieve a more meaningful, organized home.

How I Organize My Kids Toys: TIPS + unique EASY & STYLISH for how I organize my kids toys, www.jennaburger.com

Burlap Candy Corn Pennant

DIY Craft: Burlap Candy Corn Pennant. Simple, Inexpensive, and Fun! Perfect for Halloween! Tutorial @ www.jennaburger.com

One day I’m writing about upcoming trends for the coming year, the next day I’m sharing a cutesy Halloween craft.  You truly never know what you’re going to read next or what I’ll be in the mood to inspire you with… always new + interesting!

Halloween is just a couple weeks away and upon being inspired by the fun festive decor in the Target Dollar Bin, I spruced up my Fall porch with a simple, inexpensive, and fun burlap pennant to look like candy corn… so yummy, don’t you just want to eat it?!

DIY Craft: Burlap Candy Corn Pennant. Simple, Inexpensive, and Fun! Perfect for Halloween! Tutorial @ www.jennaburger.com

I really am not a crafty gal but I just couldn’t resist making this pennant.  I could have spent the few dollars to buy it, but since I had all the materials on hand from past projects, I decided to DIY it!

MATERIALS

>1/4 yard burlap
>cardstock / heavy paper – I used a manila folder (for pennant template)
>craft paint in the colors of white, orange, and yellow
>sponge brush
>twine
>scissors
>toothpick + tape

1

Using cardstock or heavy paper (I used a manila folder), cut out a template for the pennant ‘flag’.  Size is up to you.  My template is about 5.5″  x 8″.  In all, I created (8) pennants, then cut them out with sharp scissors, and ironed them flat.

DIY Craft: Burlap Candy Corn Pennant. Simple, Inexpensive, and Fun! Perfect for Halloween! Tutorial @ www.jennaburger.com

2

Dividing each pennant in 3 sections, I used a sponge brush to paint on the orange in the middle section first, then followed it with the white and yellow paint at the top and bottom.

To create a straight line, I cut out a piece of cardstock (I used a manila folder again) and painted up to the line.

DIY Craft: Burlap Candy Corn Pennant. Simple, Inexpensive, and Fun! Perfect for Halloween! Tutorial @ www.jennaburger.com

DIY Craft: Burlap Candy Corn Pennant. Simple, Inexpensive, and Fun! Perfect for Halloween! Tutorial @ www.jennaburger.com

When they were complete & dry (the next day), I was ready to create the pennant.

They look so good, I could eat them… #yum

DIY Craft: Burlap Candy Corn Pennant. Simple, Inexpensive, and Fun! Perfect for Halloween! Tutorial @ www.jennaburger.com

For this part of the project, I used the twine, scissors, tape, and a toothpick.

DIY Craft: Burlap Candy Corn Pennant. Simple, Inexpensive, and Fun! Perfect for Halloween! Tutorial @ www.jennaburger.com

3

I lined up the end of the twine with the end of the toothpick and wrapped it tight with tape.  Then starting at one end of the pennant ‘flag’ top, I poked through the burlap with the toothpick and pulled through the twine.

At the other end of the ‘flag’ top, I poked through the burlap again and pulled the twine through to the backside.

I continued this step for all the ‘flags’.

DIY Craft: Burlap Candy Corn Pennant. Simple, Inexpensive, and Fun! Perfect for Halloween! Tutorial @ www.jennaburger.com

The spacing between each ‘flag’ is subjective but I chose about 3″ and left about 2′ of extra twine at each end to hang and adjust.

DIY Craft: Burlap Candy Corn Pennant. Simple, Inexpensive, and Fun! Perfect for Halloween! Tutorial @ www.jennaburger.com

And this is the result.

DIY Craft: Burlap Candy Corn Pennant. Simple, Inexpensive, and Fun! Perfect for Halloween! Tutorial @ www.jennaburger.com

It really was so easy to make and it dresses up the front porch so pretty!

DIY Craft: Burlap Candy Corn Pennant. Simple, Inexpensive, and Fun! Perfect for Halloween! Tutorial @ www.jennaburger.com

Inside the house or out, this simple + inexpensive burlap candy corn pennant was so fun + fast to make – 20 minutes total!

DIY Craft: Burlap Candy Corn Pennant. Simple, Inexpensive, and Fun! Perfect for Halloween! Tutorial @ www.jennaburger.com

Can you believe I got crafty?!  Kinda Crazy, but it really was enjoyable to step back from the big projects + big decisions and just have fun.  This crafty-business has me thinking…

HAPPY HALLOWEEN.

If you like this festive project, you might like this Halloween pillow I made a few years back which is also on my porch.

Halloween pillow using ombre effect & stencils. Festive + Fun! tutorial by www.jennaburger.com


Choosing Art + Accessories to Compliment the Home

Balancing bold with quiet: Choosing artwork that compliments your aesthetic

It’s pretty incredible + awesome what a fresh coat of paint can do.  Whether on the wall or on a piece of furniture, a new hue can instantly change the look & style.

I love bright & bold colors, but I don’t enjoy color overload.  In small doses it works. A vomit of too much color – not so much.

Where a vibrant hue is introduced it should equally be balanced with quieter, softer, more neutral colors.  There needs to be the quiet with the crazy.  Let the bold ‘speak’ and the quiet ‘enhance’, to create an interesting + engaging composition.

When I chose to revamp my latest furniture makeover, I chose a dynamic hue of ‘kelly green’ but knew that it would be surrounded & layered with neutrals.  The cabinet is the statement piece and the layers are what makes it breathe.

Each element that surrounds the cabinet needed to be methodically chosen to magnify the cabinets beauty but allow the eye to rest.  It’s the balance of fun & calm…

Furniture Makeover: TUTORIAL ON HOW-TO PAINT FURNITURE; before & after cabinet transformation by www.jennaburger.com

When it came time to choosing ART + ACCESSORIES, I felt it had to be subtle.  Not understated, but quieter.  Whatever was chosen had to compliment, not compete.  As much as the cabinet is a statement, the artwork + layers of accessories needed to be strong but in a different way than the strong of the bright color green.

What to put on the walls with a bold color, like this green beauty, was tricky.   A quiet wall color for the backdrop was a must and artwork that enhanced the intense green would pull the entire composition together.

It’s truly all about balancing the bold and the quiet.

Finally these beauties came into my life…

Balancing bold with quiet: Choosing artwork that compliments your aesthetic

Thanks to the many creative talented artists at Minted, there is no shortage of options.

Bold & Bright.

Quiet & Neutral.

Everything at your finger tips.  The only difficult part is making a decision. 

Balancing bold with quiet: Choosing artwork that compliments your aesthetic

With custom art being unattainable for many due to budget & resources, Minted makes it easy by connecting artists with those looking to fill their walls with beautiful, meaningful custom creations.  A nice bonus is that many of the prints are limited edition art and only a certain number of prints are produced. To me that makes each piece of art more special and unique. You and 5000 don’t have the same artwork on the walls of your home…

And let’s not forget how wonderful it is to support these artists to build their business and gain exposure.  I just love it!

Balancing bold with quiet: Choosing artwork that compliments your aesthetic

The two prints above the cabinet are Tradewinds and Weathered.  They have a cohesive thread, but were created by differing artists.

This new vignette is in my master bedroom, which has a serene, soft aesthetic.  Another reason why the bold green works so well.  The other colors in the space are shades of white and hints of plum, so the selection of this artwork was perfect.

Balancing bold with quiet: Choosing artwork that compliments your aesthetic

The artist who created Tradewinds shared this thought,

“I find sometimes the simplest stroke, laden with just the right value of pigments can invoke a feeling, or memory, or inspiration. This color study invokes the imagination. The colors are inspired by the ripples of the ocean as the trade winds play, the reflective sparkle of the sun on the waters surface, and soft hints of pink coral and colorful fish swimming beneath!”

I couldn’t have put it any better.

About Weathered,

“This mixed media piece explores varying degrees of opaque and translucent color, amidst layers of overlapping brushstrokes that create a warm yet weathered texture. I was inspired by the the various and ever-changing textures and palettes around our small hobby farm, including a chicken coop made from aging weathered barnwood, rusted vintage metal license plates, and acres of trees and foliage.”

Such beautiful words.

Balancing bold with quiet: Choosing artwork that compliments your aesthetic

All my artwork from Minted are such treasures because you can truly feel the artists love + devotion for their work shine through in each of their creations.

I’m thrilled with how this cabinet has evolved as my style has changed over the years.  And I am equally happy with the elements that surround it to enhance it’s beauty!

Balancing bold with quiet: Choosing artwork that compliments your aesthetic

DISCLOSURE: THIS IS A SPONSORED POST WITH MINTED.  ALL WORDS + OPINIONS ARE 100% MY OWN.